How to Sew an Envelope Pillowcase: The Easiest Beginner Sewing Project
In This Tutorial
- What Is an Envelope Pillowcase?
- What Makes This Tutorial Different
- Materials & Tools You'll Need
- Sizes & Measurements
- Choosing the Right Fabric
- Cutting Layout
- Your Pattern Piece
- Step-by-Step Instructions
- Variations & Ideas
- Troubleshooting Common Problems
- Frequently Asked Questions
- What's Next in This Series
Every sewing journey starts with a single straight line — and there is no better first project than an envelope pillowcase. If you have never sat down at a sewing machine before, or if you tried once and felt overwhelmed, this is the project that will change everything. You will sew an envelope pillowcase that looks polished, feels professional, and takes less than an hour from start to finish. No zippers. No buttons. No complicated closures. Just straight stitches and a clever folding trick.
I designed this tutorial specifically for absolute beginners. In my experience, the biggest hurdle is not the sewing itself — it is the fear that you will mess something up. So I am going to walk you through every single step, explain every term as we go, and show you exactly what your fabric should look like at each stage. By the time you slide a pillow inside your finished pillowcase, you will have learned five fundamental sewing skills that you will use in every project going forward.
An envelope pillowcase is a pillowcase with an overlapping fabric flap on the back — like the flap of an envelope — instead of a zipper or buttons. The pillow tucks in through the flap opening, and the overlap holds it neatly inside. From the front, it looks exactly like a store-bought pillowcase. From the back, you see the elegant overlap. It is the simplest possible sewing project because it uses just one piece of fabric and requires only straight lines of stitching.
What Is an Envelope Pillowcase?
Before we pick up scissors, let me explain exactly what we are making and why it is such a perfect beginner project.
A traditional pillowcase is a fabric tube that is open on one end — the pillow slides in and can slide right back out. An envelope pillowcase adds an overlap flap (a section of fabric that folds over the opening) to keep the pillow tucked inside. Think of how a letter sits inside an envelope with the flap folded over it. That is exactly what your fabric does.
Why This Is the Perfect First Project
- Only straight lines — every seam runs in a straight line from one edge to the other. No curves, no corners to pivot around, no tricky angles.
- One piece of fabric — you cut a single rectangle. That is your entire pattern.
- No closures — no zippers, no buttons, no snaps. The envelope fold is the closure.
- Instant gratification — you will have a finished, usable pillowcase in 30 to 45 minutes.
- Practical result — this goes straight on your bed or couch. You made something real.
Skills You Will Learn
- Measuring and cutting fabric — the foundation of every sewing project
- Identifying fabric grain — so your pillowcase hangs straight and does not twist
- Sewing a straight stitch — the most-used stitch in all of sewing
- Creating a double-fold hem — the method for clean, finished edges
- Pressing with an iron — arguably more important than the sewing itself
What Makes This Tutorial Different
There are hundreds of pillowcase tutorials on the internet. Here is what makes this one worth your time:
- Truly beginner-level language. I define every sewing term the first time it appears. You will never be left guessing what "right side," "selvage," or "seam allowance" means.
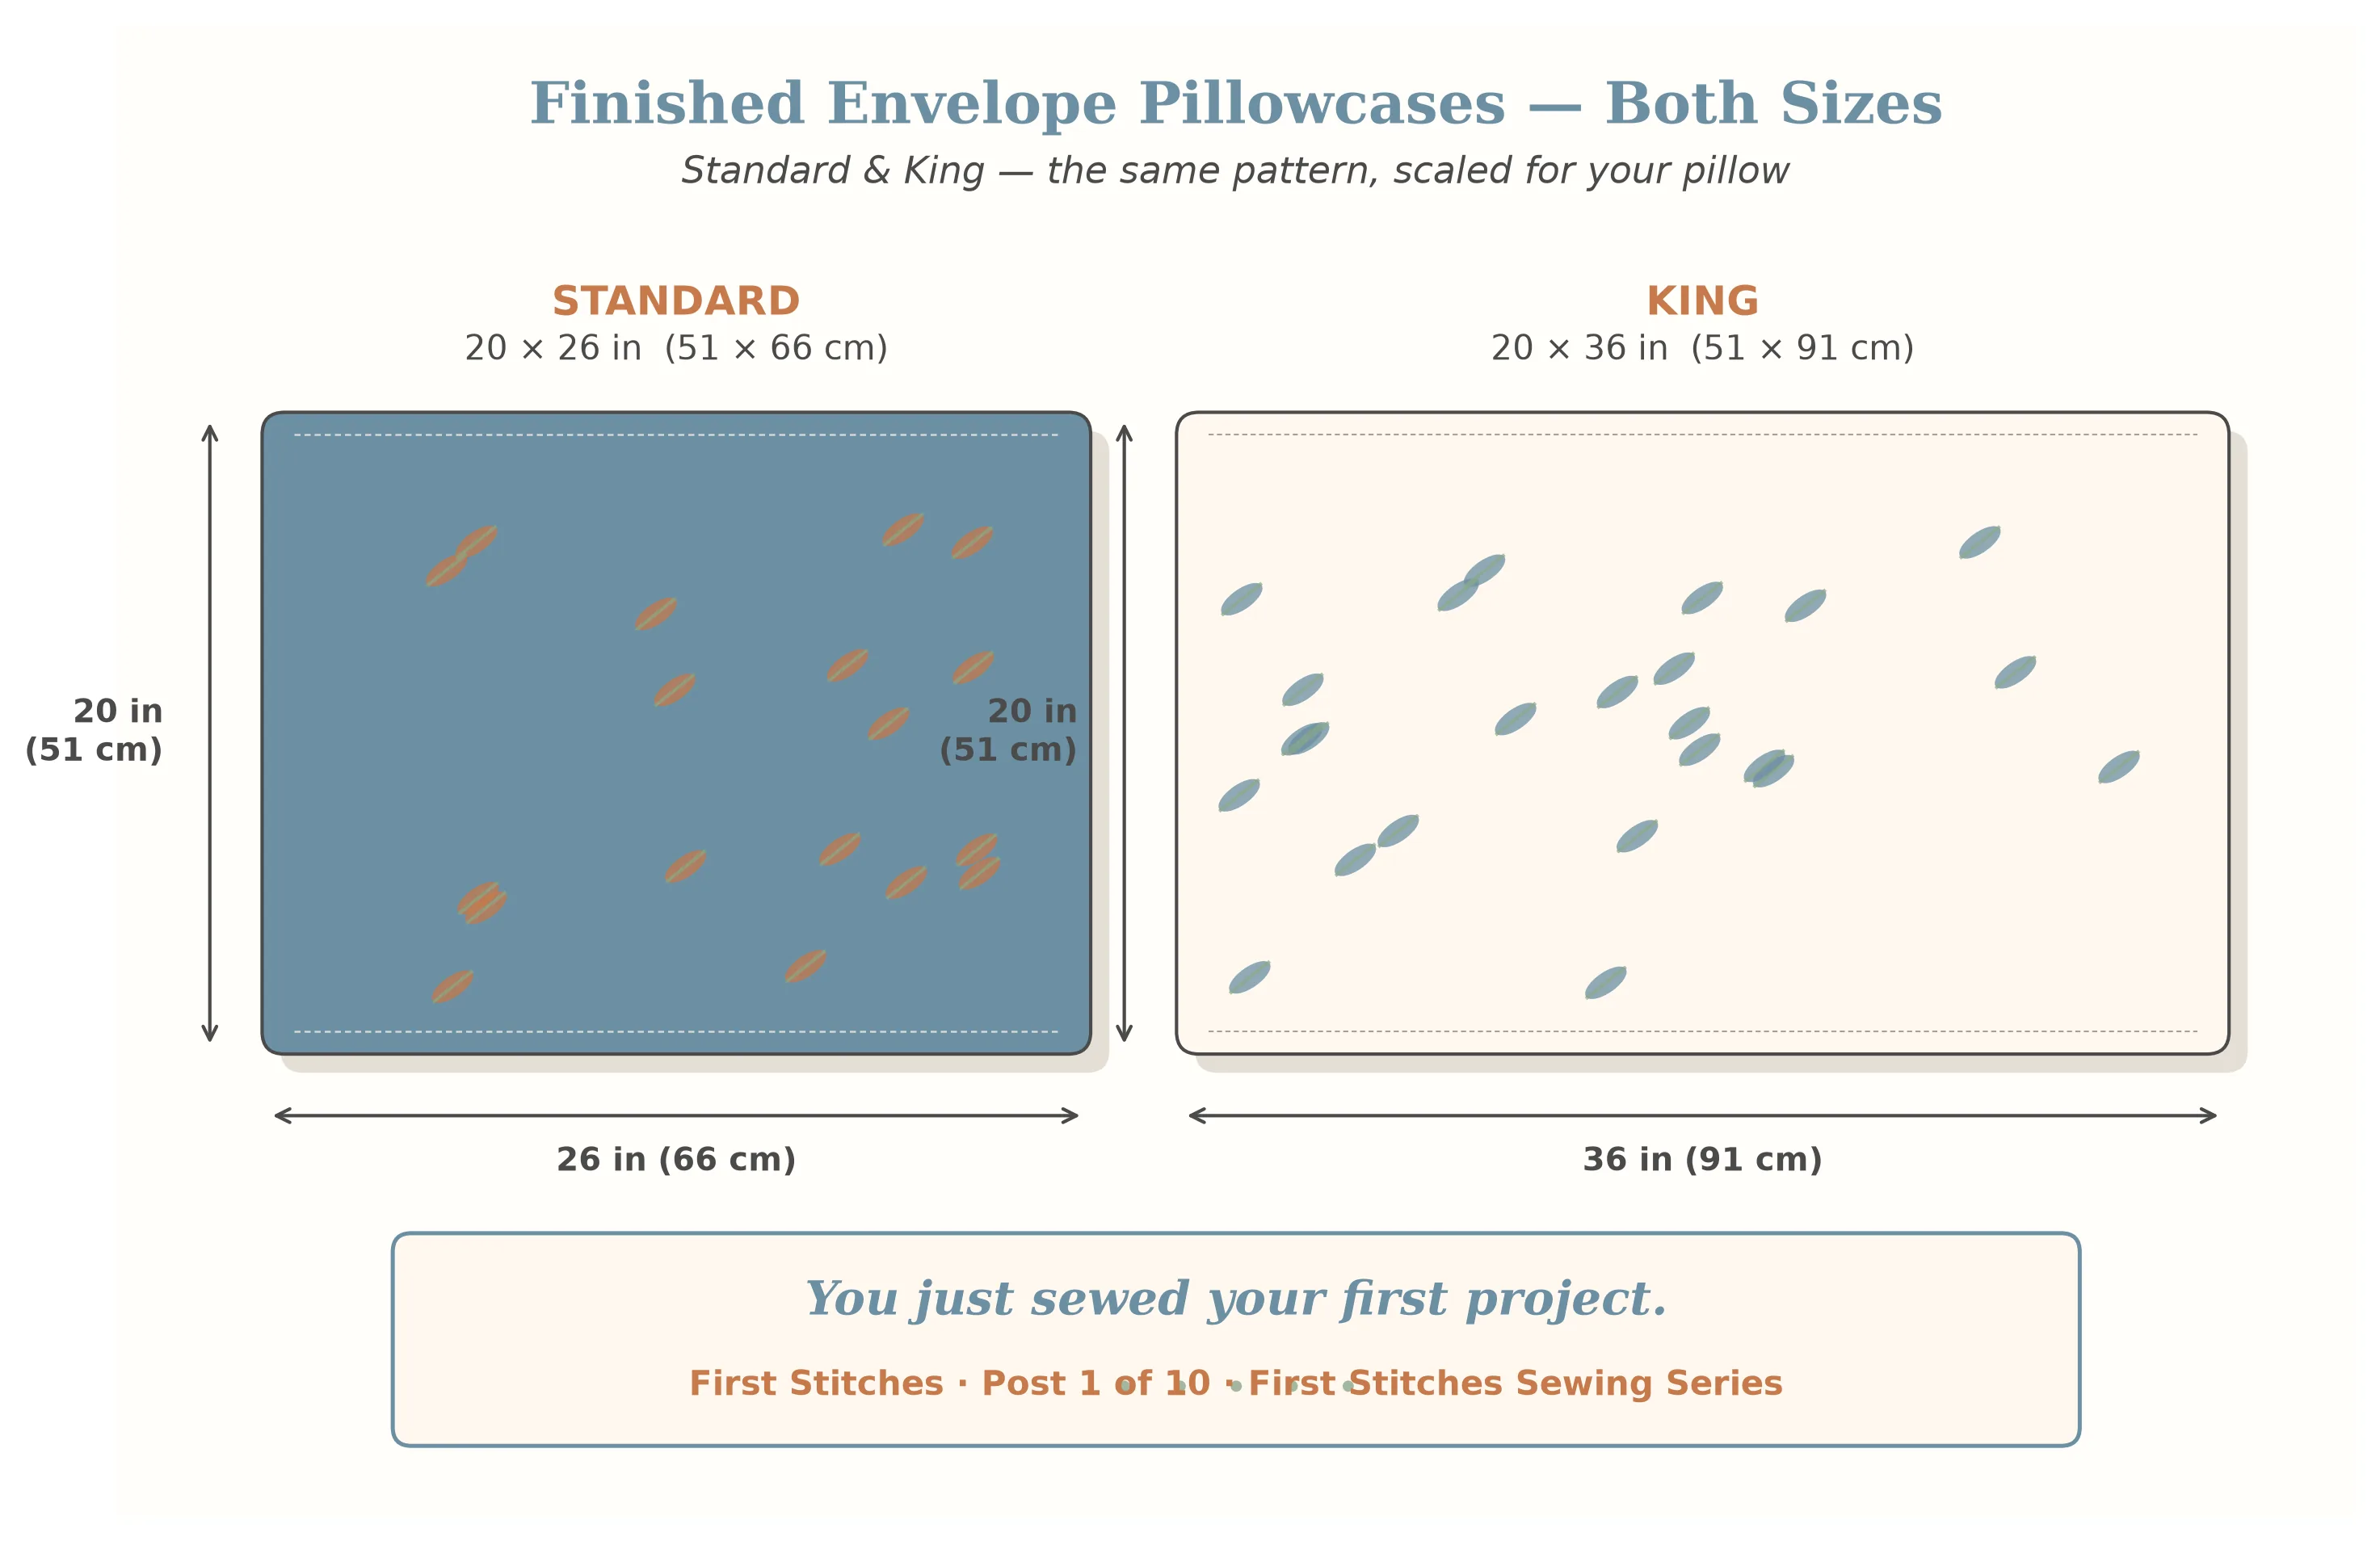
- Both sizes included. Full measurements for Standard (20 × 26 inches / 51 × 66 cm) and King (20 × 36 inches / 51 × 91 cm) pillows, so you can make exactly what you need.
- Illustrated cutting layout and pattern piece. Visual diagrams show exactly how to position your fabric and where to cut — no guesswork.
- Step-by-step construction diagrams. Every stage includes a clear illustration showing what your fabric should look like, which edges to sew, and where to fold.
- Dual measurements. Every measurement appears in both inches and centimeters, so you can use whichever ruler or tape measure you have.
- Common Mistake warnings. I have taught dozens of beginners this project, and I know exactly where people get tripped up. I flag those spots before you reach them.
Materials & Tools You'll Need
Materials & Tools
- Fabric: ¾ yard (0.7 m) of 44/45-inch wide cotton for Standard, or 1 yard (0.9 m) for King
- Thread: All-purpose polyester thread in a matching or coordinating color
- Pillow: Standard (20 × 26 in / 51 × 66 cm) or King (20 × 36 in / 51 × 91 cm) bed pillow for fitting
- Sewing machine with a straight stitch setting (any basic machine works)
- Fabric scissors or rotary cutter + cutting mat
- Straight pins or sewing clips
- Iron and ironing board (or folded towel on a table)
- Ruler or measuring tape
- Fabric marking pencil or tailor's chalk (optional)
A Note About Fabric Quantity
The yardage above assumes your fabric is 44–45 inches (112–114 cm) wide, which is the standard width for quilting cotton sold at most fabric stores. If your fabric is wider (like 54–60 inches / 137–152 cm home decorator fabric), you will need slightly less. When in doubt, buy a few extra inches — you can always use leftover fabric for your next project, like the DIY scrunchie later in this series.
Sizes & Measurements
This pattern works for the two most common pillow sizes. Here is everything laid out so you can see exactly what to cut:
| Detail | Standard Pillow | King Pillow |
|---|---|---|
| Pillow dimensions | 20 × 26 in (51 × 66 cm) | 20 × 36 in (51 × 91 cm) |
| Fabric to cut | 27 × 41 in (68.5 × 104 cm) | 27 × 51 in (68.5 × 129.5 cm) |
| Seam allowance (sides) | ½ in (1.3 cm) | ½ in (1.3 cm) |
| Hem allowance (each short end) | 1 in (2.5 cm) total — two ½ in folds | 1 in (2.5 cm) total — two ½ in folds |
| Envelope overlap | 5 in (12.7 cm) | 5 in (12.7 cm) |
| Fabric needed | ¾ yard (0.7 m) of 44/45 in fabric | 1 yard (0.9 m) of 44/45 in fabric |
| Finished size | 20 × 26 in (51 × 66 cm) | 20 × 36 in (51 × 91 cm) |
How the Math Works
If you are curious how I arrived at those cutting dimensions, here is the breakdown for the Standard size. Understanding this will help you adapt patterns in the future:
- Width (27 inches): Pillow width 20 in + two seam allowances of ½ in each (1 in total) + approximately 6 in of ease and folding room = 27 in
- Length (41 inches): Pillow length 26 in + envelope overlap 5 in + two hem allowances of 1 in each (2 in total) + two seam allowances of ½ in each (1 in total) + approximately 7 in of wrap-around = 41 in
The generous dimensions ensure your pillow fits comfortably without the fabric pulling tight. A pillowcase that is slightly too big always looks better than one that is too small and stretched.
Choosing the Right Fabric
Fabric choice matters, especially for your first project. You want something that is easy to cut, easy to sew, and forgiving of small mistakes. Here is what to look for:
Best Fabrics for Beginners
- Quilting cotton — the gold standard for beginners. Tightly woven, holds a crease beautifully when pressed, widely available in hundreds of prints and solids. Available at any fabric store or online retailer.
- Cotton broadcloth — very similar to quilting cotton, sometimes slightly lighter weight. Equally easy to work with.
- Cotton percale — a crisp, smooth cotton often used for bedsheets. If you find it in yardage, it makes a wonderful pillowcase.
Cotton vs. Linen for This Project
You might be tempted by linen, which makes beautiful pillowcases. However, for your first project, cotton is the better choice. Linen wrinkles heavily, frays more aggressively, and tends to shift while sewing. It is a gorgeous fabric, but it adds difficulty. Save linen for your second or third pillowcase when you are comfortable with the construction.
Fabrics to Avoid Right Now
- Satin or silk — slippery, shifts constantly under the presser foot, difficult to pin
- Flannel — stretches more than woven cotton and shrinks significantly when washed
- Knits (like jersey or T-shirt fabric) — stretchy fabrics require different techniques and needles
- Home decorator fabric — heavier weight, stiffer, harder to fold and hem neatly for a first project
Pre-Washing Your Fabric
Before you cut anything, wash, dry, and press your fabric. Cotton can shrink 3–5% on its first wash. If you skip this step, your finished pillowcase may shrink the first time you launder it and no longer fit your pillow properly. Wash on warm, tumble dry on low, then press out the wrinkles with your iron.
Cutting Layout
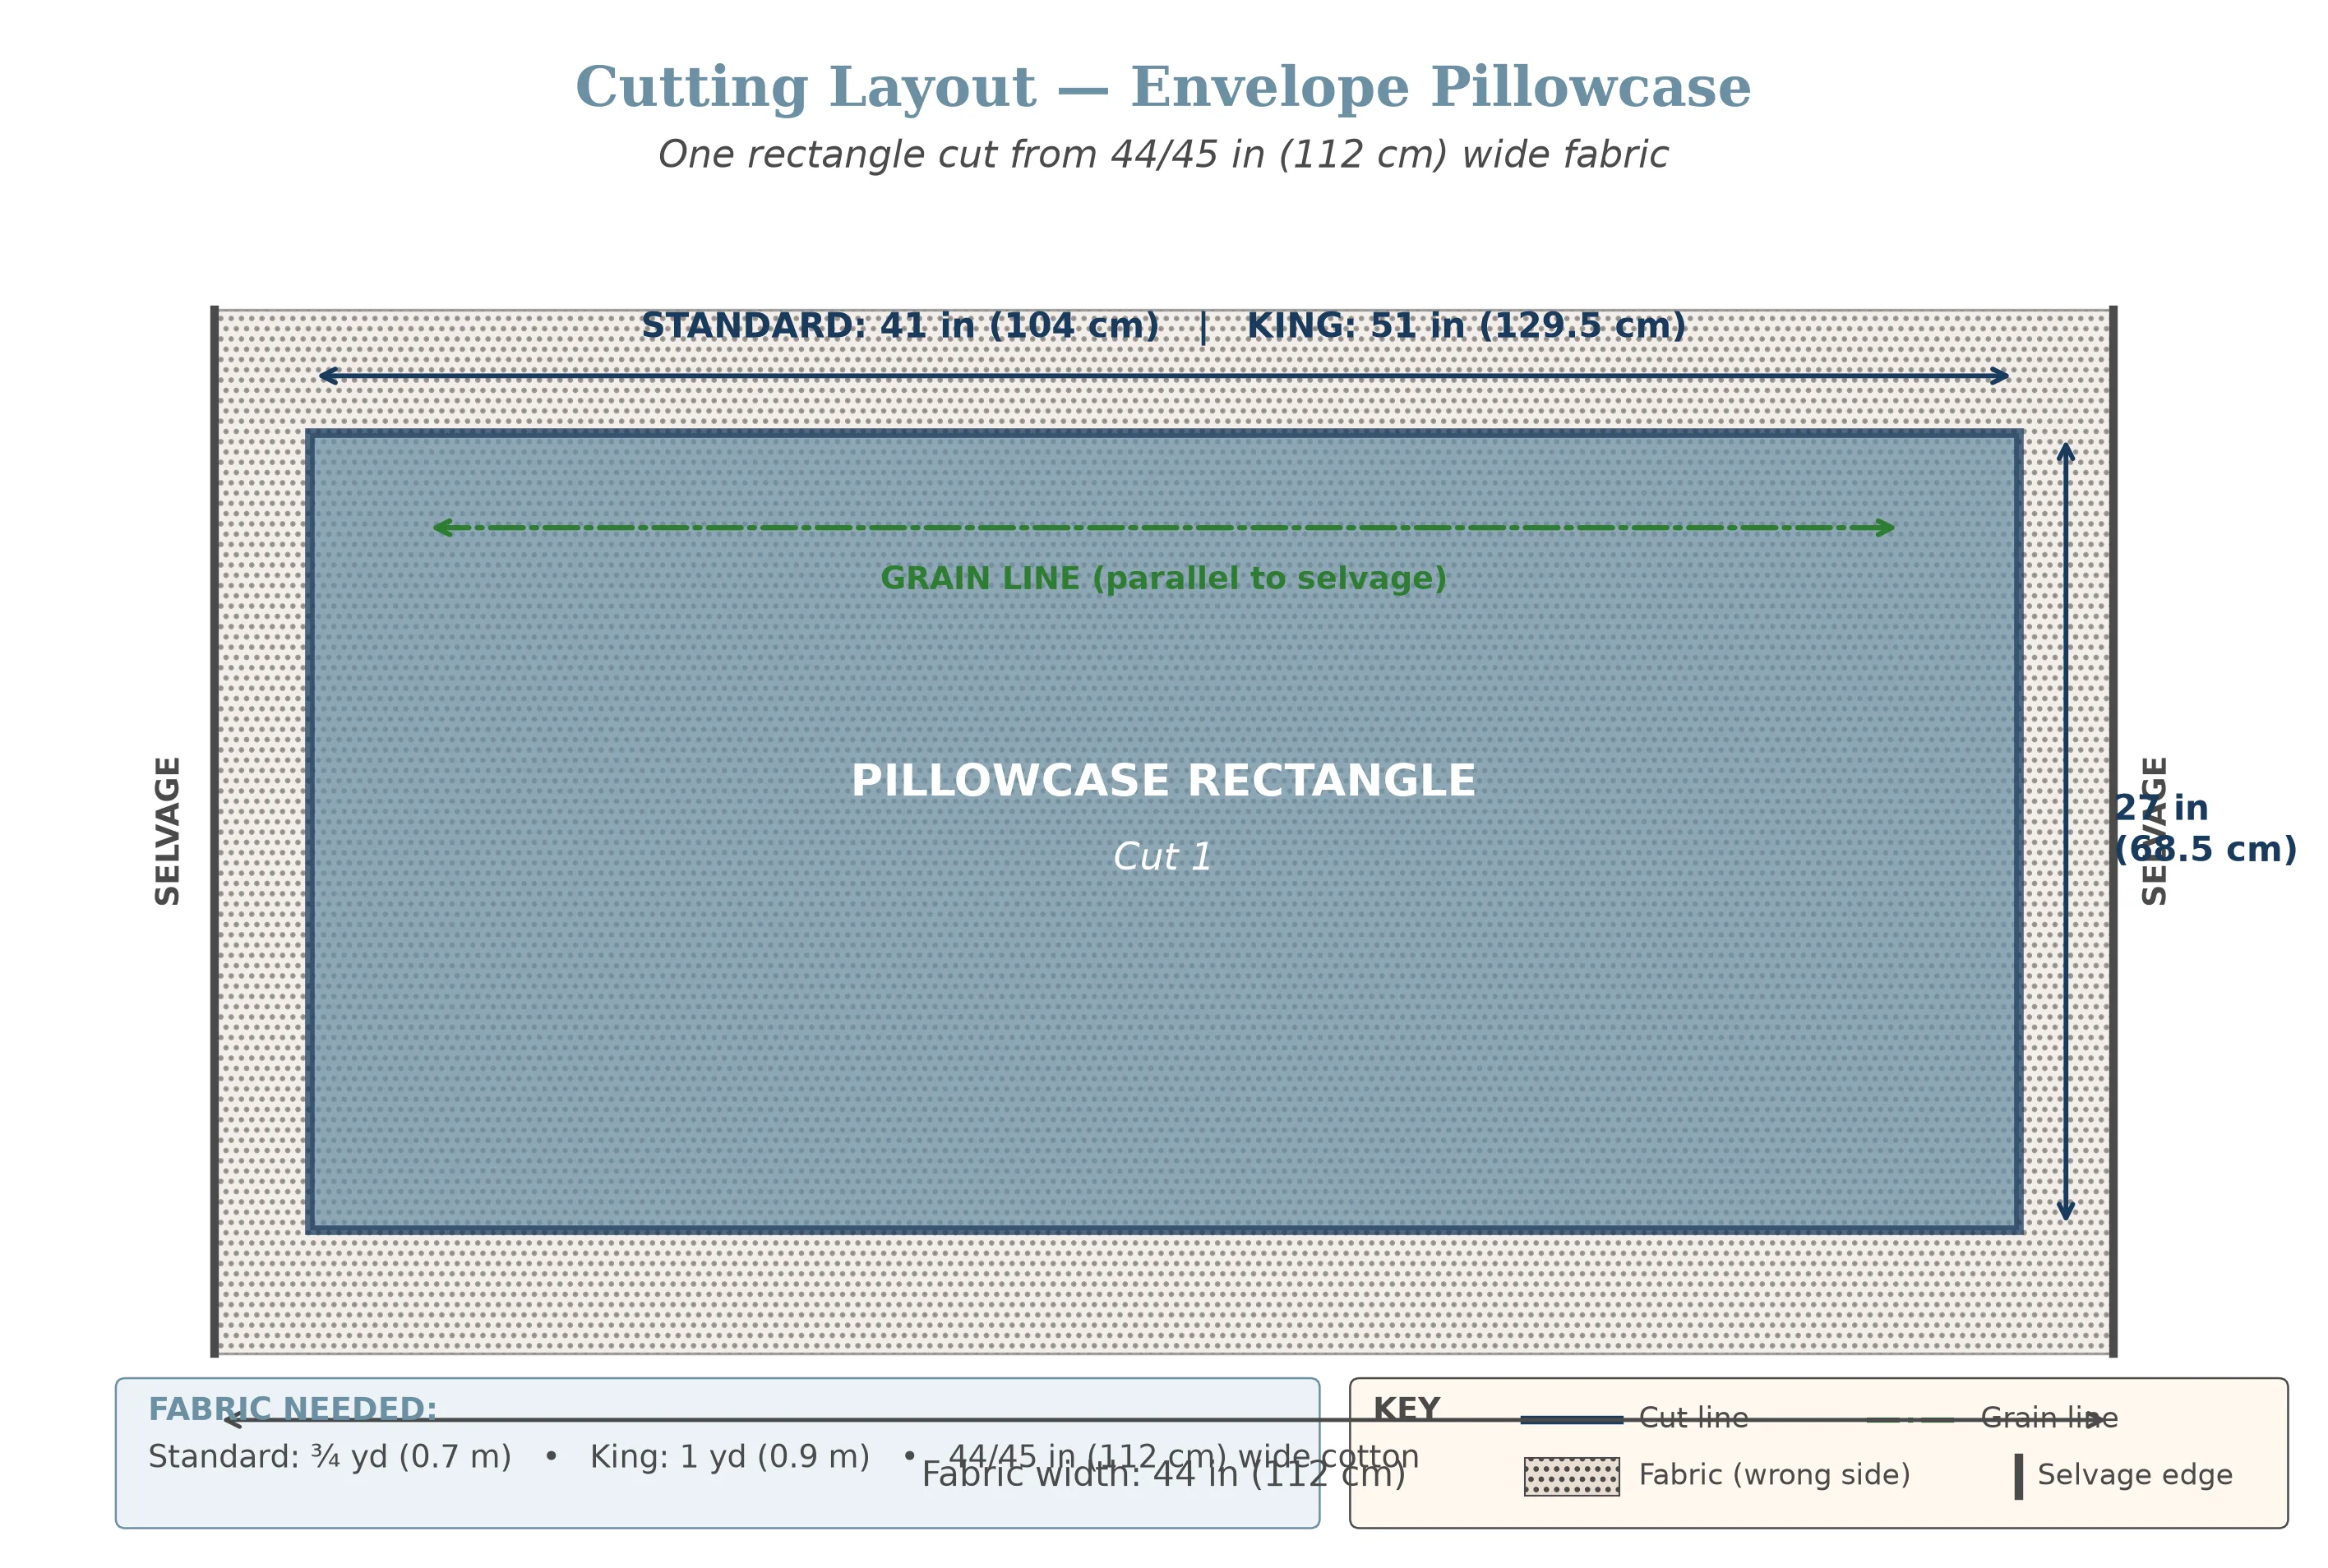
Here is how to position your fabric for cutting. You will cut just one rectangle — that is the entire pattern for this project.
Understanding Your Fabric Before You Cut
When you unfold your fabric from the store, you will notice a few things:
- Selvage edges — the two finished edges that run along the length of the fabric. These are tightly woven and will not fray. They are usually slightly different in appearance — sometimes they have tiny printed dots or text along them.
- Cut edges — the two ends where the store employee cut the fabric from the bolt. These edges will be rougher and may not be perfectly straight.
- Fabric grain — the direction of the threads. Lengthwise grain (also called the warp) runs parallel to the selvage — these threads are the strongest. Crosswise grain (or weft) runs perpendicular to the selvage.
For your pillowcase, you want the lengthwise grain running along the length of your rectangle (the 41-inch or 51-inch direction). This gives the pillowcase the most stability and prevents it from stretching out of shape over time.
How to Cut
- Lay your pre-washed, pressed fabric on a large flat surface (a table, clean floor, or cutting mat).
- Straighten one cut edge: pull a single crosswise thread or use a ruler and rotary cutter to create a perfectly straight starting edge.
- Measure and mark your rectangle from that straight edge: 27 × 41 in (68.5 × 104 cm) for Standard, or 27 × 51 in (68.5 × 129.5 cm) for King.
- Use your fabric marking pencil to draw light lines, then cut along those lines with fabric scissors or a rotary cutter.
Your Pattern Piece
This project has the simplest possible pattern — a single rectangle. But understanding what every marking on the diagram means will prepare you for more complex patterns in future projects.
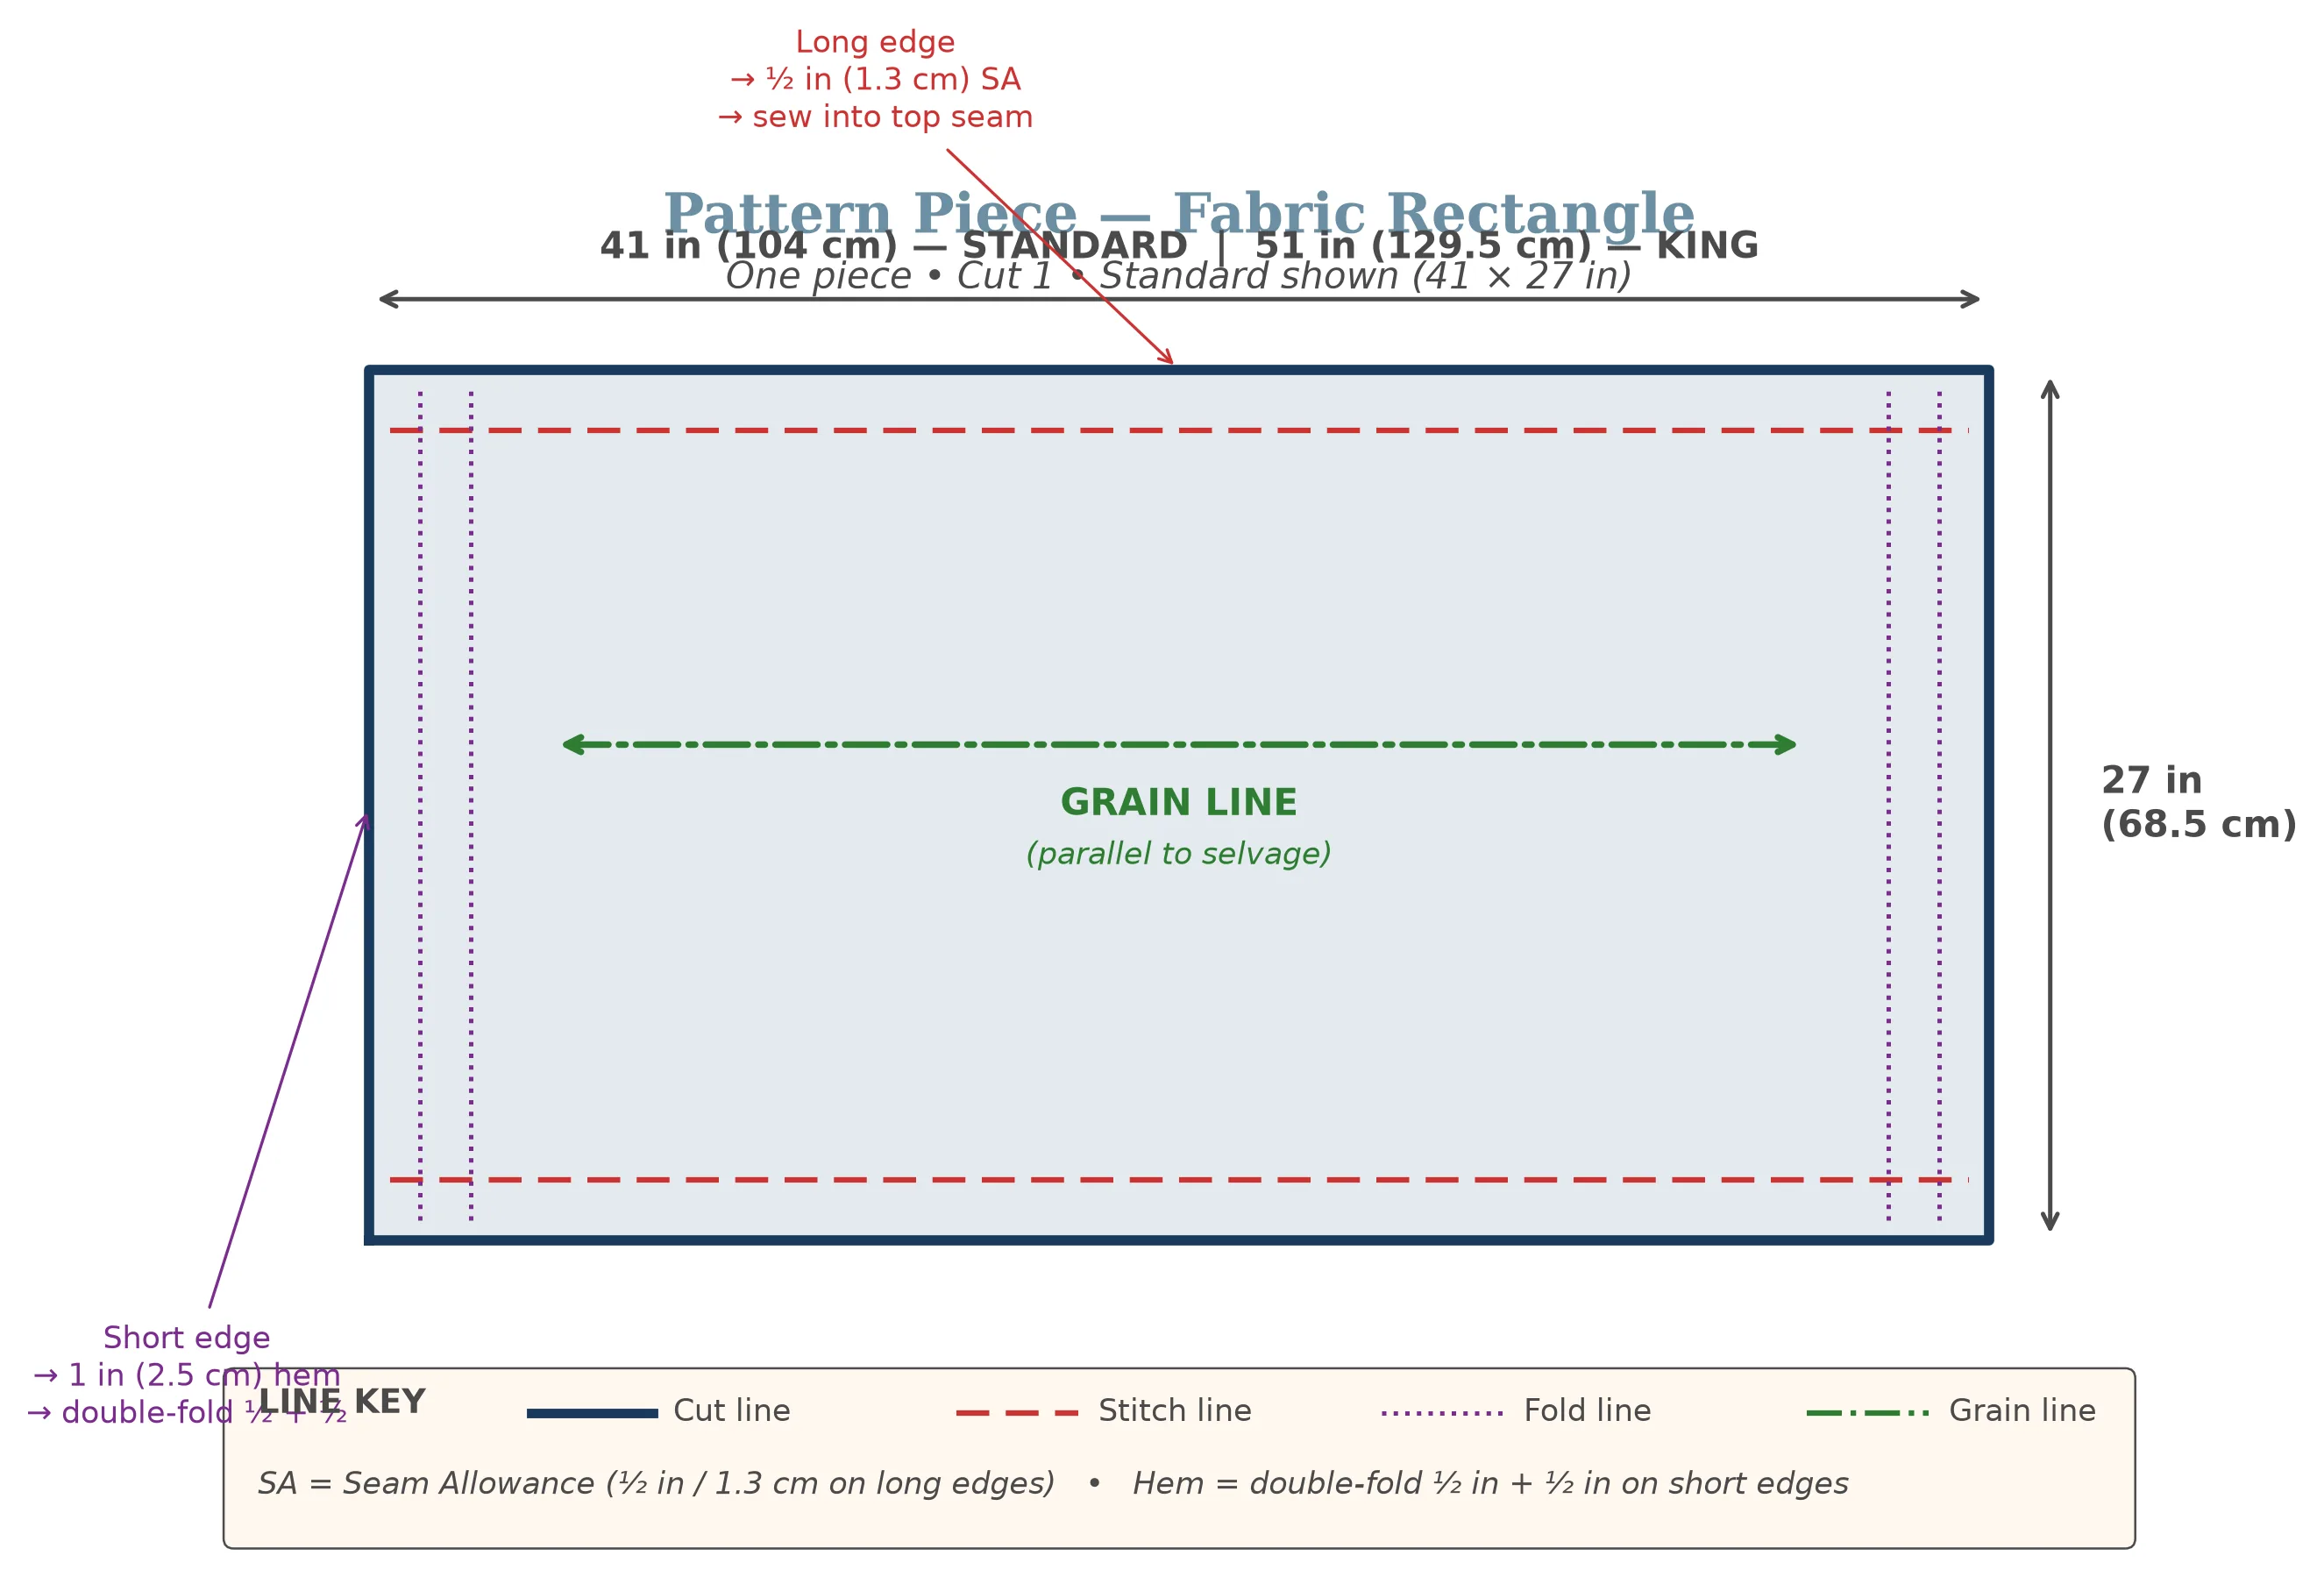
Here is what the markings mean:
- Solid outer line — this is your cutting line. Cut exactly on this line.
- Dashed inner line — this is your stitching line, positioned ½ inch (1.3 cm) inside the cutting line on the two long edges.
- Arrow in the center — this is the grain line. Align this arrow parallel to the selvage edge of your fabric.
- Dotted lines near short edges — these mark the fold lines for your double-fold hem.
Step-by-Step Instructions
Alright — your fabric is cut, your iron is hot, and your sewing machine is threaded. Let's make a pillowcase. I am writing these steps for the Standard size. If you are making the King size, the only difference is the length of your rectangle — every other step is identical.
Set Up Your Sewing Machine
Before we sew a single stitch on our pillowcase, let's make sure your machine is ready:
- Thread your machine with all-purpose polyester thread in a color that matches or coordinates with your fabric. Thread both the top spool and the bobbin (the small spool that sits underneath the needle plate).
- Select a straight stitch. On most machines, this is stitch number 1 or the default setting. You want a regular straight stitch, not a zigzag or decorative stitch.
- Set your stitch length to 2.5 mm (approximately 10–12 stitches per inch). This is the standard stitch length for most sewing and should be the default on your machine.
- Check your needle. Make sure you have a universal needle (size 80/12 is standard) — this is the needle that comes installed in most new machines, and it works perfectly for cotton fabric.
Hem the Two Short Edges
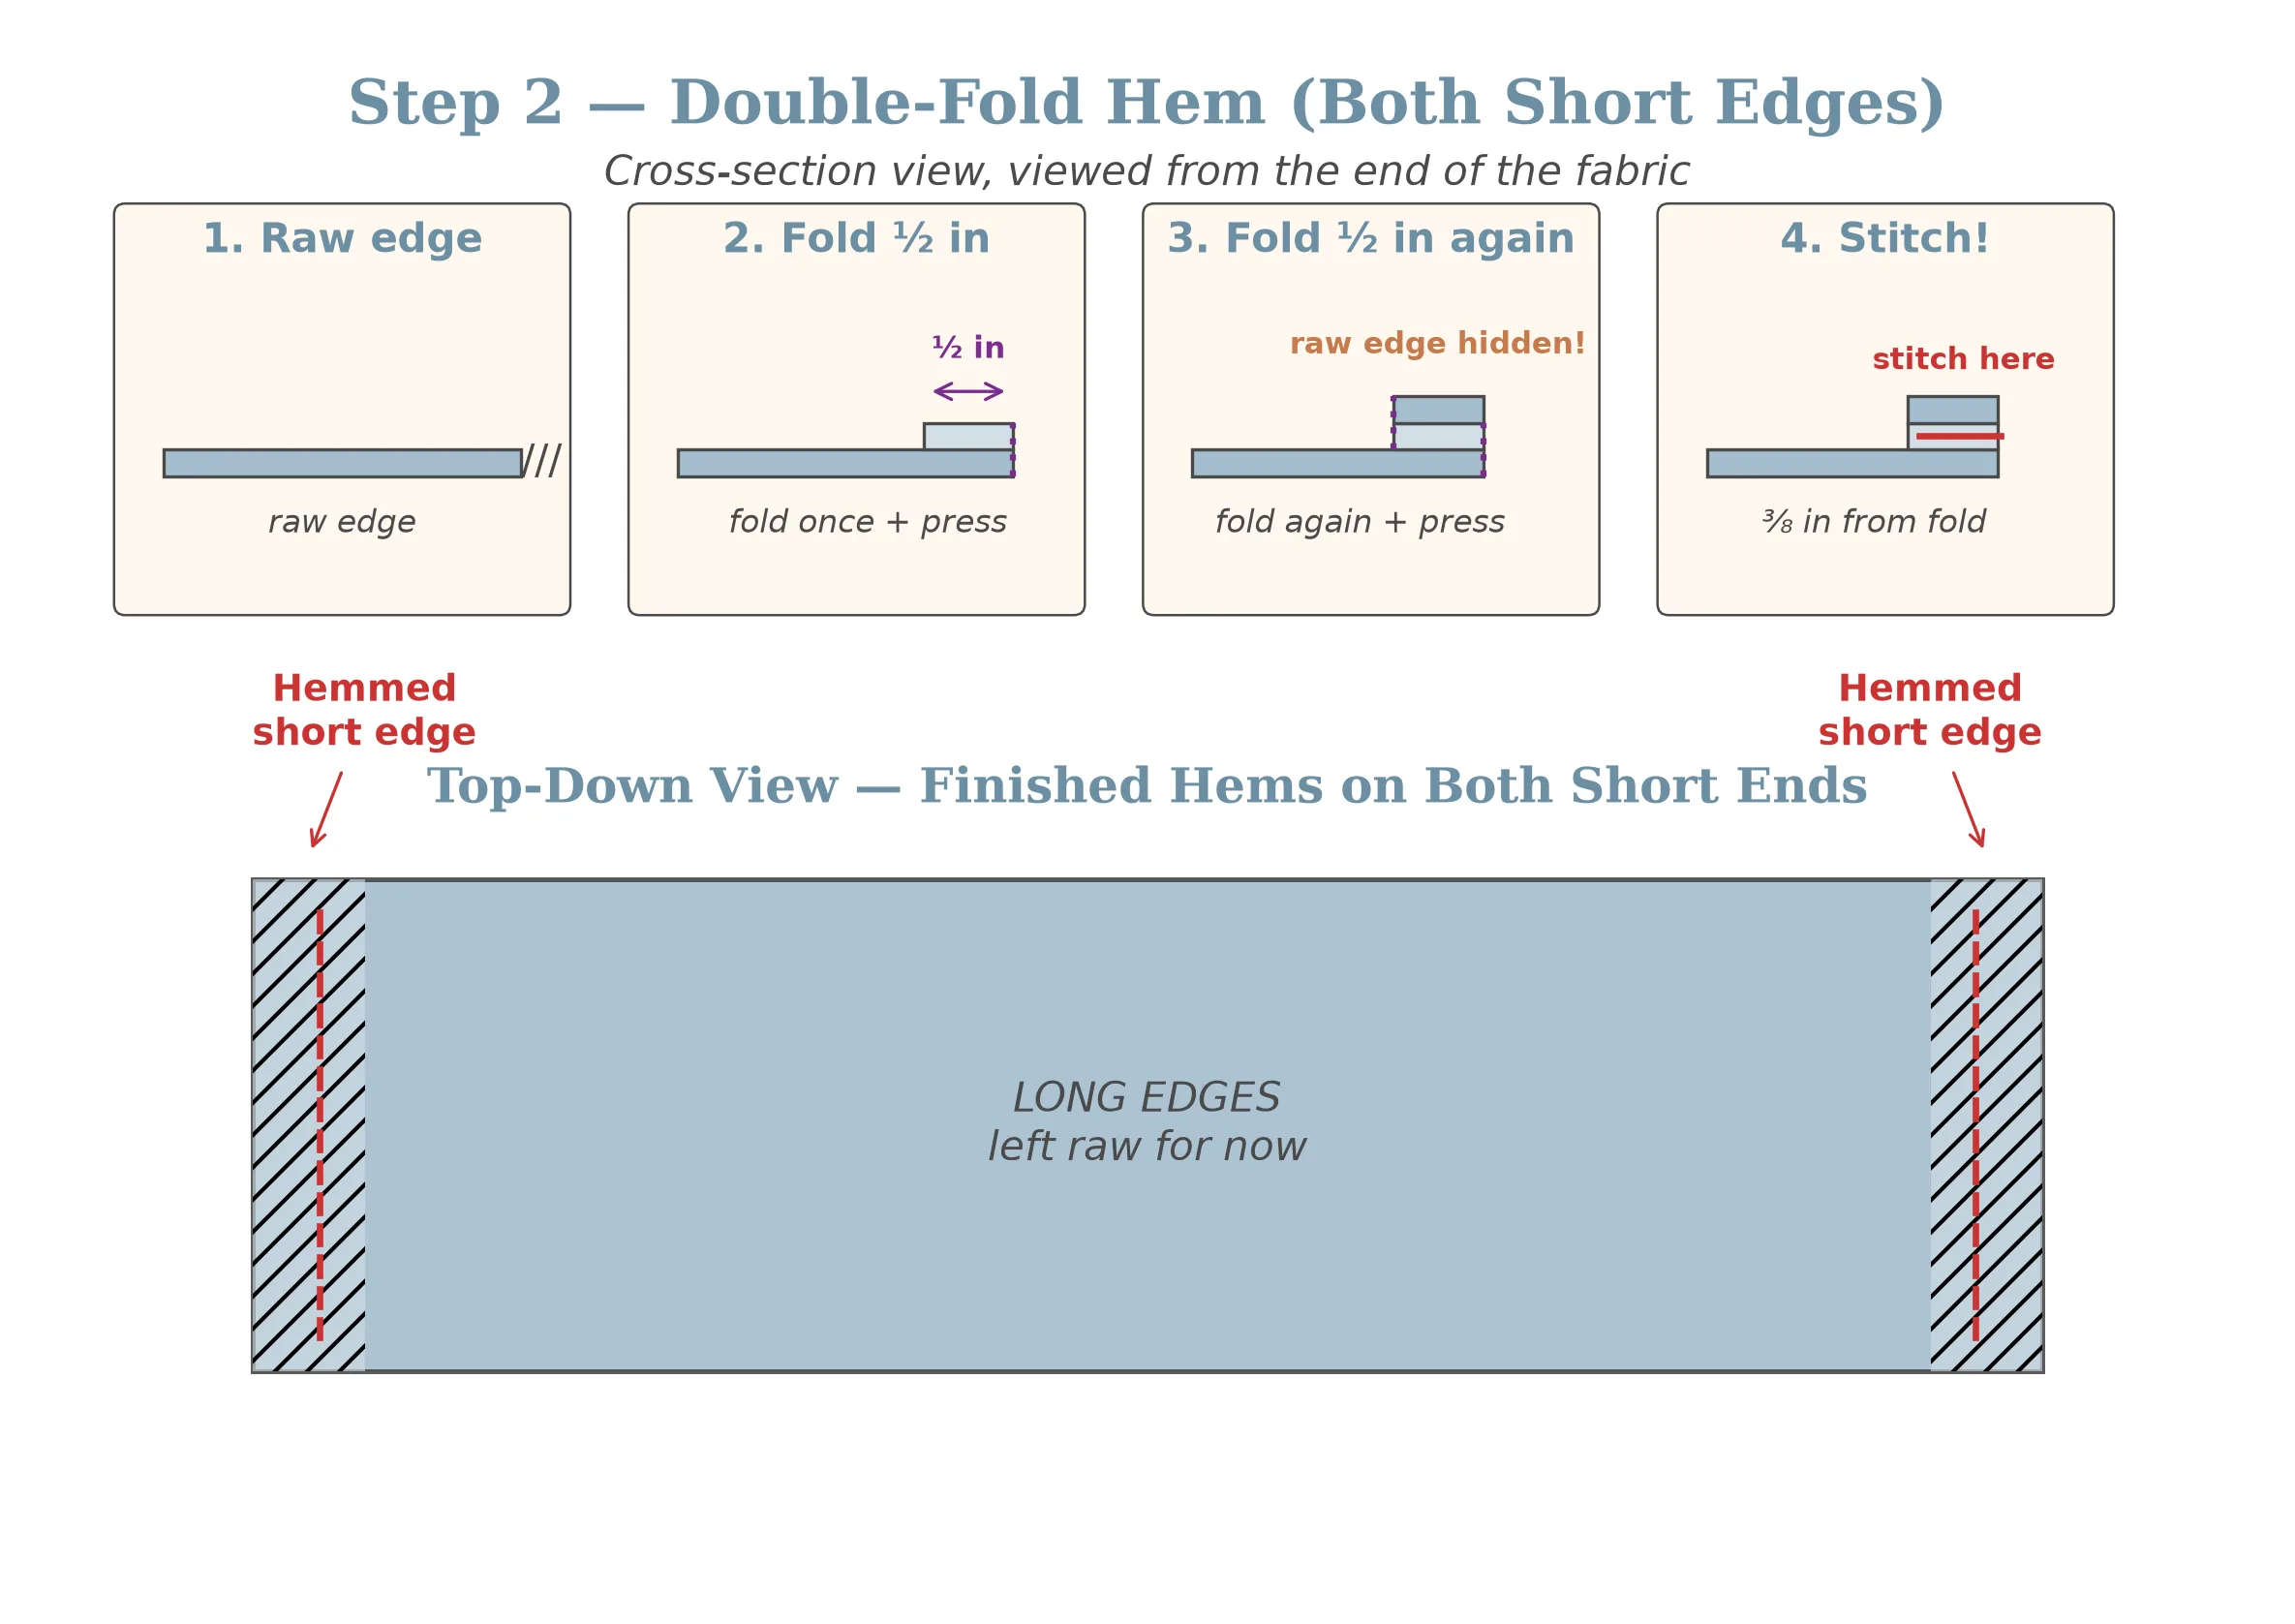
A double-fold hem is when you fold the raw edge of the fabric inward twice, hiding the raw edge completely inside the fold. This creates a neat, finished edge that will not fray in the wash.
Do this on both short ends of your rectangle:
- Lay your fabric rectangle on the ironing board, wrong side up. (The wrong side is the back of the fabric — usually lighter or less vivid than the right side, which is the side with the printed pattern.)
- On one short edge, fold the fabric ½ inch (1.3 cm) toward the wrong side. Press with your iron. Pressing means placing the iron down, holding it still for 2–3 seconds, then lifting and repositioning — as opposed to sliding the iron back and forth, which can stretch the fabric.
- Fold another ½ inch (1.3 cm) toward the wrong side, so the raw edge is now completely tucked inside the fold. Press again.
- Pin along the fold to hold it in place. Place pins perpendicular to the fold (pointing toward the center of the fabric) about every 3 inches (7.5 cm).
- Sew along the inner folded edge, approximately ⅜ inch (1 cm) from the fold. Sew slowly and steadily. Backstitch at the beginning and end of the seam — this means sewing forward a few stitches, then pressing the reverse button to sew backward over those stitches, then continuing forward. Backstitching locks the thread so the seam does not unravel.
- Remove pins as you sew (never sew over pins — they can break your needle).
Repeat on the other short edge. You should now have two neatly hemmed short ends and two raw (unhemmed) long edges.
Fold the Fabric Into the Envelope Shape
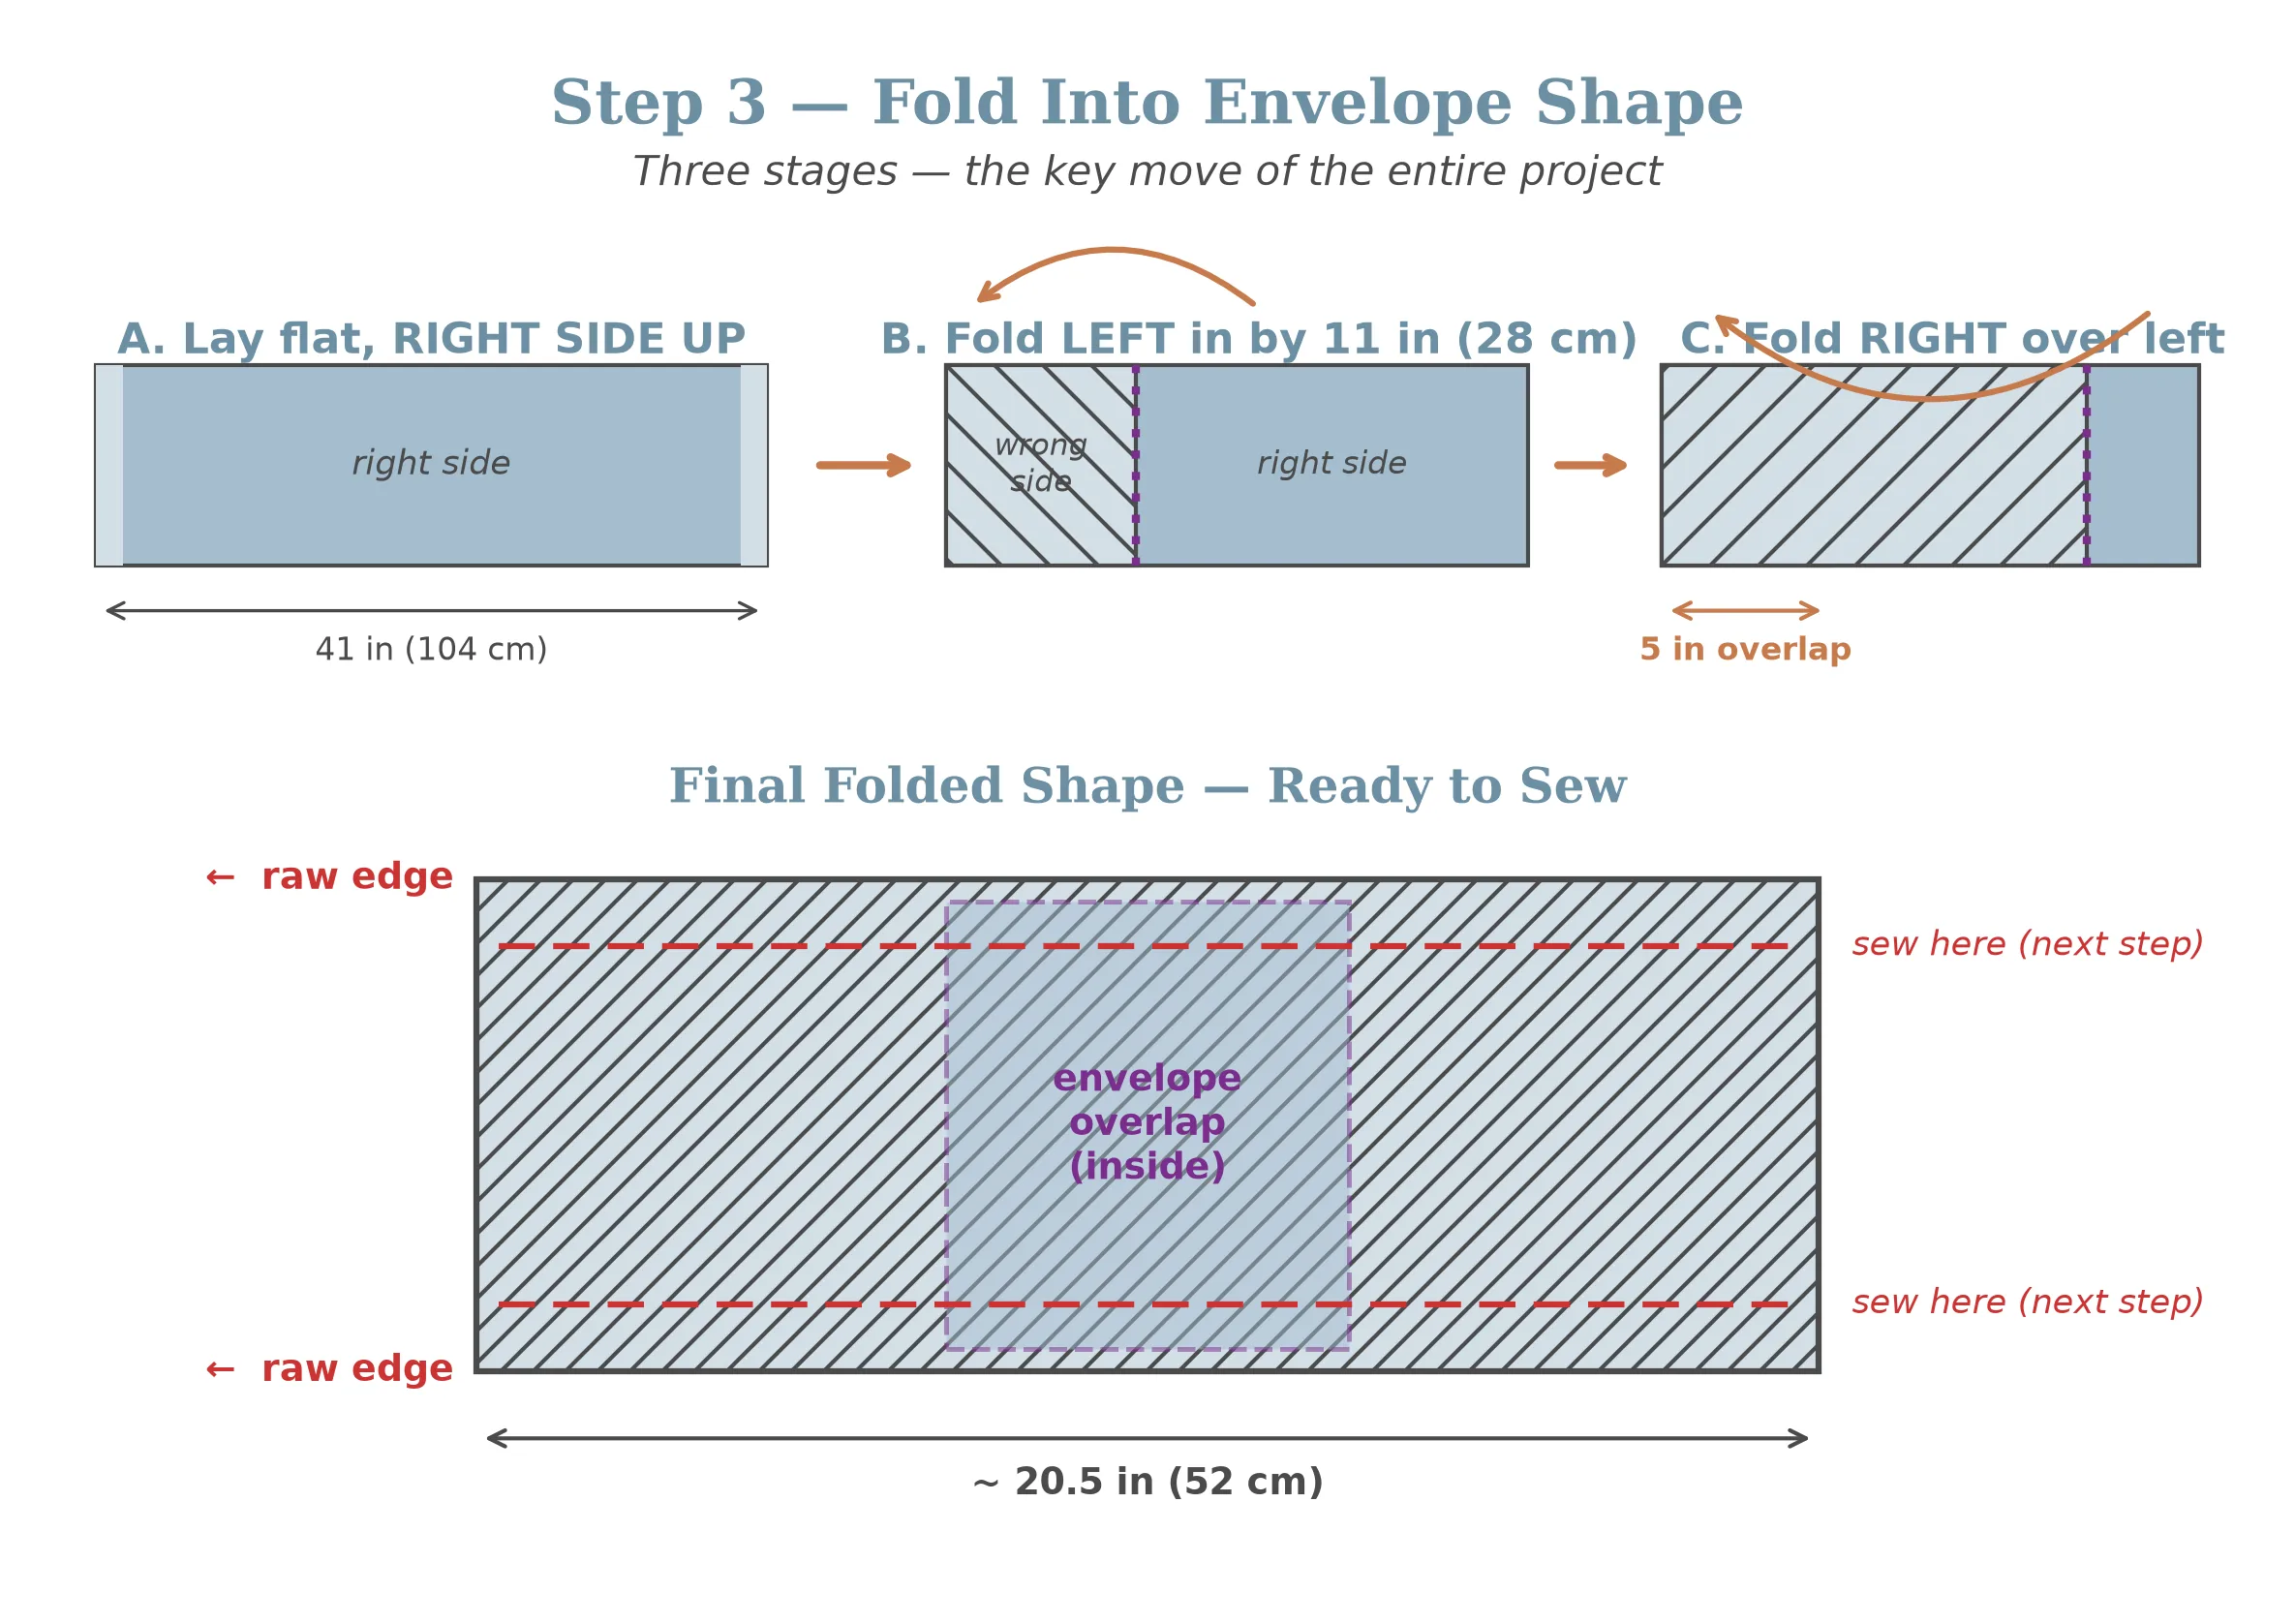
This is the step that gives the envelope pillowcase its name — and its magic. Here is how to fold your hemmed rectangle into the pillowcase shape:
- Lay the fabric flat, right side facing up. The right side (the pretty printed side) should be facing the ceiling. Both hemmed short edges should be at the left and right ends.
- Fold the left hemmed edge toward the center by 11 inches (28 cm). This fold creates the back flap — the part of the envelope that the pillow tucks behind. The right side of the fabric is now folded onto itself (right sides touching).
- Fold the right hemmed edge over the top so that the overall folded piece measures approximately 27 × 20.5 inches (68.5 × 52 cm). This second fold should overlap the first fold by about 5 inches (12.7 cm). You are folding right sides together — meaning the right side of the fabric is on the inside and the wrong side faces out.
You should now have a multi-layered rectangle roughly the size of your pillow, with raw (unstitched) edges along the top and bottom, and the hemmed edges overlapping in the center. This overlap is the "envelope."
- Pin along the top and bottom raw edges. Place pins every 2–3 inches (5–7.5 cm), making sure all layers are caught. You should be pinning through 3 layers of fabric on the sides — this is what creates the envelope pocket when you turn the pillowcase right side out.
- Check your overlap. Peek between the layers to make sure the hemmed edges overlap properly and are not twisted. The right side of the fabric should be completely on the inside.
Pin and Sew the Top and Bottom Seams
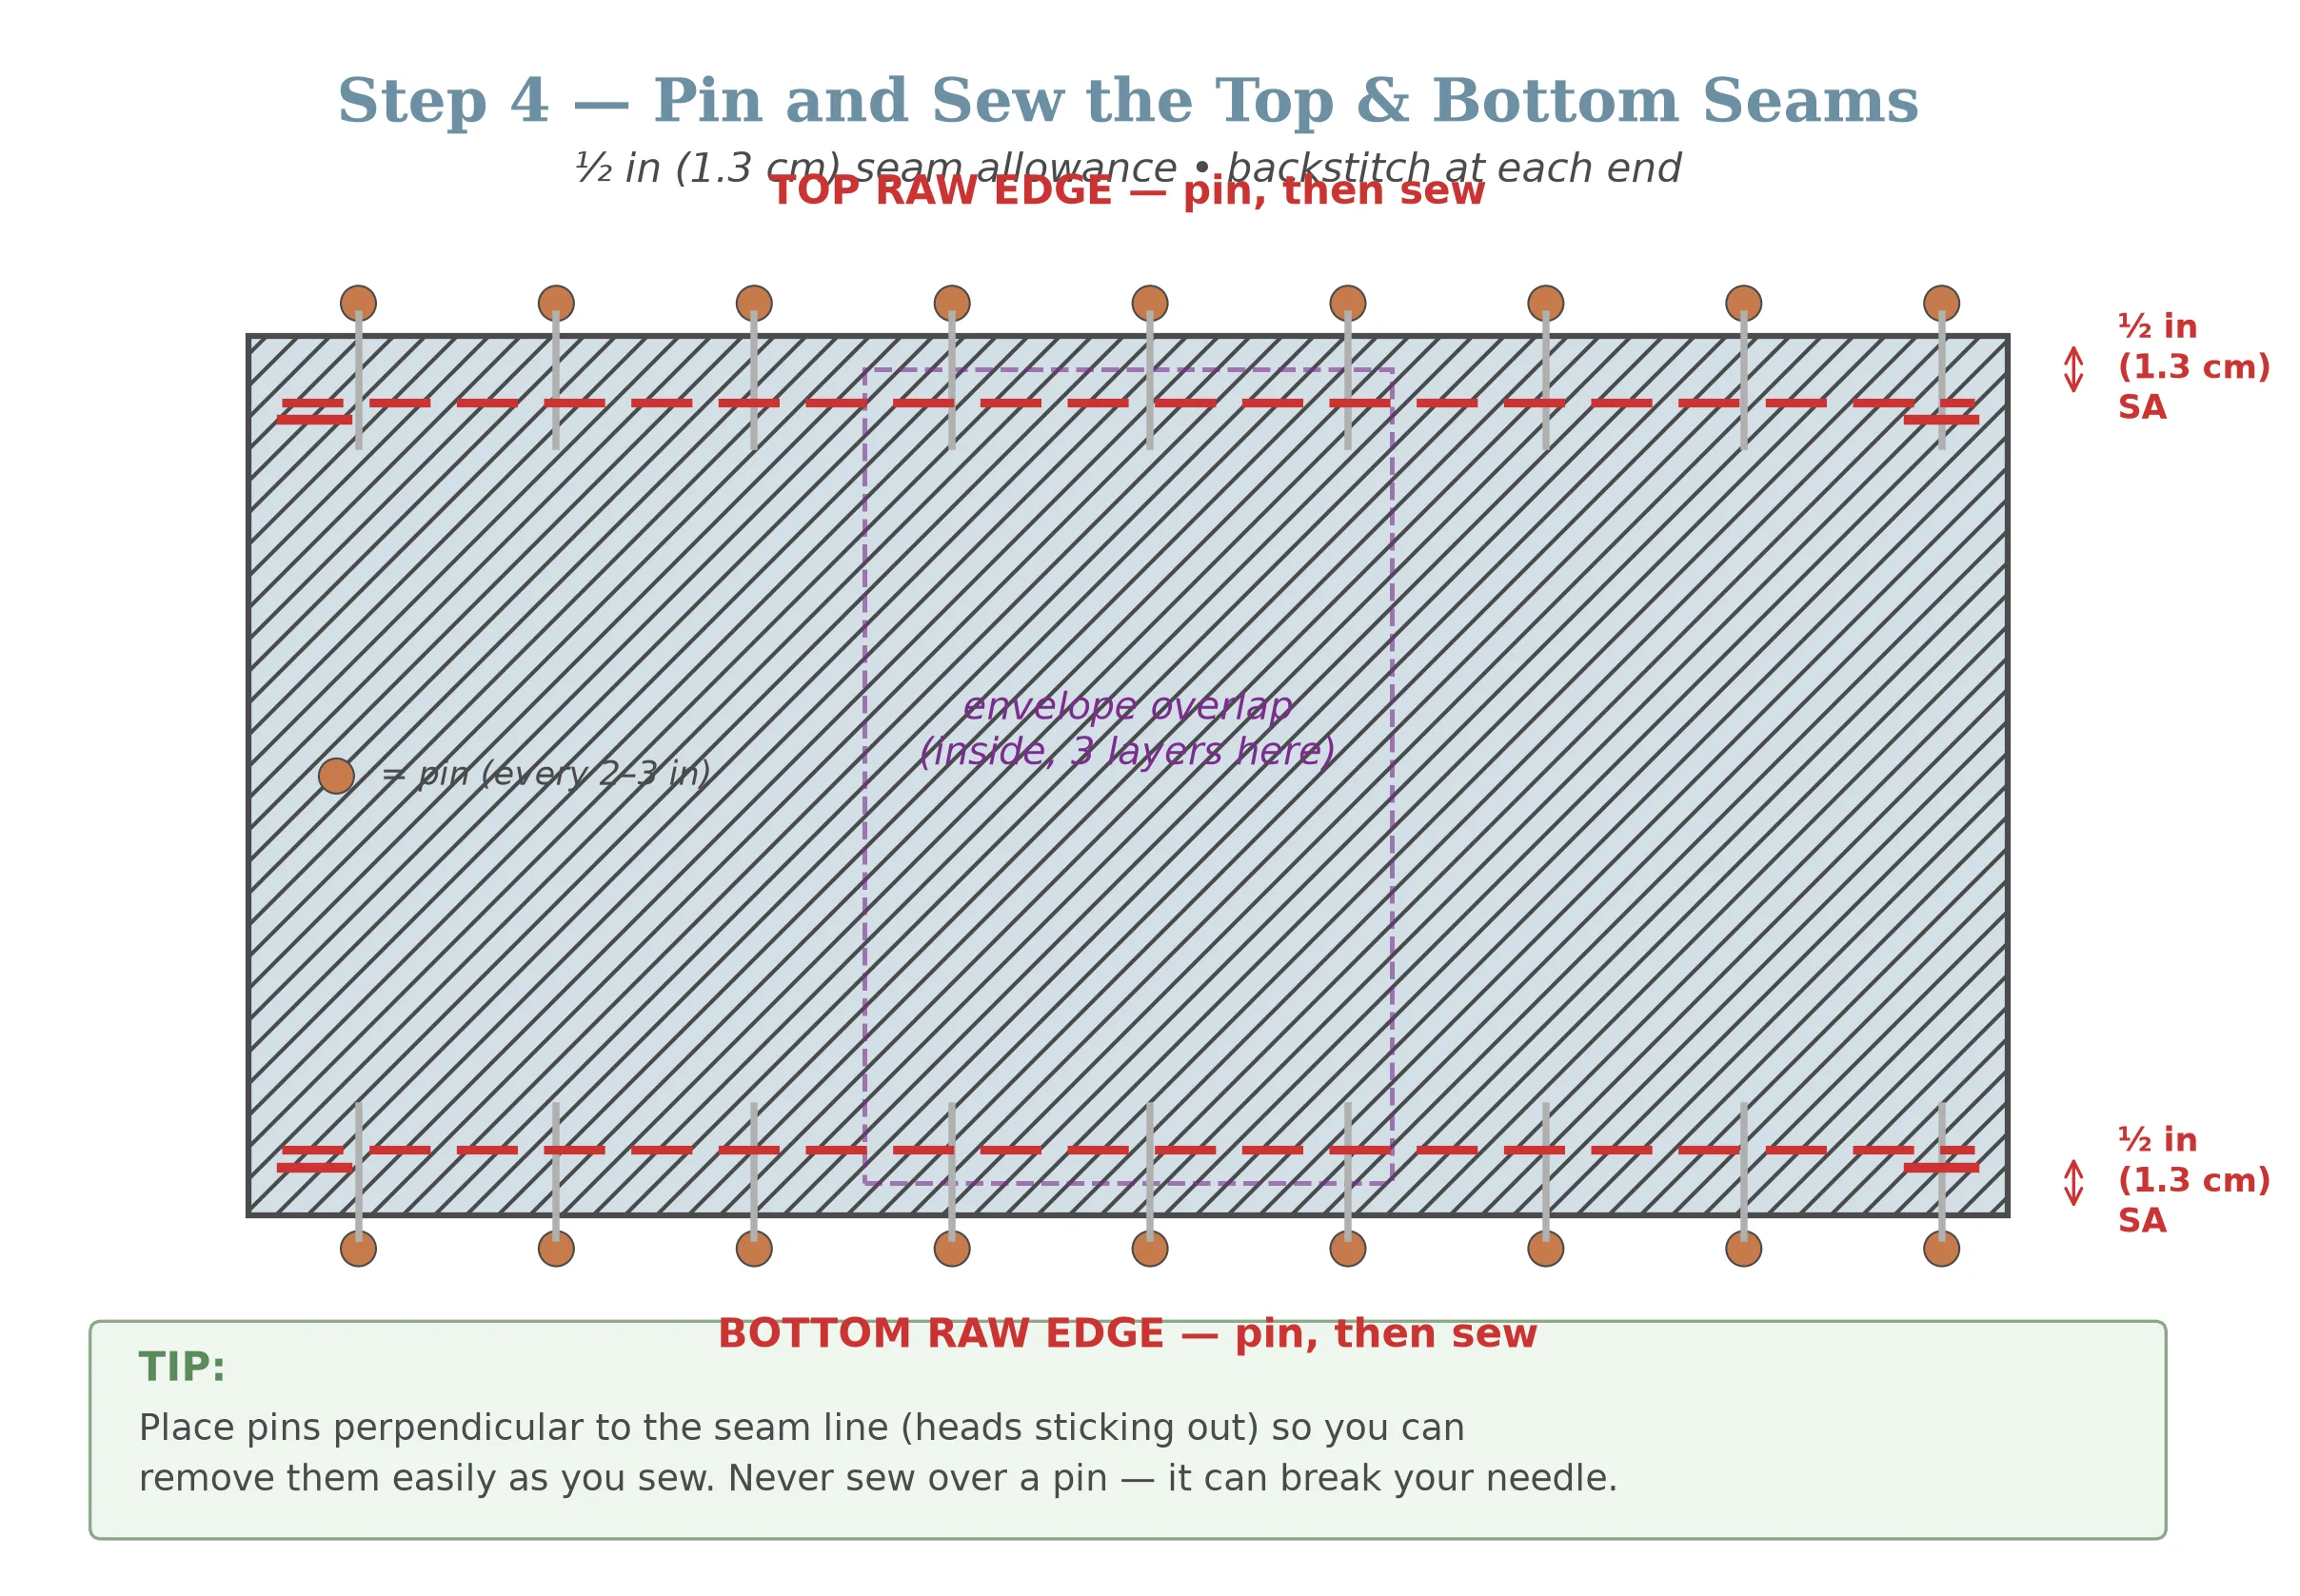
Now you will sew the two seams that close the pillowcase into a pocket. These are the most important stitches in the project — and they are just straight lines.
- Place the folded fabric under the presser foot, aligning the top raw edge with the ½ inch (1.3 cm) seam guide on your machine's needle plate. (Look for a line or marking to the right of the needle — most machines have guides engraved or printed at common seam allowances.)
- Backstitch 3–4 stitches at the very beginning to lock the thread.
- Sew a straight line from one end of the top edge to the other, maintaining a consistent ½ inch (1.3 cm) distance between the needle and the raw edge. Sew slowly and keep your eye on the seam guide, not the needle.
- Backstitch 3–4 stitches at the end.
- Remove the fabric from the machine by raising the presser foot and pulling the fabric gently toward the back, then cutting the threads.
- Repeat on the bottom edge.
You have now sewn both seams. The pillowcase is structurally complete — all that remains is finishing.
Trim Corners, Press, and Turn Right Side Out
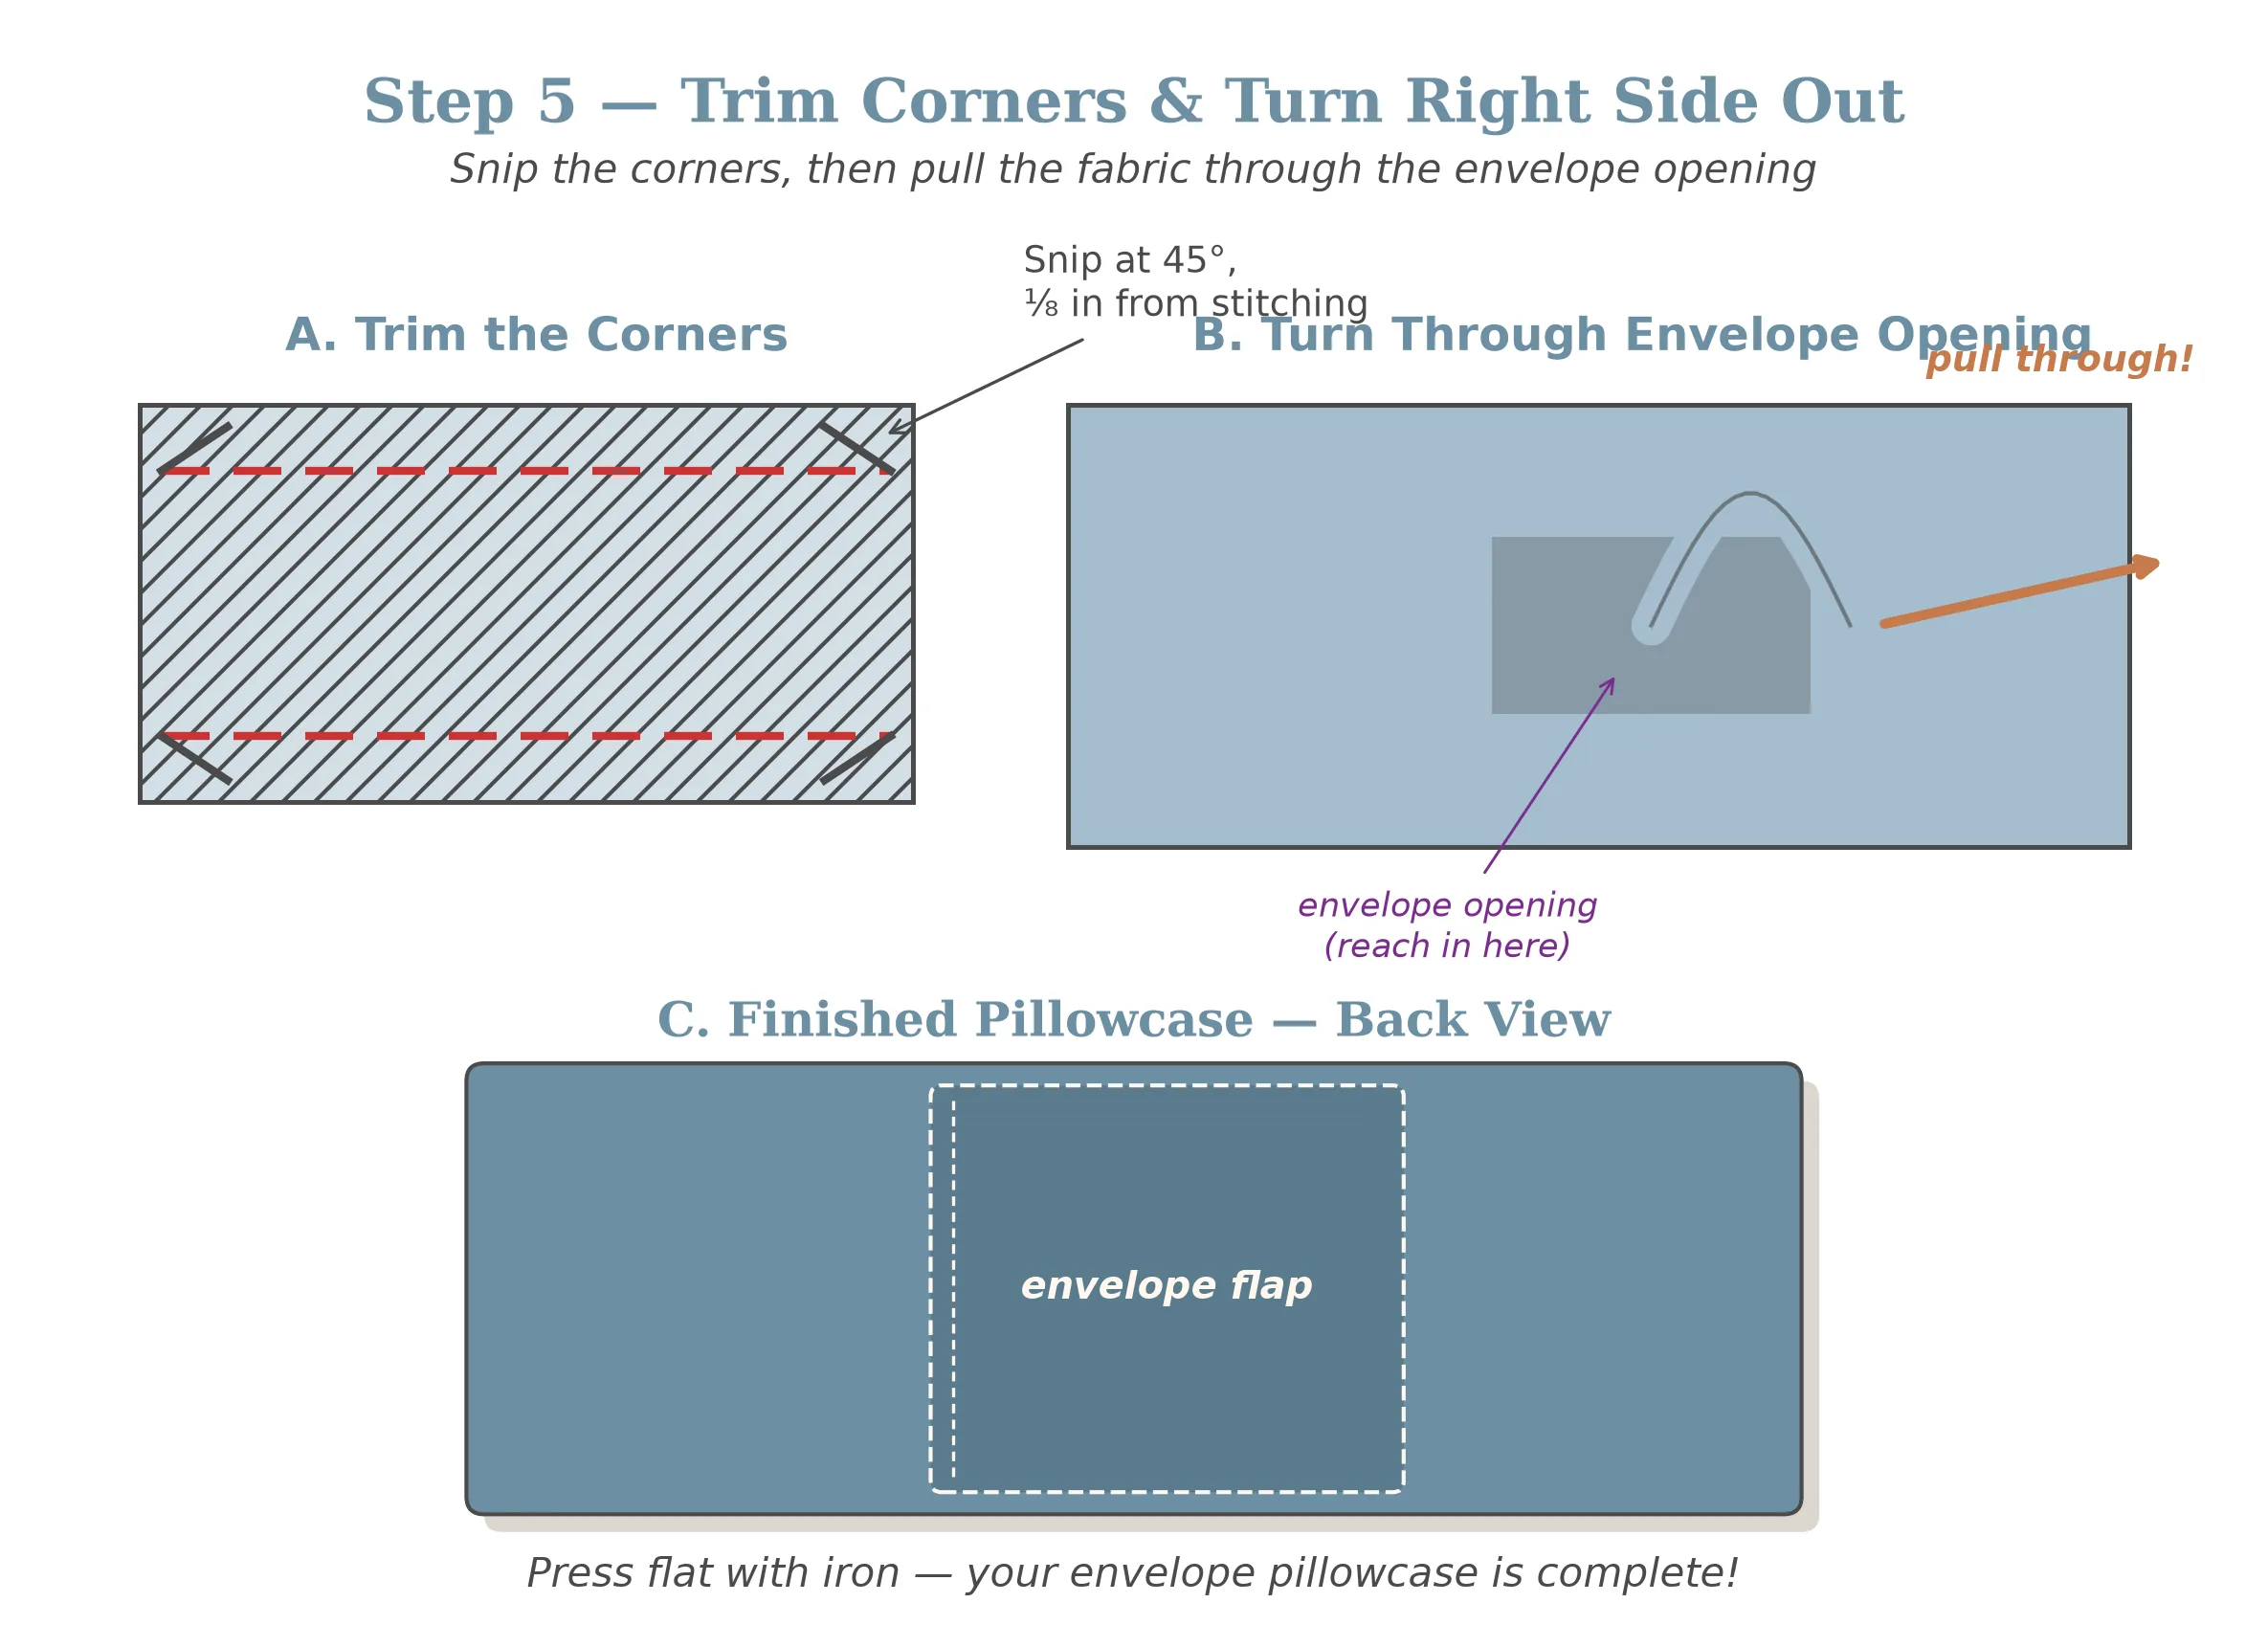
- Trim the seam allowance at the four corners diagonally — cut at a 45-degree angle, about ⅛ inch (3 mm) from the stitching. Do not cut through the stitches. This removes bulk so the corners can turn out sharp and flat instead of lumpy.
- Press the seams. With the pillowcase still inside out, use your iron to press both seams flat. This sets the stitches and makes the next step easier.
- Turn the pillowcase right side out by reaching through the envelope overlap opening and pulling the fabric through. The right side (the pretty printed side) should now face outward.
- Push the corners out. Use a blunt, pointed tool — a chopstick, a knitting needle, or the eraser end of a pencil — to gently push the corners from the inside until they are square. Do not use scissors or a sharp tool, which could poke through the fabric.
- Give the entire pillowcase a final press. Iron it flat, pressing the seams along the edges. Your pillowcase should look crisp and professional.
Insert the Pillow and Admire Your Work
Fold your pillow in half, slide it through the envelope opening, then unfold it inside the pillowcase. Adjust the fabric so the pillow sits flat, then flip the pillowcase over to see the envelope flap lying neatly over the back.
You just sewed your first project. Take a moment to appreciate what you made — a real, functional, beautiful pillowcase. Every professional seamstress started exactly where you are right now.
Variations & Ideas
Now that you have mastered the basic envelope pillowcase, here are some ways to customize future versions:
Make It Your Own
- Contrast band: Use a different fabric for the envelope flap so a pop of pattern or color shows on the back.
- Decorative trim: Sew a strip of rickrack, pom-pom trim, or lace along the edge of the overlap before assembling.
- French seams: Once you feel confident, try French seams (a technique that encloses all raw edges inside the seam for a boutique-quality finish). You would sew the first seam at ¼ inch with wrong sides together, trim, turn, then sew again at ¼ inch with right sides together.
- Monogram or appliqué: Add iron-on letters or a simple fabric shape to the front before assembling.
- Mix fabrics: Use one fabric for the front panel and a coordinating fabric for the back panel. Simply cut two separate pieces instead of one rectangle, then hem the overlapping edges and sew the sides.
- Gift set: Make a pair of matching pillowcases — it makes a wonderful handmade gift for housewarmings, weddings, or holidays.
Troubleshooting Common Problems
If something does not look quite right, do not panic. Here are the most common issues beginners encounter and how to fix them:
The Pillowcase Is Too Tight
Your seam allowance was probably wider than ½ inch, which made the finished pillowcase smaller. Carefully use a seam ripper (a small tool designed to cut stitches) to remove the seam, then re-sew with a more accurate ½ inch seam allowance. Alternatively, you can re-sew at ⅜ inch to gain a little room.
The Corners Are Lumpy
You may not have trimmed the corners closely enough. Turn the pillowcase inside out, trim the corner seam allowances closer to the stitching (but not through it), then turn right side out again and press.
The Stitches Look Loopy on One Side
This is a thread tension issue. Loops on the bottom usually mean the top thread tension is too loose. Loops on the top usually mean the bobbin is not threaded correctly. Re-thread both the top thread and the bobbin, following your machine's manual exactly, then test on a scrap.
The Fabric Puckers Along the Seam
Puckering is often caused by a dull needle or incorrect thread tension. Try installing a fresh needle and re-threading. Also make sure you are not pulling the fabric through the machine — let the feed dogs (the small teeth beneath the needle plate) move the fabric on their own. Your job is to guide the fabric gently, not push or pull it.
Frequently Asked Questions
What size fabric do I need for a standard envelope pillowcase?
For a standard pillow (20 × 26 inches / 51 × 66 cm), you need one rectangle of fabric measuring 27 × 41 inches (68.5 × 104 cm). This is approximately ¾ yard (0.7 m) of 44/45-inch wide fabric. The dimensions include seam allowances, hem allowances, and the envelope overlap flap.
What is an envelope pillowcase?
An envelope pillowcase is a pillowcase with an overlapping fabric flap on the back — like the flap of an envelope — instead of a zipper or button closure. The pillow slides in through the flap opening and stays neatly hidden inside. From the front, it looks just like a regular pillowcase. It is the easiest style of pillowcase to sew because it requires only straight stitches and no closures or hardware.
What is the best fabric for a beginner pillowcase?
Quilting cotton or cotton broadcloth are the best choices for a beginner pillowcase. They are tightly woven, easy to cut straight, hold a press well, feed smoothly through a sewing machine, and are available in hundreds of colors and prints. Avoid slippery fabrics like satin, stretchy fabrics like jersey, or loosely woven fabrics like gauze for your first project.
Can I sew an envelope pillowcase without a sewing machine?
Absolutely. You can sew the entire pillowcase by hand using a backstitch for the seams and a slip stitch for the hems. Hand-sewing will take longer — approximately 2 to 3 hours instead of 30 to 45 minutes — but the results are just as functional and beautiful. Use a sharp hand-sewing needle (called a "sharp" or "between") and keep your stitches small and even, about ⅛ inch (3 mm) apart.
How do I wash a handmade envelope pillowcase?
Wash your cotton pillowcase on a warm or cool cycle with like colors, then tumble dry on low or hang to dry. Cotton may shrink slightly on the first wash, which is why this pattern includes ease. Iron while slightly damp for the crispest, smoothest finish. Avoid bleach on printed fabrics, as it can fade the colors.
What is seam allowance and why does it matter?
Seam allowance is the strip of fabric between your line of stitching and the cut (raw) edge. This pattern uses a ½ inch (1.3 cm) seam allowance. It matters because it directly affects the finished size of your project. If your seam allowance is wider than specified, the pillowcase will come out smaller. If it is narrower, the seam may not be strong enough. Consistent seam allowance is one of the most important skills in sewing.
Series Progress
First Stitches: 10 Simple Sewing Projects for Absolute Beginners
Post 1 of 10 — Envelope Pillowcase
What's Next in This Series
You have just completed your first sewing project — and learned measuring, cutting, pressing, hemming, and straight stitching along the way. In the next tutorial, we will take those straight-stitch skills and level them up by building a three-dimensional project: a tote bag with box corners and reinforced handles.
Continue Your Sewing Journey
Explore Related Series
You did it. You measured, you cut, you pressed, you stitched — and now you have a real, handmade envelope pillowcase sitting on your bed or couch. It does not matter if the seams are not perfectly straight or if the corners could be a little sharper. What matters is that you started. You sat down at a sewing machine, and you made something with your own hands.
In my experience, this is the moment that hooks people on sewing. That first finished project — the one you can actually use — changes something. Suddenly, you look at pillowcases in stores and think, "I could make that." Because now, you can.
When you are ready for your next challenge, head over to the Simple Tote Bag tutorial, where we will add box corners, handles, and your first three-dimensional construction. Same straight stitches, a little more adventure.
Happy sewing!