How to Sew a Simple Tote Bag: Beginner Pattern with Box Corners
In This Tutorial
- Why a Tote Bag Is the Perfect Second Project
- What Makes This Tutorial Different
- Materials & Tools You'll Need
- Sizes & Measurements
- Choosing the Right Fabric
- Cutting Layout
- Pattern Pieces
- Step-by-Step Instructions
- Variations & Ideas
- Troubleshooting Common Problems
- Frequently Asked Questions
- What's Next in This Series
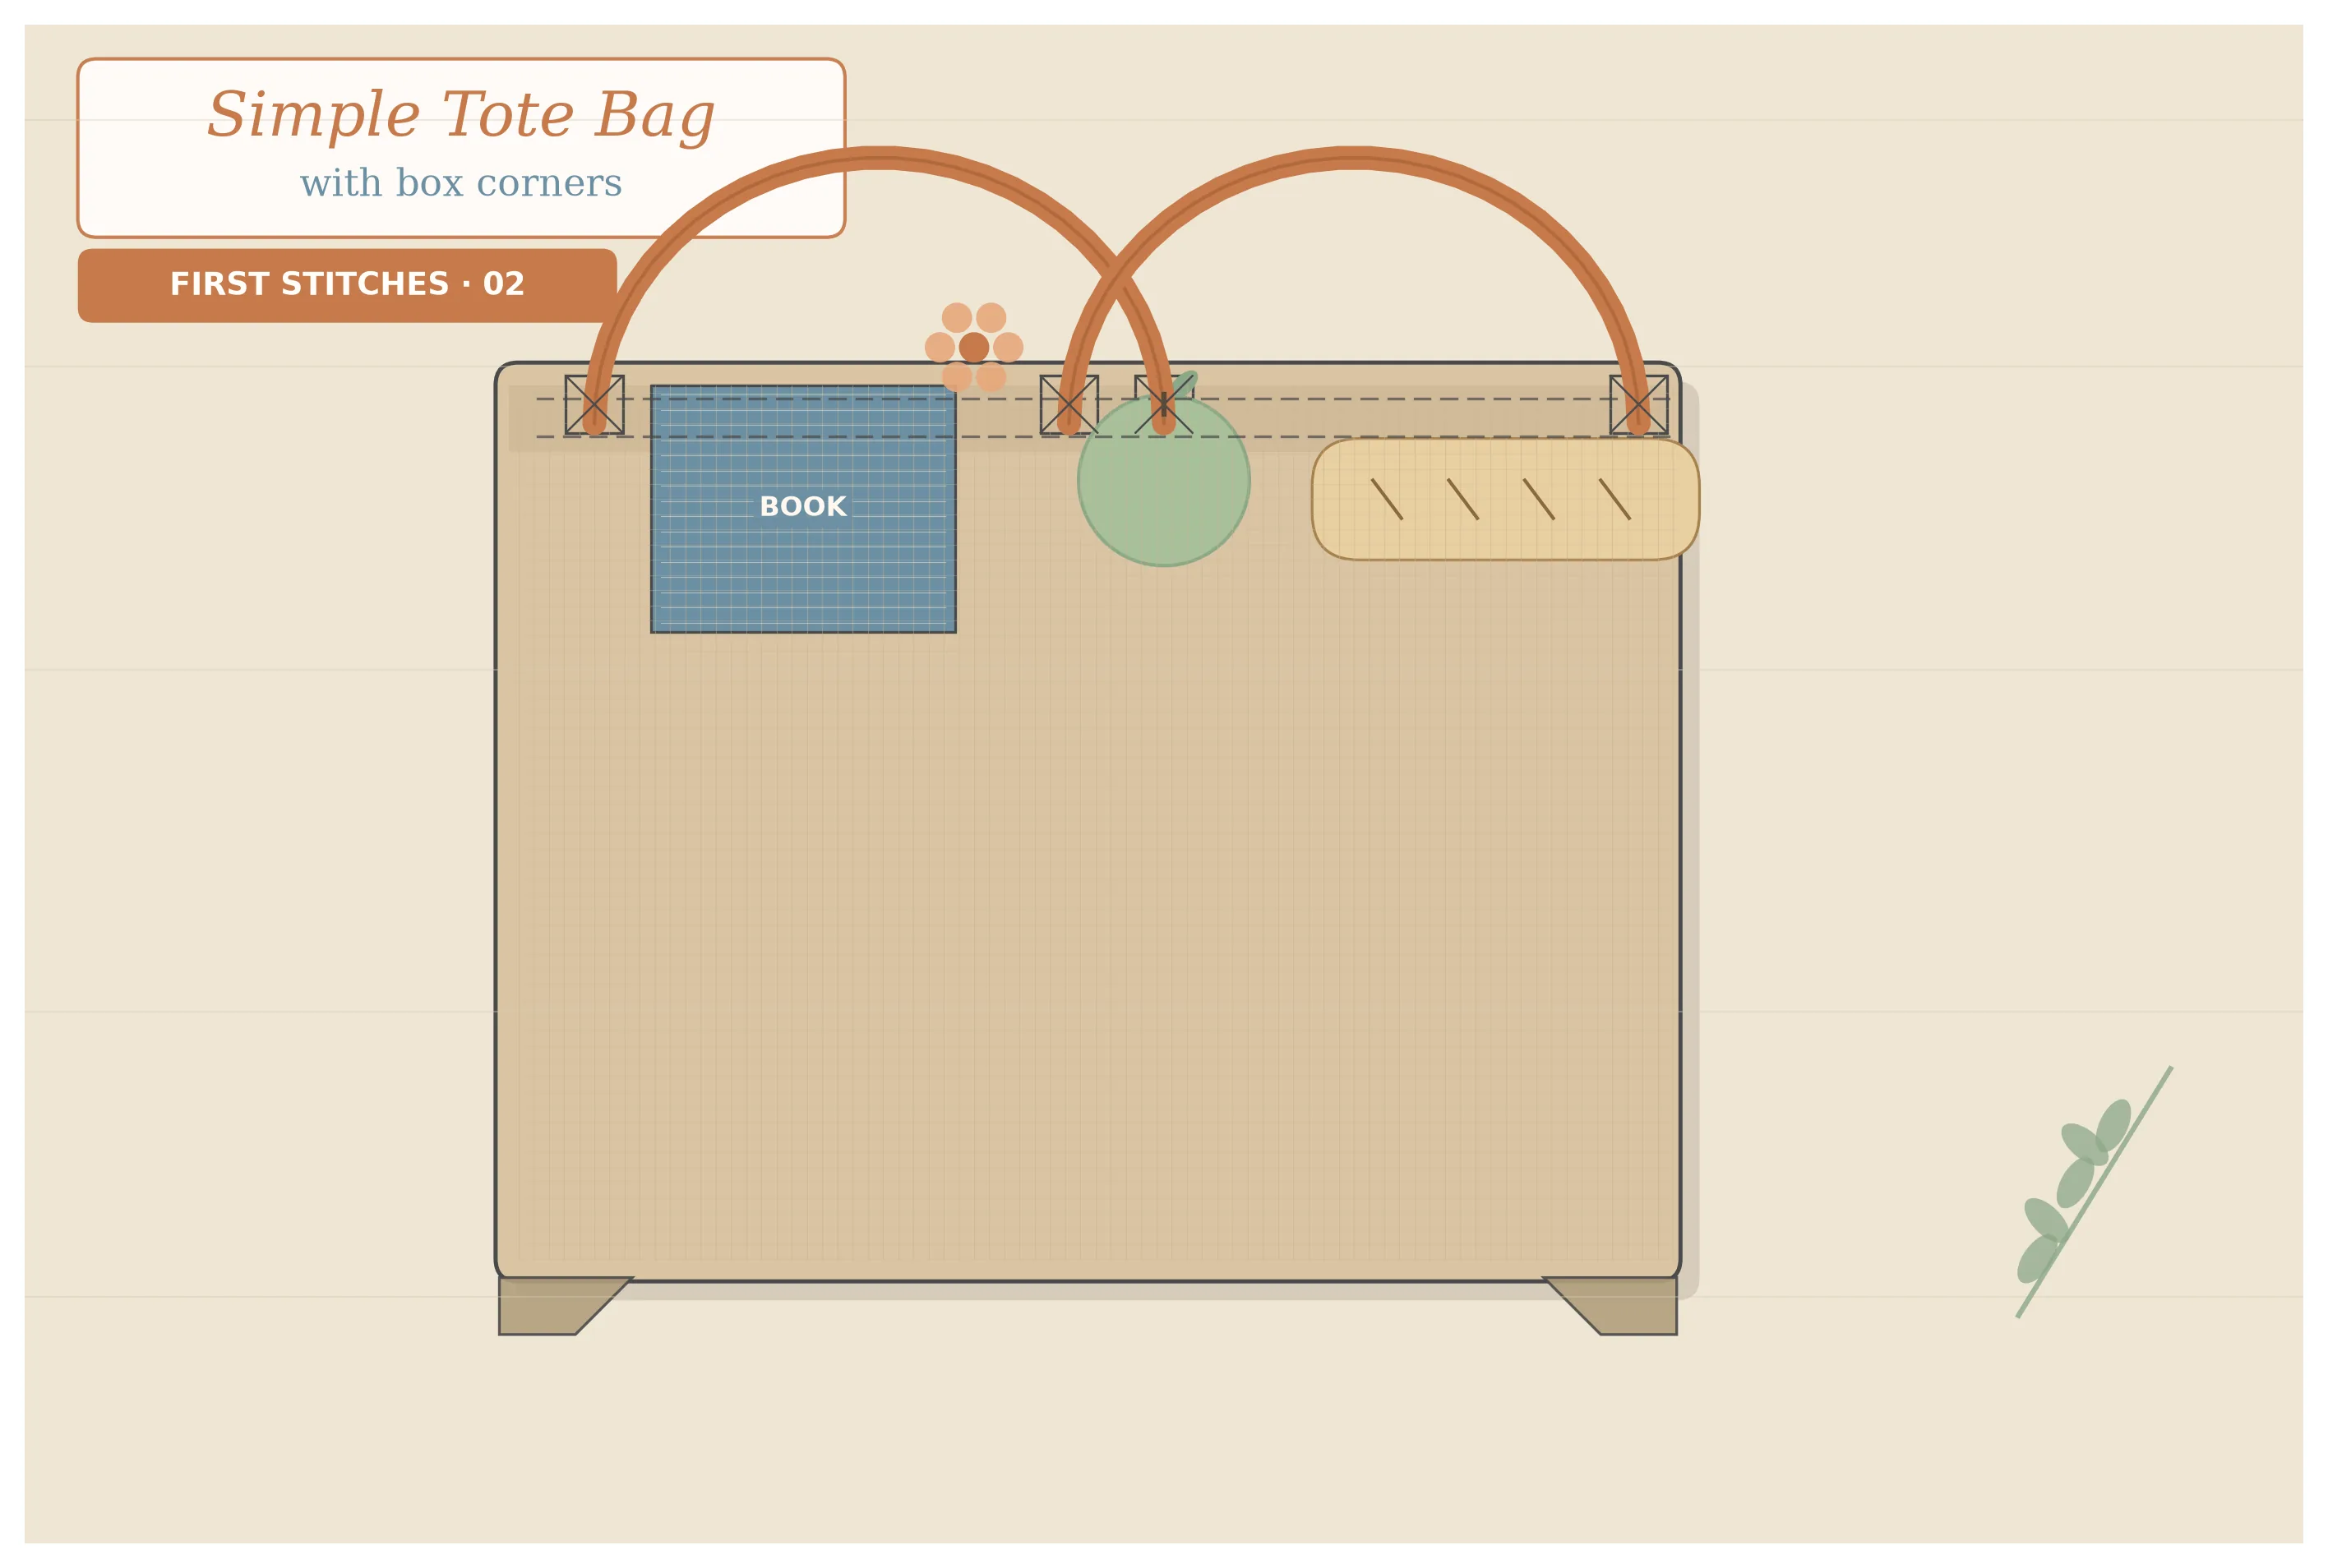
In your first project, you sewed an envelope pillowcase using only straight seams on a flat piece of fabric. Now we are going to take those same straight stitches and build something three-dimensional: a tote bag that stands up on its own, holds your groceries, your library books, or your beach towel, and looks like something you bought at a boutique.
A tote bag is a simple open-top bag with two handles and a flat bottom. This version uses a technique called box corners to create that flat bottom — and it is much easier than it sounds. You will pinch a corner, sew one straight line, and snip off the excess. That single move transforms a flat fabric tube into a bag with a rectangular base.
I chose this as the second project in the First Stitches series because it builds on everything you learned with the pillowcase — straight stitching, pressing, seam allowance — while introducing three new skills: sewing a tube, creating box corners, and making reinforced handles. By the end, you will have a bag you actually use every day, and the confidence to tackle more complex bag patterns later in this series and beyond.
Why a Tote Bag Is the Perfect Second Project
- Still only straight lines. There are no curves, no zippers, and no tricky closures. Every seam is a straight line from point A to point B.
- Your first 3D project. The box corners teach you how flat fabric becomes a three-dimensional object — a concept you will use in every bag, pouch, and garment you sew from now on.
- Forgiving construction. If a seam is slightly off, no one will notice. A tote bag is meant to be slouchy and casual.
- Practical and giftable. You will use this bag for years, and it makes a wonderful handmade gift.
- One hour or less. Once you have cut your fabric, the sewing takes about 30 to 45 minutes.
Skills You Will Learn
- Sewing a tube — joining two edges to create a cylindrical shape
- Box corners — the technique that gives bags their flat bottom
- Topstitching — visible stitching on the outside that is both decorative and structural
- Handle construction — folding, pressing, and stitching fabric strips into sturdy straps
- Reinforcement stitching — the box-X stitch that prevents handles from tearing out
What Makes This Tutorial Different
Most tote bag tutorials assume you already know your way around a sewing machine. This one does not. Here is what sets this tutorial apart:
- Every term defined. I explain "right sides together," "topstitching," "box corners," and "reinforcement stitching" the first time they appear, with clear descriptions of what your fabric should look like.
- Illustrated cutting layout and pattern pieces. Visual diagrams show exactly how to position your pieces on the fabric so you waste as little as possible.
- Step-by-step construction diagrams. Each stage includes a clear illustration so you can compare your work to the expected result.
- Dual measurements throughout. Every dimension appears in both inches and centimeters.
- Common Mistake warnings at every tricky step. I flag the exact spots where beginners tend to go wrong — before you reach them.
Materials & Tools You'll Need
Materials & Tools
- Fabric: 1 yard (0.9 m) of 44/45-inch wide medium-weight cotton or canvas
- Thread: All-purpose polyester thread in a matching or contrasting color
- Sewing machine with straight stitch capability
- Fabric scissors or rotary cutter + cutting mat
- Straight pins or sewing clips
- Iron and ironing board
- Ruler or measuring tape
- Fabric marking pencil or tailor's chalk
Sizes & Measurements
This pattern makes a medium-sized tote bag — large enough for groceries or a laptop, small enough to carry comfortably on your shoulder. Here are the finished dimensions and cutting measurements:
| Detail | Measurement |
|---|---|
| Finished bag width | 14 in (35.5 cm) |
| Finished bag height | 15 in (38 cm) |
| Finished bag depth (bottom) | 4 in (10 cm) |
| Handle drop length | 10 in (25.5 cm) |
| Body rectangle to cut | 15 × 36 in (38 × 91.5 cm) — cut 1 |
| Handle strips to cut | 4 × 22 in (10 × 56 cm) — cut 2 |
| Seam allowance | ½ in (1.3 cm) throughout |
| Box corner depth | 2 in (5 cm) from point |
| Fabric needed | 1 yard (0.9 m) of 44/45 in fabric |
Choosing the Right Fabric
A tote bag needs fabric that is sturdy enough to hold weight but not so heavy that your sewing machine struggles. Here are the best options for beginners:
Best Fabrics for a Beginner Tote
- Cotton canvas (7–10 oz) — the classic tote bag fabric. Sturdy, easy to sew, holds its shape beautifully. Available in natural, dyed, and printed versions.
- Cotton duck — very similar to canvas, slightly tighter weave. Equally good.
- Medium-weight quilting cotton — lighter than canvas, so the bag will be softer and more slouchy. Great for a lightweight everyday tote.
- Denim (light to medium weight) — upcycle old jeans or buy yardage. Gives a casual, durable tote.
Fabrics to Avoid for Your First Tote
- Heavy upholstery canvas — too thick for most home sewing machines, will break needles
- Thin voile or lawn — too flimsy to hold the bag's shape
- Stretchy knits — will distort under the weight of the bag's contents
- Silk or satin — slippery, delicate, and not durable enough for a utility bag
As with the pillowcase, pre-wash your fabric before cutting. Canvas and cotton can shrink 3–5% on the first wash, and you do not want your finished tote to shrink after you have put all that work into it.
Cutting Layout
You will cut three pieces from your fabric: one large body rectangle and two handle strips. Here is how to arrange them on your fabric to minimize waste.
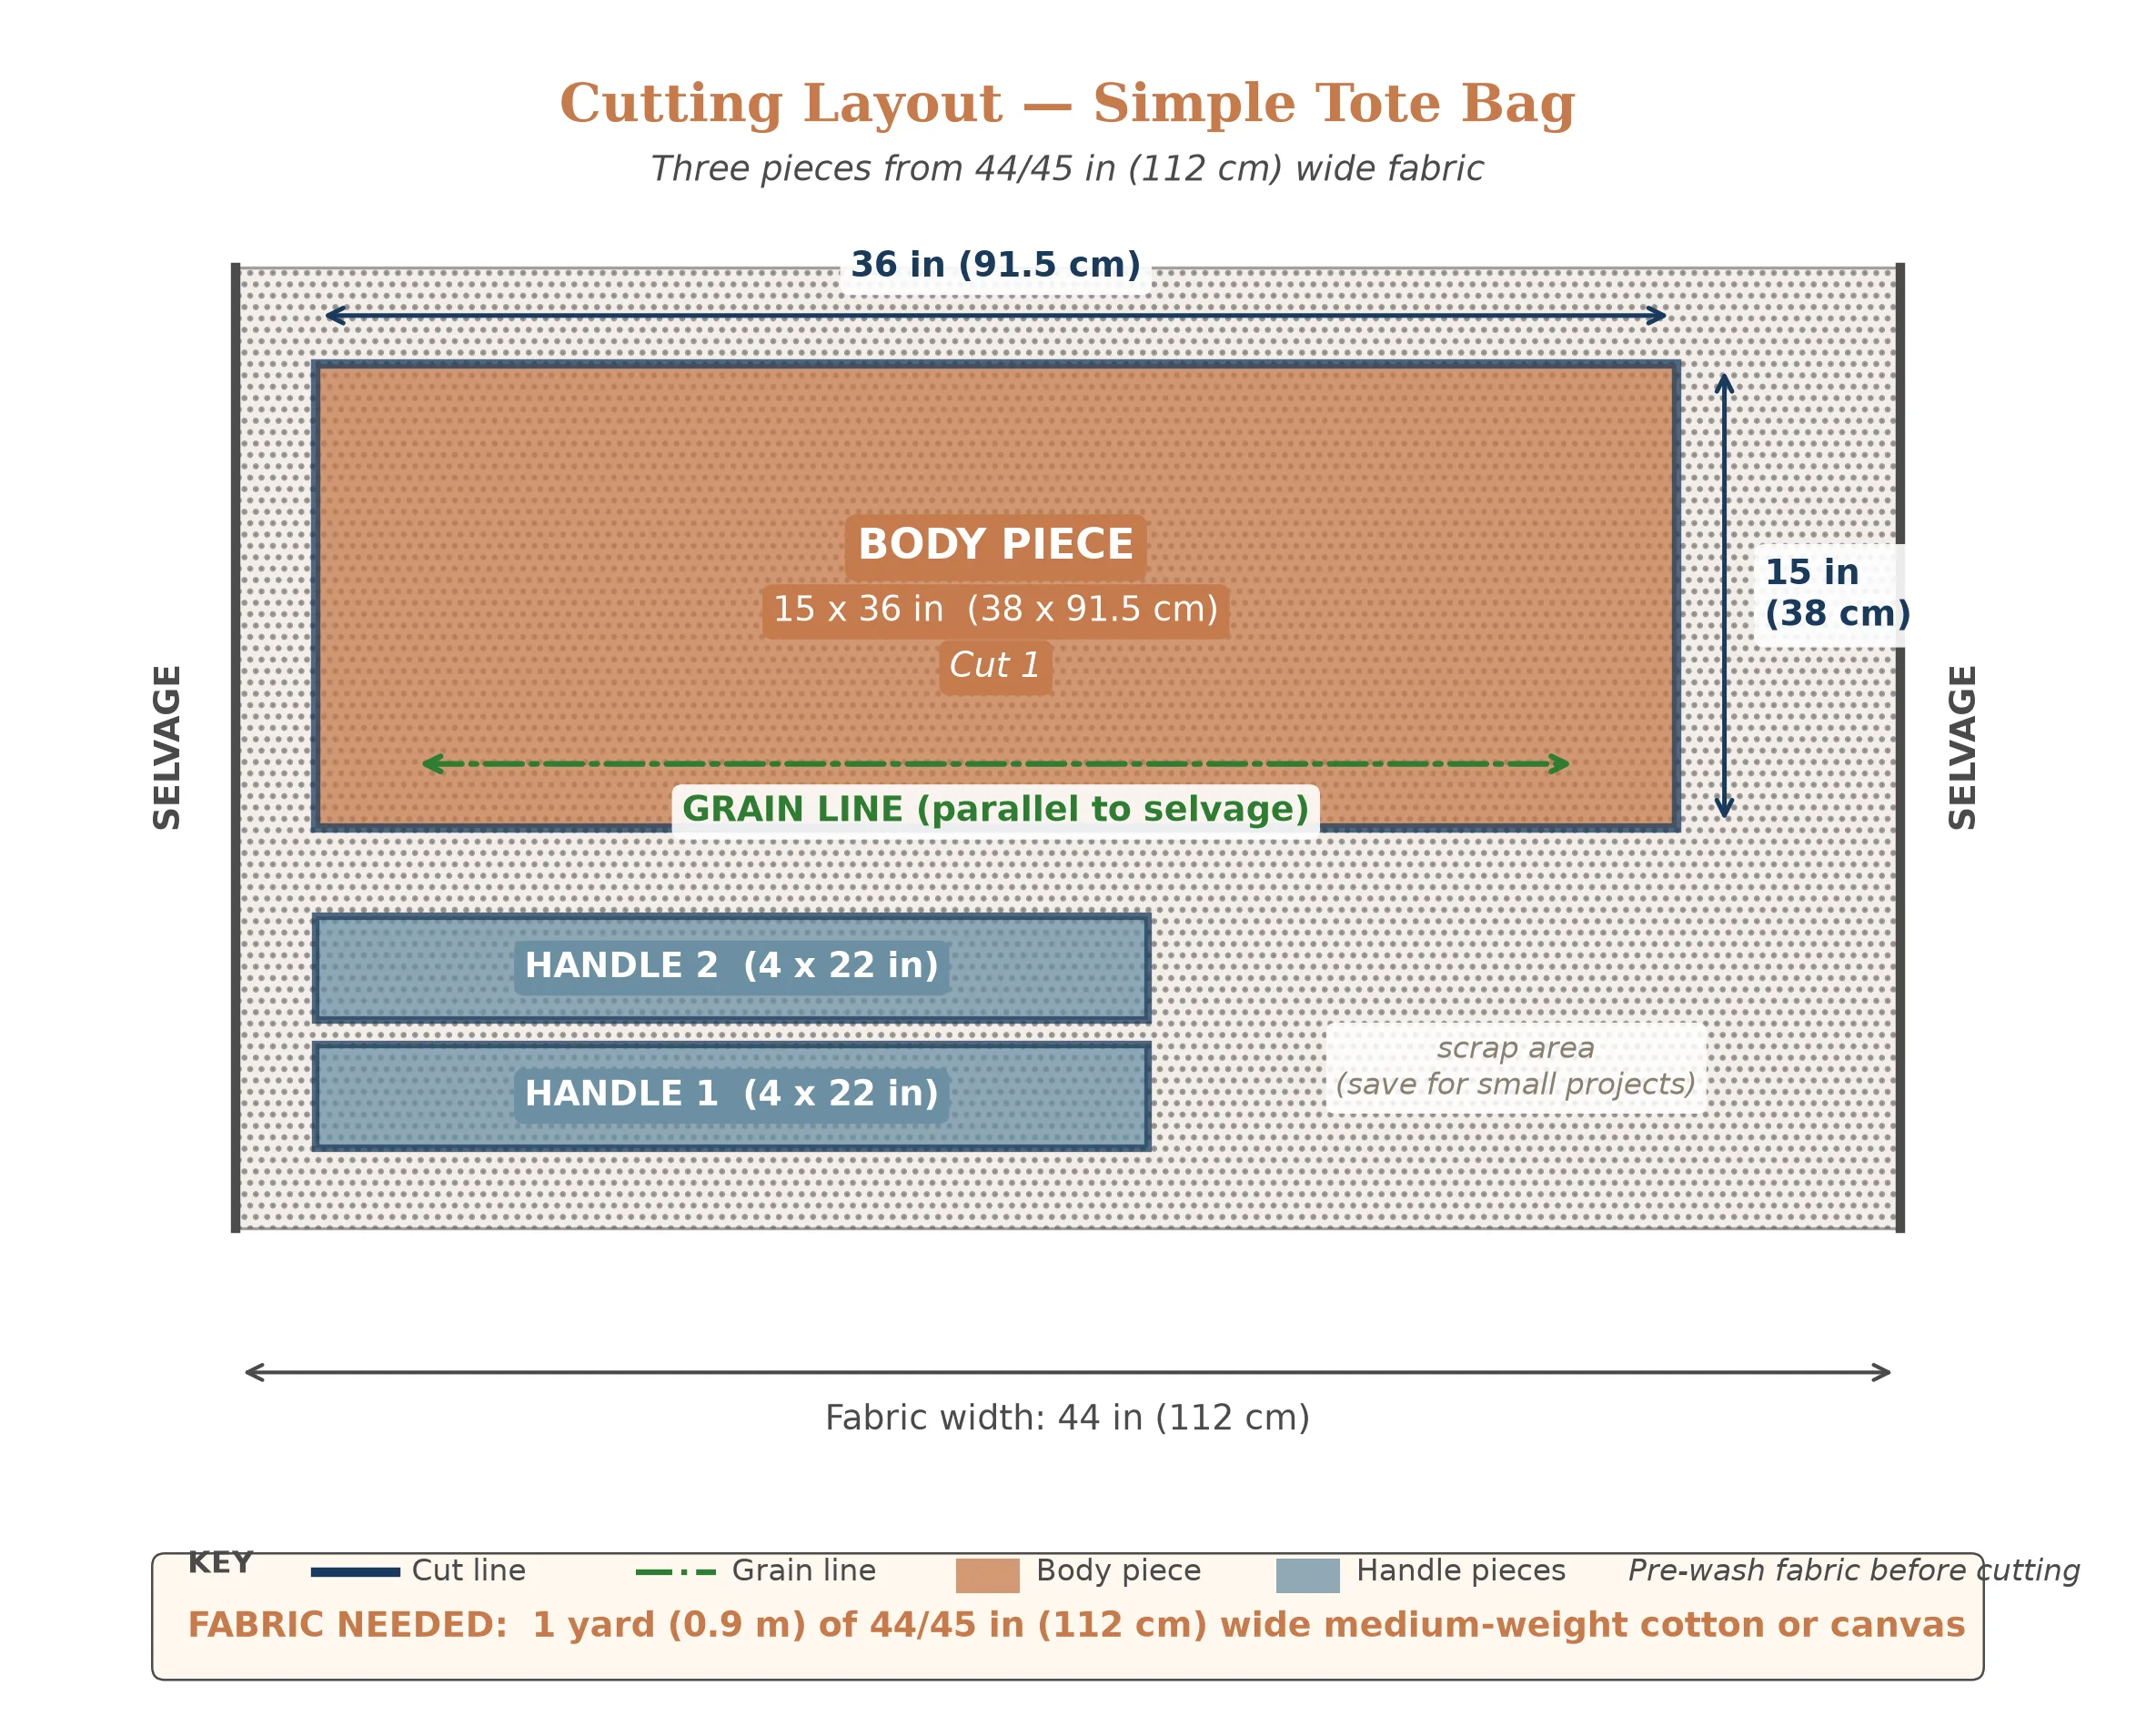
Lay your pre-washed, pressed fabric flat. If your fabric is 44–45 inches (112–114 cm) wide, the body rectangle (15 × 36 in / 38 × 91.5 cm) will fit across the width with room to spare. Cut the body piece first, then cut the two handle strips (4 × 22 in / 10 × 56 cm each) from the leftover fabric.
Pattern Pieces
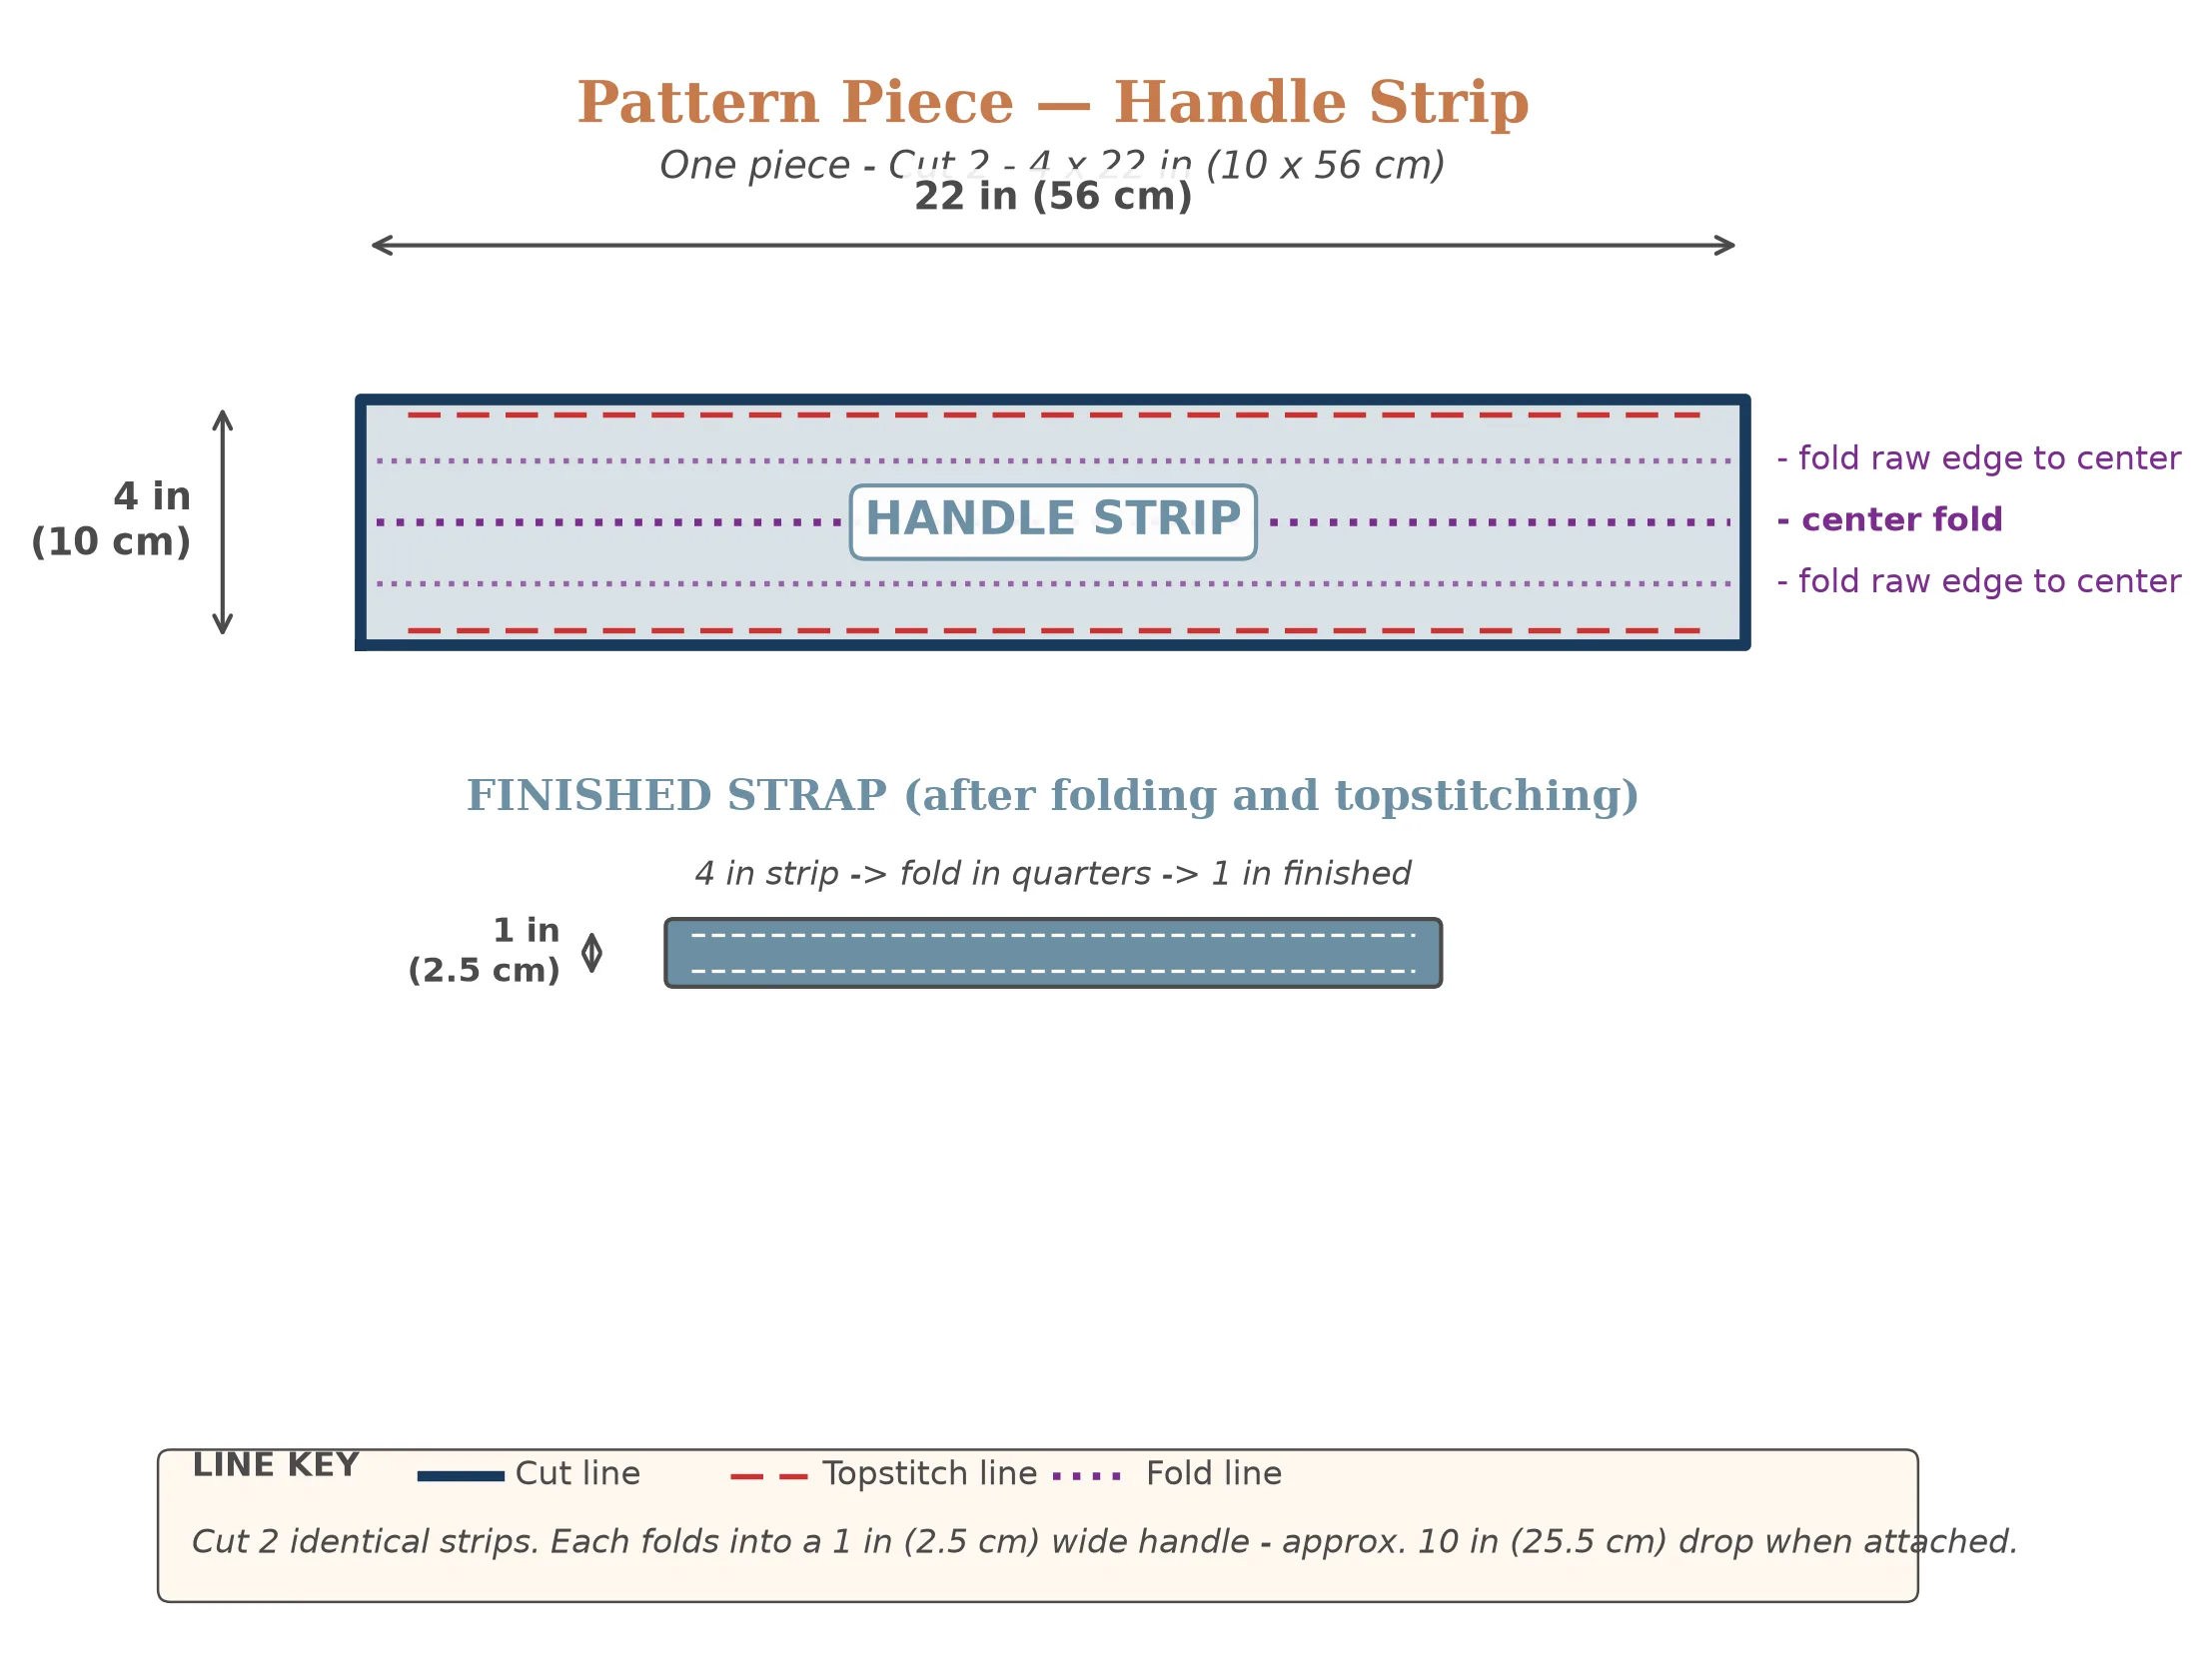
This project uses three simple pattern pieces — all rectangles. No curves, no complex shapes.
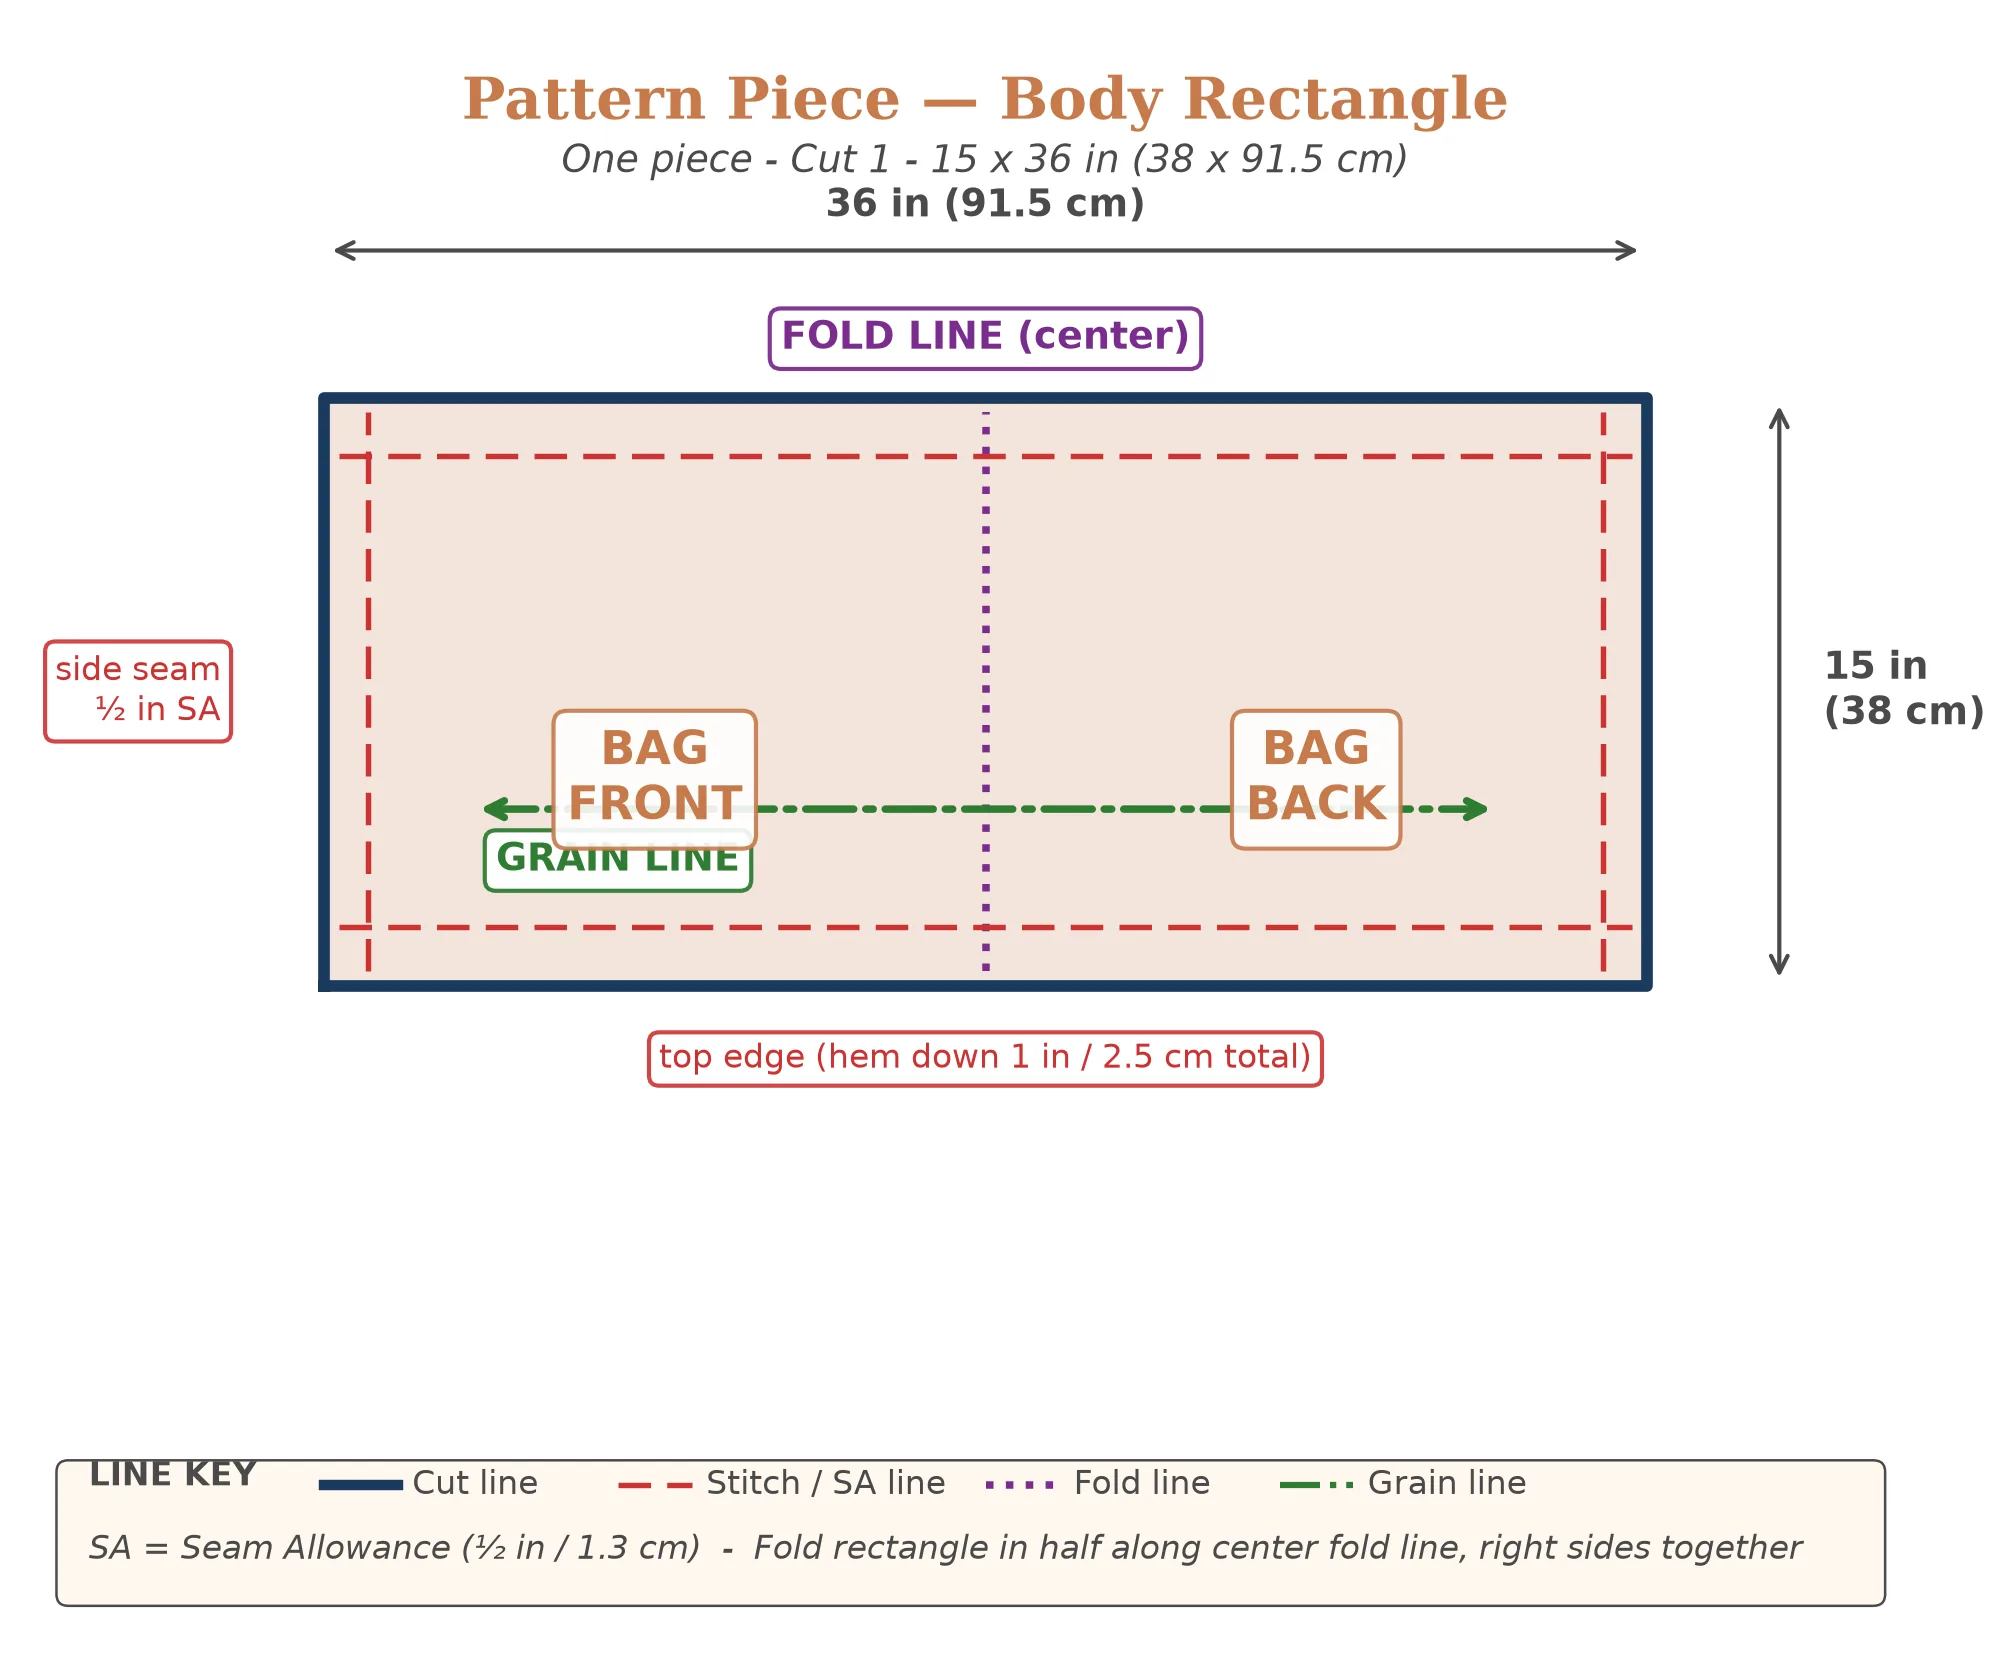
The body piece has a fold line marked at the center of the 36-inch length. You will fold the fabric in half along this line (right sides together) to create the front and back of the bag in one piece, with a continuous folded bottom and two open side seams to sew.
Step-by-Step Instructions
Thread your machine with all-purpose thread, set your stitch length to 2.5 mm, and install a universal needle (size 80/12 for cotton, or 90/14 for heavier canvas). Let's build a tote bag.
Cut Your Fabric Pieces
Using your ruler and fabric marking pencil, measure and cut the following from your pre-washed fabric:
- Body: 15 × 36 in (38 × 91.5 cm) — cut 1
- Handle strips: 4 × 22 in (10 × 56 cm) — cut 2
Mark the center of the body rectangle's long edge with a small notch or pin — this is your fold line.
Make the Handles
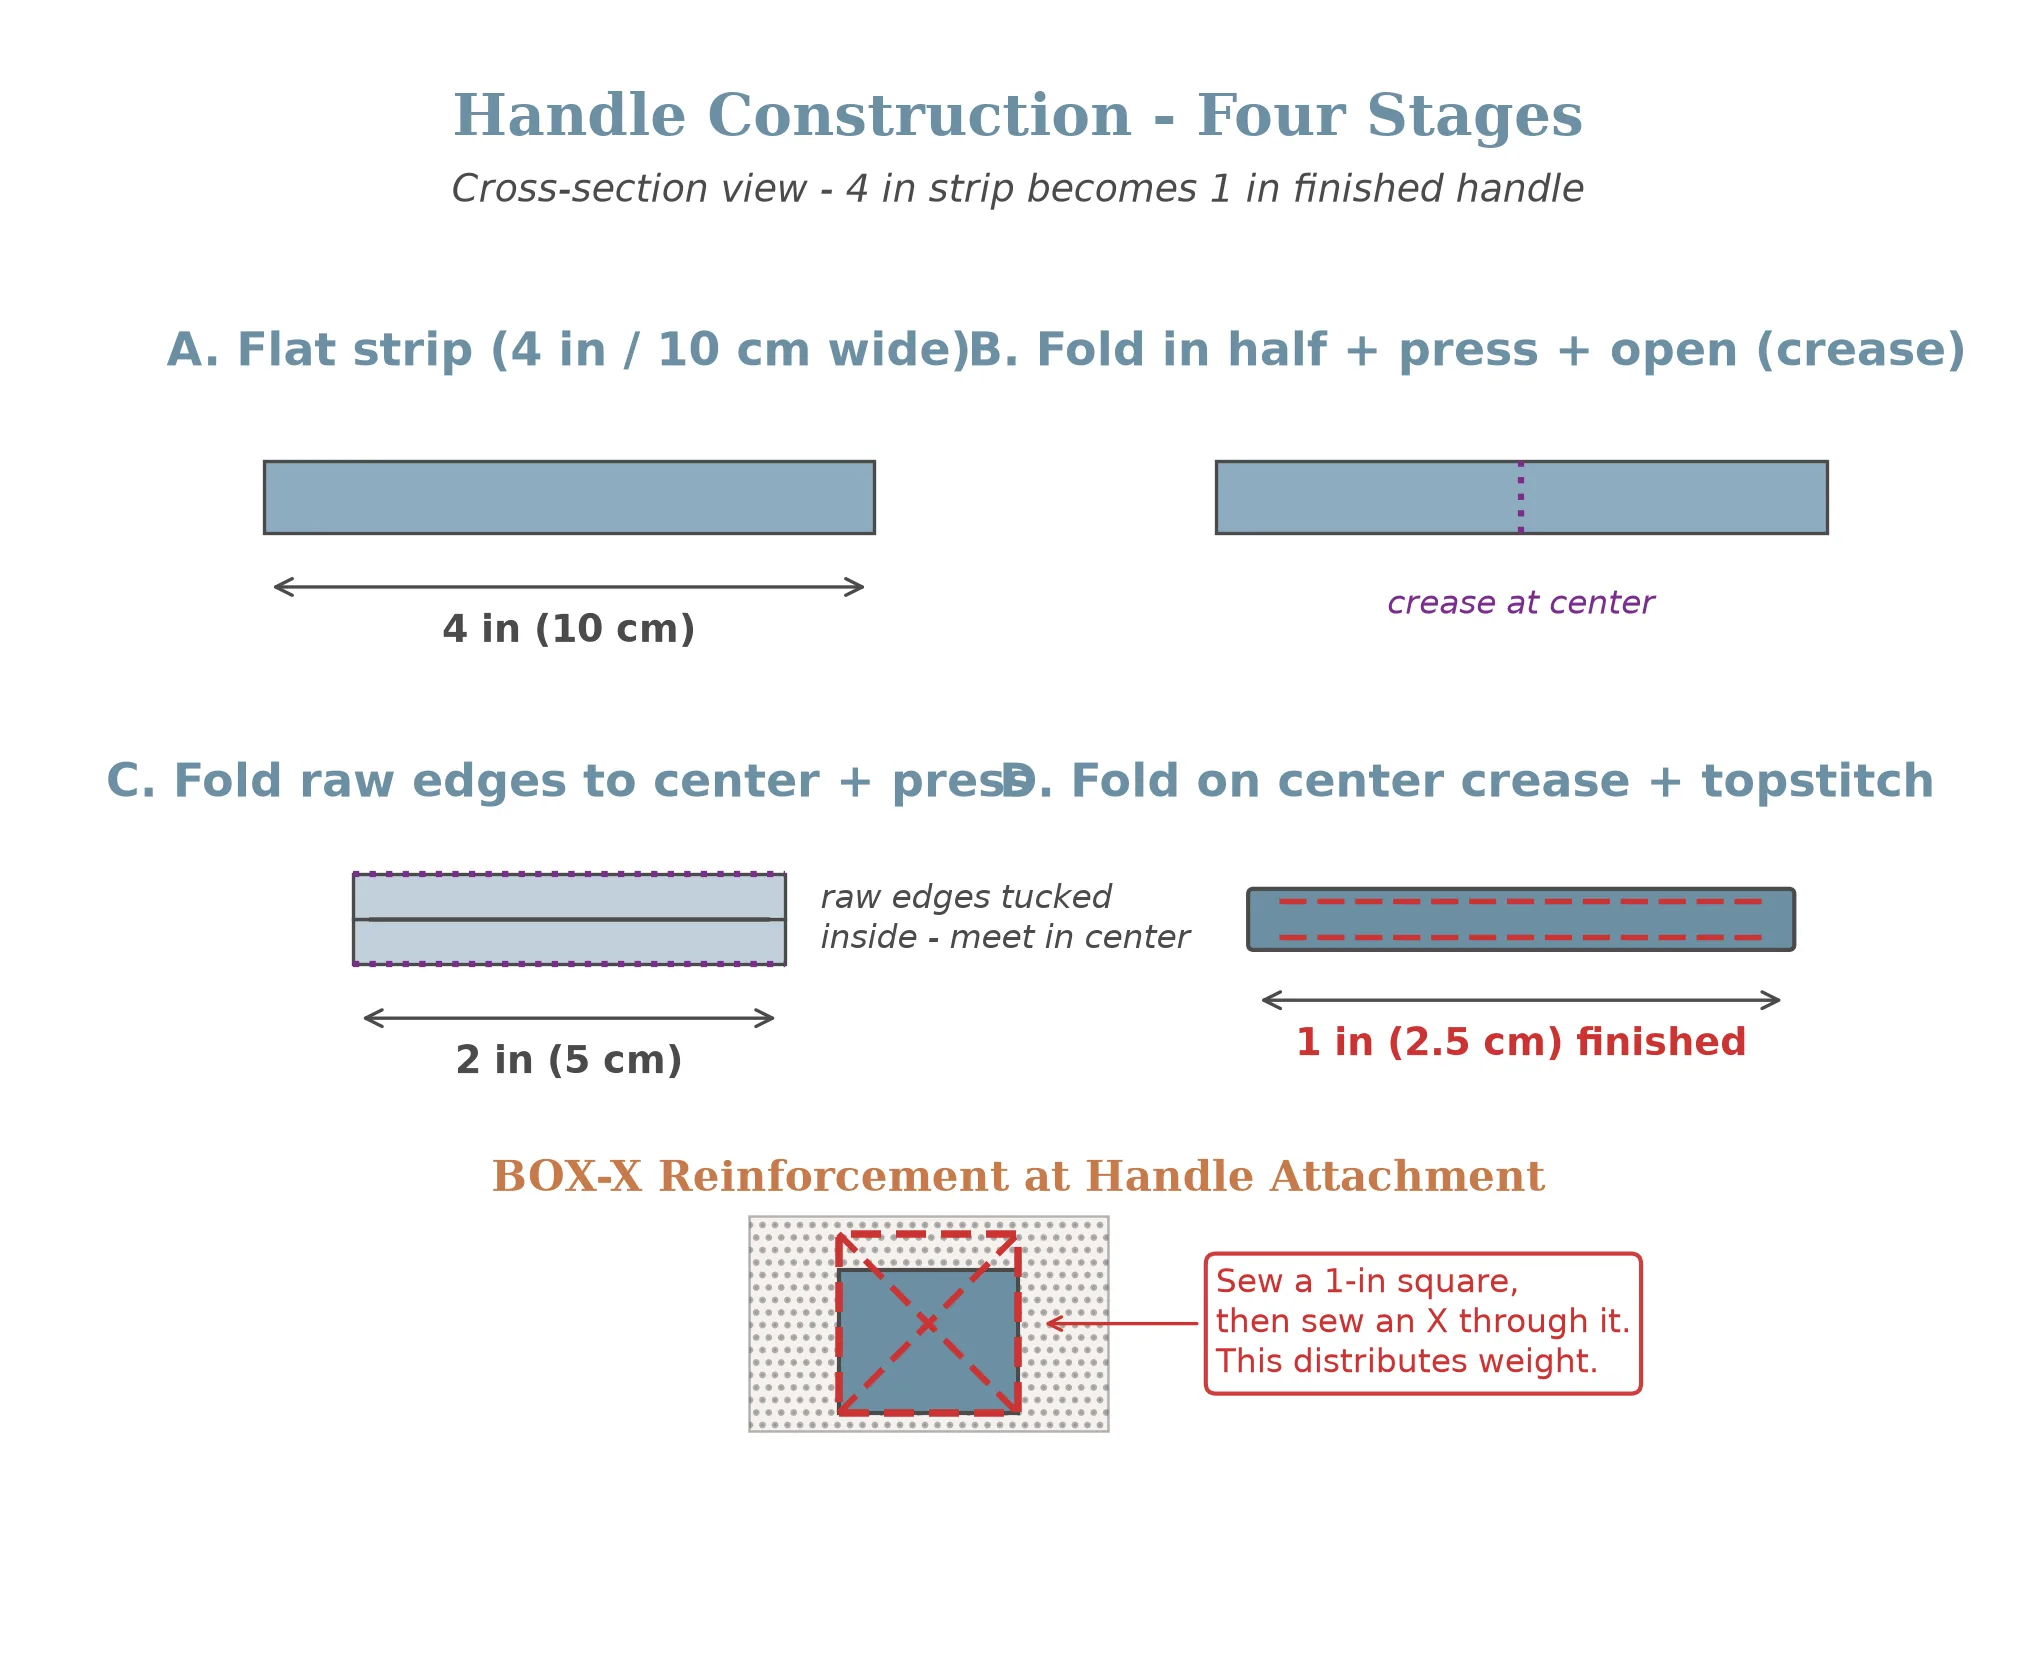
Each handle strip will be folded and stitched into a finished strap that is 1 inch (2.5 cm) wide. Do this for both strips:
- Fold the strip in half lengthwise, wrong sides together (so the right side faces out). Press the fold with your iron.
- Open the strip back up. You now have a crease down the center.
- Fold each long raw edge to meet the center crease. Press both folds. The strip should now be 2 inches (5 cm) wide with the raw edges tucked inside.
- Fold the strip in half again along the original center crease. The raw edges are now completely enclosed inside. Press firmly. The strip should be 1 inch (2.5 cm) wide.
- Topstitch along both long edges, approximately ⅛ inch (3 mm) from each edge. Topstitching is visible stitching on the outside of the fabric that serves both a decorative and structural purpose — it holds the folds in place and adds strength.
Sew the Body Side Seams
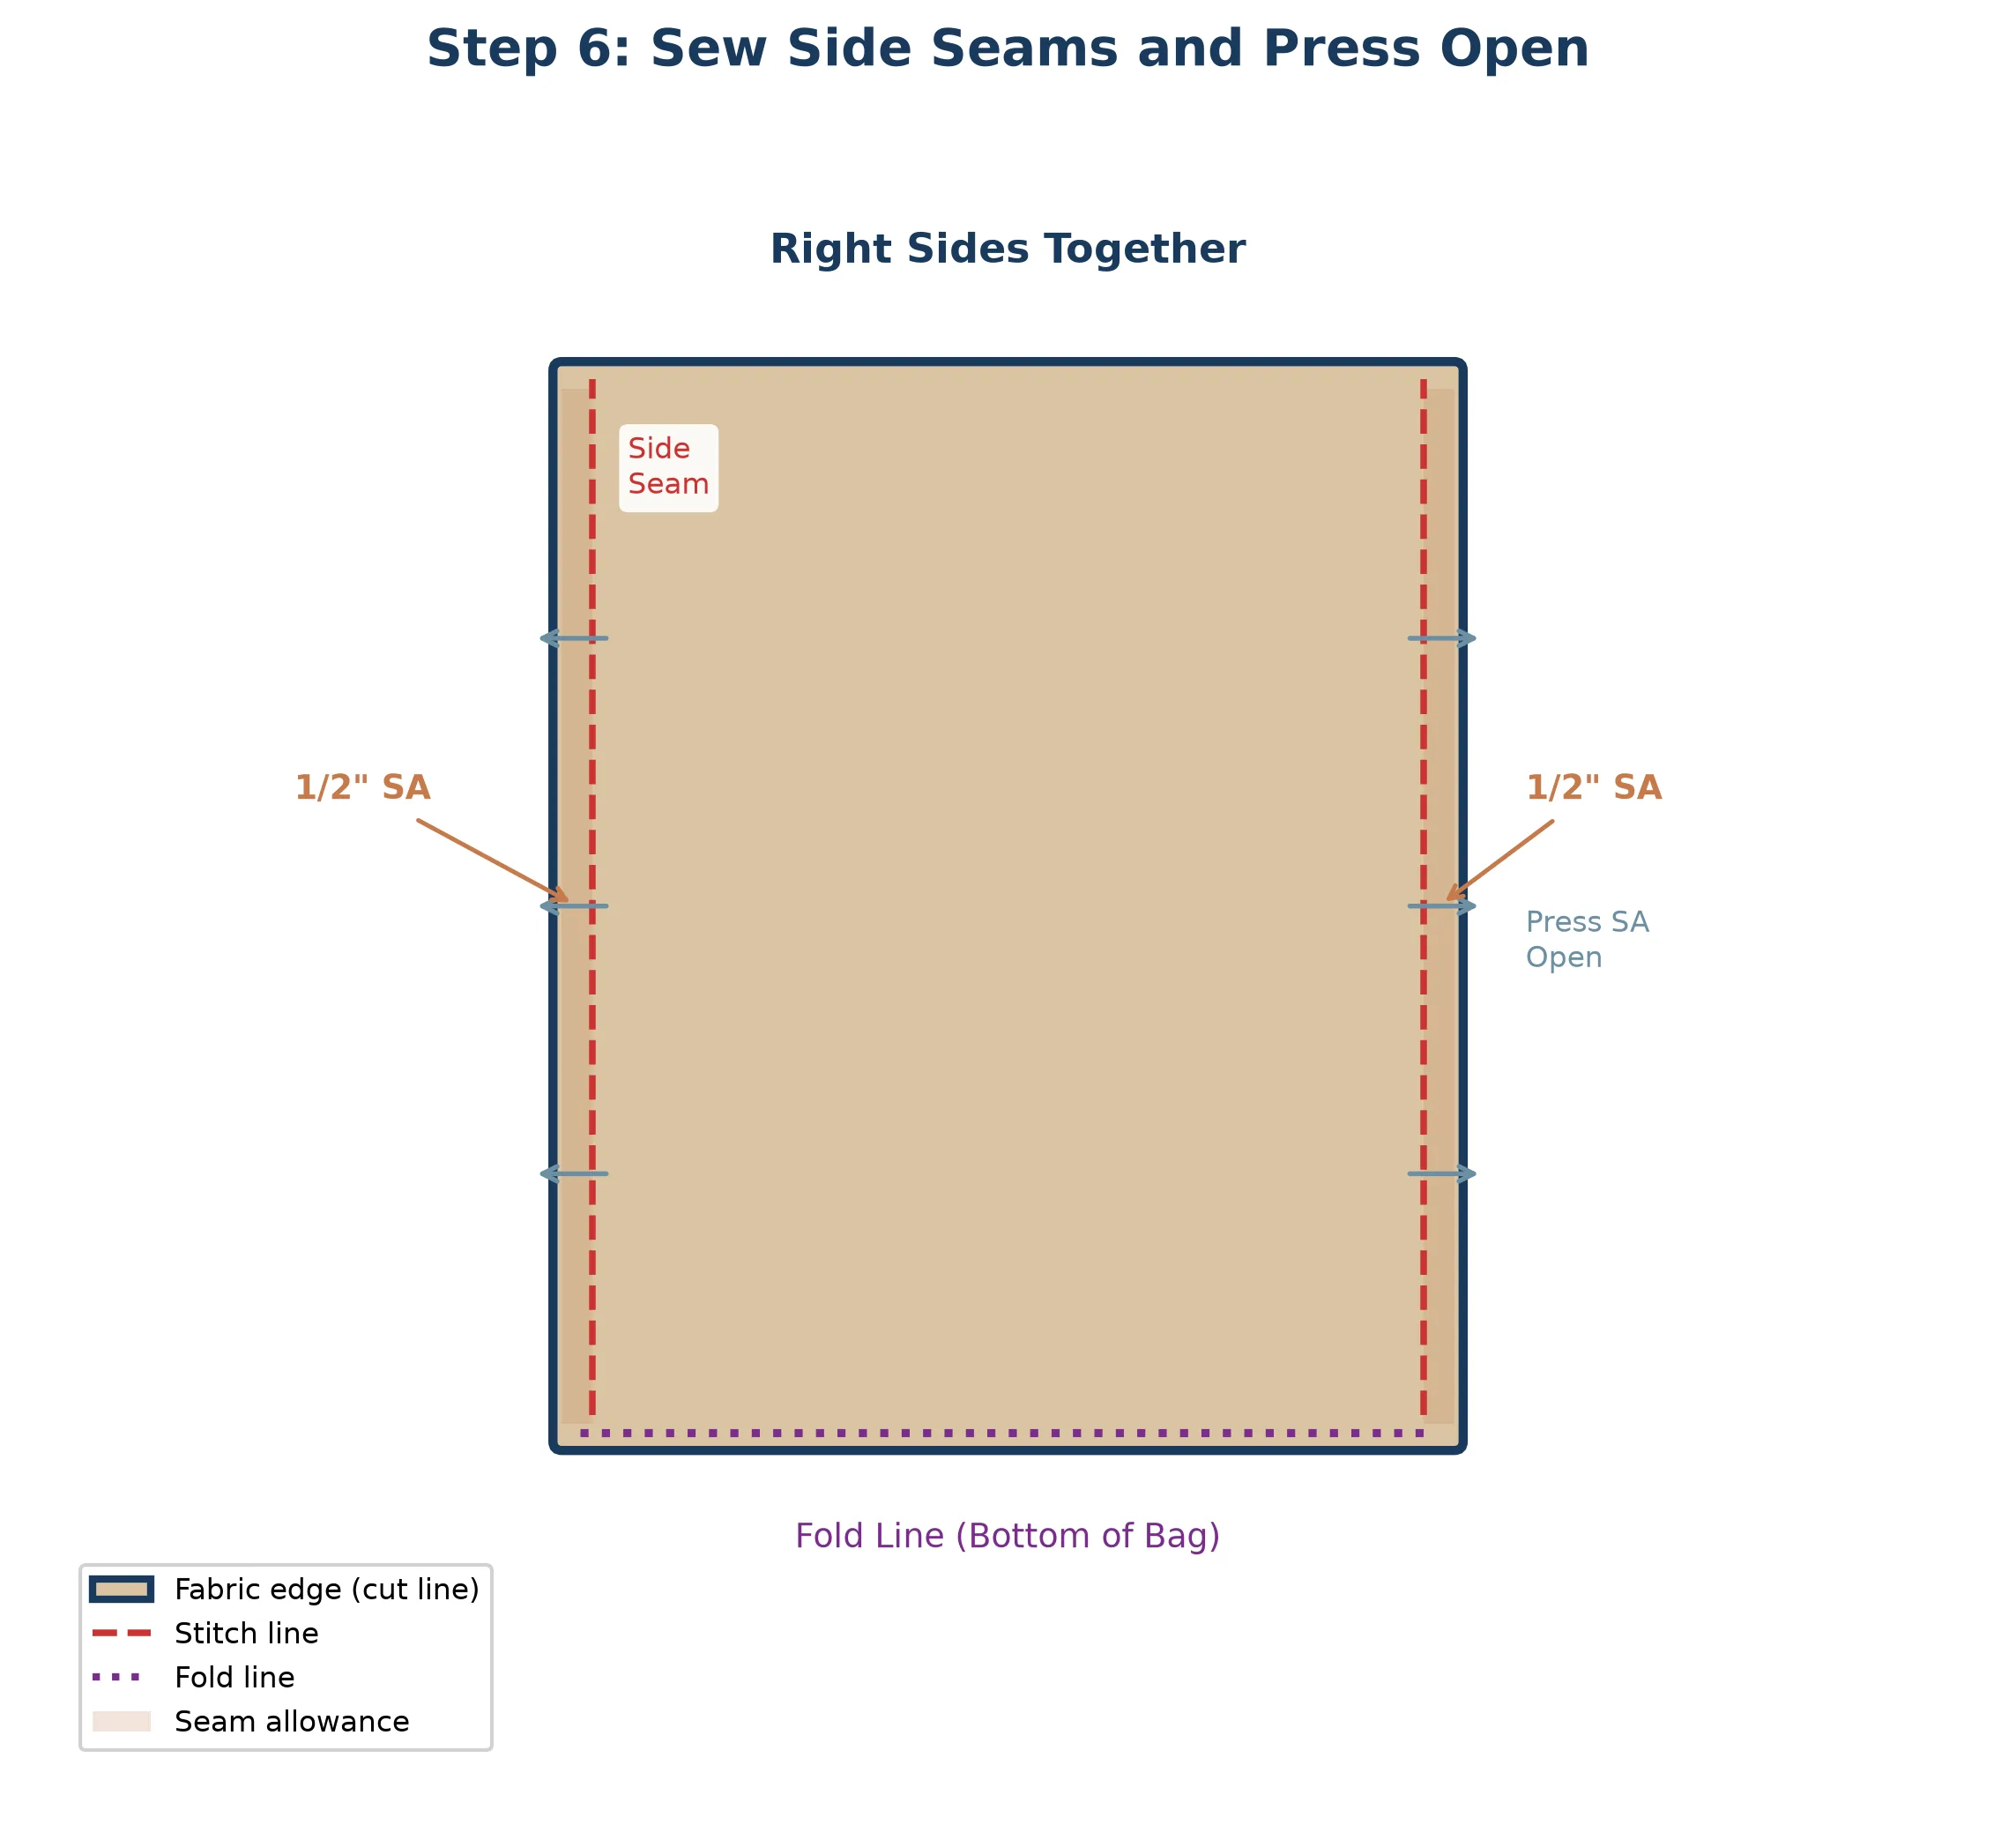
- Fold the body rectangle in half along the center mark, with right sides together. The right side (the pretty side) should be on the inside, and the wrong side facing out. The fold is at the bottom, and the two raw short edges are at the top.
- Pin along both side edges (the two open edges perpendicular to the fold). Place pins every 3 inches (7.5 cm).
- Sew both side seams at ½ inch (1.3 cm) seam allowance. Backstitch at the beginning and end of each seam.
- Press the seams open. Open up the seam allowance and press each side flat with your iron. This reduces bulk and makes the box corners easier in the next step.
You now have a fabric tube that is open at the top and folded at the bottom. It looks like a flat pillowcase — but we are about to give it a three-dimensional shape.
Create the Box Corners
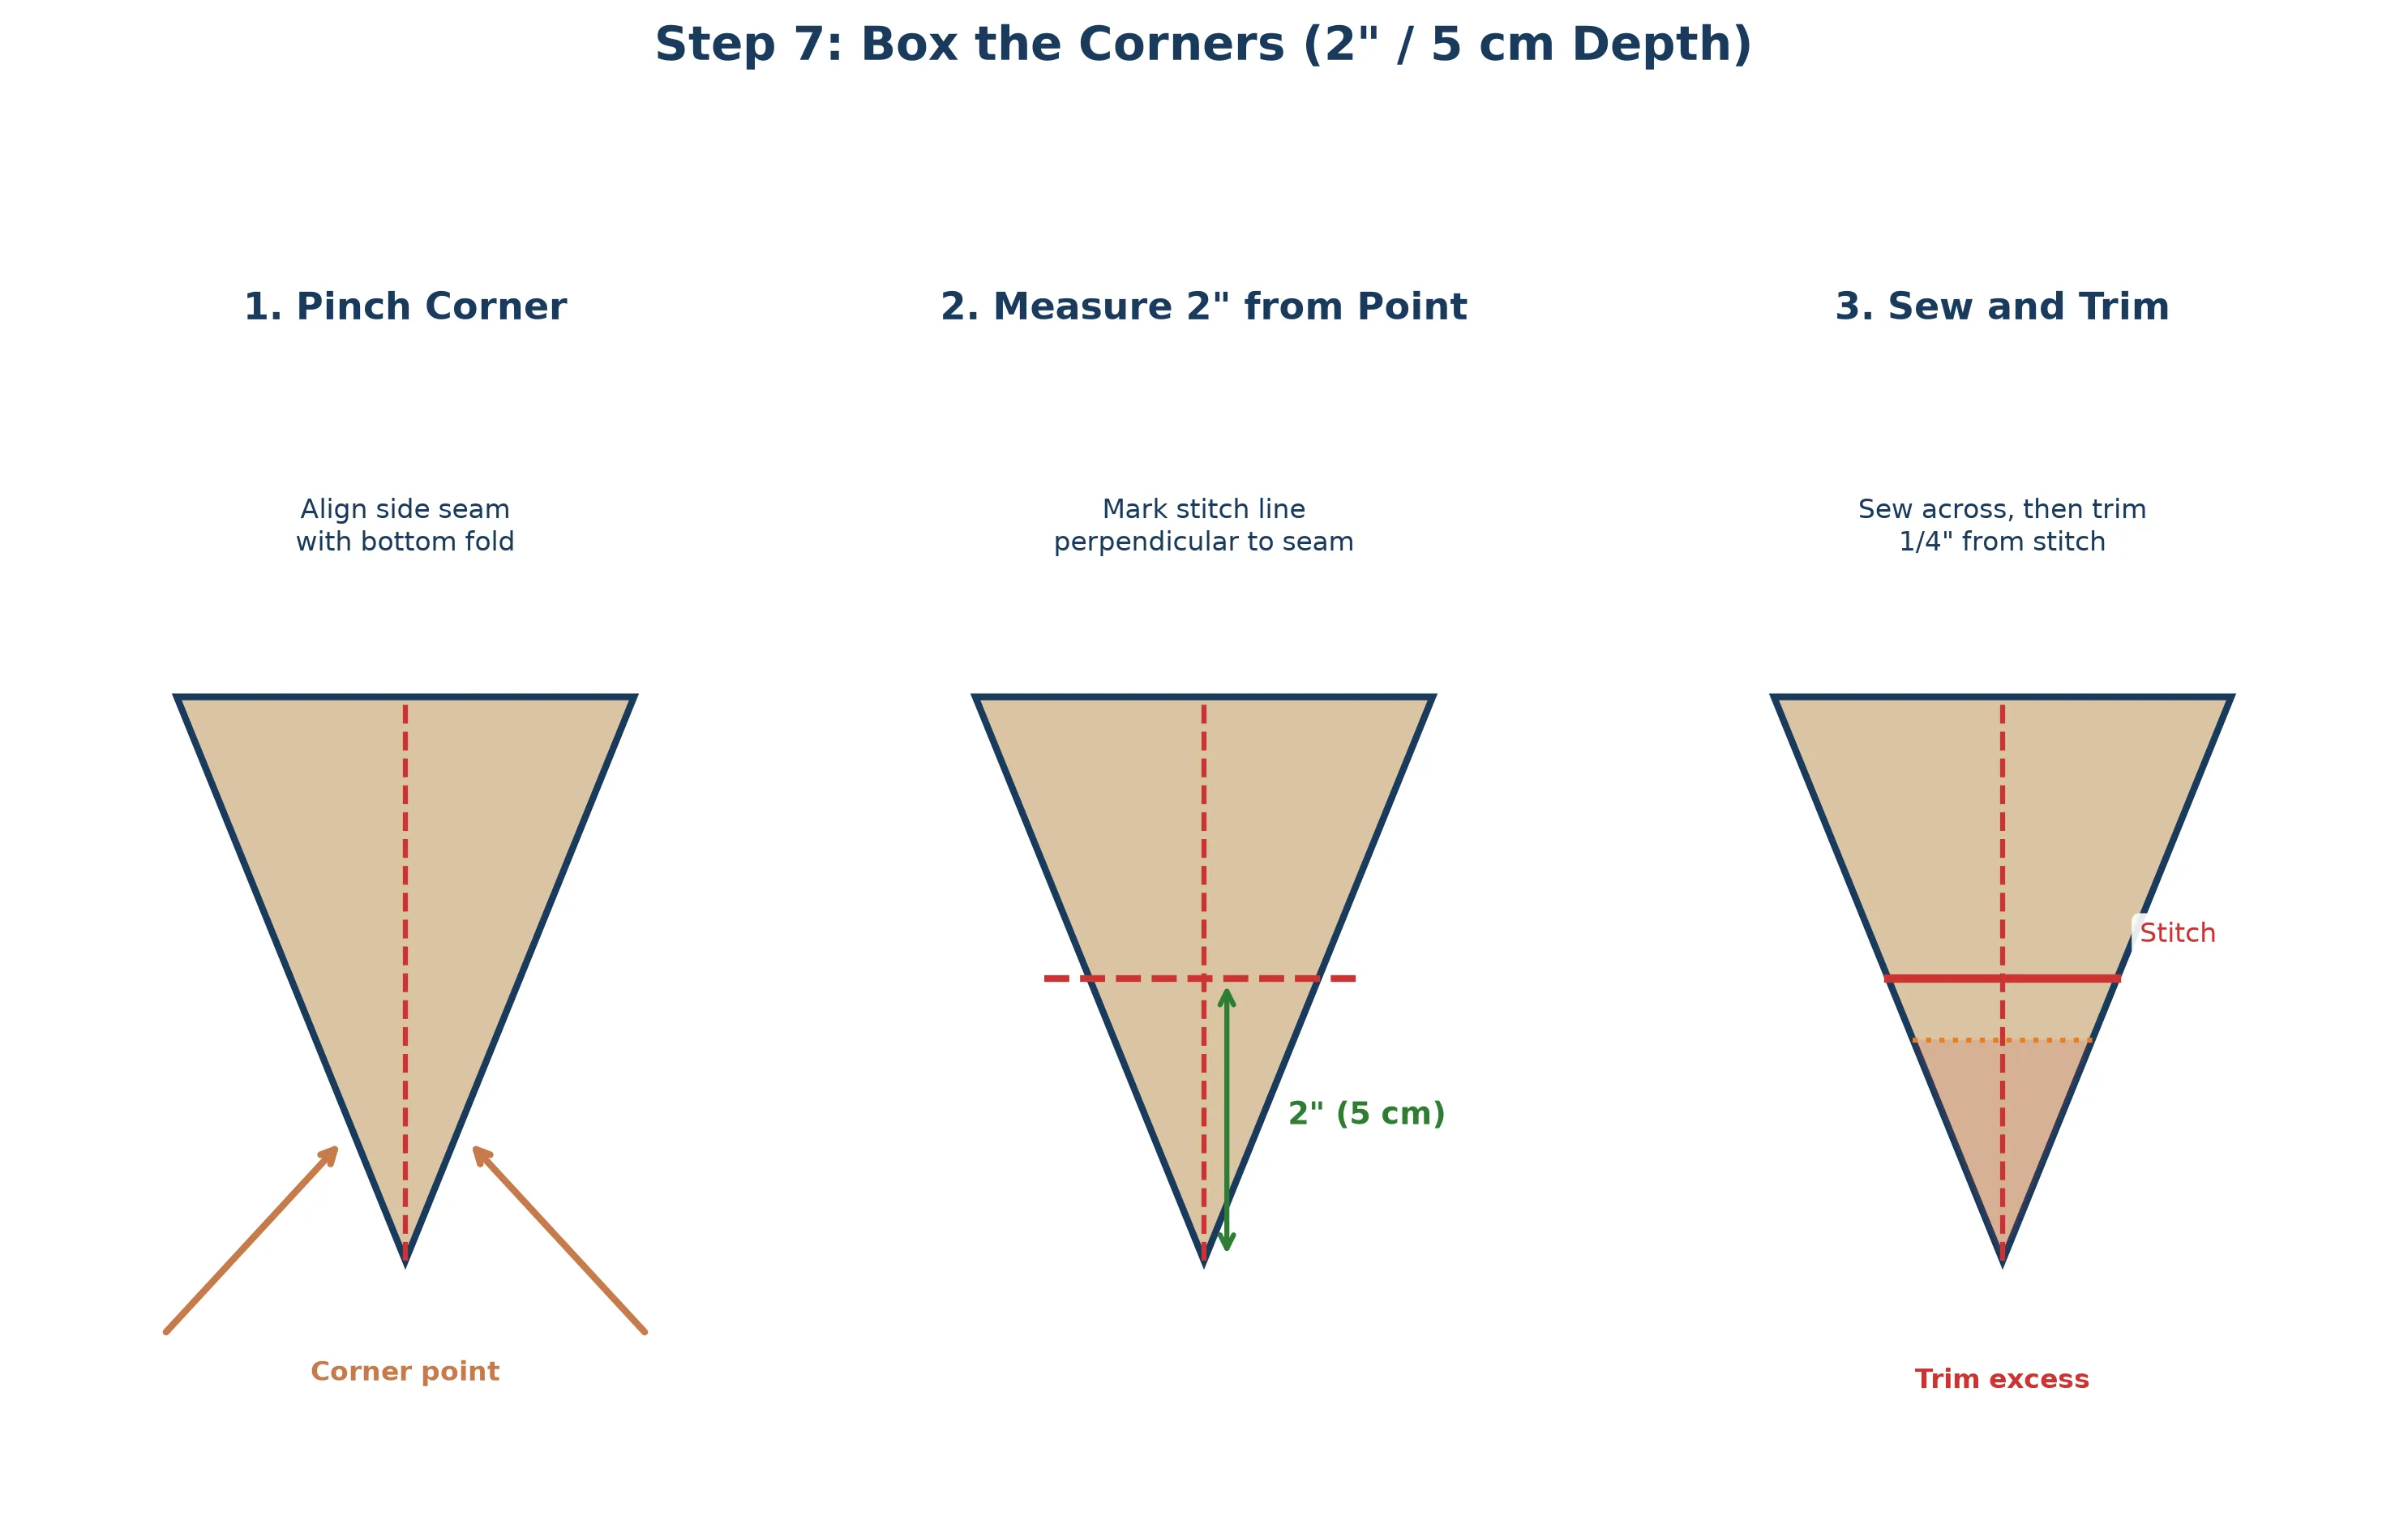
This is the step that transforms your flat tube into a real bag. It looks complicated in words but is incredibly simple in practice:
- Keep the bag inside out (wrong side facing out, seams visible).
- Pinch one bottom corner so the side seam aligns with the bottom fold, forming a triangle. The seam should run straight down the center of the triangle.
- Flatten the triangle on your table and smooth it out.
- Measure 2 inches (5 cm) from the point of the triangle and draw a line perpendicular to the seam using your fabric marking pencil. This line is your stitching line.
- Sew along the drawn line. Backstitch at both ends. This seam creates the flat bottom of the bag.
- Trim the excess triangle to ¼ inch (6 mm) from the stitching line.
- Repeat on the other bottom corner.
Hem the Top and Attach the Handles
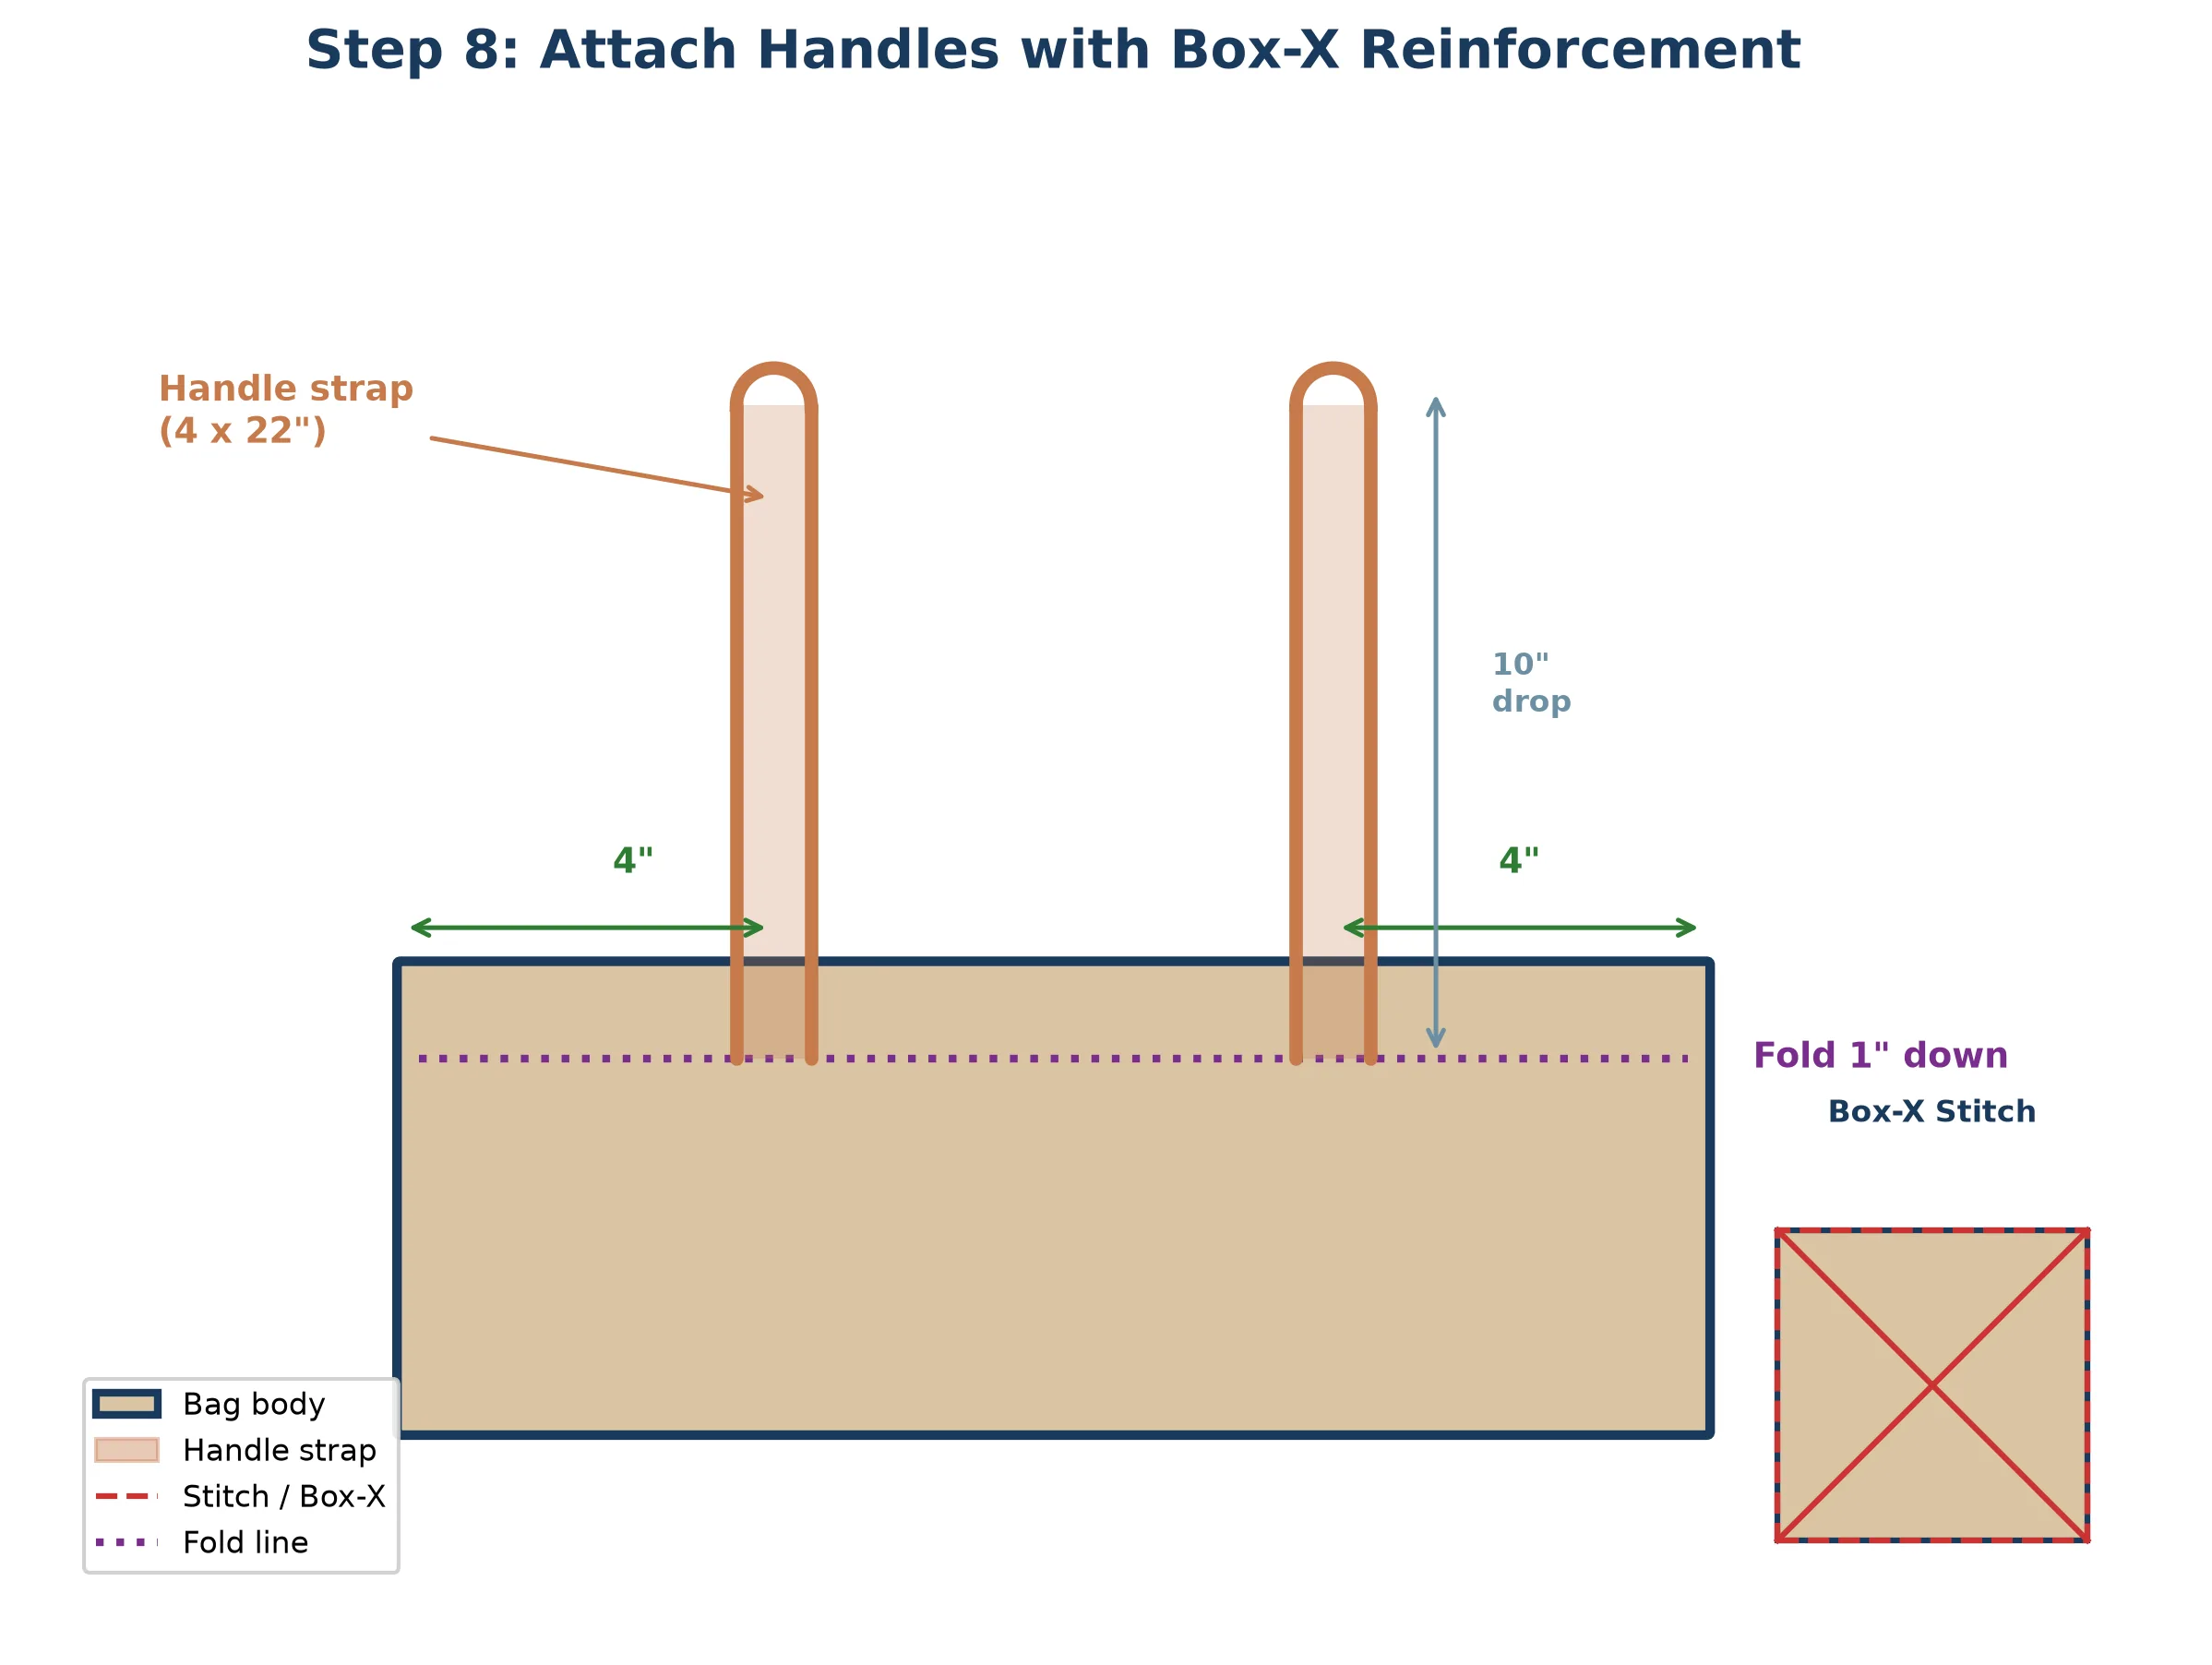
- Turn the bag right side out. Reach inside and pull the fabric through so the right side faces outward and the seams are hidden inside.
- Fold the top raw edge down ½ inch (1.3 cm) toward the inside (wrong side) and press.
- Fold it down another ½ inch (1.3 cm) so the raw edge is completely enclosed. Press and pin all the way around.
- Position the handles. Place each handle end between the two layers of the hem, approximately 4 inches (10 cm) from each side seam. The handle should point upward (toward the opening). Pin securely through all layers.
- Topstitch around the entire top edge, approximately ⅛ inch (3 mm) from the inner folded edge. Sew slowly over the handles — you will be going through several layers of fabric, so let the machine do the work and do not pull the fabric.
- Reinforce each handle with a box-X stitch: sew a small 1-inch (2.5 cm) square at each handle attachment point, then sew an X through the square. This distributes the weight and prevents the handles from ripping out when the bag is loaded.
Final Press and Admire
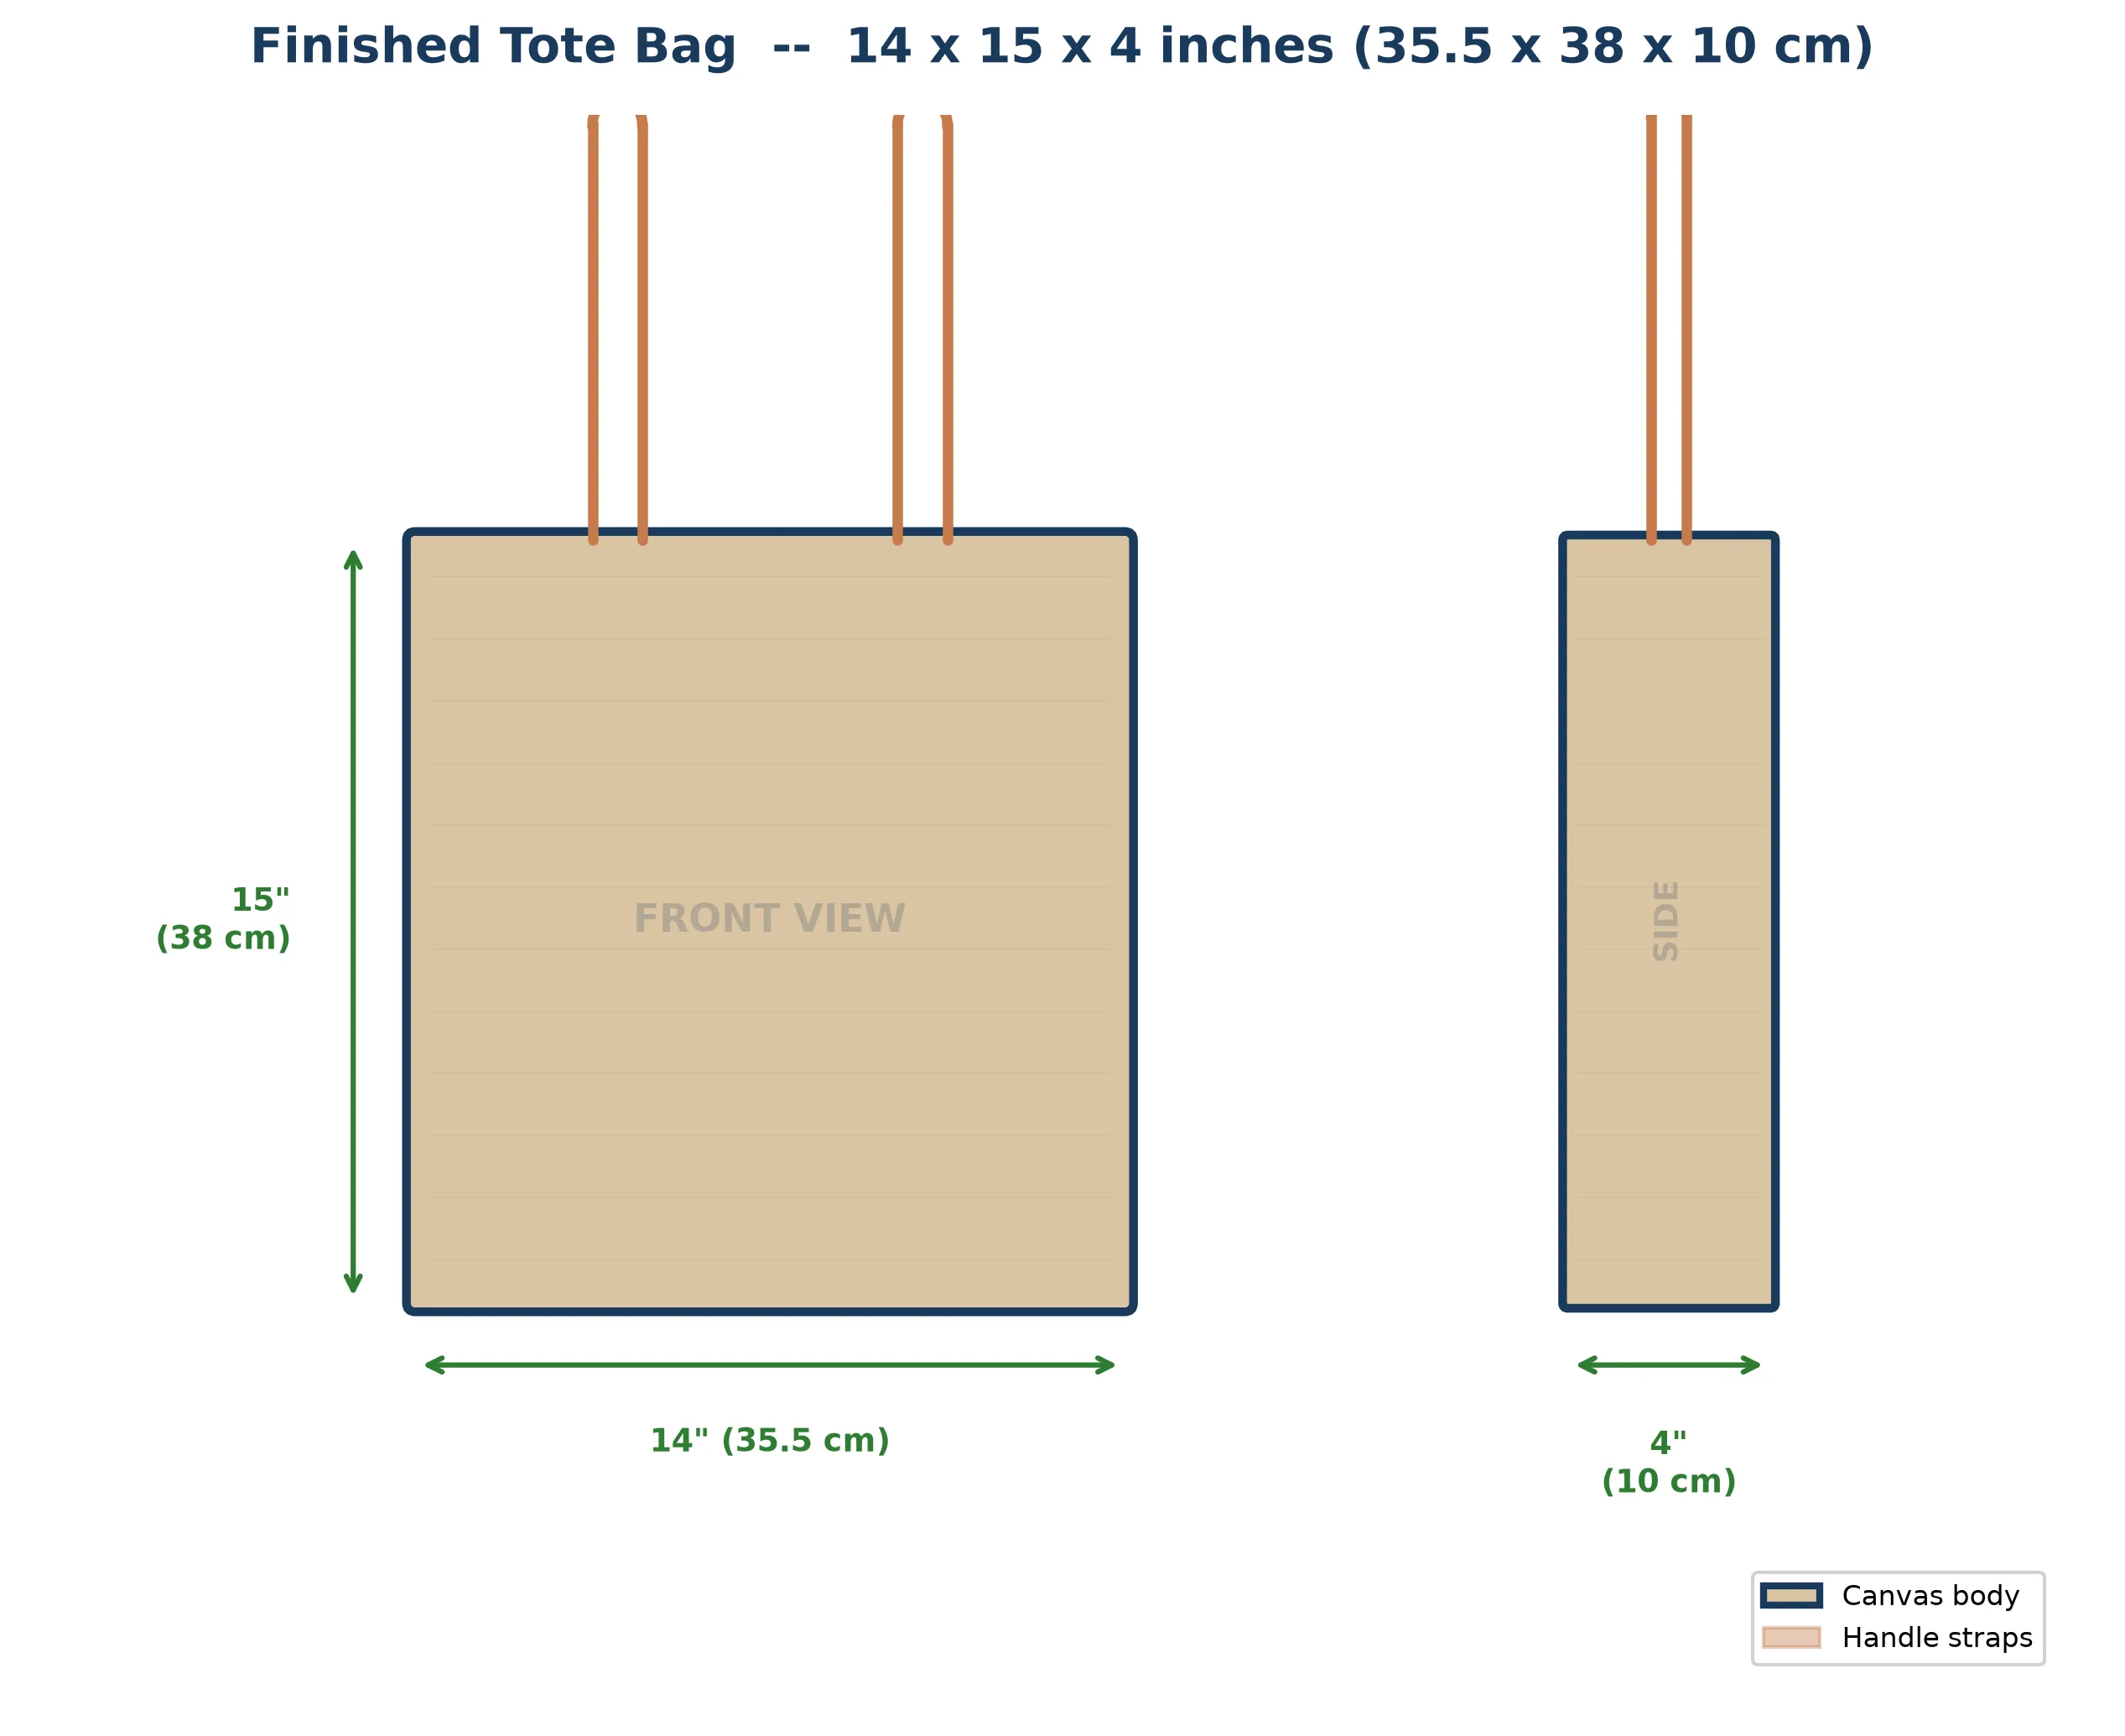
Give the entire bag a final press with your iron, paying special attention to the top hem and the box corners. Stand the bag upright on its flat bottom and step back. You just made a three-dimensional, functional bag from a flat piece of fabric.
Load it up with books, groceries, or your sewing supplies and take it for a test run. The box-X stitching on the handles will hold up to surprising amounts of weight — I regularly carry 15–20 pounds (7–9 kg) in bags made this way.
Variations & Ideas
Customize Your Tote
- Add a lining: Cut a second body rectangle from lightweight cotton, sew it identically, and insert it inside the outer bag before hemming. (You will learn full lining construction in the zippered pouch tutorial.)
- Add an interior pocket: Sew a small patch pocket to the lining before assembling. Perfect for your phone or keys.
- Contrast handles: Use a different fabric or webbing for the handles to add a pop of color.
- Add a magnetic snap: Install a magnetic snap closure at the top center for a more polished finish.
- Wider bottom: Increase the box corner measurement to 3 inches (7.5 cm) for a bag that stands more stably and holds bulkier items.
- Decorative stitching: Use a contrasting thread color for the topstitching to add a handmade, artisan look.
Troubleshooting Common Problems
The Bag Leans to One Side
This usually means your box corners are different sizes. Turn the bag inside out and measure both corners. If they are off, use a seam ripper to remove the smaller one and re-sew it to match the larger one. Always measure both corners from the exact same point before stitching.
The Handles Feel Flimsy
If your handles feel limp or floppy, you may have used fabric that is too lightweight. You have two options: (1) Topstitch a second row of stitching down the center of each handle for added stiffness, or (2) make new handles using a heavier fabric like canvas, even if the bag body is quilting cotton. You can also add a strip of fusible interfacing (an iron-on stiffening material) inside the handle before folding.
My Machine Struggles Over the Thick Handle Layers
When you sew over the handles, you are going through 6+ layers of fabric. Try these fixes:
- Slow down. Use your hand wheel to manually move the needle through the thick spot for the first few stitches.
- Switch to a heavier needle. A size 90/14 or 100/16 universal or jeans needle will punch through canvas layers more easily.
- Use a walking foot if your machine has one. This specialty presser foot feeds multiple layers evenly.
- Flatten the layers first by hammering the folded handle edges with a wooden mallet or the flat side of a meat tenderizer. This sounds strange, but it compresses the fibers and makes sewing much easier.
The Box Corners Look Pointy Instead of Flat
You probably did not align the side seam with the bottom fold precisely. The side seam needs to run exactly along the center of the triangle for the box corner to be symmetrical. Turn the bag inside out, remove the stitches with a seam ripper, re-align the seam with the fold, pin carefully, and re-sew.
The Top Hem Is Uneven
This happens when the fold is not pressed evenly all the way around. Press is everything. Turn the bag inside out, unfold the hem, re-press with careful measurements, re-fold, re-press, re-pin, and re-stitch. Taking extra time at the pressing stage saves rework later.
Frequently Asked Questions
How much fabric do I need to sew a tote bag?
You need approximately 1 yard (0.9 m) of 44/45-inch wide medium-weight cotton or canvas fabric. This is enough for the body rectangle (15 × 36 in) and two handle strips (4 × 22 in each) with a small amount left over for a test swatch or small accessories like a fabric scrunchie.
What are box corners on a tote bag?
Box corners are a sewing technique that gives a flat-bottomed, three-dimensional shape to a bag that would otherwise be completely flat. After sewing the side seams, you pinch each bottom corner into a triangle so the side seam aligns with the bottom fold. Then you sew a straight line across the triangle at the desired depth and trim the excess. The result is a rectangular base that lets the bag stand upright on its own. The same technique is used in the zippered pouch project later in this series.
What is the best fabric for a beginner tote bag?
Medium-weight quilting cotton, cotton canvas (7–10 oz), or cotton duck are ideal for a beginner tote bag. They are sturdy enough to hold shape and carry weight, but easy to cut and sew on a standard home sewing machine. Avoid very heavy upholstery fabrics (which can break needles) and very lightweight fabrics like voile or lawn (which will not hold the bag's shape).
How do I reinforce tote bag handles?
Reinforce tote bag handles with a box-X stitch. At each point where a handle meets the bag body, sew a small square approximately 1 inch (2.5 cm) on each side, then sew an X diagonally through the square. This creates six layers of stitching that distribute weight evenly across a wider area, preventing the handles from pulling out when the bag is heavily loaded. Some sewists add a second row of topstitching down the center of each handle for additional strength.
Can I add a lining to this tote bag?
Yes! Cut a second body rectangle from a lighter-weight cotton fabric and sew it identically to the outer bag (including box corners). Slip the lining inside the outer bag with wrong sides together, fold both raw top edges inward, and topstitch around the top edge to join them. This hides all raw seam allowances inside and gives the bag a polished interior. For your first tote, I recommend making the unlined version to master the basic construction, then adding a lining on your second attempt.
How do I wash a handmade tote bag?
Machine wash your cotton or canvas tote bag on a cool or warm gentle cycle, then air dry flat or tumble dry on low. Cotton canvas holds up very well to regular washing. If you pre-washed your fabric before sewing (as recommended in this tutorial), shrinkage should be minimal. Avoid washing with heavy items like jeans, which can distort the bag's shape. Iron while slightly damp if you want crisp, smooth fabric.
Series Progress
First Stitches: 10 Simple Sewing Projects for Absolute Beginners
Post 2 of 10 — Simple Tote Bag
What's Next in This Series
You have now built a flat project (the pillowcase) and a three-dimensional project (this tote bag). In the next tutorial, we are going to slow down and focus on precision. You will sew a set of cloth napkins with mitered corners — a technique that produces crisp, professional-looking corners on any hemmed project. It is a detail that separates a "homemade" look from a "handmade with skill" look, and you will use it on cushion covers, tablecloths, curtains, and garments for the rest of your sewing life.
Continue Your Sewing Journey
Explore Related Series
You started with a flat rectangle and a couple of strips, and you turned them into a bag that stands on its own, carries real weight, and looks like something from a craft market. That is remarkable for your second sewing project.
Think about what you just learned: you made handles from scratch using a folding-and-pressing technique. You sewed a tube and then gave it a three-dimensional shape with box corners. You learned topstitching for function and beauty, and reinforcement stitching to make something genuinely strong. Every one of these skills will show up again in future projects — the zippered pouch, the lined drawstring bag, and far beyond this series into professional bag-making.
In my experience, the tote bag is the project that makes beginners realize: I can actually do this. You made something practical, durable, and genuinely useful. Every time you grab this bag on your way out the door, you will remember that you made it yourself. And that feeling never gets old.
When you are ready, head to the next tutorial: Cloth Napkins with Mitered Corners. We will trade bold construction for quiet precision — and learn a finishing technique that will make everything you sew look more polished.
Happy sewing!