Sew a Fabric Storage Basket — Interfaced Box Basket Pattern
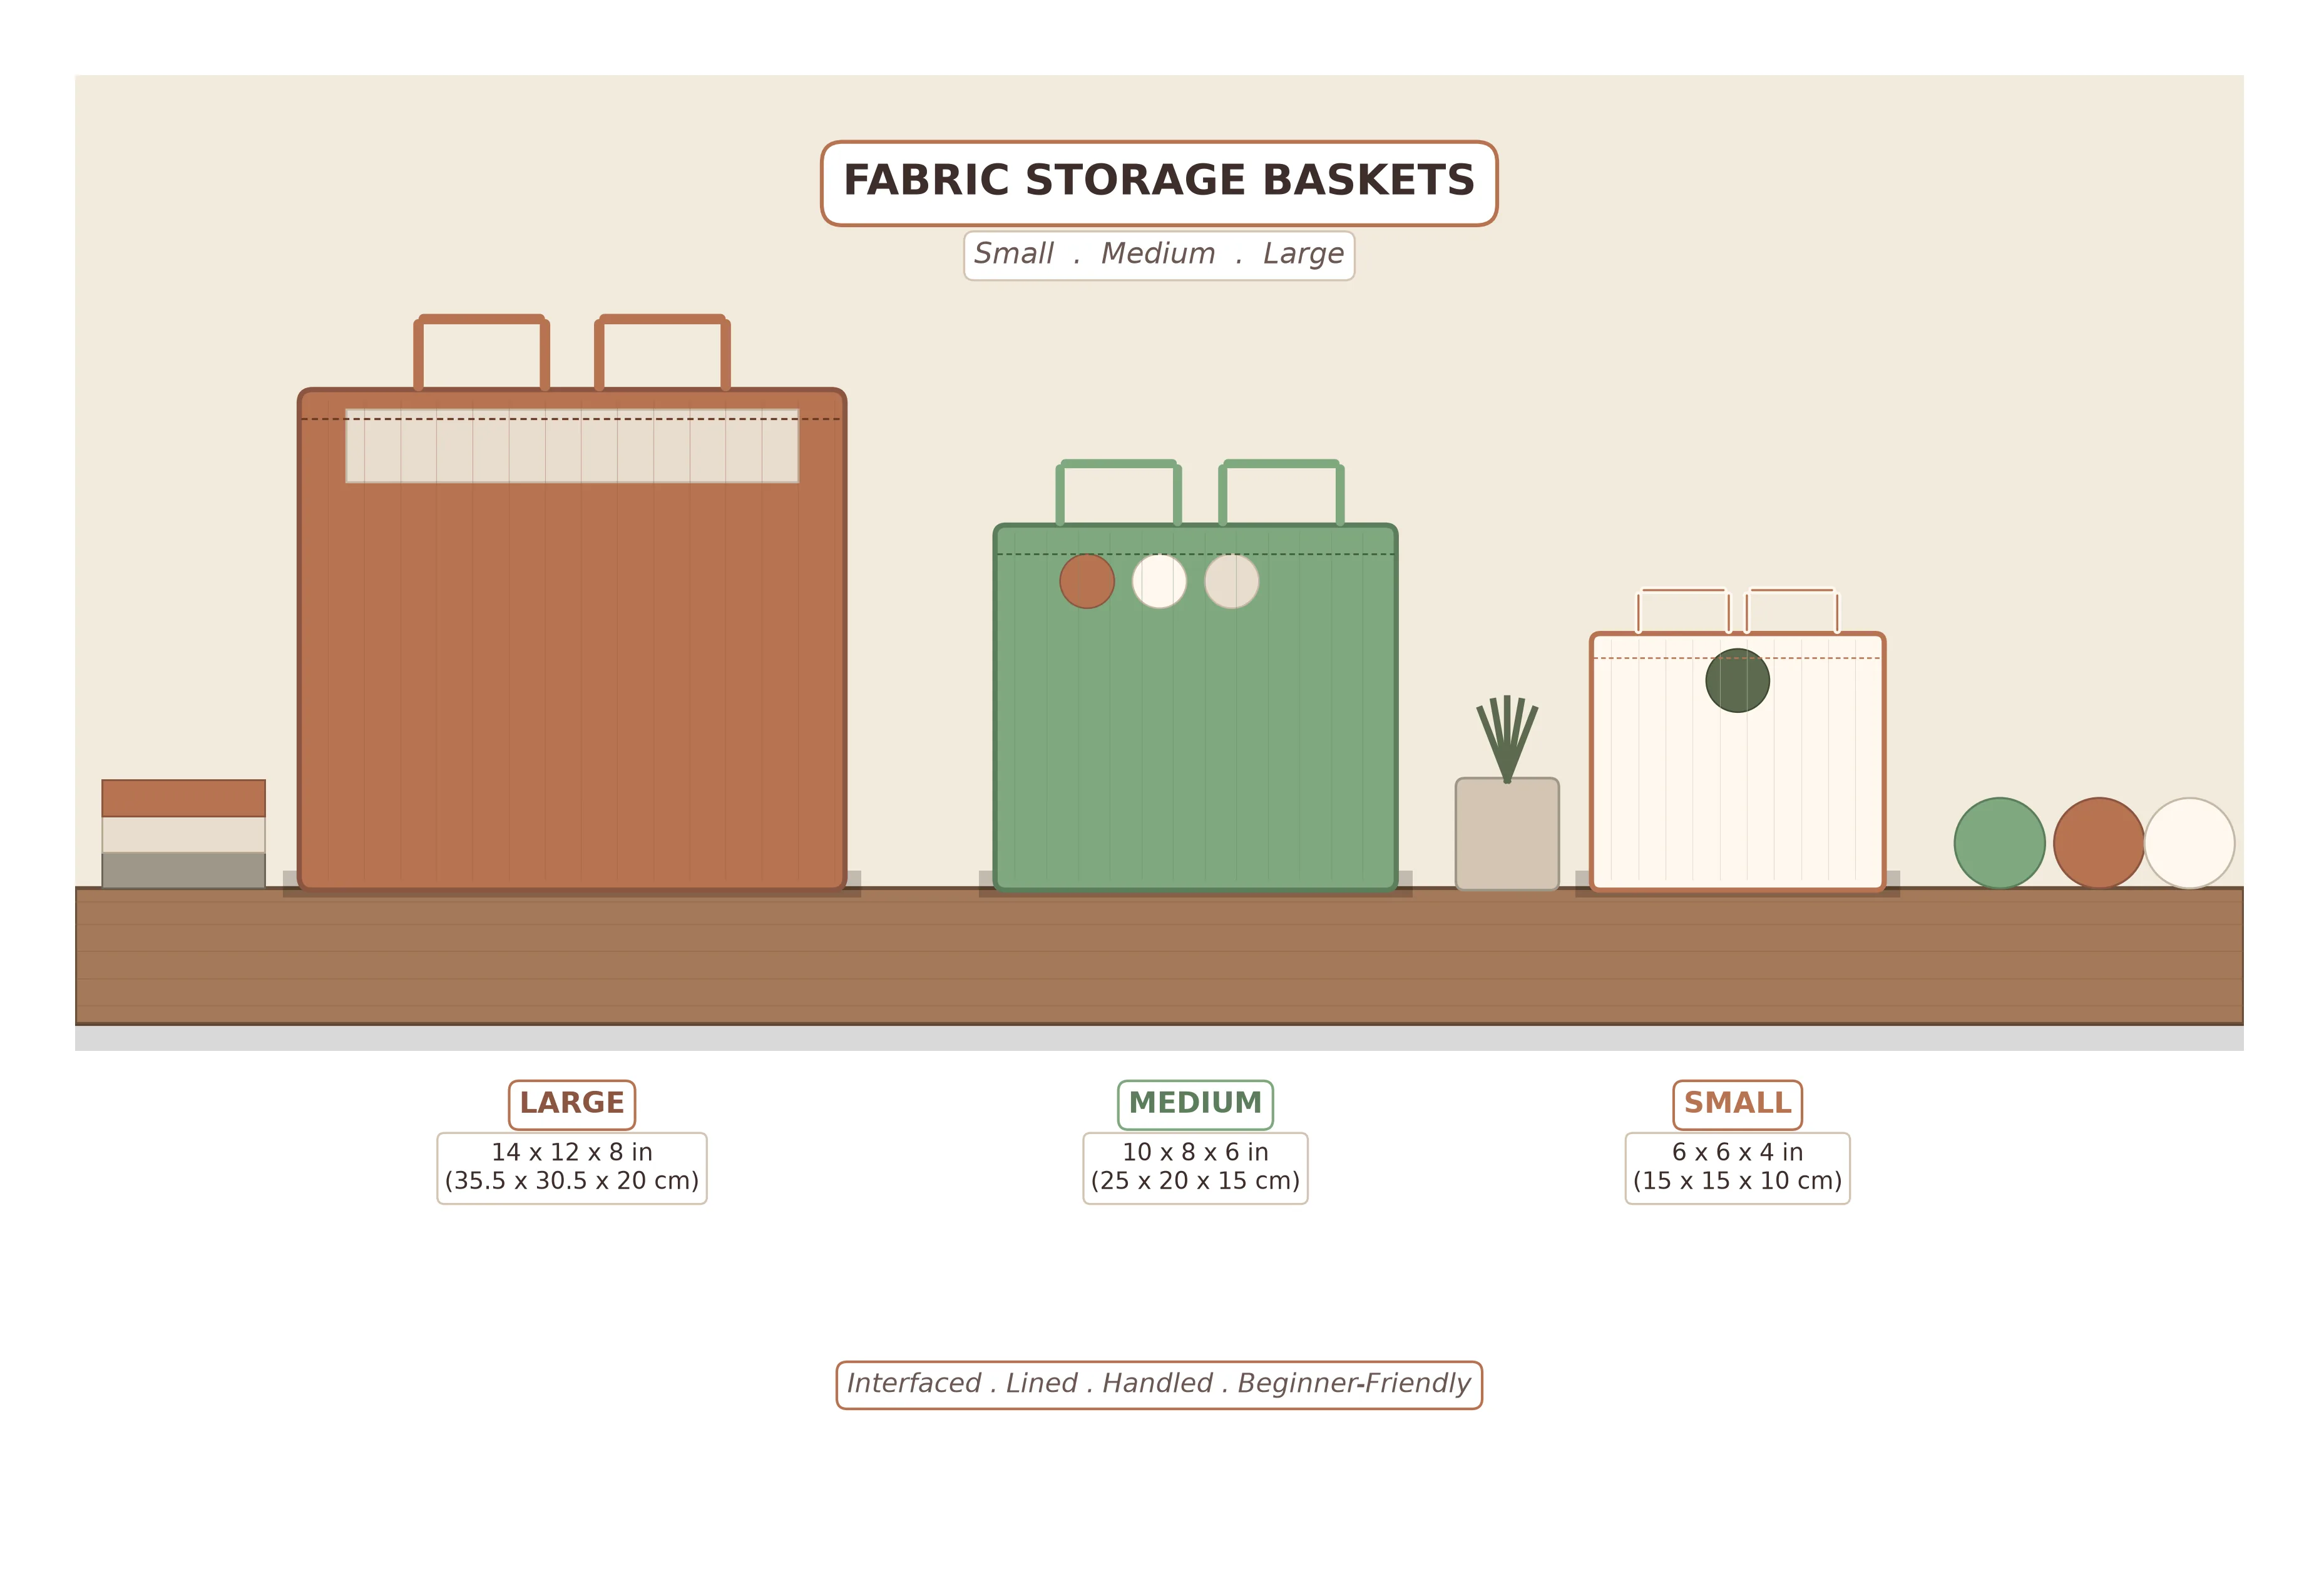
A structured, free-standing basket with handles — in three nestable sizes, built from the same simple method.
Why Make Your Own Fabric Storage Basket
If you have ever paused in the organizing aisle at the home store and thought, I could definitely sew that for less — you were right. A fabric storage basket pattern is one of the most useful things a beginner sewist can learn, because the technique scales. The same method makes a tiny bedside catchall, a medium bookshelf organizer, or a large laundry bin. Once you understand how interfacing adds structure and how boxing corners creates depth, you can design a basket for any purpose, in any fabric, in any size.
In this tutorial we'll make a DIY fabric storage basket with handles, a fully lined interior, and a crisp topstitched rim. The construction uses two beginner-friendly techniques that will serve you well in bags, pouches, and dozens of other projects: fusible interfacing (iron-on stiffening that transforms limp fabric into firm, body-having fabric) and boxed corners (a quick pinch-and-stitch move that turns a flat pouch into a three-dimensional container).
What makes this tutorial different from the hundreds of basket patterns online is that we treat the basket as a system, not a single project. The dimensions chart below gives you three sizes that nest neatly inside one another, all built with the same construction order. Learn it once, and you can make the whole set.
The hardest part of a fabric basket is deciding what color to make it. The sewing itself is just straight seams, a few folds, and a hot iron.
Three Sizes to Choose From
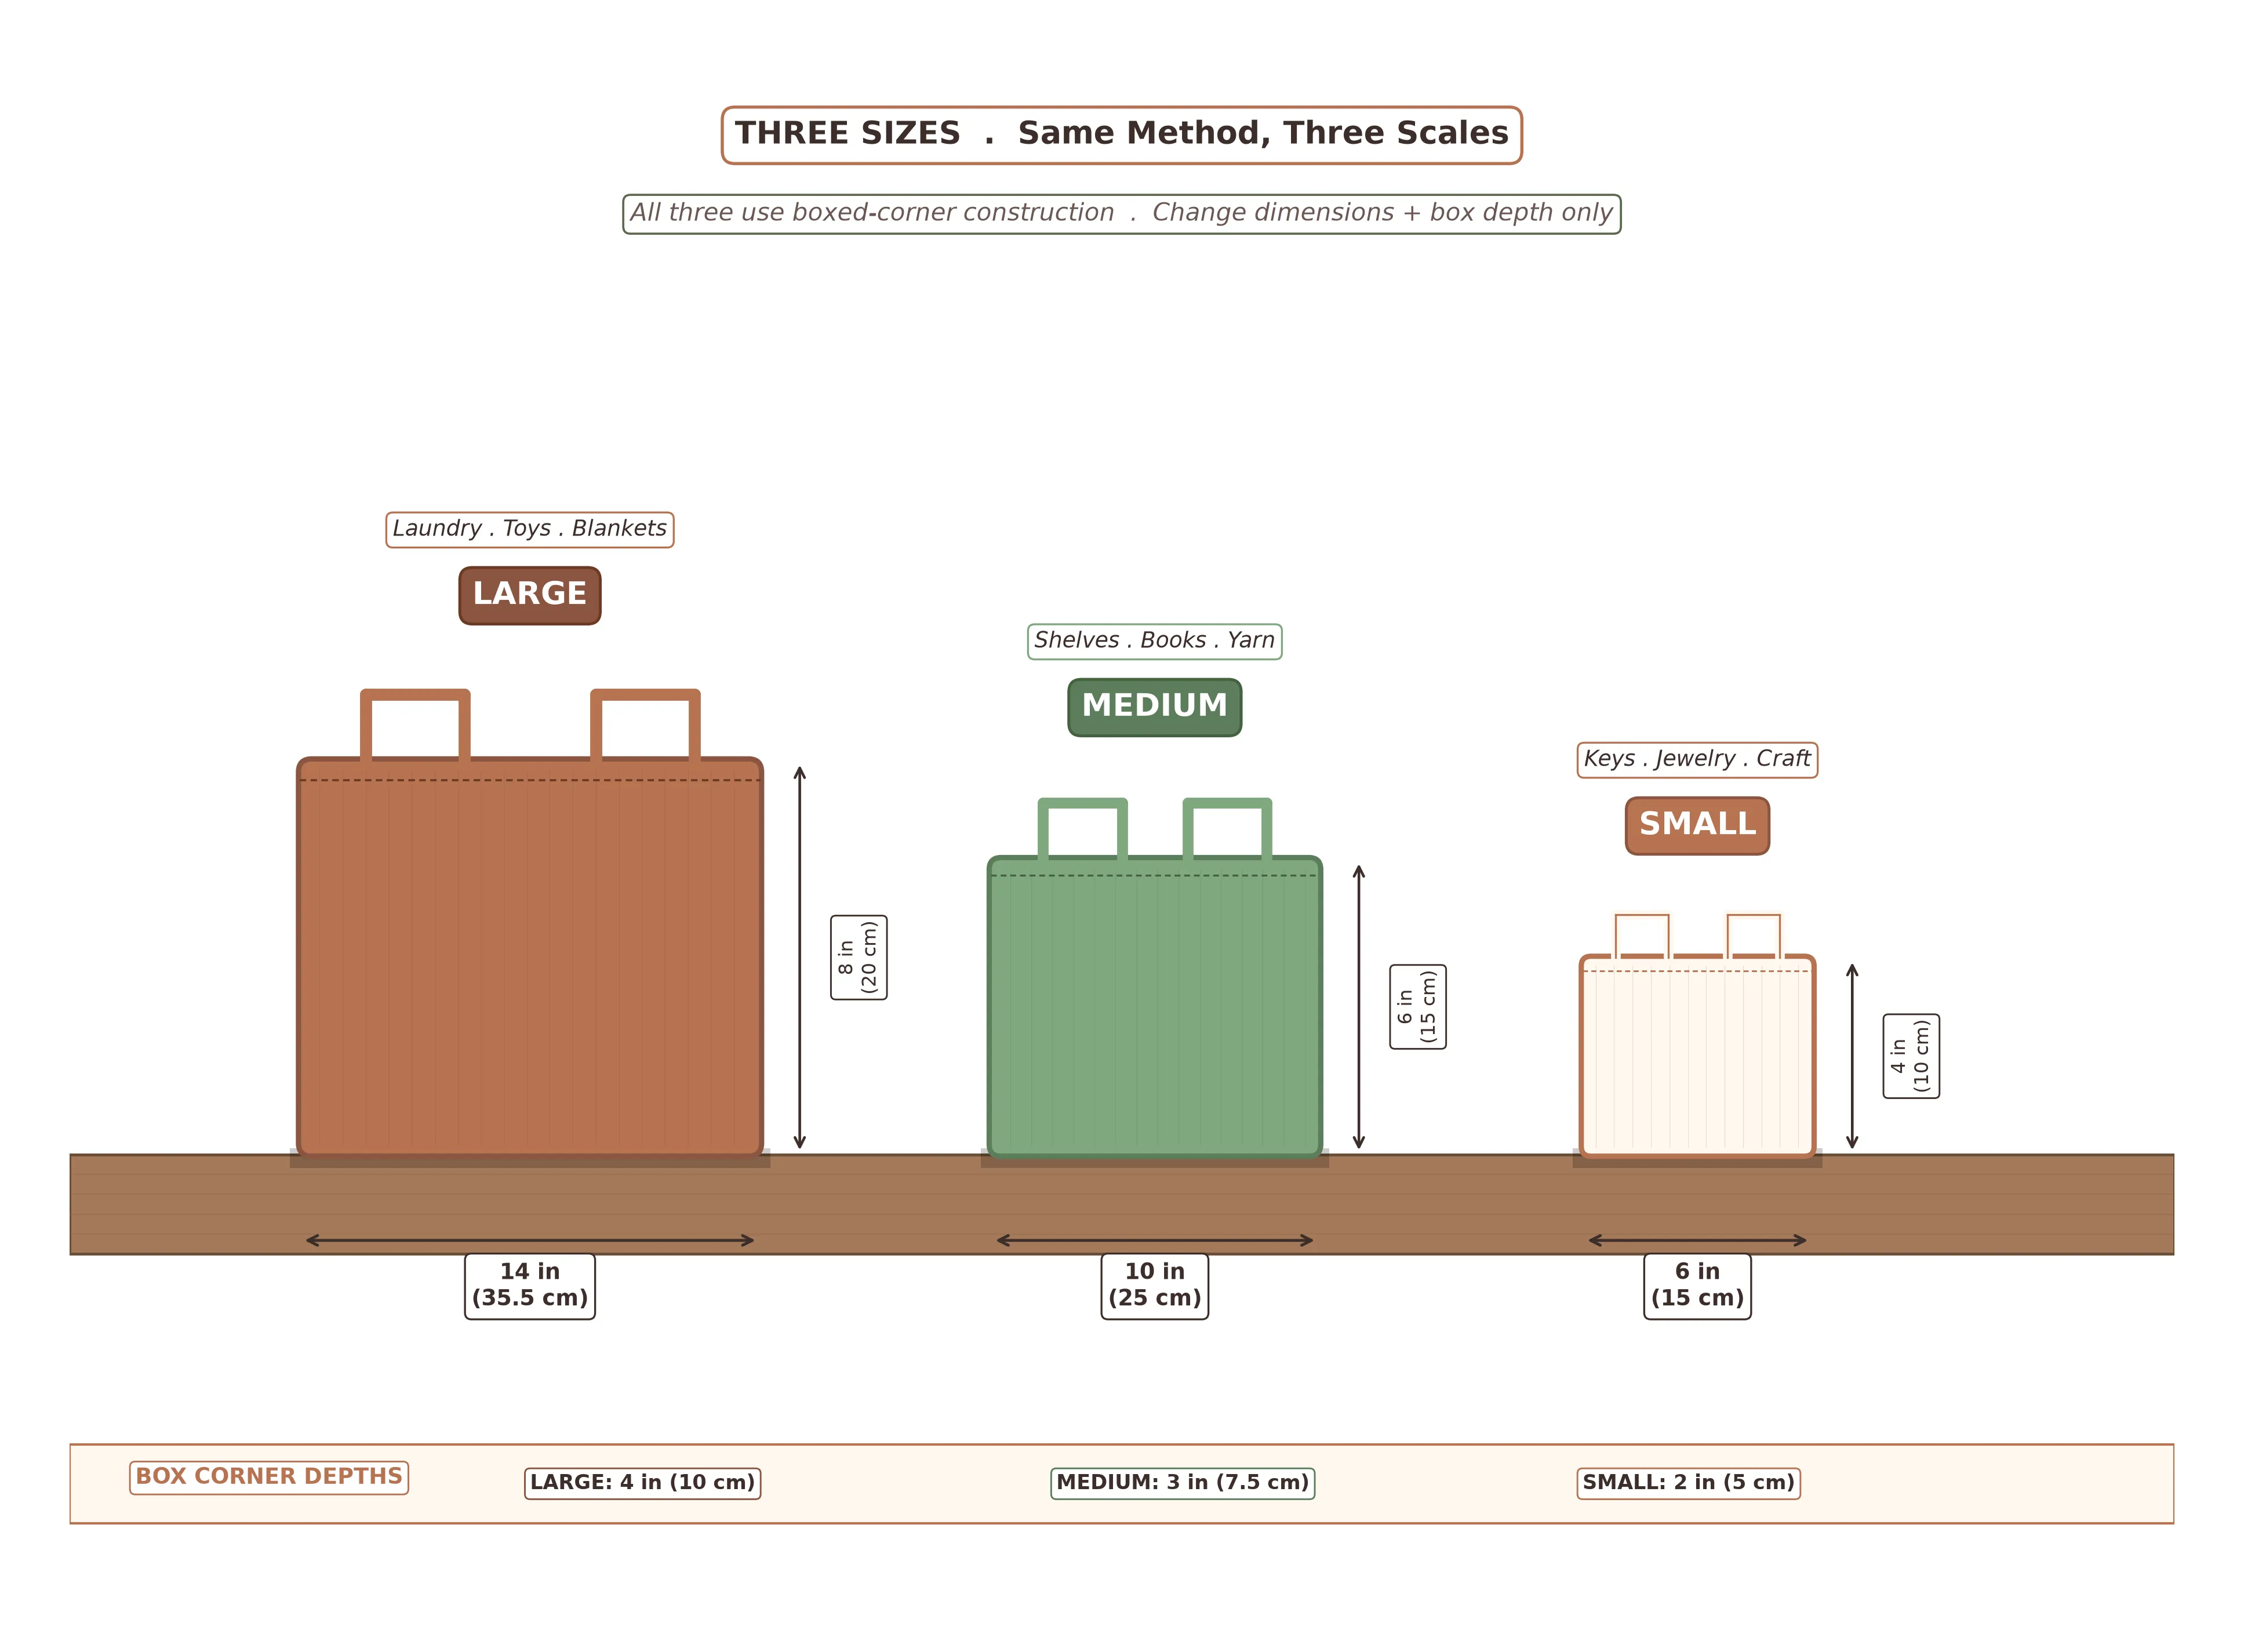
Before cutting, decide which size you want to make. All three use the same construction steps — only the dimensions change. Finished sizes below assume a 1/2 in (1.3 cm) seam allowance.
SMALL — Catchall
Finished:
6 × 6 × 4 in
(15 × 15 × 10 cm)
Boxed corner: 2 in / 5 cm
MEDIUM — Shelf
Finished:
10 × 8 × 6 in
(25 × 20 × 15 cm)
Boxed corner: 3 in / 7.5 cm
LARGE — Laundry
Finished:
14 × 12 × 8 in
(35.5 × 30.5 × 20 cm)
Boxed corner: 4 in / 10 cm
Each size uses a flat rectangle for the main body (which becomes the two sides, front, and back of the basket), a separate base rectangle, and two handle strips. The medium size is the easiest to start with — it uses manageable fabric widths and shows off the technique at a satisfying scale.
Materials & Tools
What You'll Need
Fabric & Interfacing
Tools
Choosing the Right Interfacing
Interfacing is the single most important material choice you'll make. The right weight gives your basket a crisp, upright structure that stays standing when empty. The wrong weight leaves you with a sad, slumping pouch. Here's how the common options compare for this project:
| Interfacing | Best For | Feel | Notes |
|---|---|---|---|
| Pellon 809 Decor-Bond | Small & medium baskets | Firm, paper-like | My default choice — easy to fuse, holds shape well. |
| Pellon 71F Peltex (sew-in or fusible) | Large, free-standing bins | Very stiff, board-like | Can be hard to sew through; use a jeans needle. |
| ByAnnie Soft & Stable | Baskets you want to feel plush | Spongy, foam-like | Sew-in only; adds thickness. Pricey but gorgeous. |
| Pellon SF101 Shape-Flex | Lining only | Light, drapey | Too soft for the exterior alone; use in addition to a firm one. |
I like to interface both the exterior fabric and the lining with a medium-weight fusible. Two medium layers give better structure than one heavy layer and are far easier to sew through at the seams and boxed corners.
Cutting Layout
For the medium size, cut the following from fabric that is at least 44 in (112 cm) wide:
- Exterior main body: one rectangle 33 in × 13 in (84 × 33 cm)
- Exterior base: one rectangle 11 in × 9 in (28 × 23 cm)
- Lining main body: one rectangle 33 in × 13 in (84 × 33 cm)
- Lining base: one rectangle 11 in × 9 in (28 × 23 cm)
- Handles: two strips 14 in × 4 in (35.5 × 10 cm)
- Interfacing: cut the same main-body and base pieces, but trim 1/2 in (1.3 cm) off each edge so the interfacing sits inside the seam allowance (less bulk in the seams)
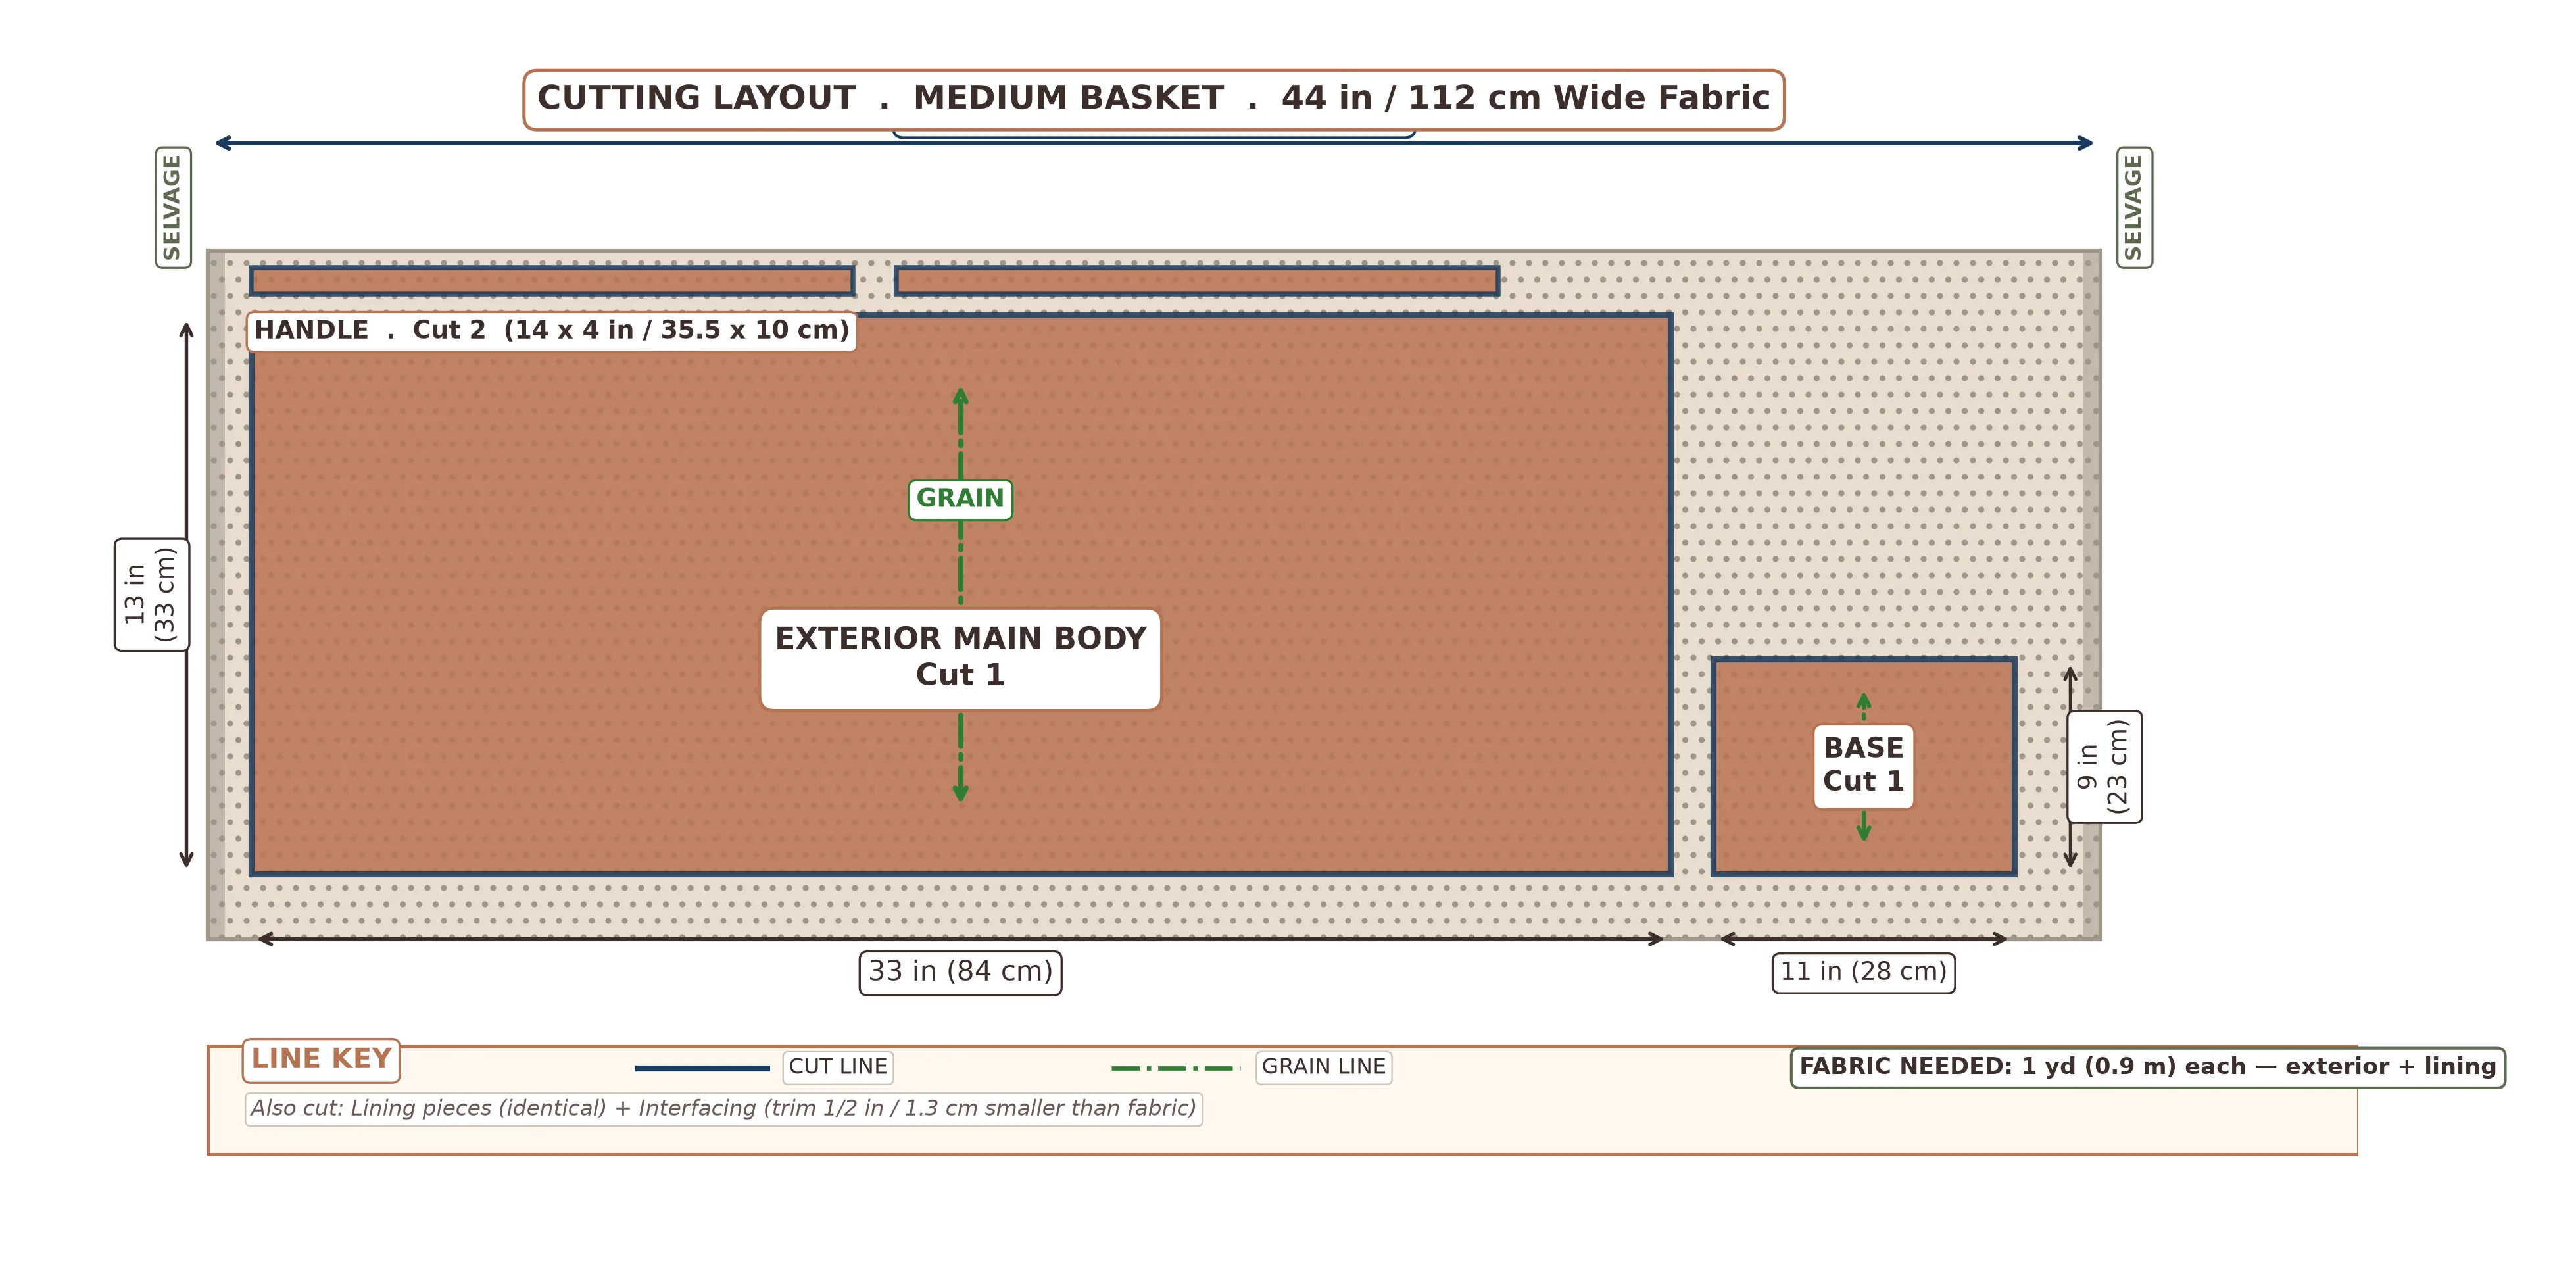
Don't skip trimming the interfacing 1/2 in (1.3 cm) smaller than your fabric pieces. If the fusible extends into the seam allowances, you'll end up with thick, lumpy seams that are hard to turn and refuse to lie flat. The trimmed-back interfacing trick is used by professional bag makers for exactly this reason.
Pattern Pieces
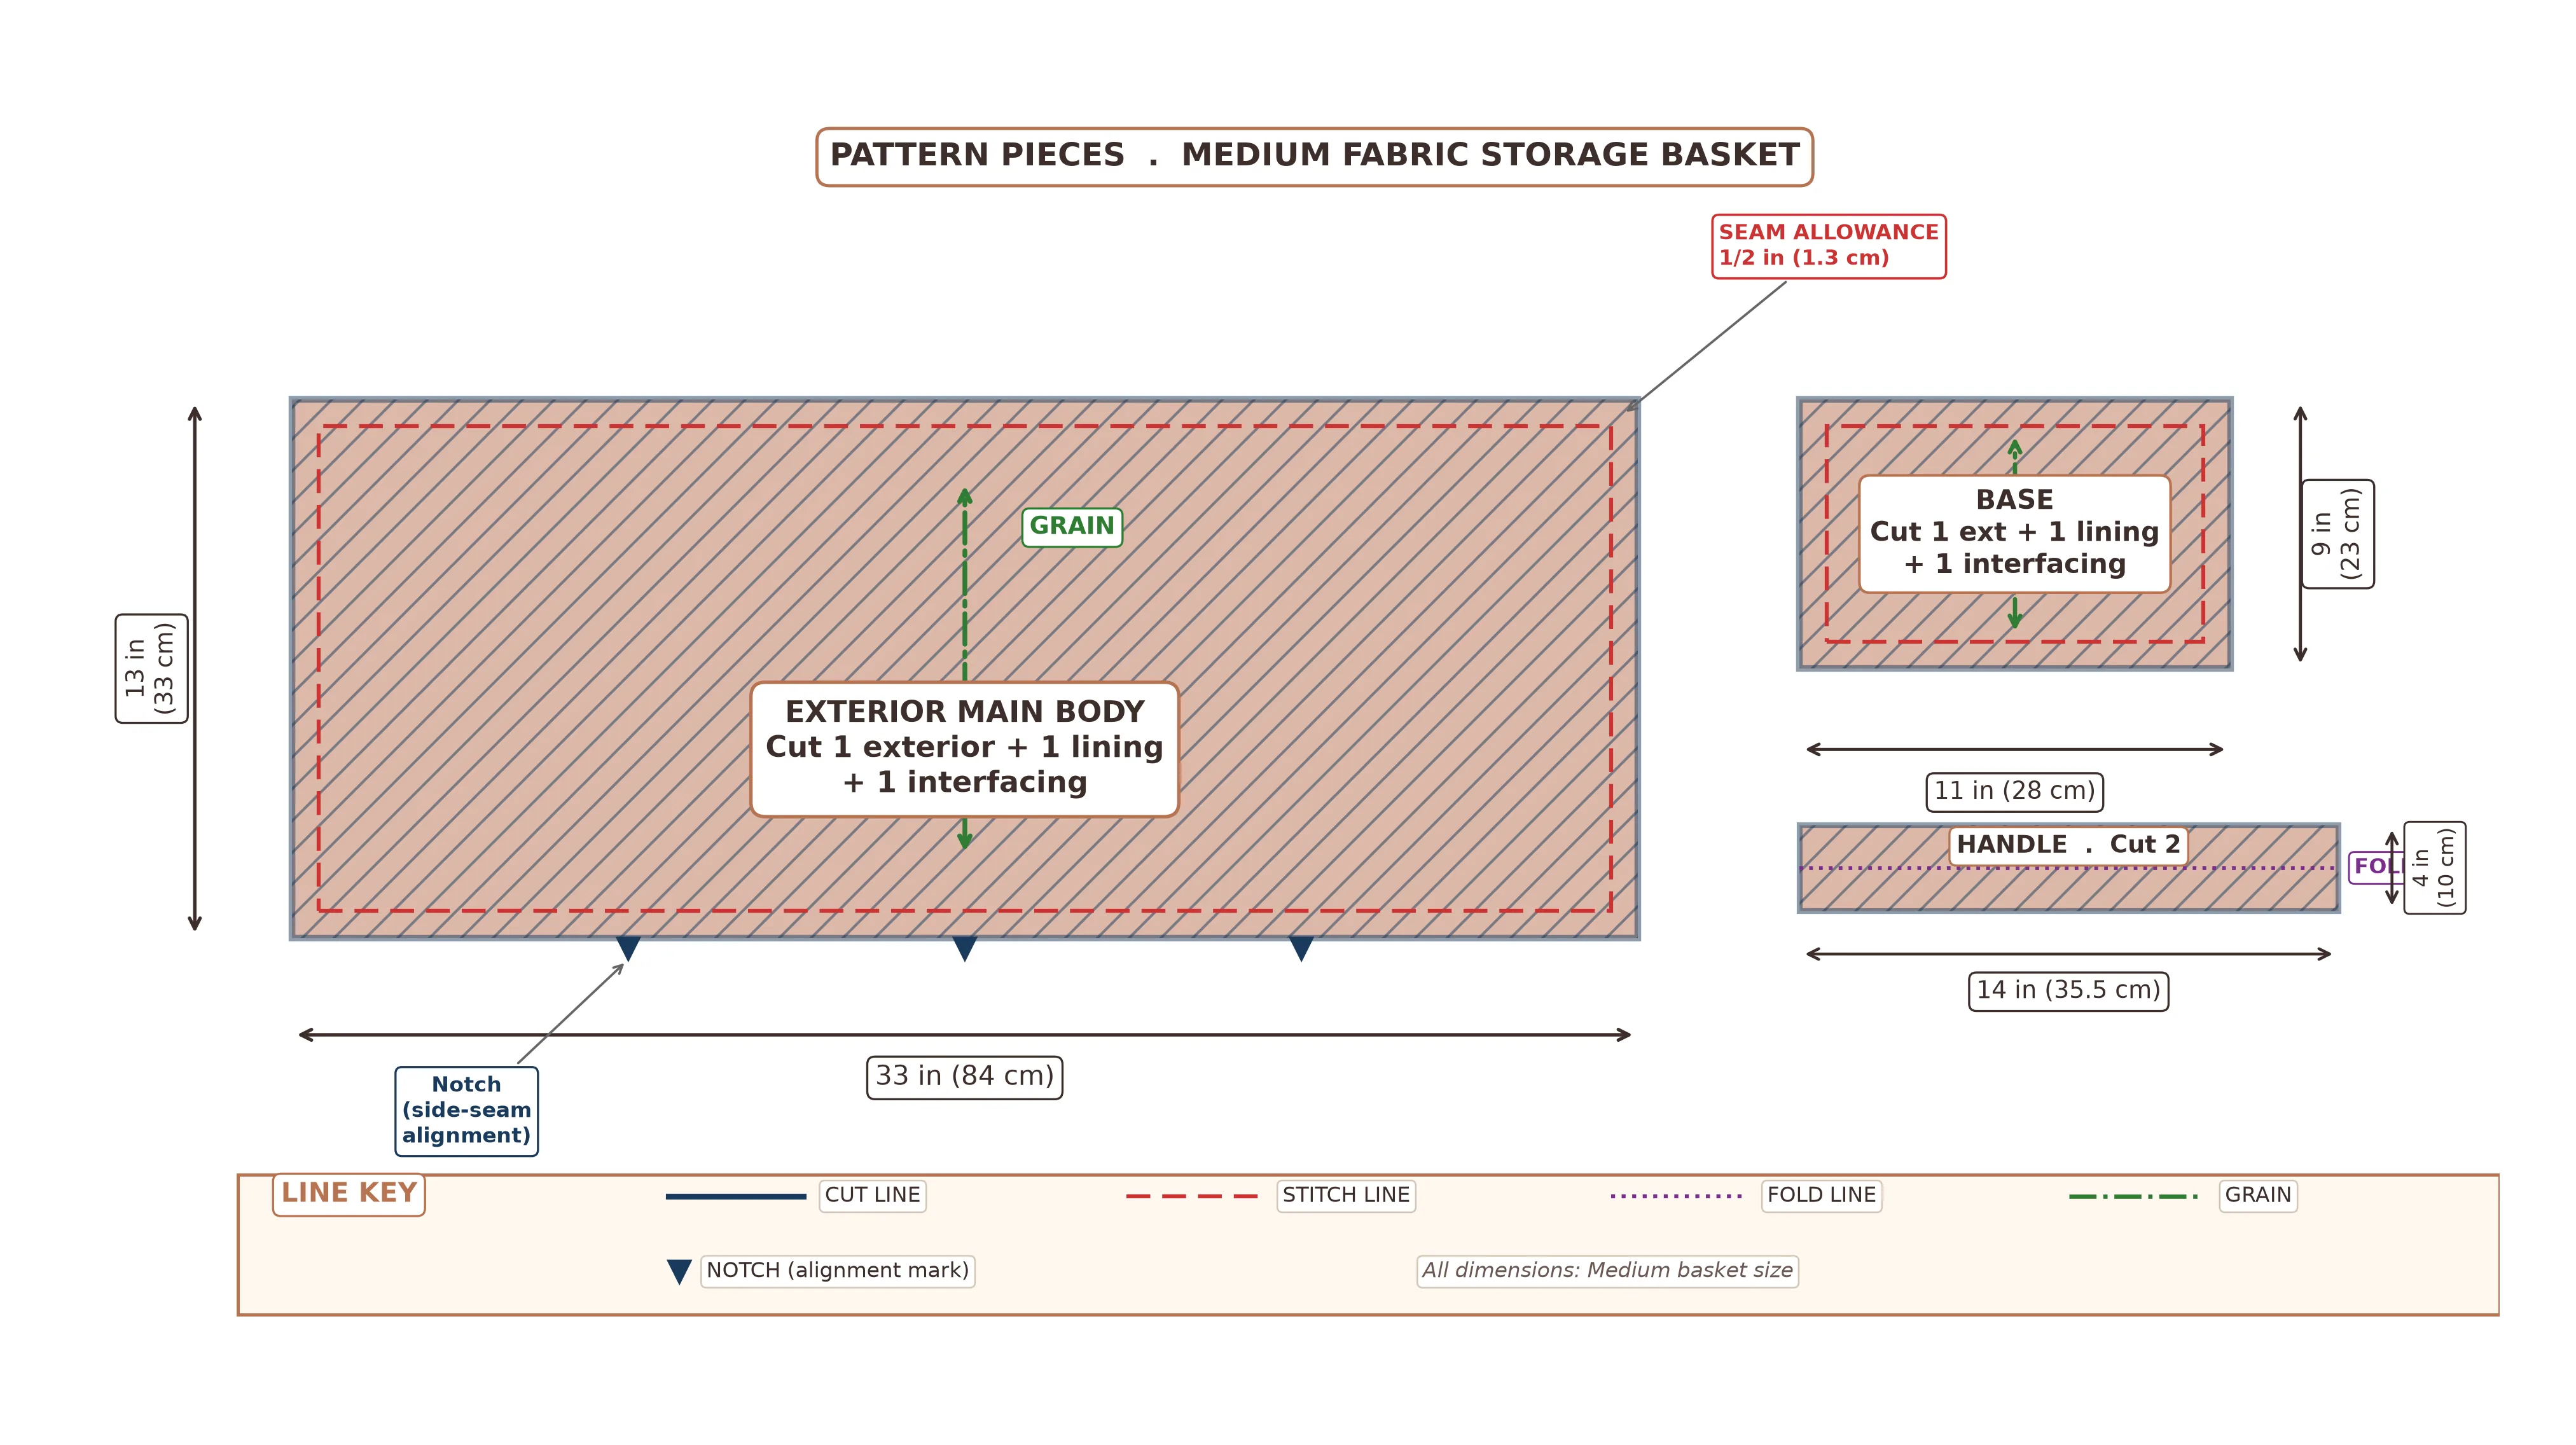
There are only three pattern shapes to understand. The main body wraps around the basket to form all four sides, meeting at one side seam. The base is a separate rectangle sewn in to form the floor. Handles are simple folded strips.
Understanding the Dimensions
If you want to design your own custom basket size, here's the formula:
- Main body length = (finished width × 2) + (finished depth × 2) + 1 in (2.5 cm) for side seam allowance
- Main body height = finished height + 1 in (2.5 cm) for top and bottom seam allowance
- Base = finished width + 1 in × finished depth + 1 in
- Handles = your preferred length × 4 (strip is folded to a quarter of its cut width)
Step-by-Step Construction
Work through the steps in order. Press as you go — flat, pressed seams are the single biggest factor in whether your finished basket looks homemade or professional.
Fuse the Interfacing
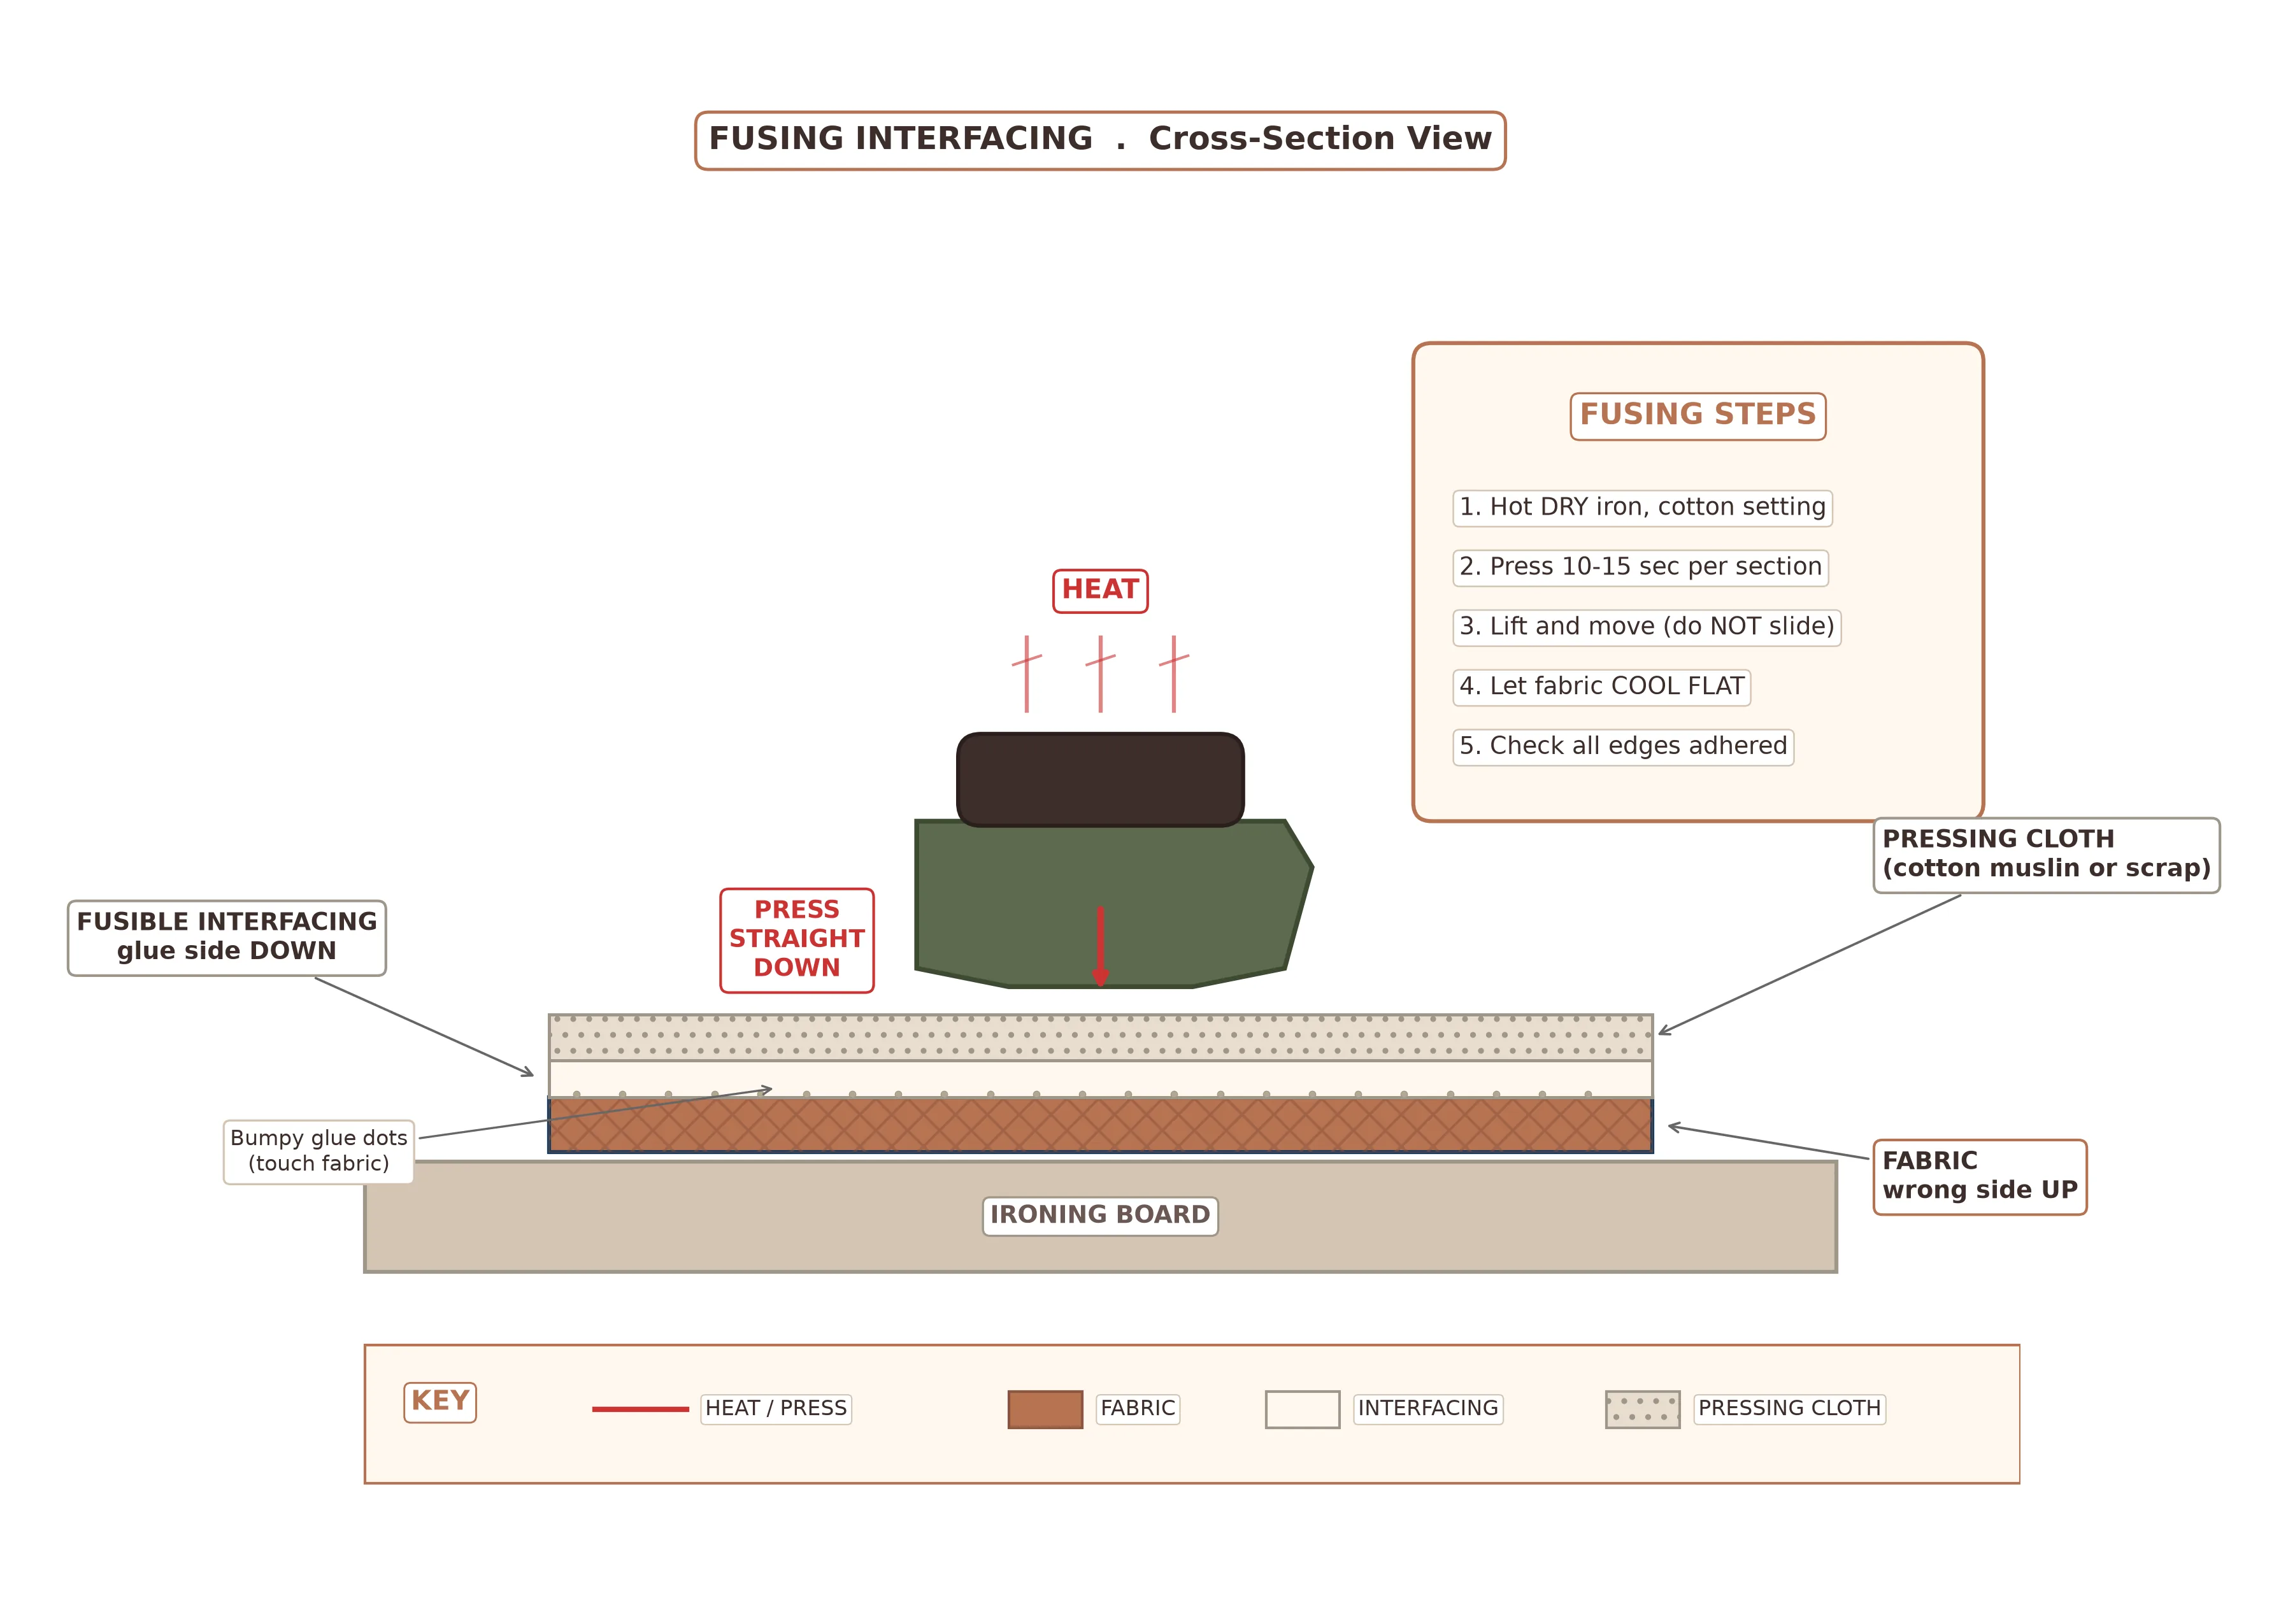
Lay each exterior piece wrong side up on your ironing board. Center the matching interfacing piece on top, glue side down (the glue side is slightly bumpy or shiny). Cover with a pressing cloth to protect your iron.
Set your iron to the cotton setting with no steam. Press firmly for 10–15 seconds per section, lifting and moving (not sliding) the iron. Let each piece cool completely flat before handling — moving warm interfacing causes bubbling.
Make the Handles
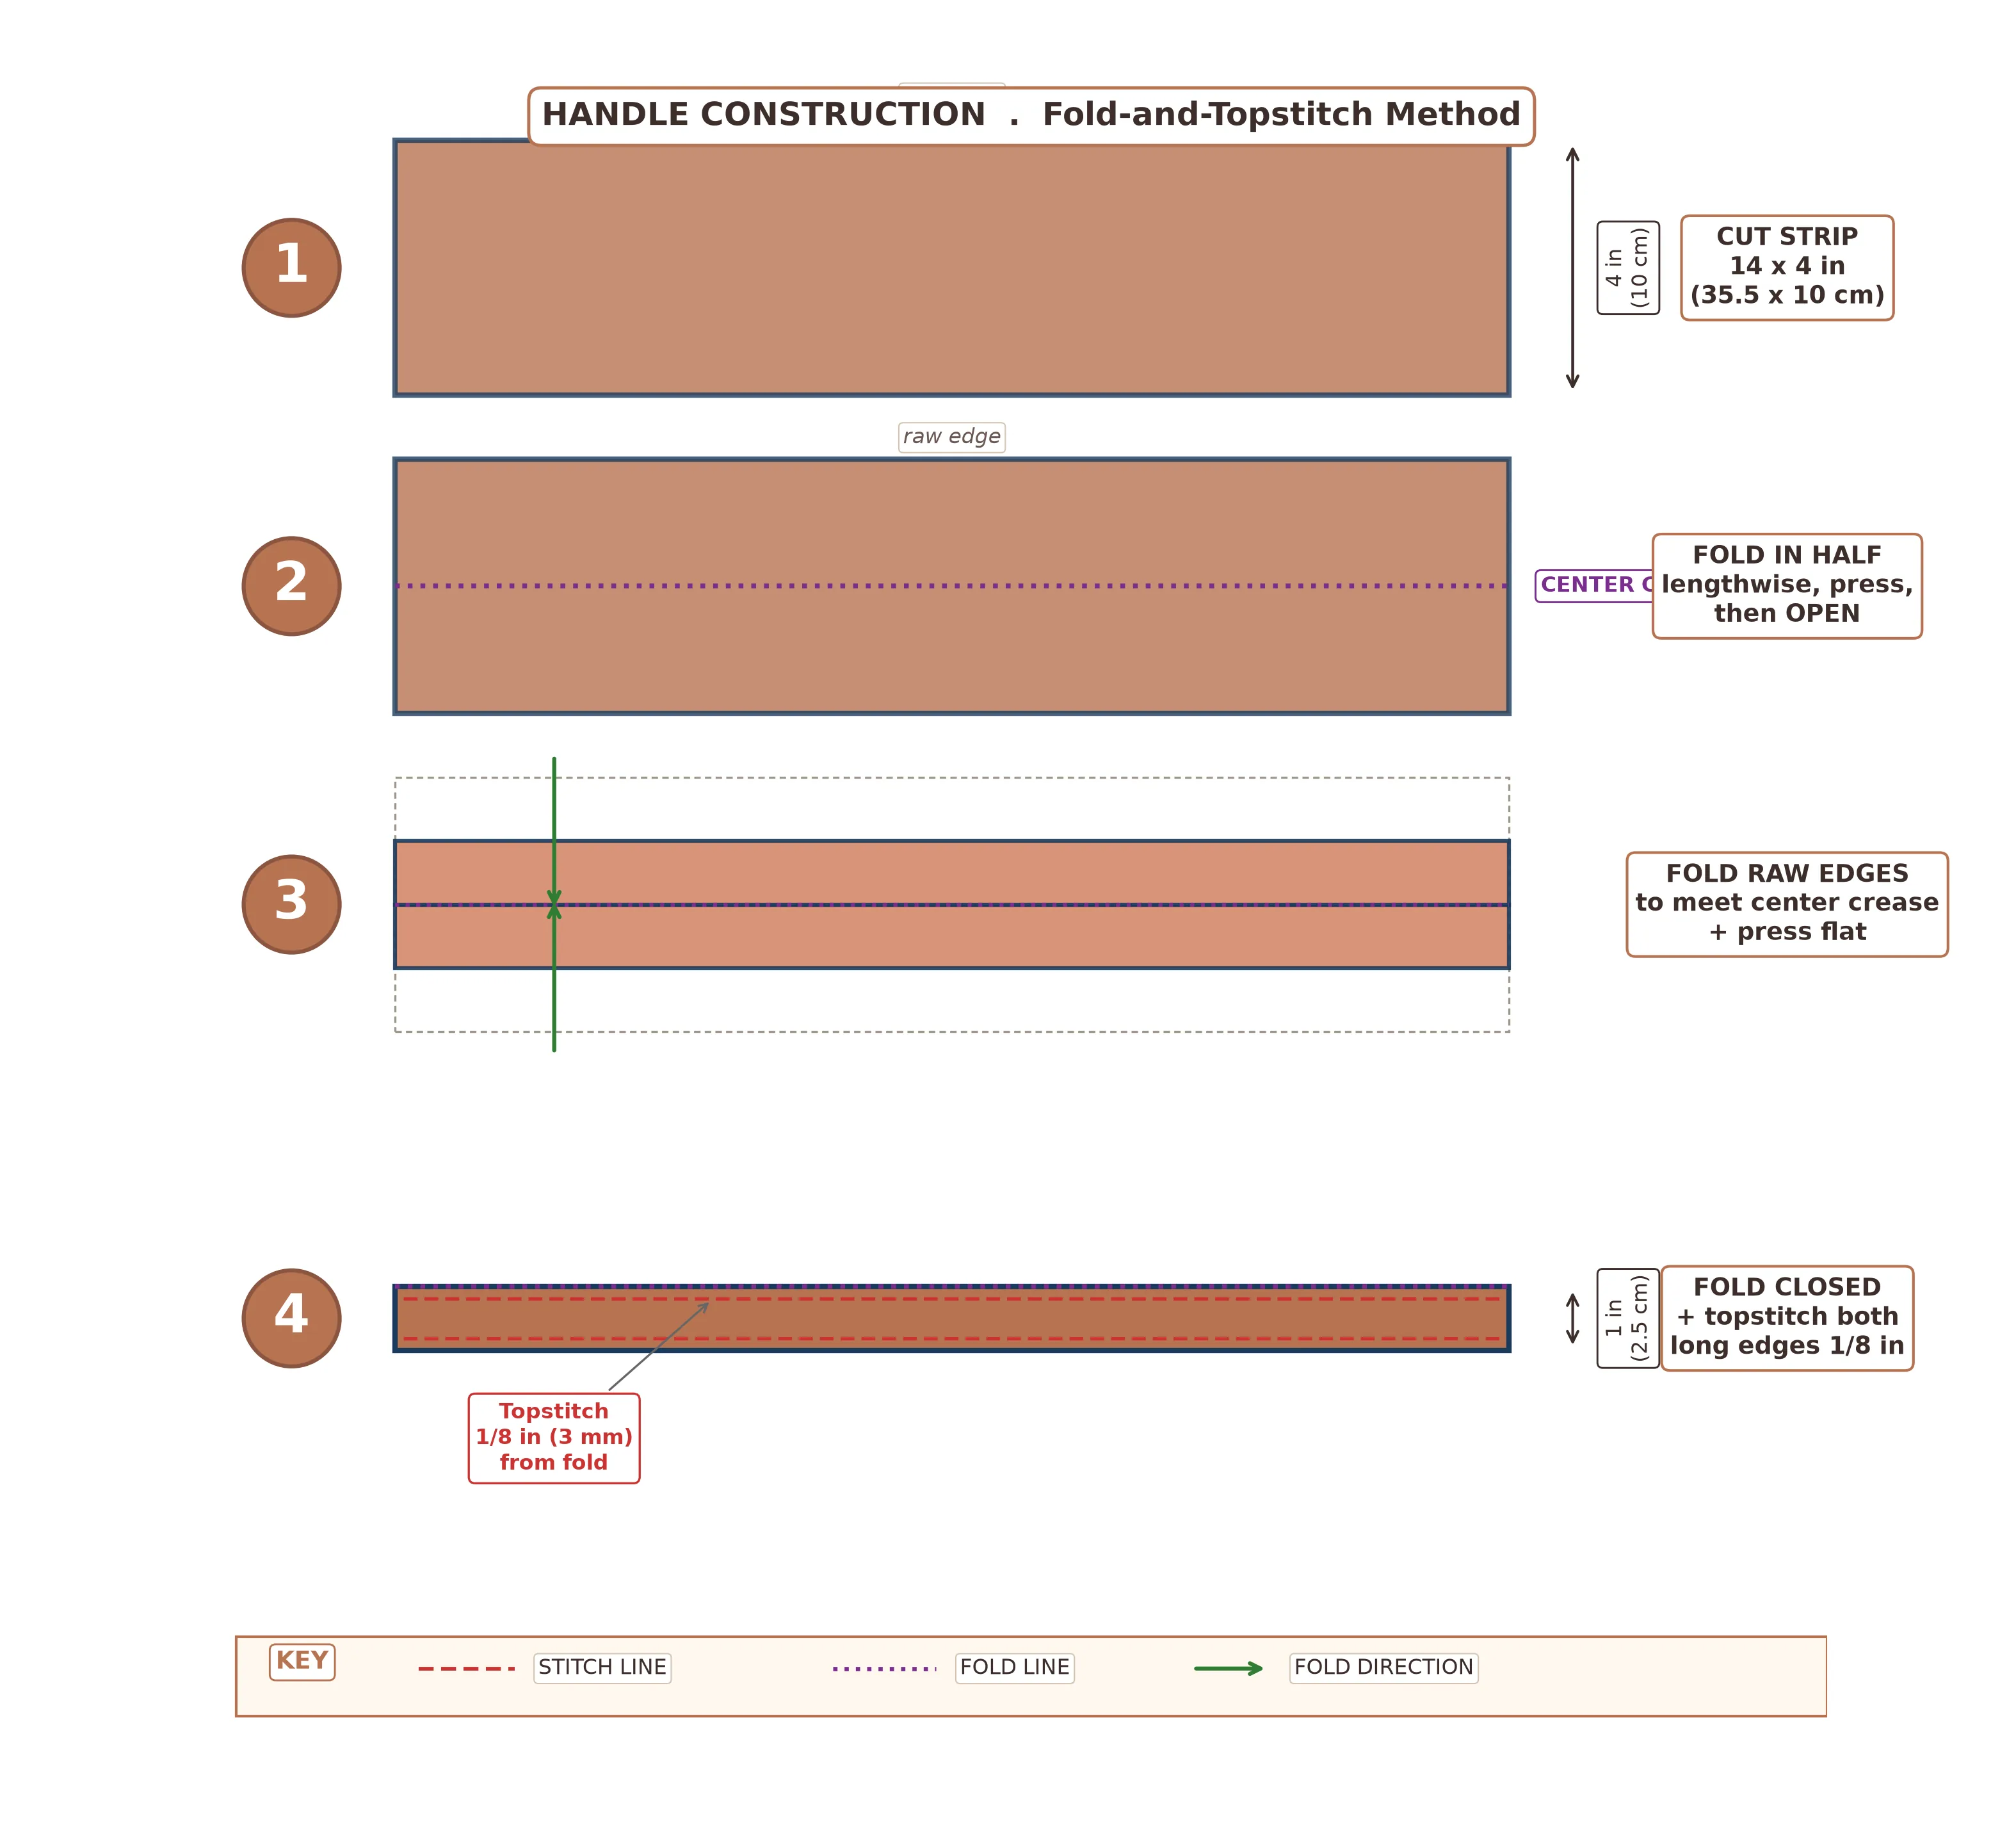
Take one handle strip and fold it in half lengthwise, wrong sides together. Press to create a center crease, then open flat. Fold each long edge in to meet the center crease. Press. Fold in half along the original crease — you now have a four-layer strip that is 1 in (2.5 cm) wide with no raw edges showing.
Topstitch close to both long edges, about 1/8 in (3 mm) from the folds. Repeat for the second handle.
Attach Handles to the Exterior
Lay the exterior main-body piece out flat. The side seam will be at one short end — identify your front and back panels (they are the two middle thirds of the long strip). On each panel, measure in from each side and mark two points 3 in (7.5 cm) apart, centered on the panel width.
Pin a handle at those marks, with the handle looping down onto the fabric (so it will loop up when the basket is assembled). The raw ends of the handle should sit 1/4 in (6 mm) below the top edge of the main body. Baste in place with a 1/4 in (6 mm) seam.
Sew the Side Seam
Fold the exterior main body in half with right sides together, matching the short ends. Pin along the raw short edge. Stitch with a 1/2 in (1.3 cm) seam allowance, backstitching at both ends. You now have an exterior tube.
Press the side seam open. This small step matters — a pressed-open seam gives you a flat, professional edge where the basket side meets.
Attach the Base
With the exterior tube still wrong-side-out, pin the exterior base piece into the bottom opening, right sides together. Match the long sides of the base to the front and back panels; the short sides of the base match the two side panels. Clip into the tube's seam allowance at the four corners if needed to help it curve around the base.
Stitch all the way around the base with a 1/2 in (1.3 cm) seam allowance, pivoting at each corner. Clip the corners diagonally to reduce bulk.
Assemble the Lining (With a Turning Gap)
Repeat steps 4 and 5 with the lining fabric — but when you sew the base to the lining tube, leave a 4 in (10 cm) gap in one of the long sides. This gap is how you'll turn the whole basket right-side out at the end.
Backstitch firmly at the start and end of the gap so the stitches don't pop open when you tug the fabric through.
Join Exterior and Lining at the Rim
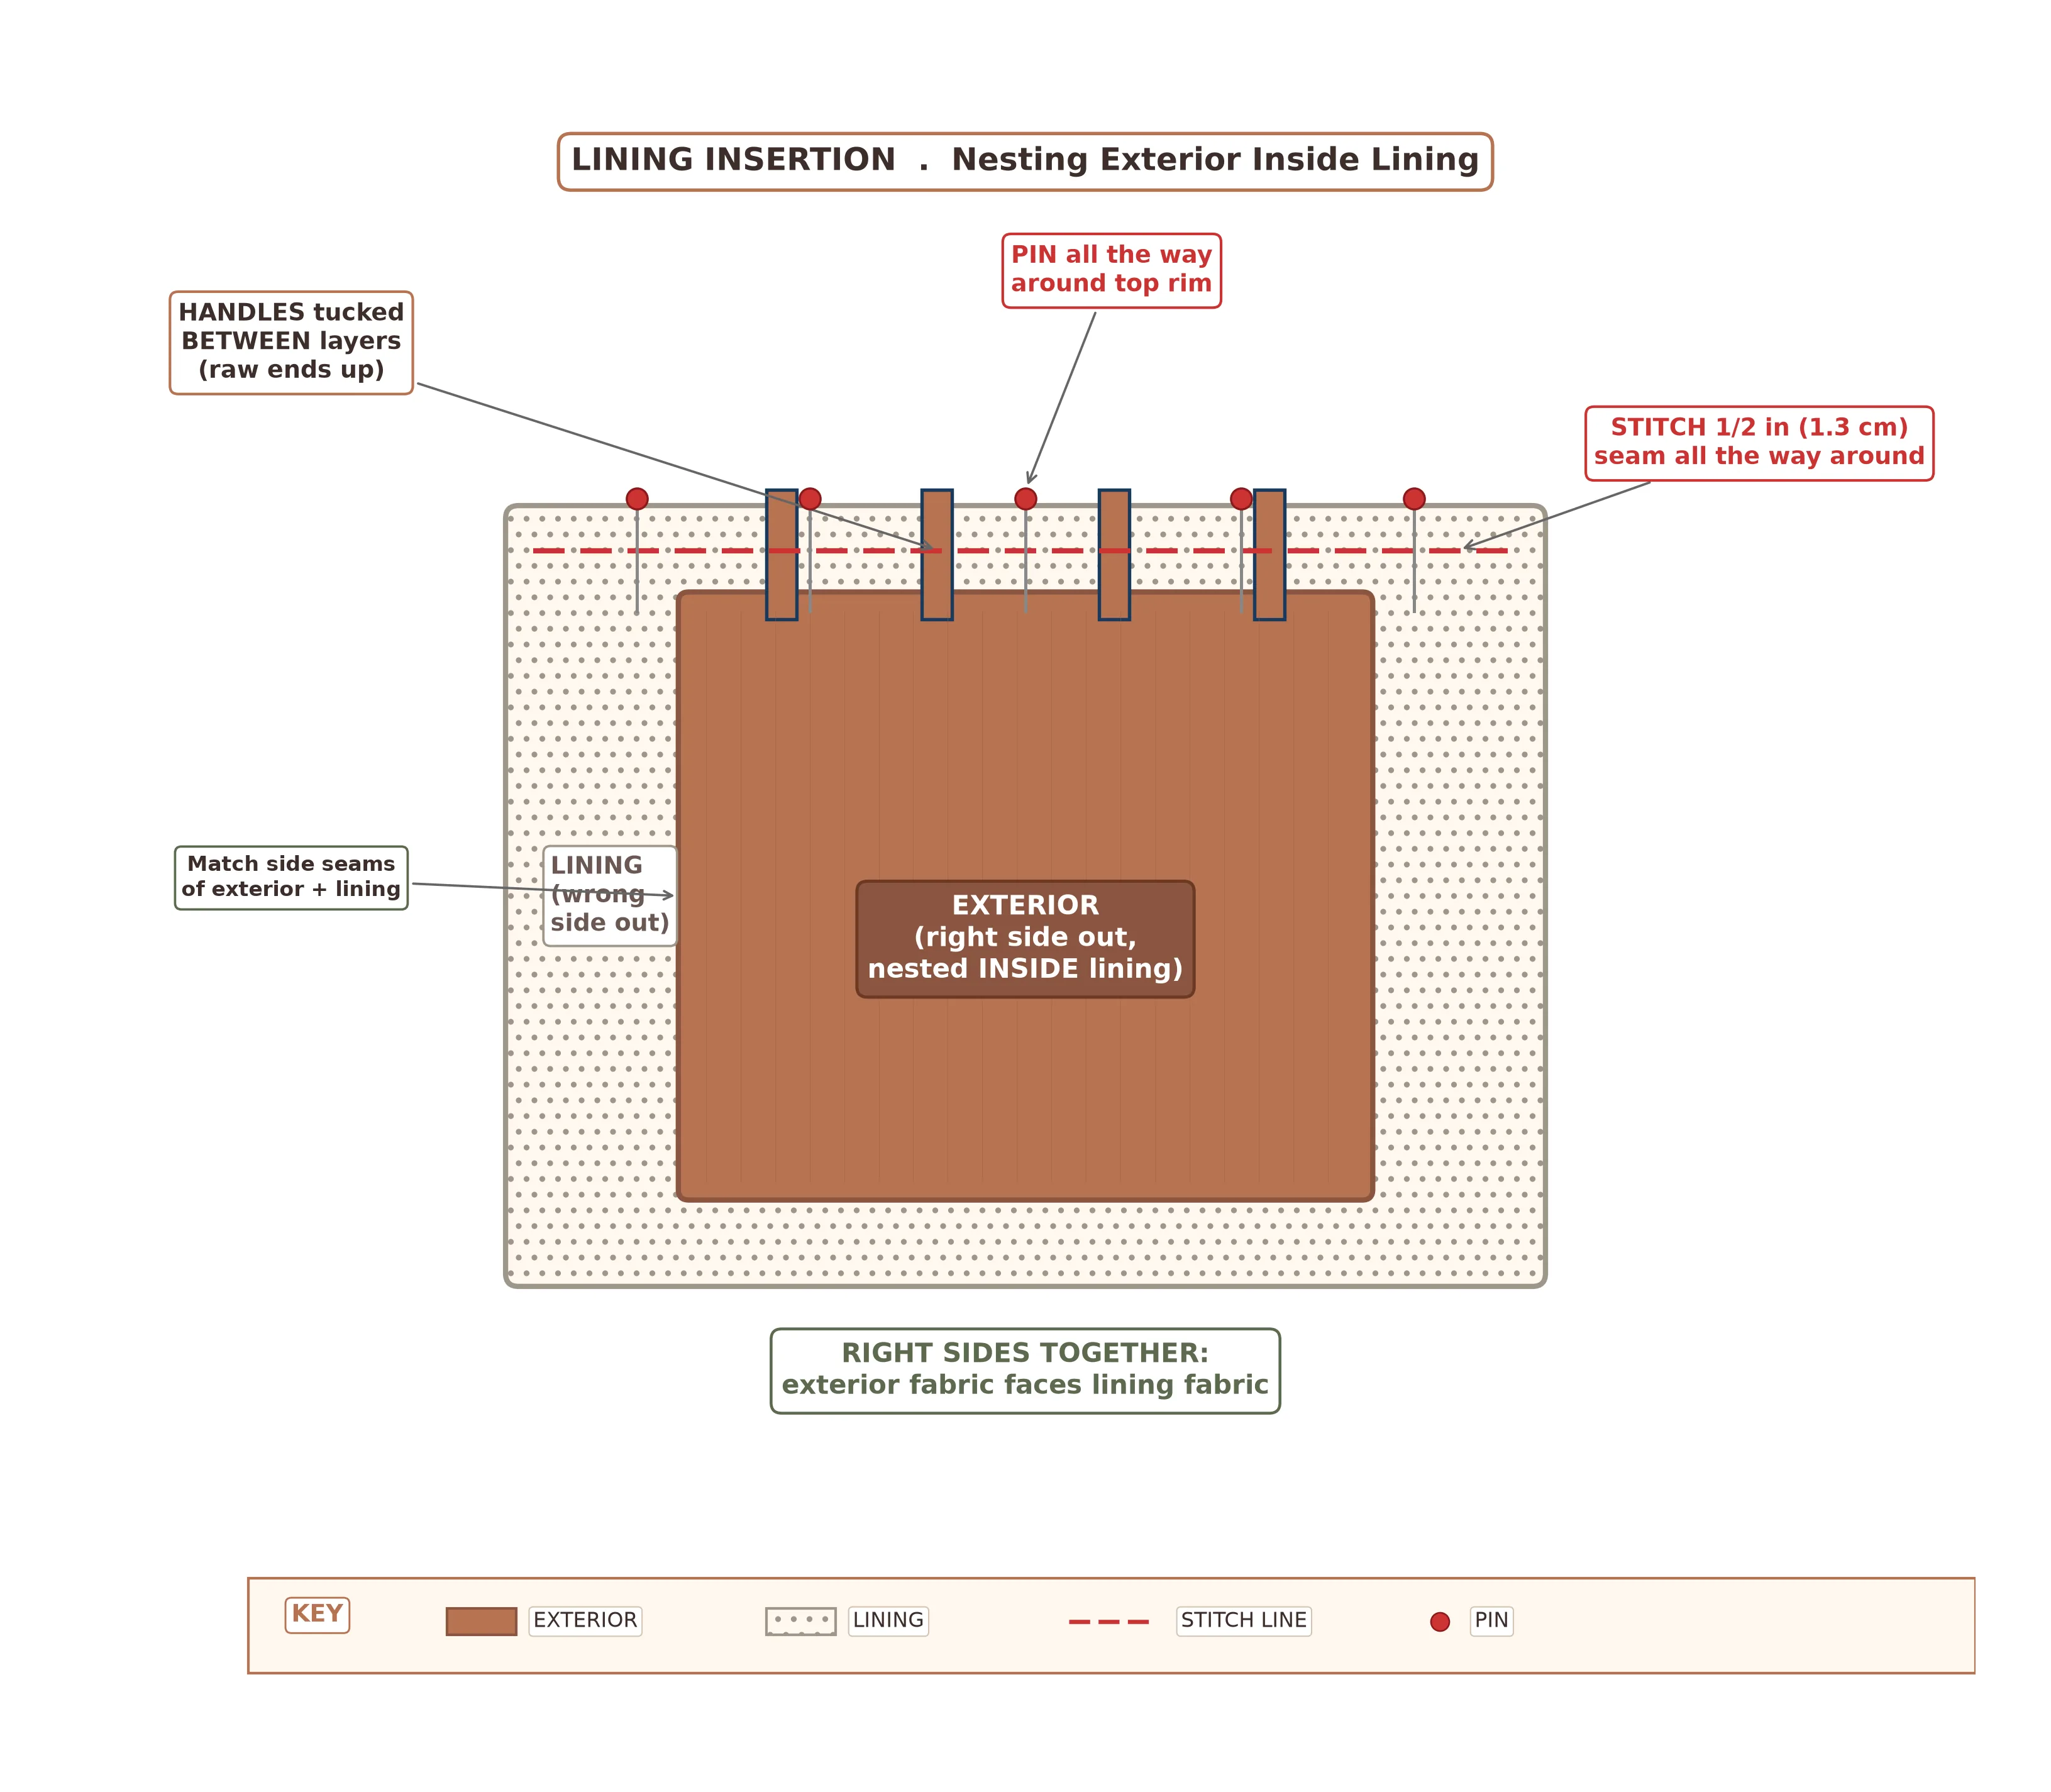
Turn the exterior right side out. Keep the lining wrong side out. Slip the exterior inside the lining — right sides are now facing each other, with the handles tucked between the two layers.
Match the side seam of the exterior to the side seam of the lining and pin all the way around the top edge. Stitch with a 1/2 in (1.3 cm) seam allowance all the way around the rim.
Turn Through the Gap
Reach through the 4 in (10 cm) gap you left in the lining base and gently pull the entire exterior through. It will feel awkward — like turning a sock inside out through a small hole — but it works. Push out the top-rim corners and the base corners from the inside.
Close the lining gap by folding the raw edges inside and either machine-stitching close to the fold, or hand-stitching with a ladder stitch for an invisible finish. Since this is hidden inside the lining, machine-stitching is perfectly fine.
Topstitch the Rim
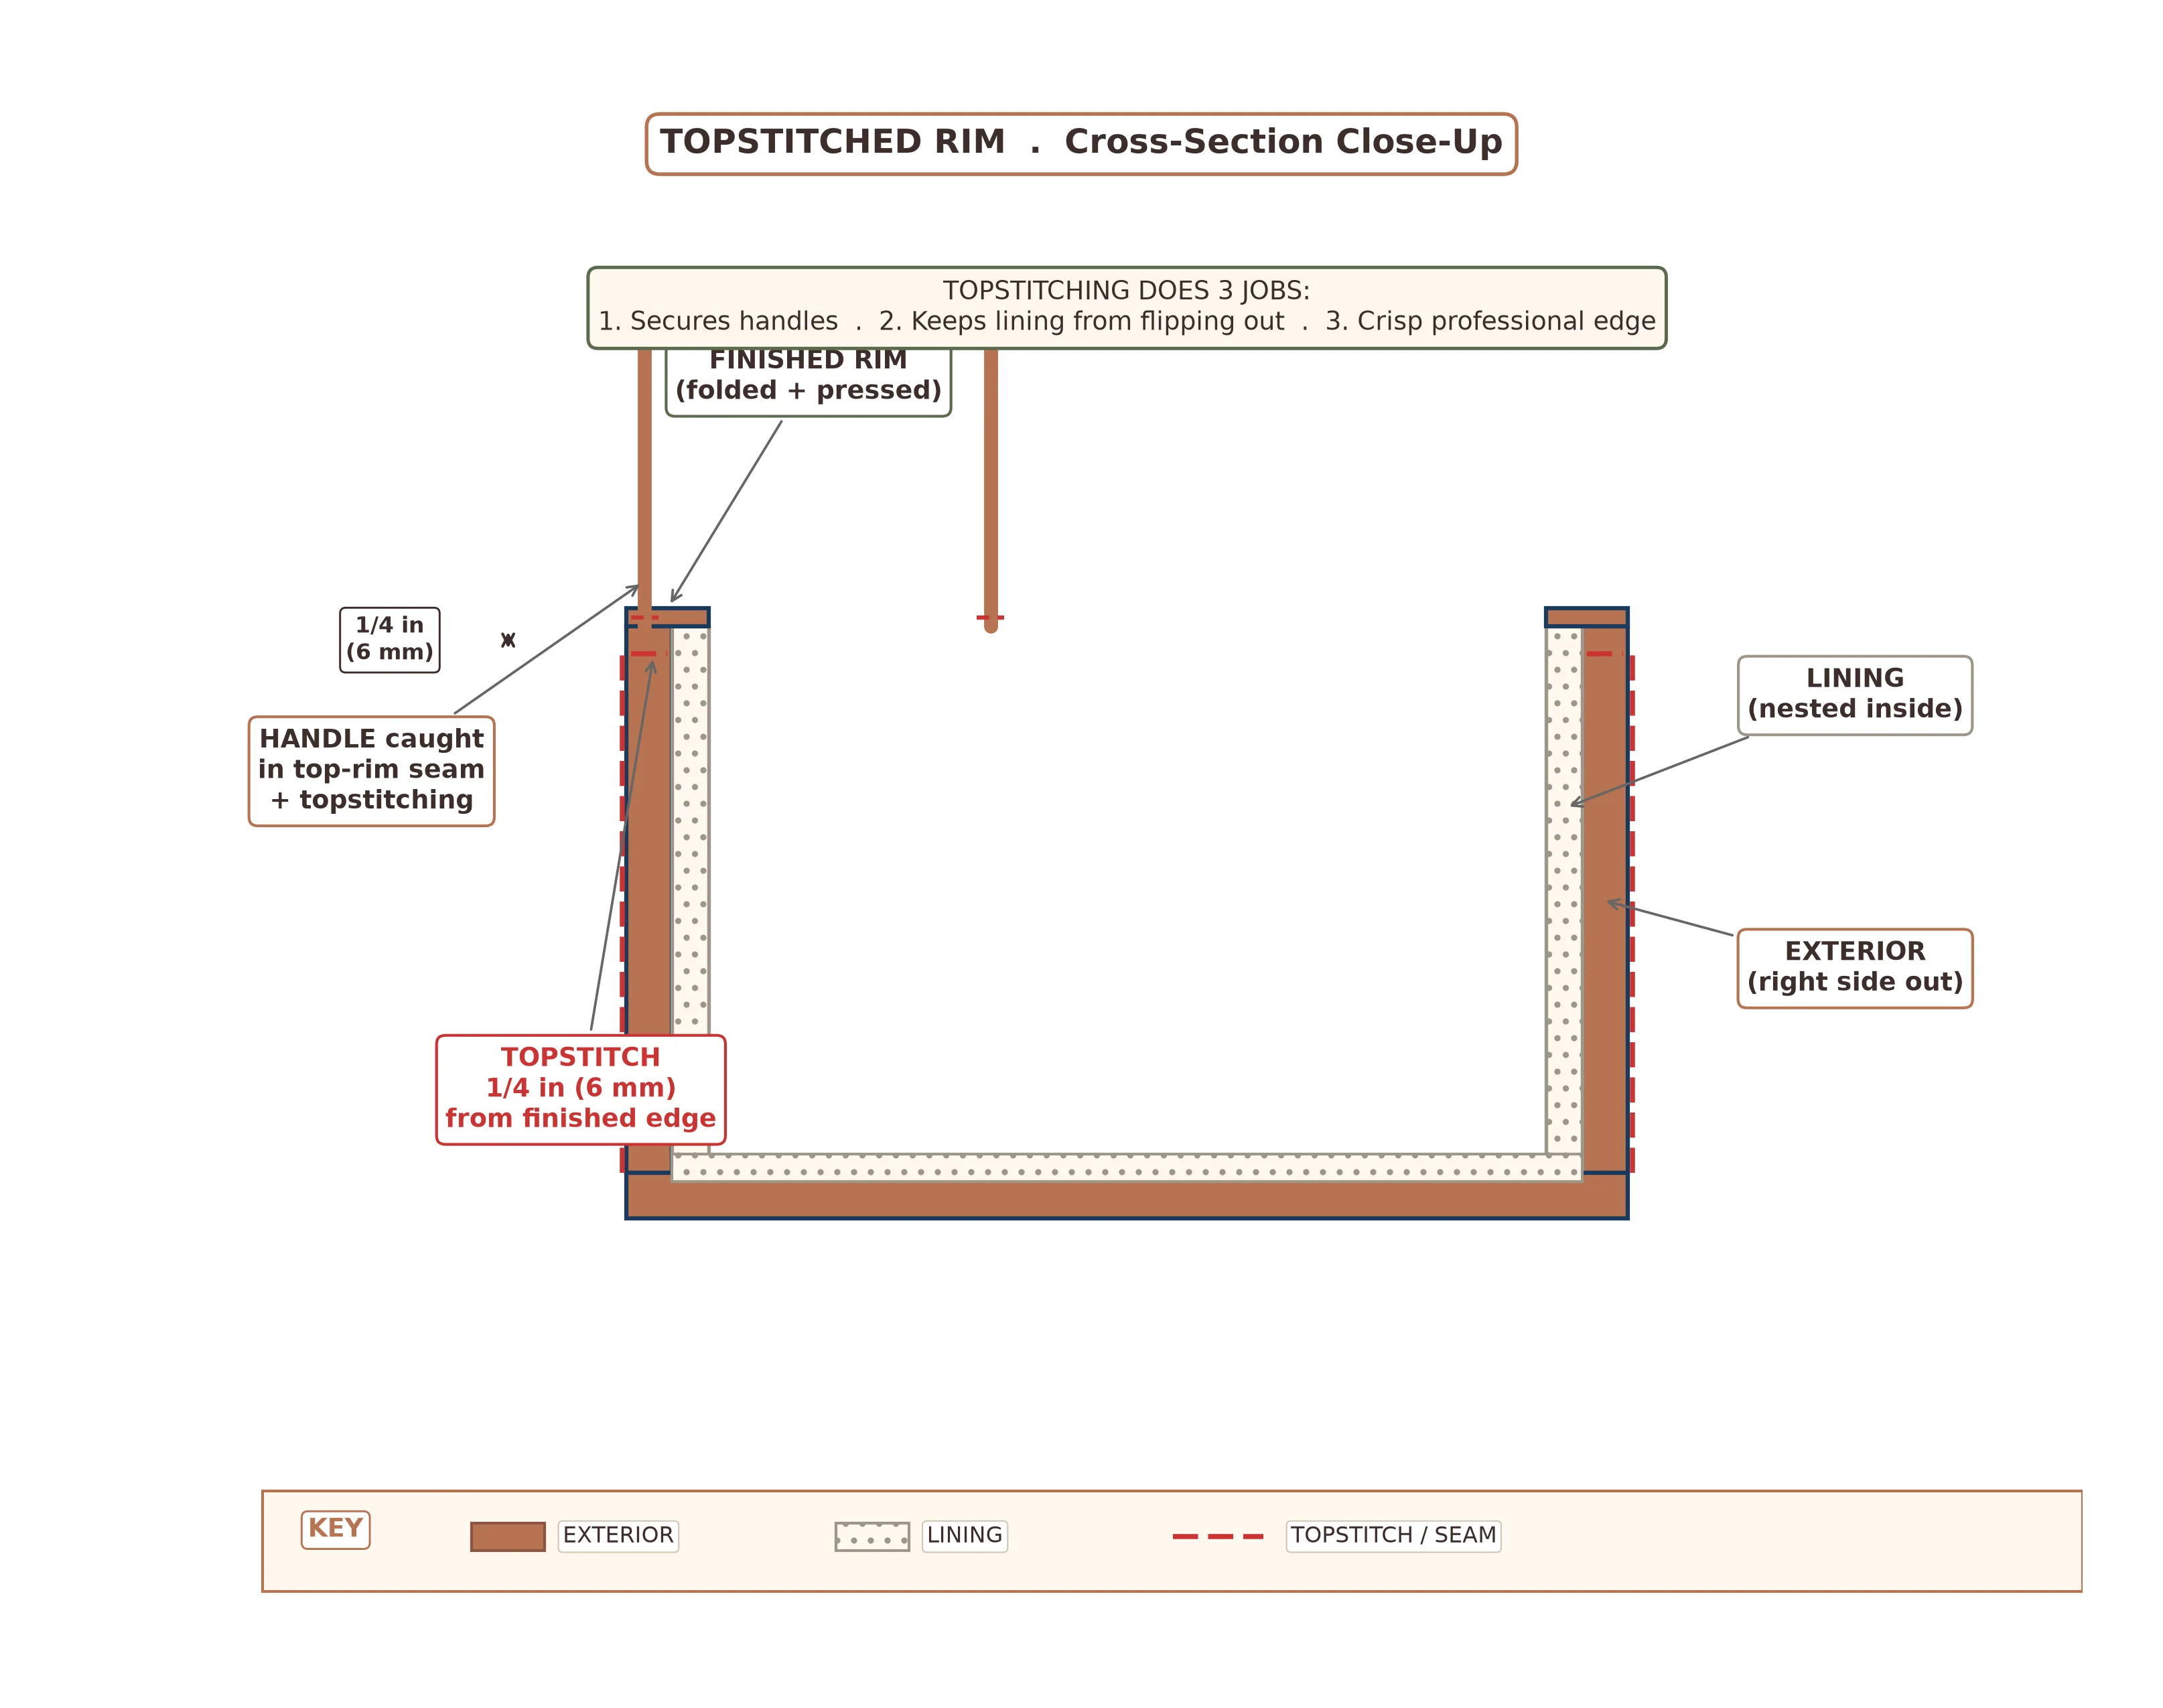
Nest the lining down inside the exterior. Press the top rim very carefully, rolling the seam so the exterior and lining meet exactly at the edge. Topstitch all the way around, 1/4 in (6 mm) from the finished top edge.
This final topstitching does three jobs at once: it stabilizes the handles, it keeps the lining from flipping to the outside, and it gives the basket a crisp, professional edge.
The Boxing-Corner Trick (Explained)
If you used a separate base piece as described above, your basket already has built-in boxed corners — the base is the box. But there's a second, even faster method you'll see in many patterns: skip the separate base, and just box the four bottom corners of a flat pouch instead.
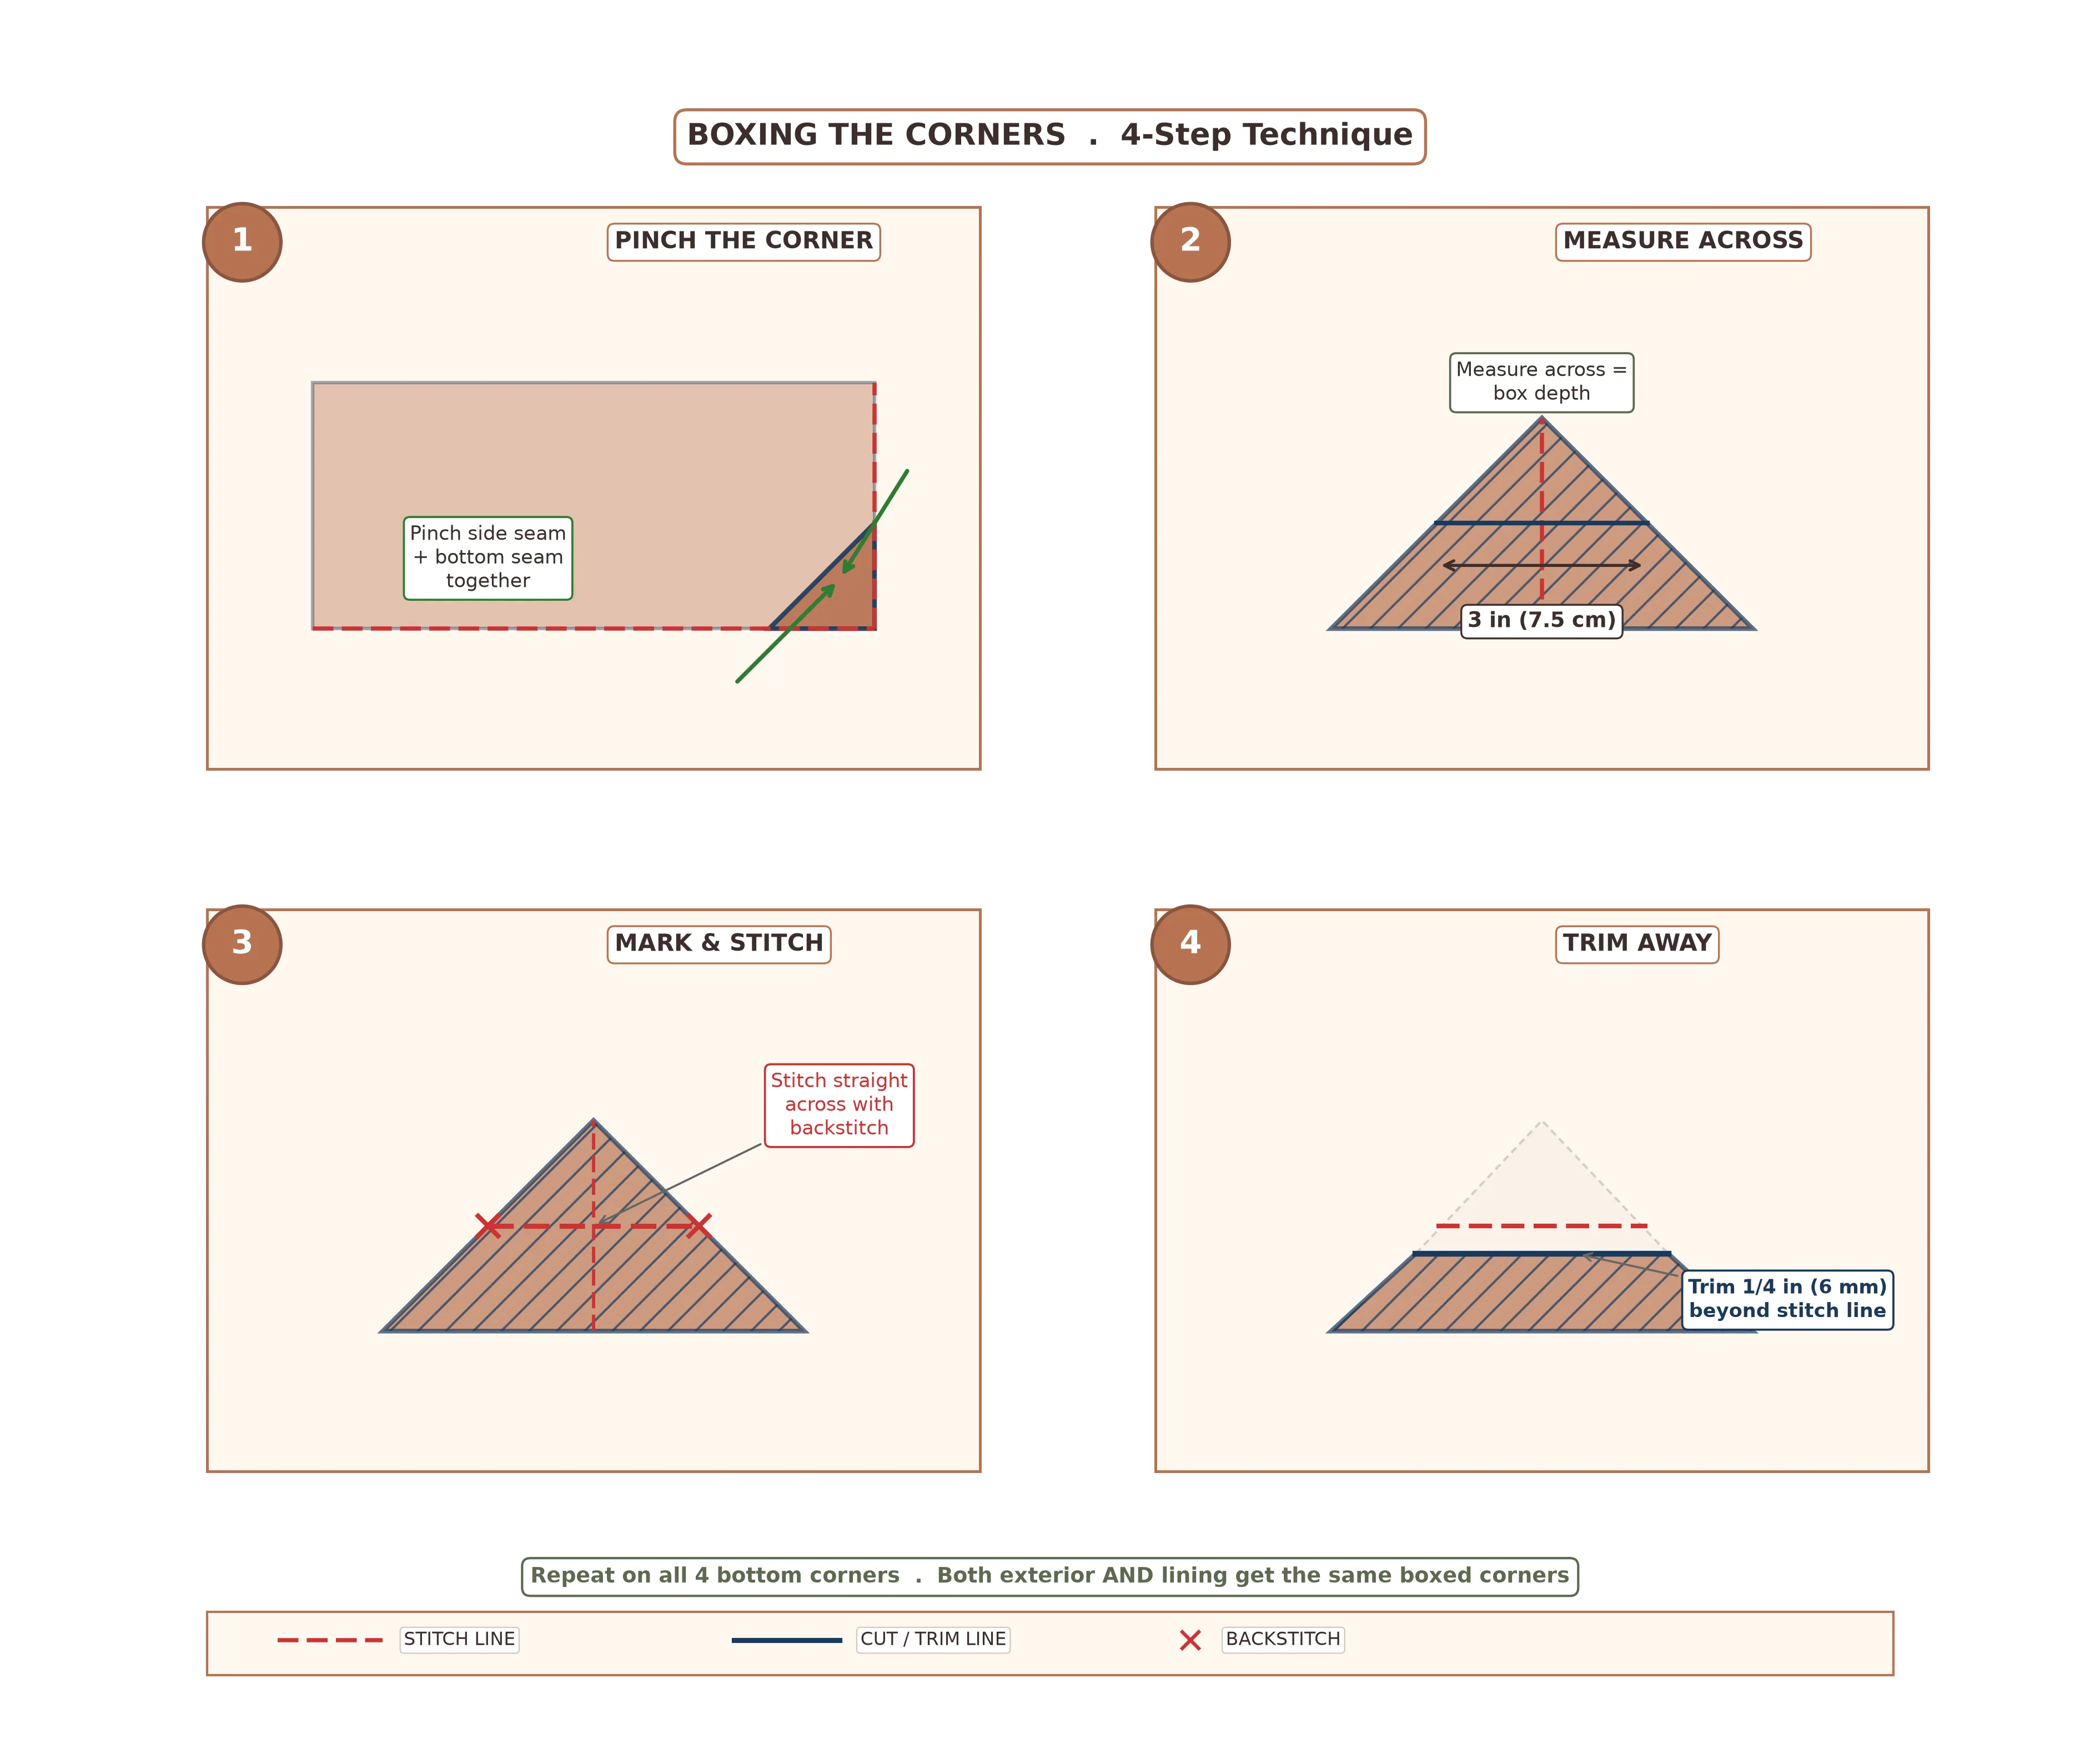
Here's how the alternative boxing method works, step by step:
- Sew your main body as a tube, then fold it flat so one short end becomes the bottom.
- Sew that bottom closed with a 1/2 in (1.3 cm) seam. You now have a flat pouch.
- At each bottom corner, pinch the side seam and the bottom seam together so they stack directly on top of each other, forming a flat triangle.
- Measure across the triangle to find the point where it is exactly as wide as your desired box depth — for example, 3 in (7.5 cm) across for the medium size.
- Draw a straight line across the triangle at that point (perpendicular to the seam), stitch along the line, backstitch, and trim away the triangle leaving a 1/4 in (6 mm) seam.
When you turn the pouch right-side out, those four stitched triangles become the four corners of a 3D box. Both methods — separate base and boxed corners — produce excellent results. Use the separate-base method when you want a very clean, square bottom. Use the boxing-corner method when you want fewer pieces and a faster project.
If you use the boxing-corner method, both your exterior and your lining need the same size boxed corners. Otherwise, the lining won't fit smoothly inside the exterior and you'll get puckering at the base.
Variations & Ideas
Divided Interior
Add a lining divider by stitching a vertical seam up the middle of the lining before assembly. Perfect for art-supply caddies.
Fold-Down Cuff
Make the lining 3 in (7.5 cm) taller than the exterior. Fold the extra lining down over the exterior for a contrast cuff.
Rope Handles
Skip the fabric handles and attach grommets at the top with cotton rope or leather pulls knotted through.
Oilcloth Lining
Use laminated cotton or oilcloth for the lining to make a wipe-clean basket for the kitchen or craft room.
Patchwork Exterior
Piece scrap fabric into the main body panel before cutting. A beautiful way to use quilting leftovers.
Nesting Set of Three
Make all three sizes in coordinating fabrics for a stunning shelf set — see the dimensions chart above.
Frequently Asked Questions
What weight of interfacing is best for a fabric storage basket?
A medium-heavy fusible interfacing like Pellon 809 Decor Bond or Pellon 71F Peltex-light works best for most fabric storage baskets. For taller or heavier-use baskets like a large laundry bin, add a layer of fusible foam such as ByAnnie Soft and Stable to achieve the firm, free-standing structure that makes the basket hold its shape when empty.
Can I sew a fabric storage basket without interfacing?
You can, but the basket will be floppy and will collapse without something inside it. If you prefer to skip fusible interfacing, substitute two layers of pre-washed canvas, denim, or a layer of heavyweight twill combined with cotton batting quilted onto the exterior panels. The structure must come from somewhere.
What is a boxed corner in sewing?
A boxed corner is a technique that turns a flat two-dimensional pouch into a three-dimensional container with a defined base. You pinch each bottom corner so the side seam and the bottom seam stack directly on top of one another, then stitch across the resulting triangle. When turned right side out, the basket has a flat rectangular bottom and square sides.
What size boxed corner should I cut for my basket?
The boxed corner measurement equals the depth you want your basket base to be. A 2 in (5 cm) box creates a basket base that is 4 inches wider and 4 inches deeper than the flat sewn pouch. For the three sizes in this tutorial, we use 2 in, 3 in, and 4 in (5 cm, 7.5 cm, 10 cm) boxed corners for small, medium, and large respectively.
How do I keep my fusible interfacing from bubbling?
Bubbling is caused by three things: an iron that is not hot enough, not holding the iron in place long enough, or not using steam when the interfacing requires it. Always read the specific interfacing instructions. For most fusibles, use a hot dry iron, hold for 10 to 15 seconds per section with firm pressure, and let the piece cool completely flat before moving it.
Can I machine wash a fabric storage basket?
Baskets with fusible interfacing can be gently hand washed or spot cleaned, but repeated machine washing may cause the interfacing to delaminate from the fabric over time. If you need a washable basket, use sew-in interfacing instead of fusible, or quilt two layers of fabric with batting between them for a washable structured alternative.
Sewing for Your Home — 12 Beginner-Friendly Home Decor Projects
Keep Building Your Home Sewing Skills
Now that you've mastered interfacing and boxed corners, you have the foundation for dozens of structured projects. Here's what to try next.