Sew a Table Runner with Mitered Corners — Beginner Pattern
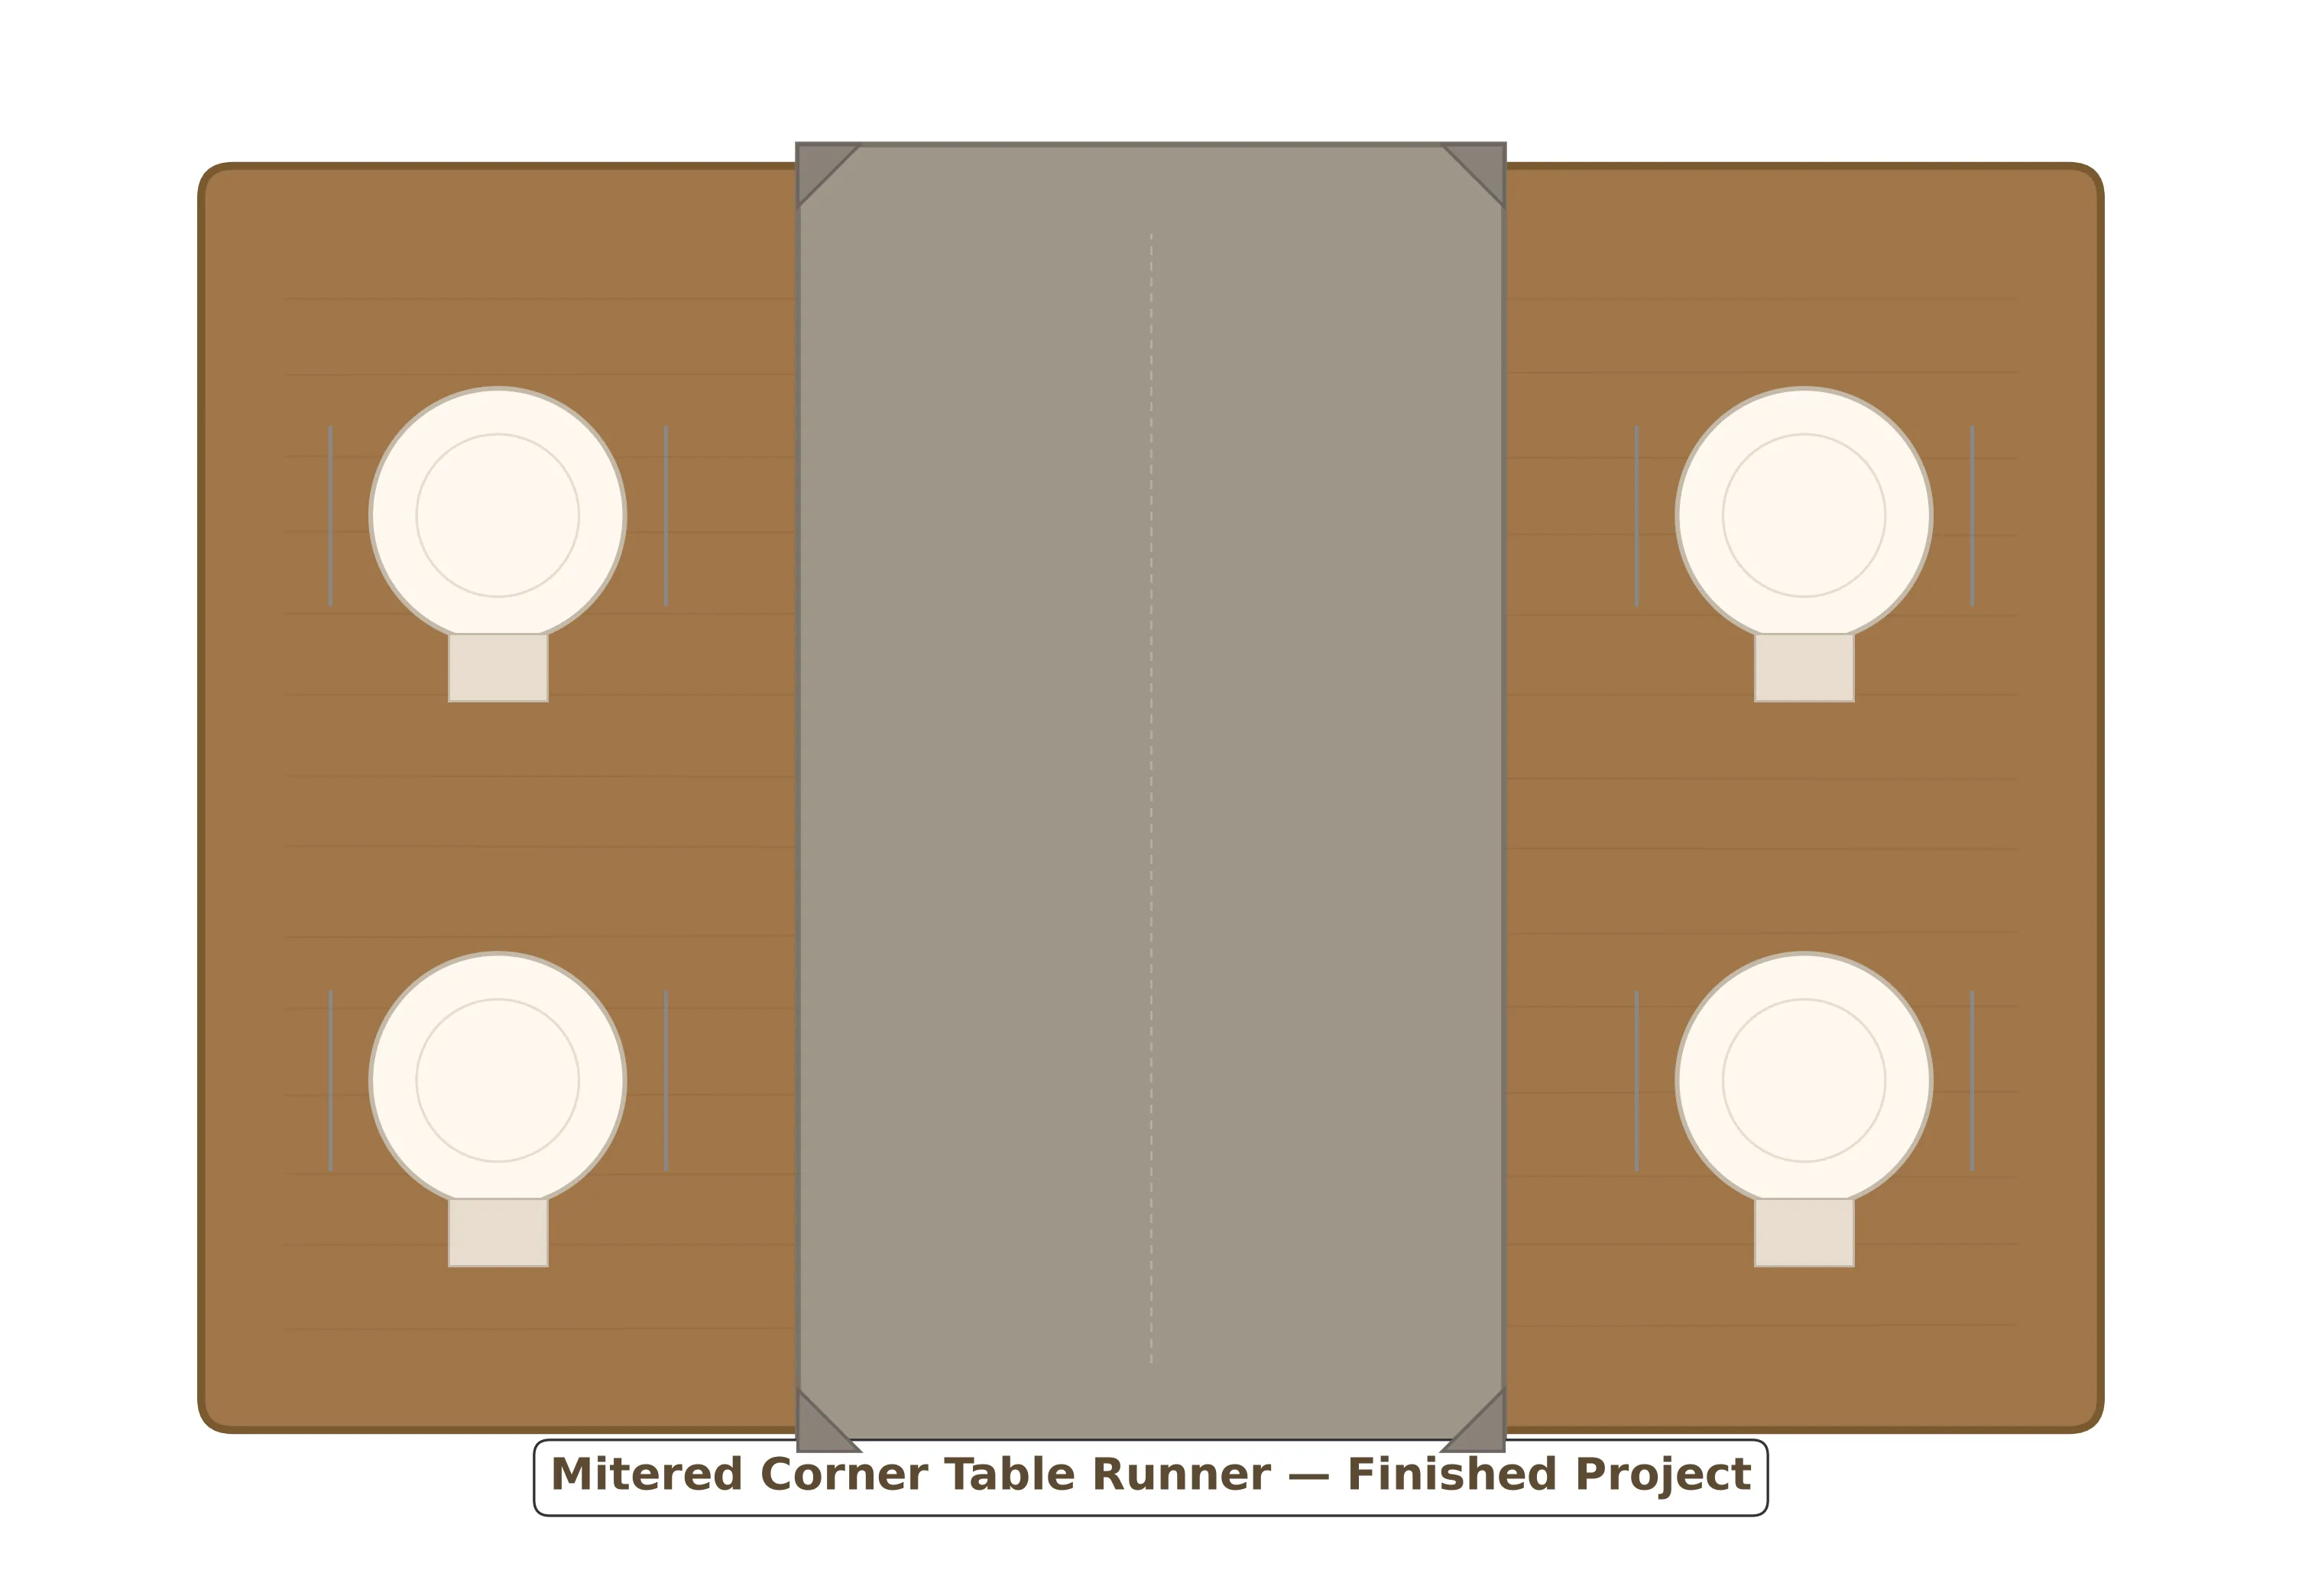
A beautifully made table runner with mitered corners is one of the fastest ways to transform a dining table from everyday to elegant. The runner itself is just a rectangle — nothing more — but the mitered corners at each end elevate it from "fabric strip" to "boutique home décor."
If you have never sewn a mitered corner before, you are about to learn one of the most useful techniques in all of sewing. The mitered corner (a corner where two hems meet at a crisp 45-degree seam) is the same finish used on quilt bindings, cloth napkins, picture-frame mats, and tailored shirt plackets. Master it here, and you unlock cleaner finishes on dozens of future projects.
This tutorial walks through sizing your runner for any table, choosing the right fabric, and — most importantly — the exact fold-and-stitch sequence that produces picture-perfect mitered corners every single time. I'll also point out the three common mistakes beginners make at corners, so you can avoid them from the first attempt.
What Is a Mitered Corner?
A mitered corner is a corner-finishing technique where two folded hems meet at a 45-degree diagonal seam, forming a clean, flat join with no bulk. The word "miter" (sometimes spelled "mitre") comes from woodworking and picture framing, where two angled pieces join to form a right angle.
In sewing, a mitered corner is the opposite of an overlapping corner, where one hem simply folds over the top of the other. Overlapping corners are faster to sew but create a visible lump of extra fabric at every corner — a tell-tale sign of a hastily made piece.
Mitered vs. Overlapped Corners — Why the Extra Step Matters
Overlapped corner: Fast to sew. Creates a double-thick fabric lump at each corner. Looks acceptable from a distance; obvious up close. Best for utility items like dish towels where speed trumps appearance.
Mitered corner: Adds about 2 minutes per corner. Creates a perfectly flat, symmetrical 45-degree seam with zero bulk. Looks boutique-quality from any angle. Best for anything on display: table runners, napkins, placemats, quilts, decorative pillows.
Verdict: Mitered corners are the clear winner for a table runner. The investment is only 8 minutes total (2 minutes × 4 corners) for a dramatically more professional result.
Sizing a Runner for Your Table
Before you cut, you need to decide how long and wide your runner should be. There are two accepted rules of thumb in table styling:
The Length Rule — "Table + 12 to 24"
Measure your table length, then add 12 to 24 inches total for overhang. The runner should extend 6 to 12 inches (15 to 30 cm) past each end of the table. Any shorter and it looks stubby; any longer and it drags on the floor or chair.
The Width Rule — "One-Third of Table Width"
A runner should be about one-third the width of your table — typically 12 to 16 inches (30 to 40 cm). On a standard 36-inch wide dining table, a 14-inch runner is the sweet spot. On a narrower console or bench, scale down to 10–12 inches.
| Table Length | Runner Length (finished) | Runner Width (finished) | Fabric Needed (44" wide) |
|---|---|---|---|
| 48 in (122 cm) — 4-seat | 60–72 in (152–183 cm) | 12–14 in (30–36 cm) | 3/4 yd (0.7 m) |
| 60 in (152 cm) — 6-seat | 72–84 in (183–213 cm) | 14 in (36 cm) | 1 yd (0.9 m) |
| 72 in (183 cm) — 6-seat | 84–96 in (213–244 cm) | 14–16 in (36–40 cm) | 1-1/4 yd (1.15 m) |
| 96 in (244 cm) — 8-seat | 108–120 in (274–305 cm) | 16 in (40 cm) | 1-1/2 yd (1.4 m) |
Choosing the Right Fabric
The right fabric makes mitered corners easier to press and the finished runner look more expensive. Three fabrics work especially well:
Quilting Cotton (Best for Beginners)
Quilting cotton presses into razor-sharp creases, feeds smoothly through your machine, and holds a mitered corner beautifully. It's my go-to recommendation for anyone sewing their first mitered-corner project. Weight: about 3.5–5 oz/yd².
Linen-Cotton Blend (Best Look)
A linen-cotton blend (often sold as "Essex linen" or "cotton-linen") gives the runner a sophisticated natural texture with slight slubbing that reads as high-end. It's a touch harder to press crisp — give it a shot of starch — but the finished runner looks like it came from a boutique home store.
Cotton Canvas or Duck Cloth (Most Durable)
Cotton canvas (around 7–8 oz/yd²) is heavier and more structured, ideal for a runner that will be used daily or washed often. The thicker fabric is harder to miter neatly — plan to trim bulk aggressively at the corners.
Materials & Tools
What You Need
Materials
- Medium-weight cotton or linen-cotton blend — see sizing chart for yardage
- All-purpose polyester thread in a coordinating color
- Optional: spray starch (for crisp pressing)
- Optional: lightweight iron-on interfacing for extra body
Tools
- Sewing machine with a straight stitch
- Fabric scissors or rotary cutter with cutting mat
- Clear quilting ruler, 6 × 24 inches recommended
- Iron and ironing board
- Water-soluble marking pen or tailor's chalk
- Pins or sewing clips
- Hand-sewing needle (optional slip-stitch finish)
Cutting Layout
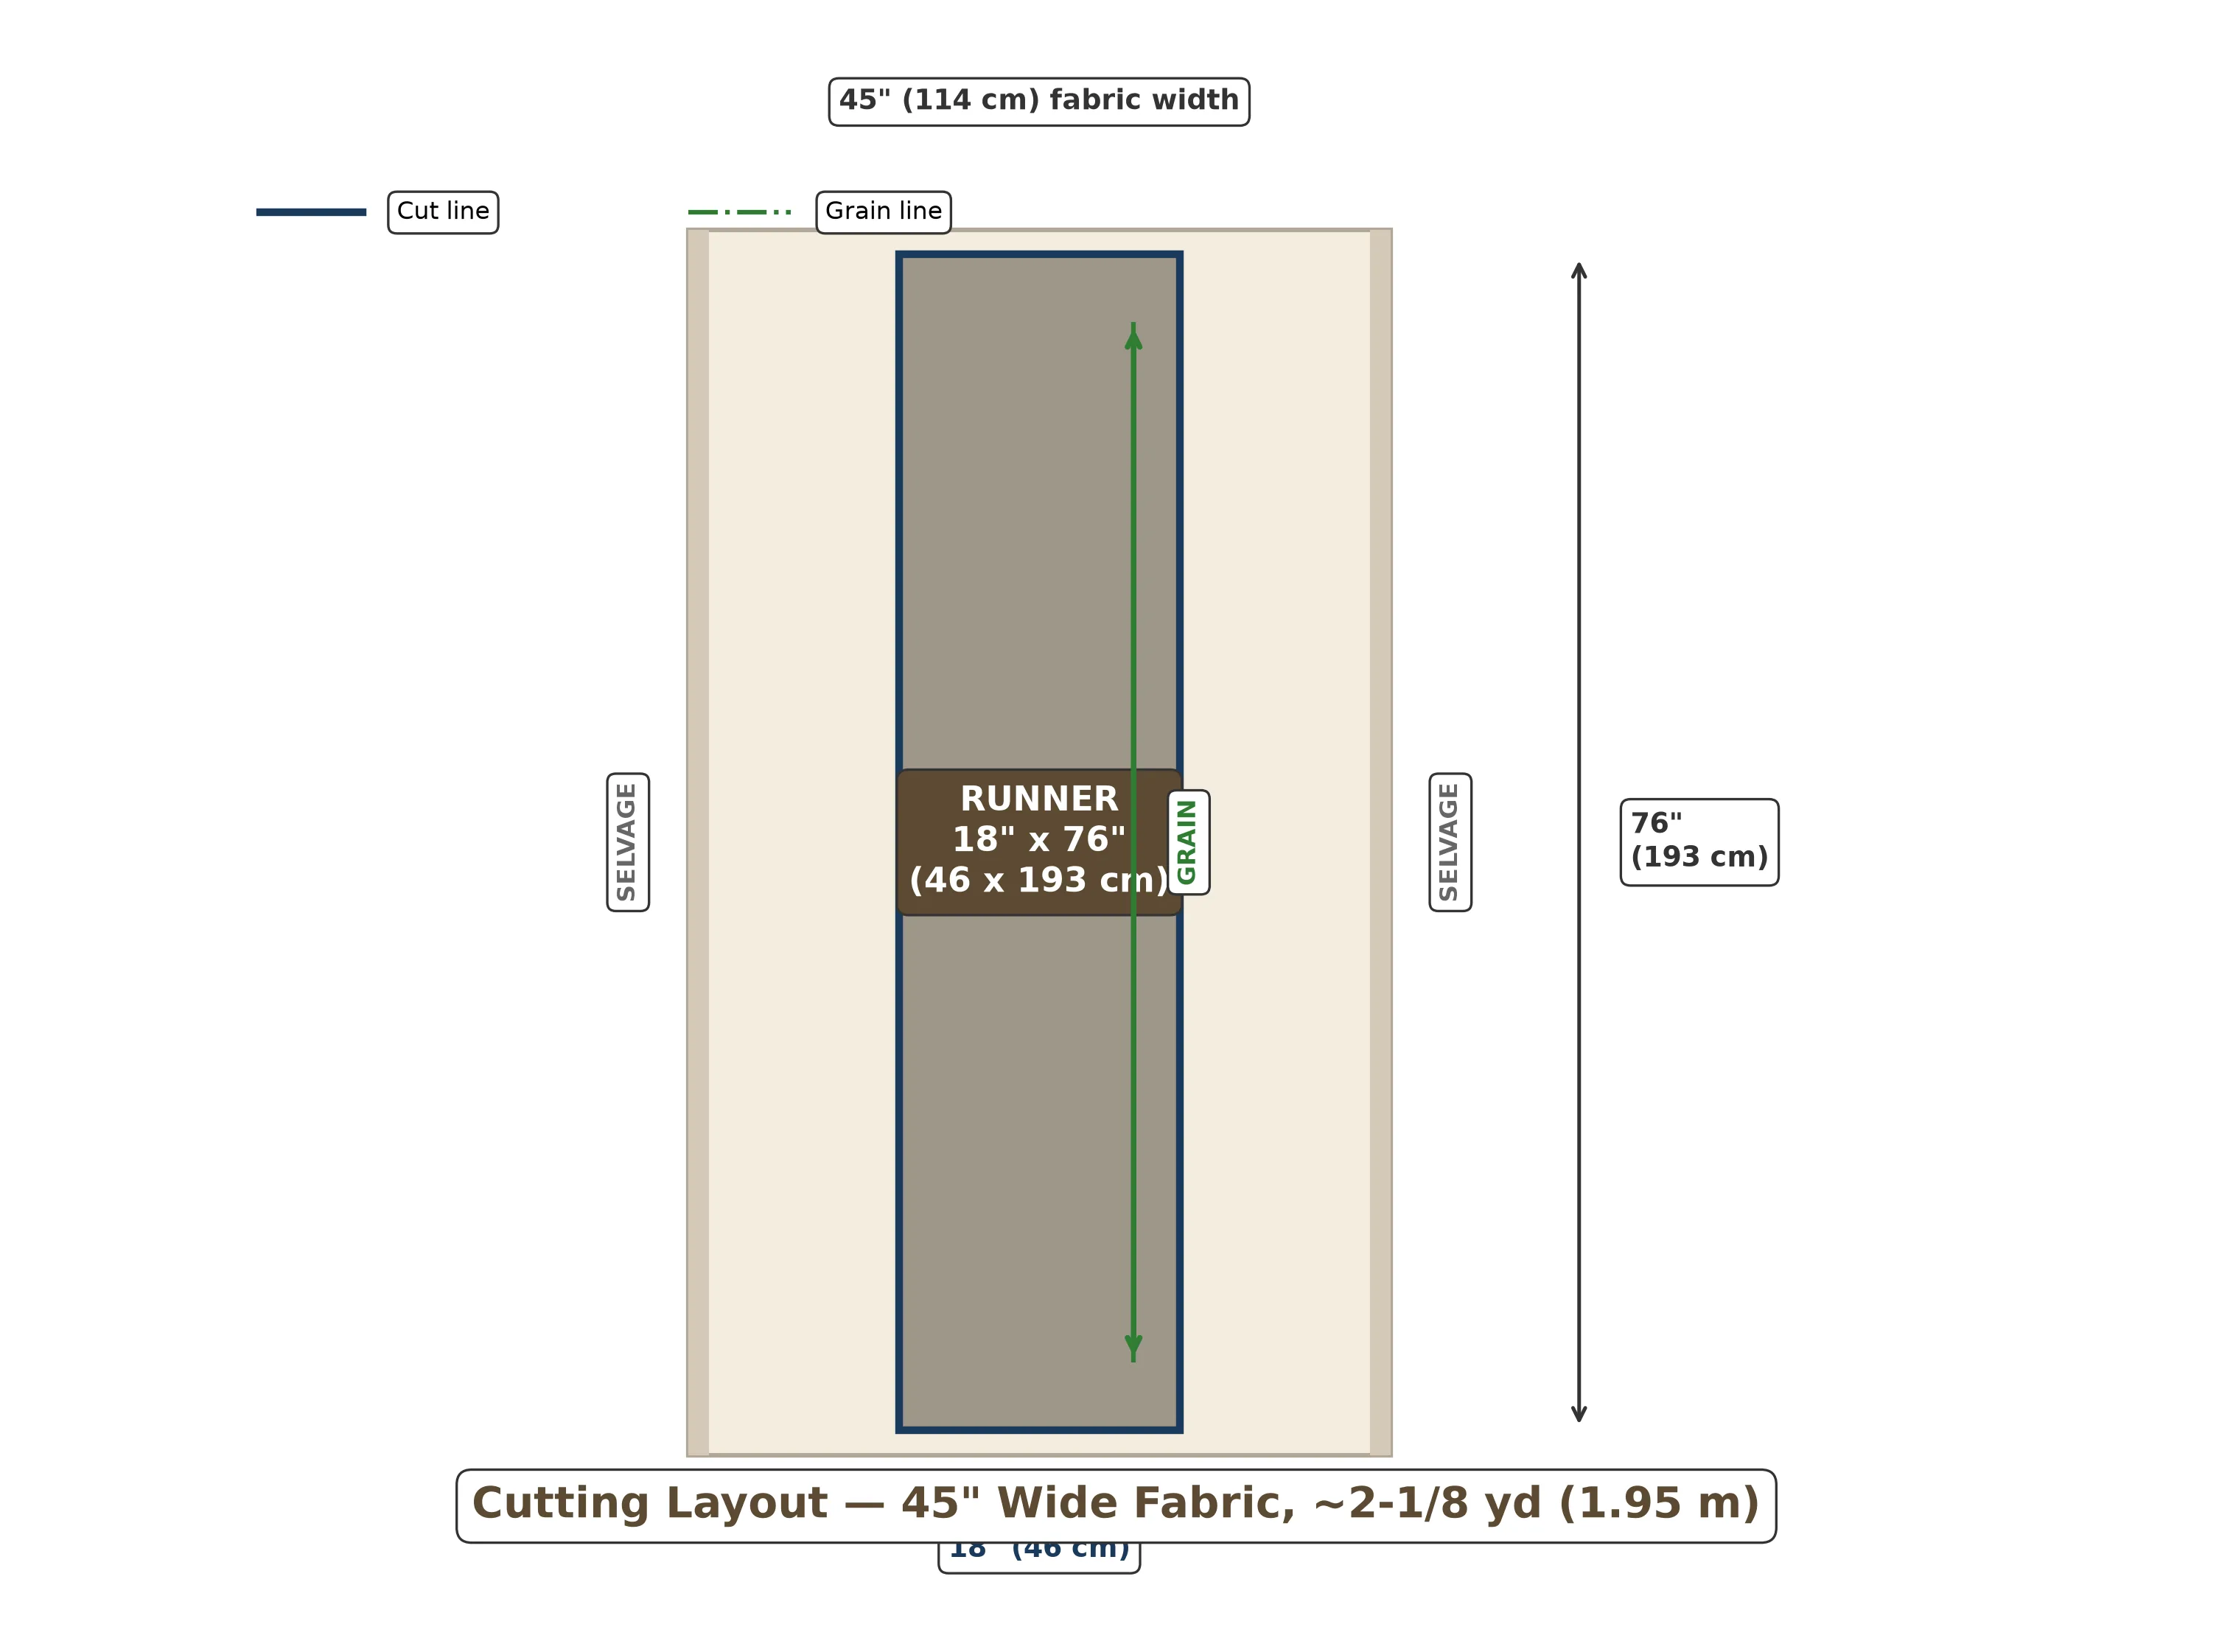
Mitered corner projects use a single rectangle with a generous hem allowance all the way around. The math is simple:
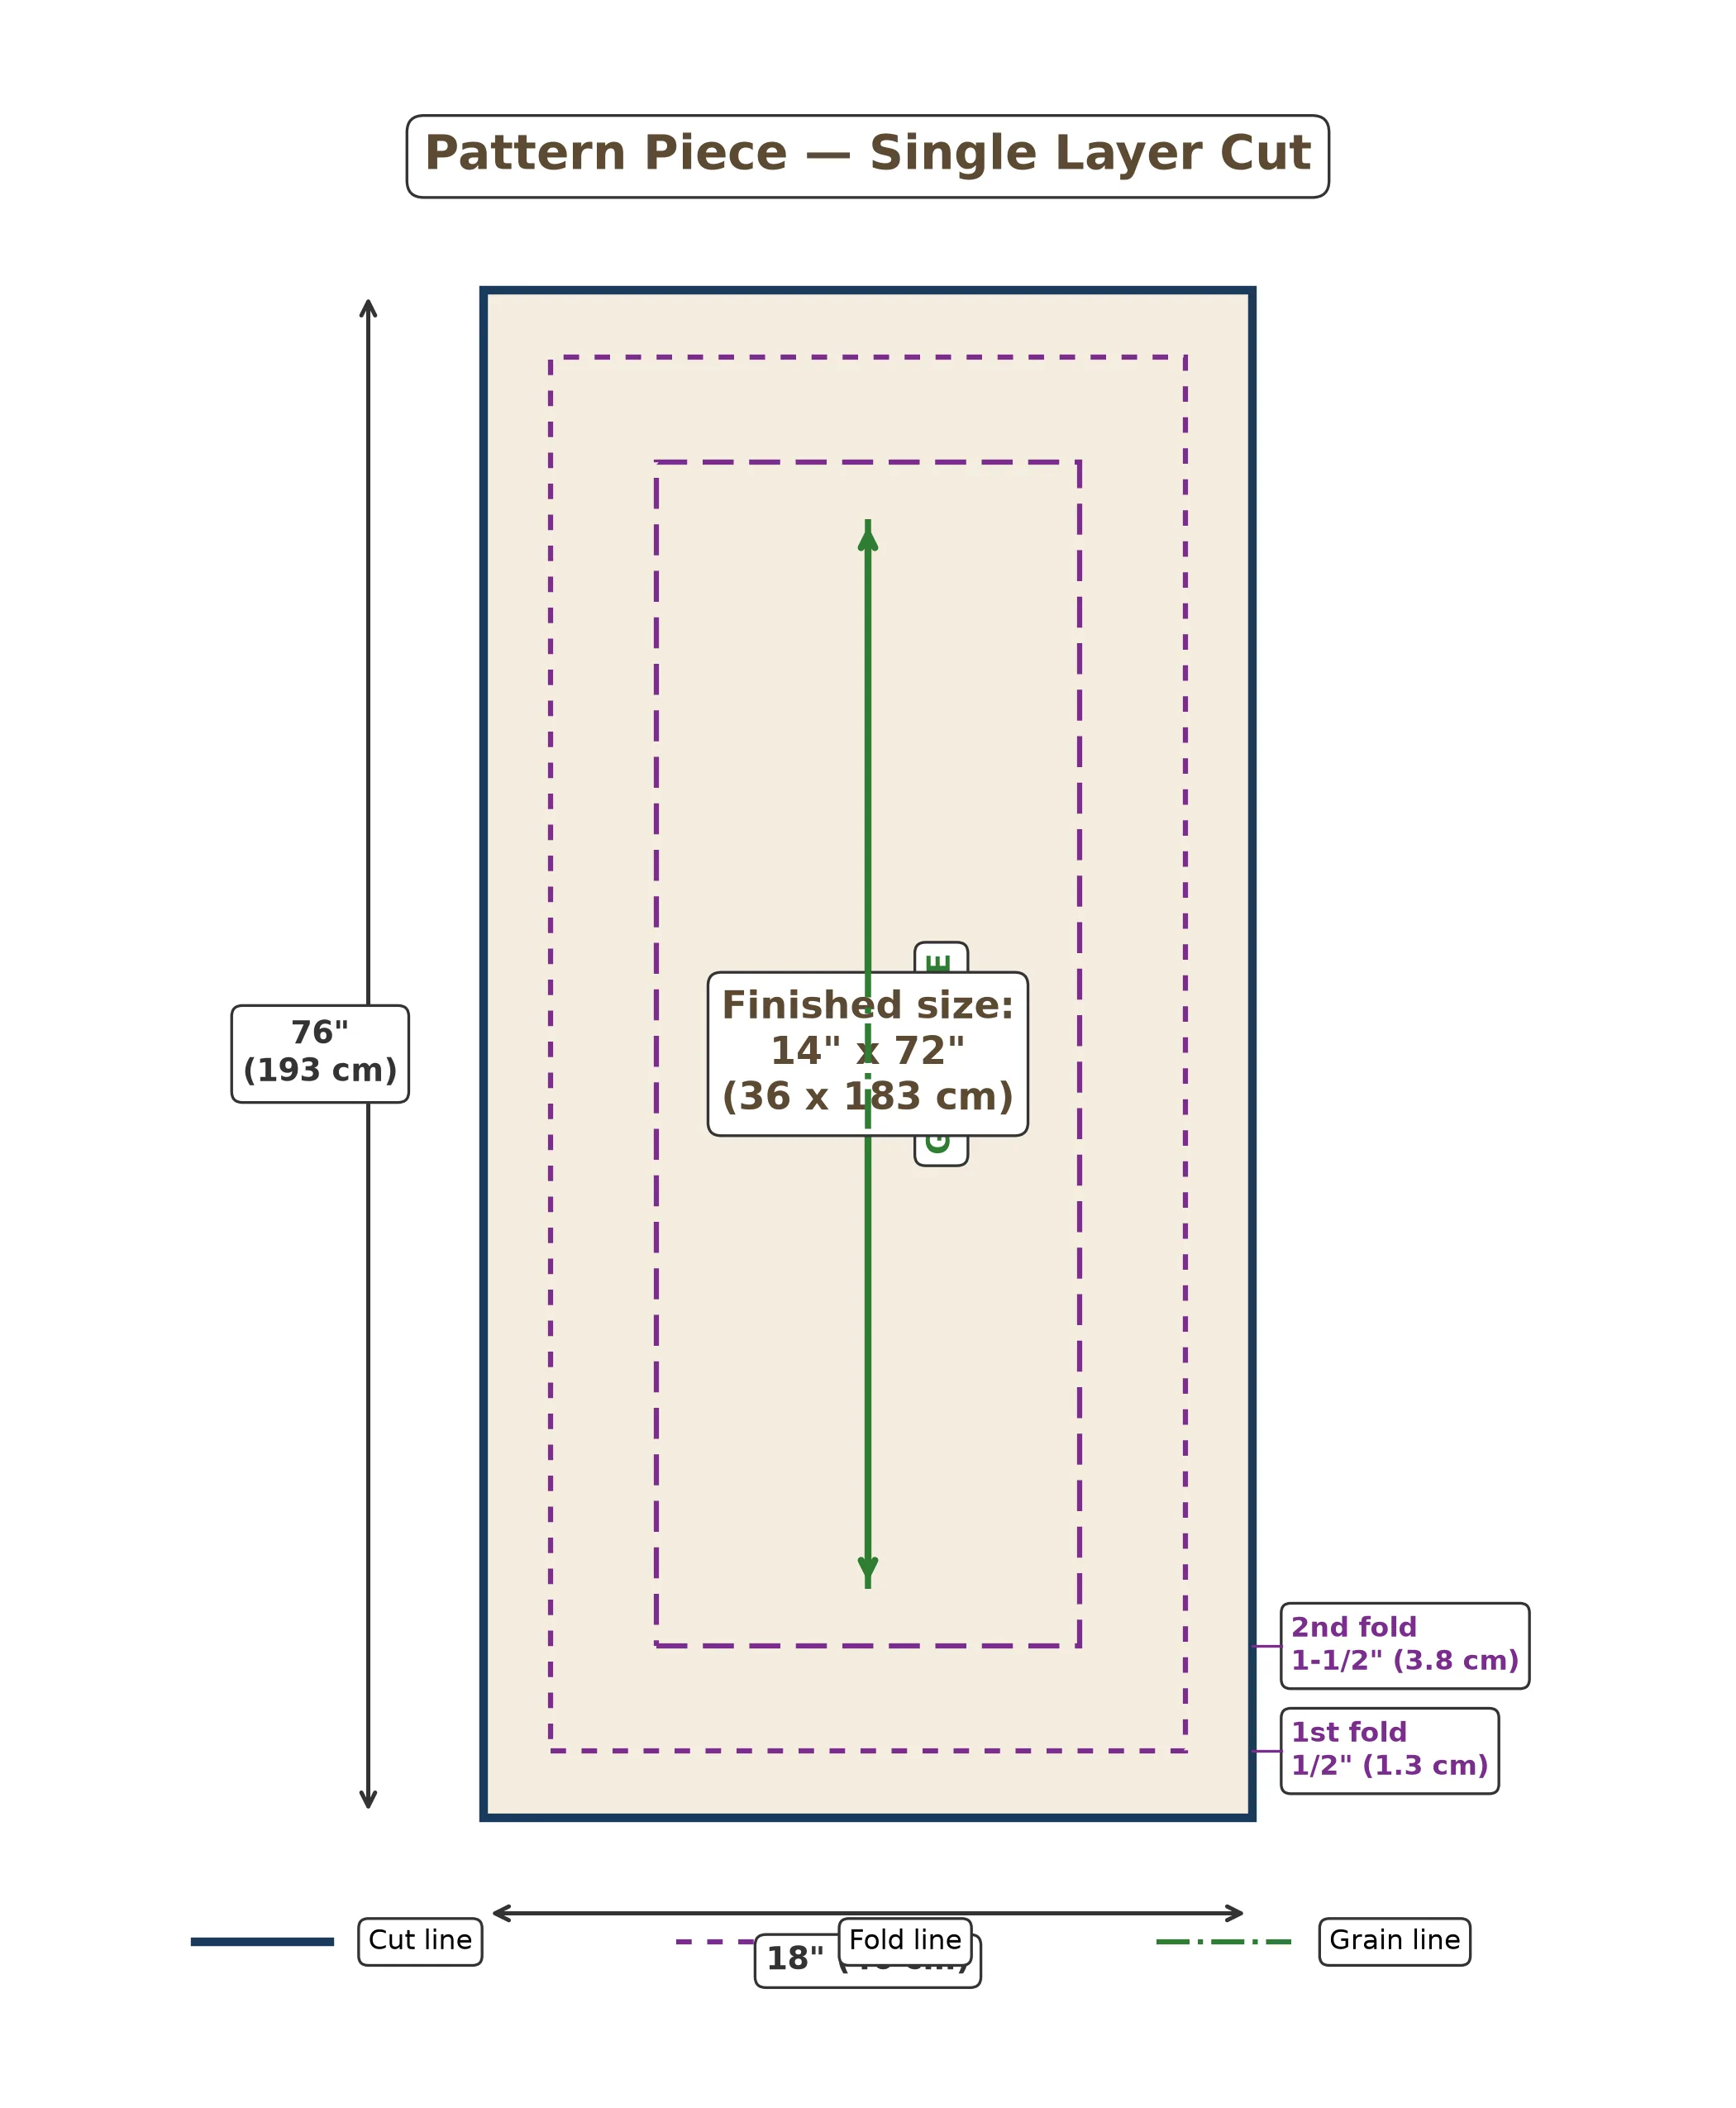
Cut dimensions = Finished size + 4 inches on each dimension
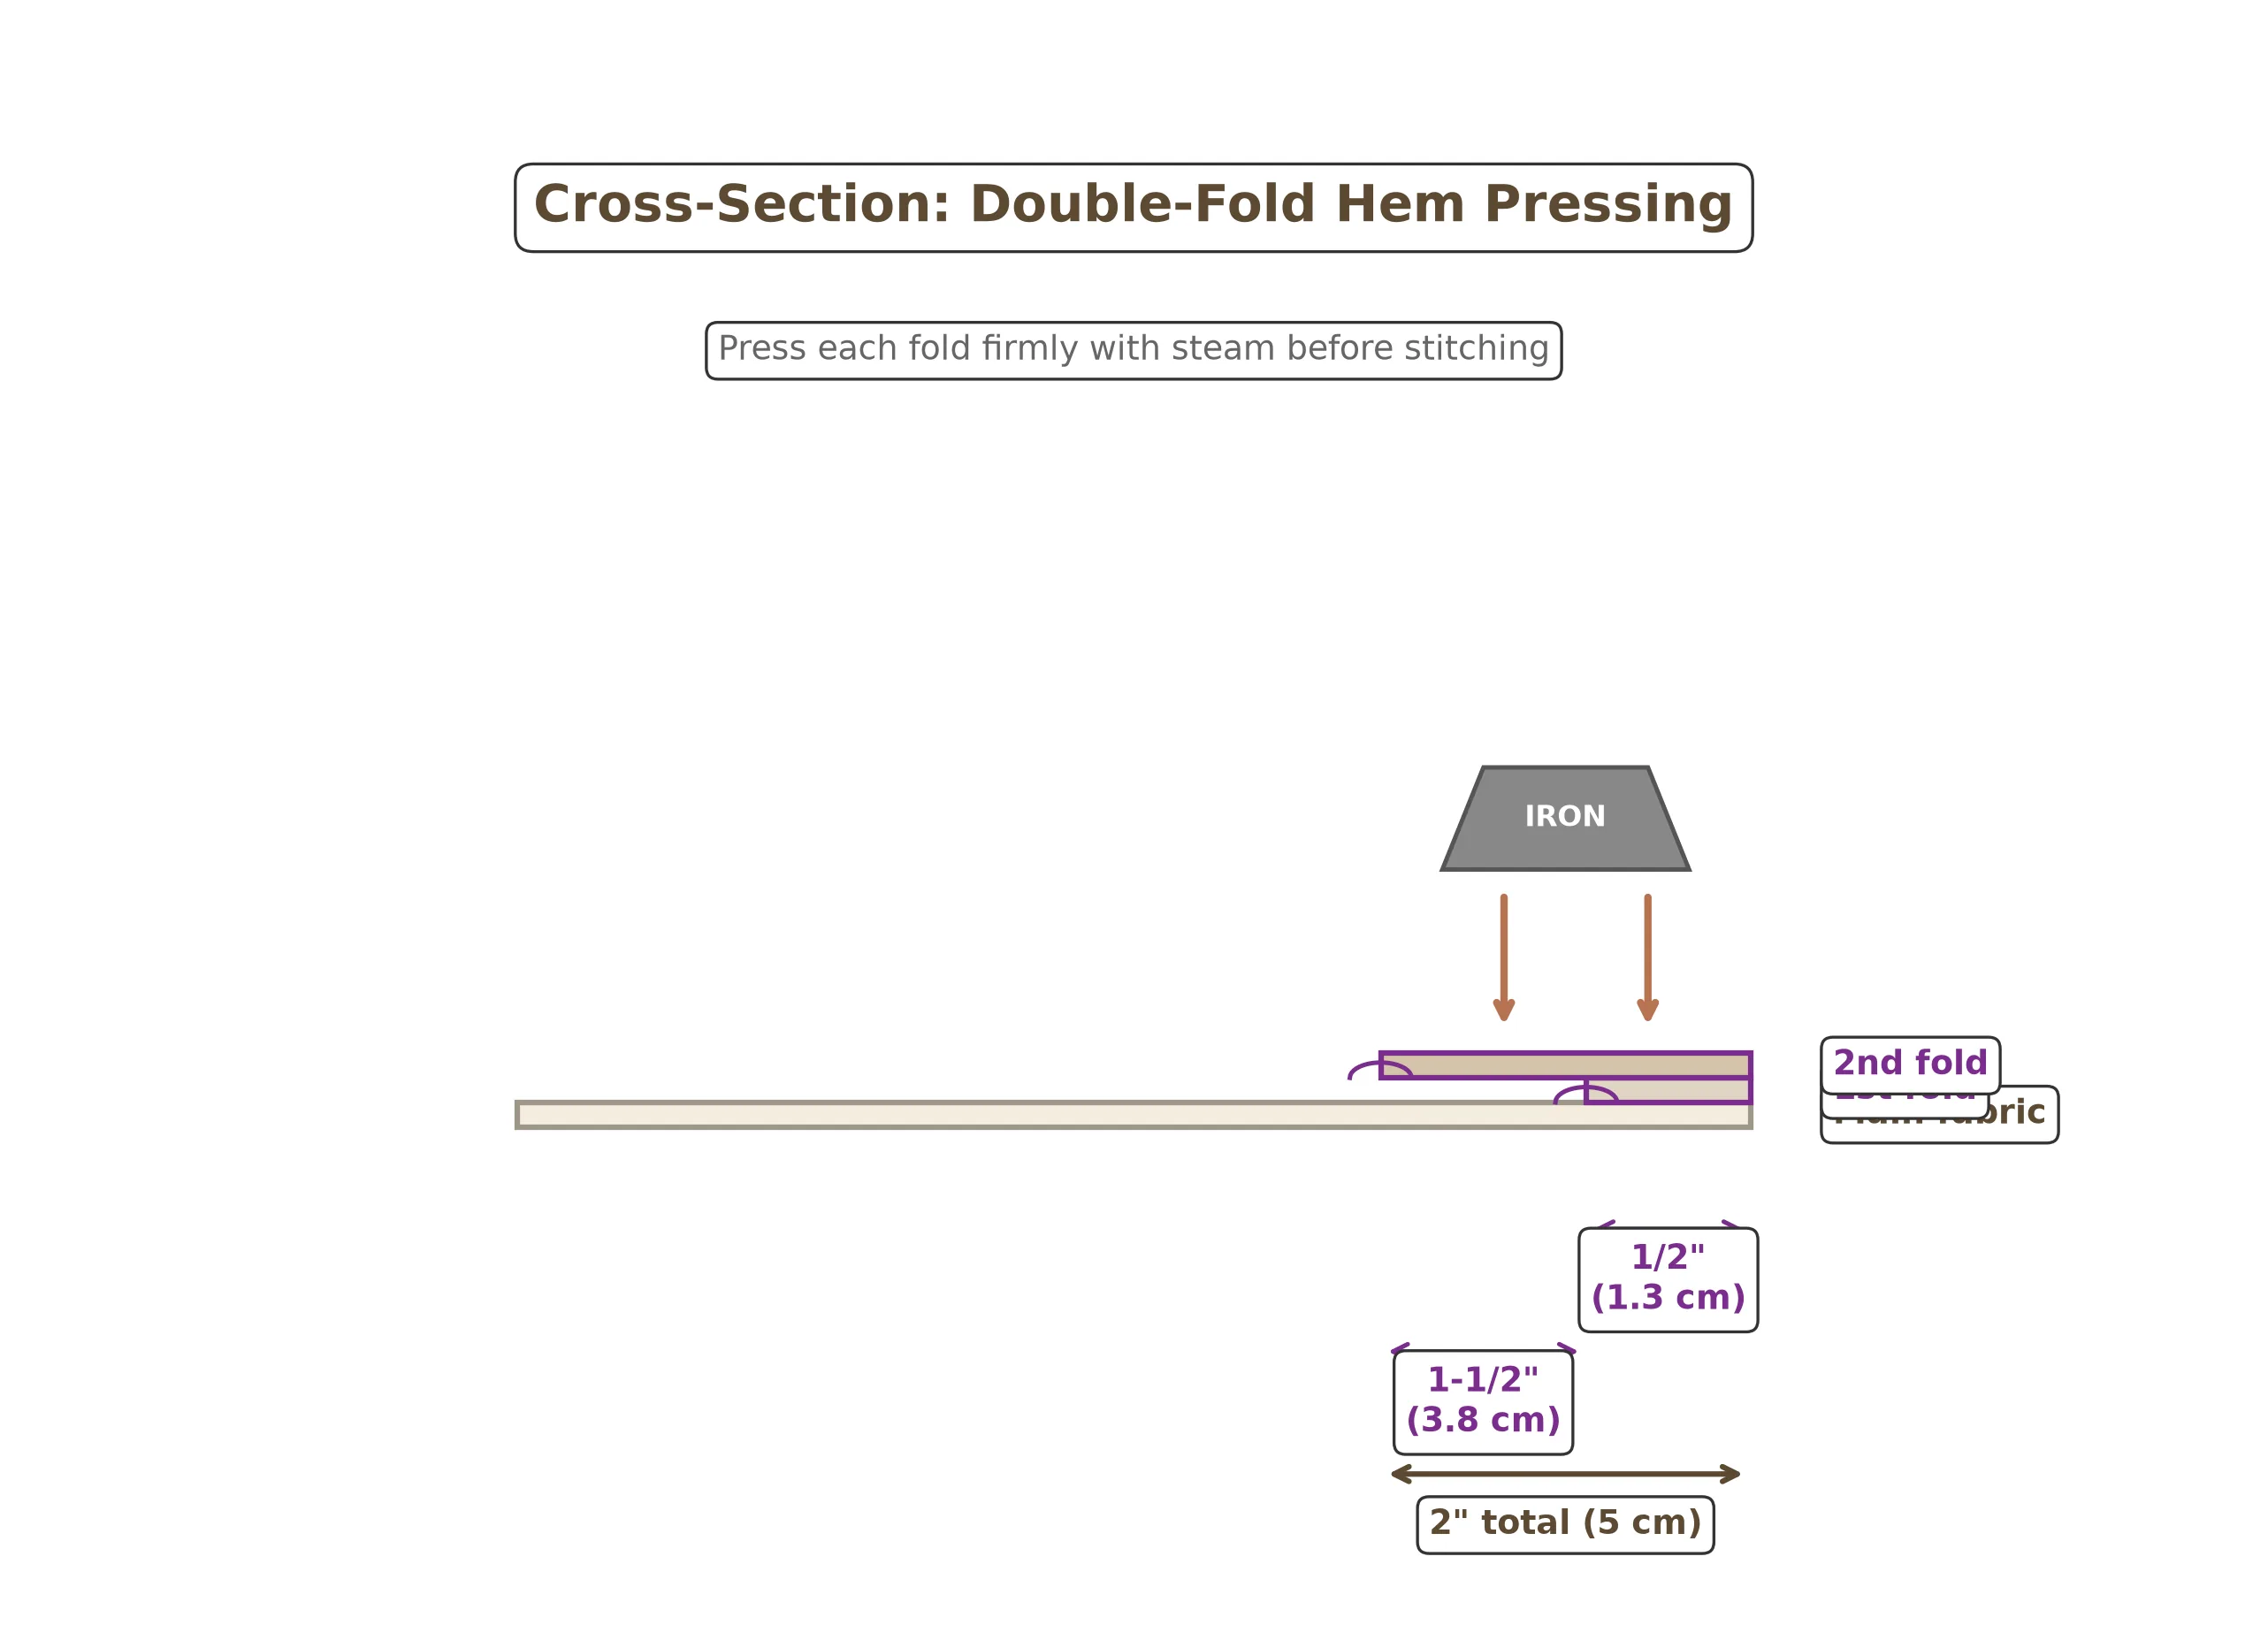
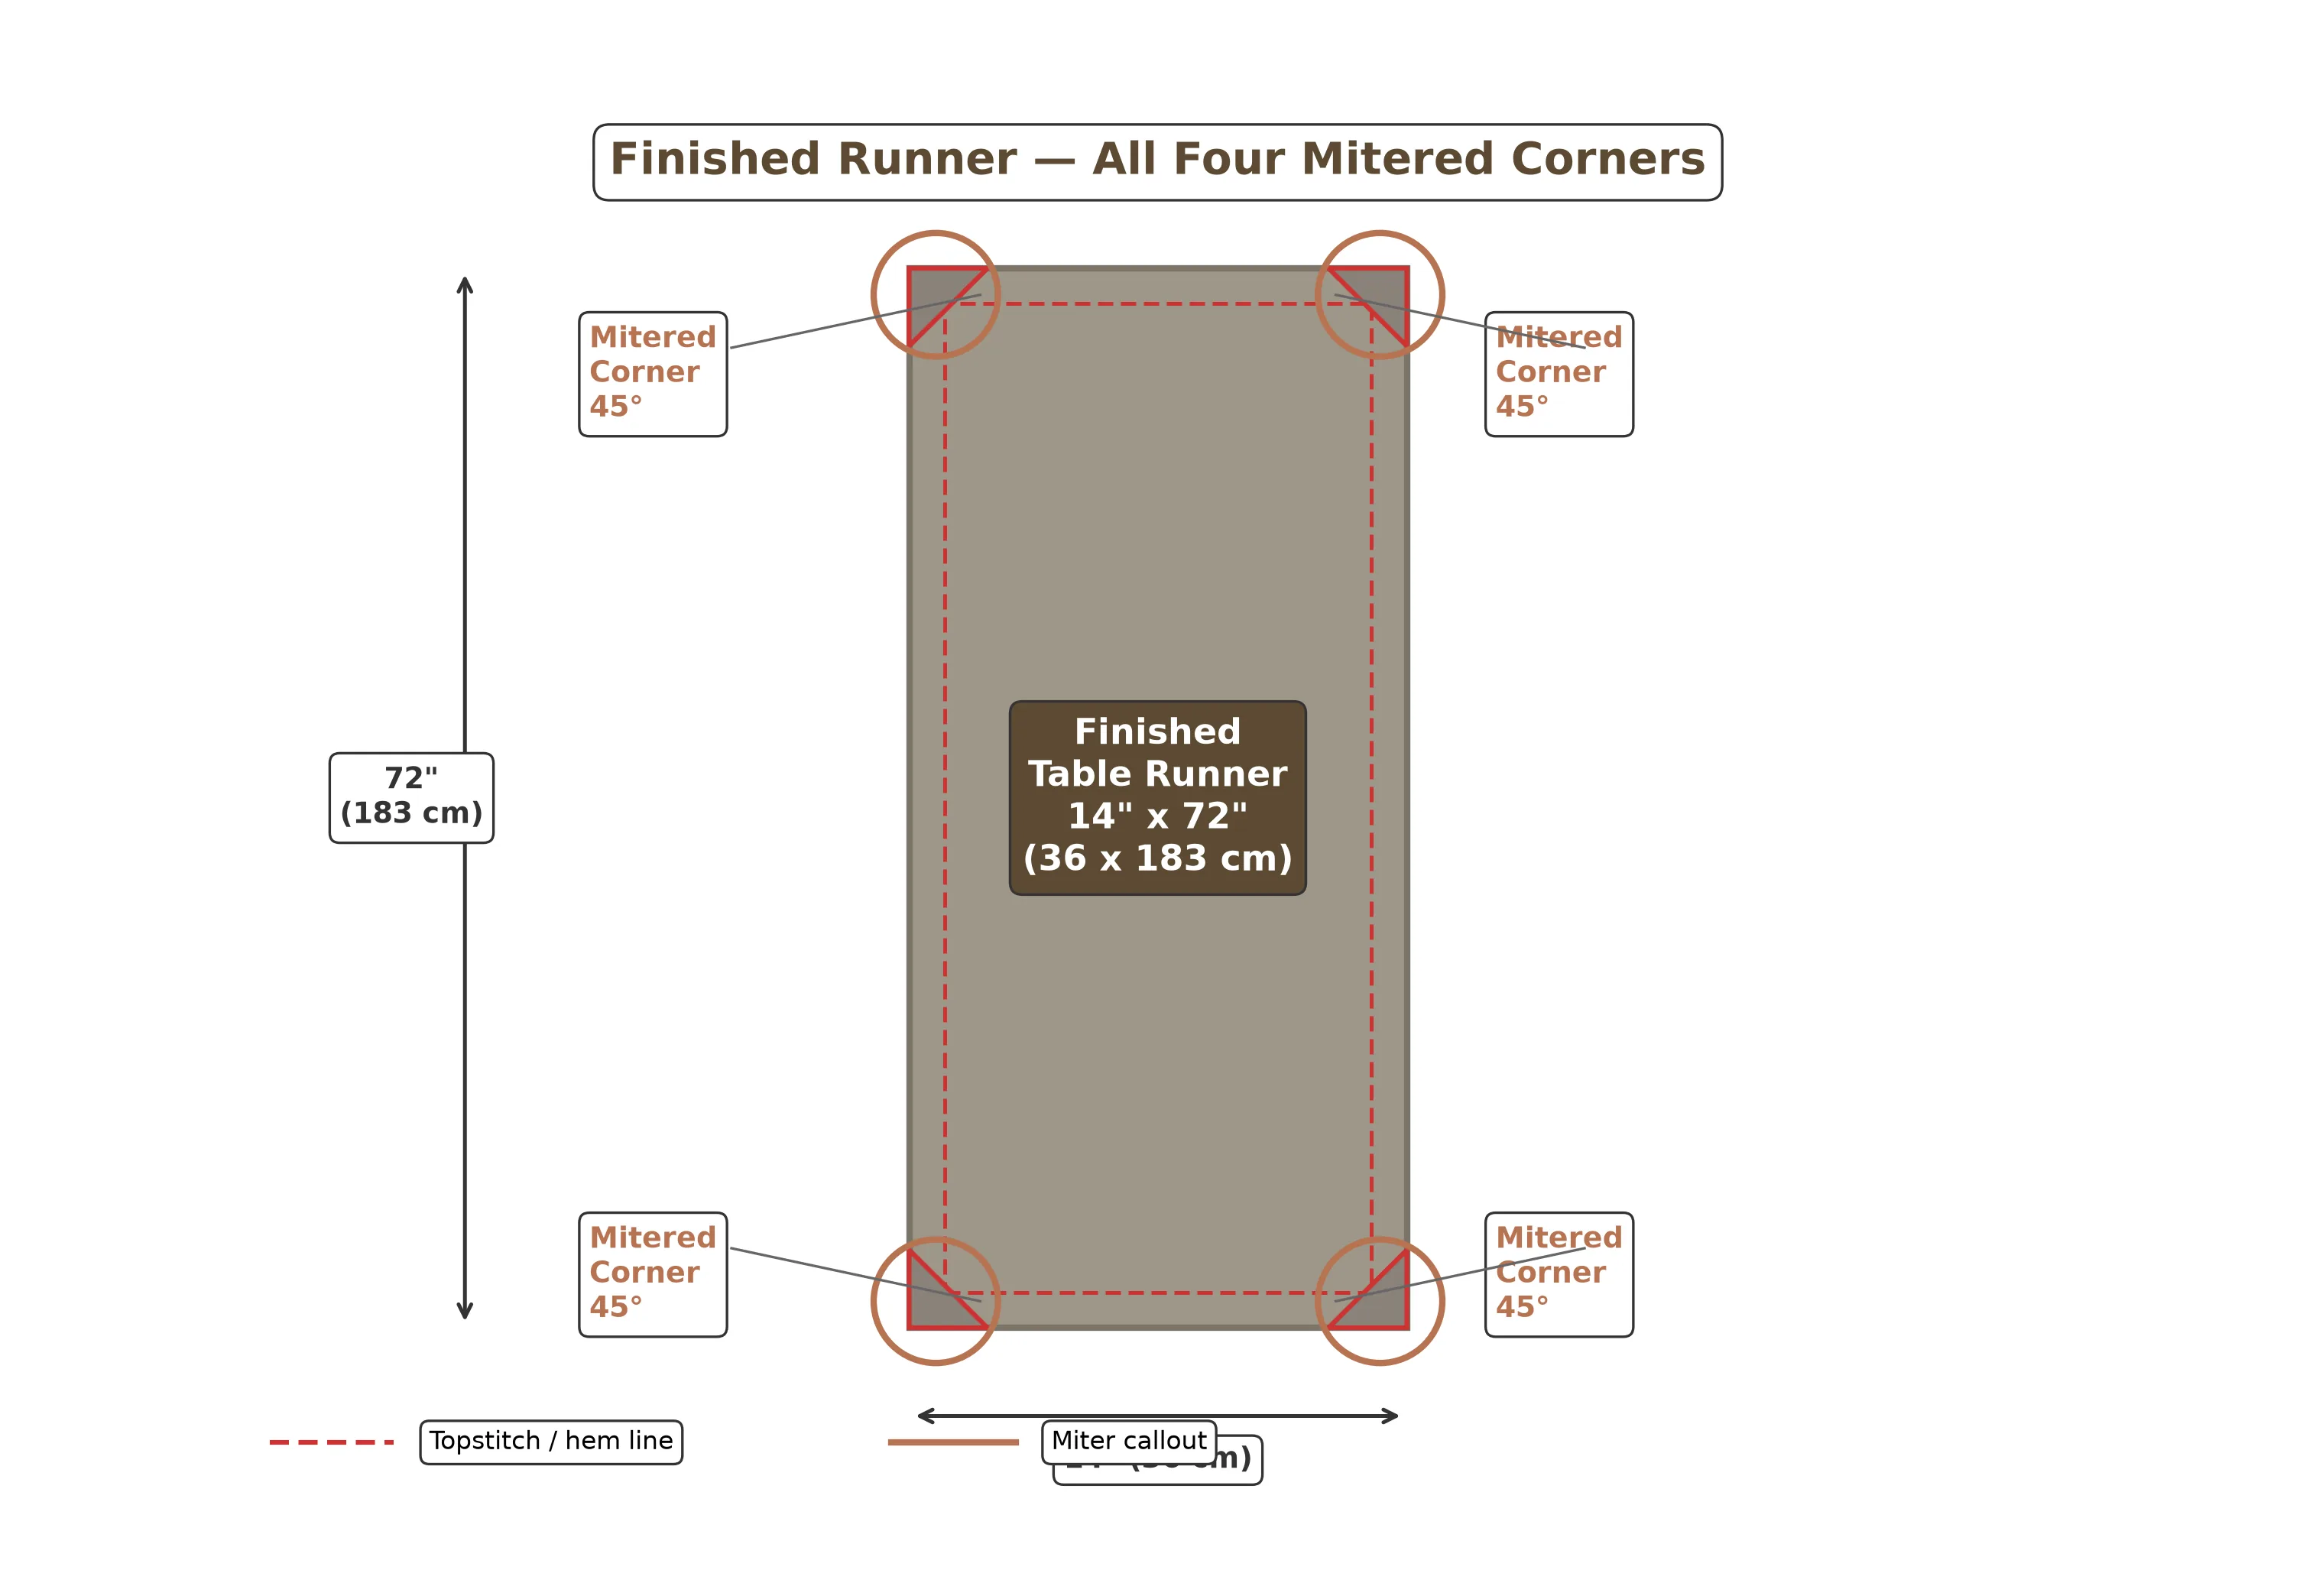
That extra 4 inches is split as a 1/2-inch (1.3 cm) first fold and a 1-1/2-inch (3.8 cm) second fold on each edge, totaling 2 inches of hem allowance per side × 2 sides = 4 inches per dimension. For a 14 × 72 in (36 × 183 cm) finished runner, cut your fabric at 18 × 76 in (46 × 193 cm).
How to Cut Straight and True
- Straighten the raw edge first. Pull a crosswise thread or use your ruler to cut a perfectly straight line across the width of your fabric. A crooked starting edge throws off everything that follows.
- Measure and mark the full length. Lay your fabric flat on a cutting mat. Measure from the straightened edge and mark the cut length (e.g., 76 inches) at both selvage edges.
- Cut using a ruler and rotary cutter for the straightest possible edge. Scissors work too — just go slowly and keep the fabric flat.
- Mark 45-degree miter guides. On the wrong side of the fabric, use a ruler to draw a 2-inch (5 cm) square at each corner, then draw a diagonal line from the inside corner to the outside corner. This diagonal is your miter stitching line.
Step-by-Step Construction
Here is the complete mitered corner sequence, broken into six manageable steps. Take your time with pressing — it's where mitered corners are won or lost.
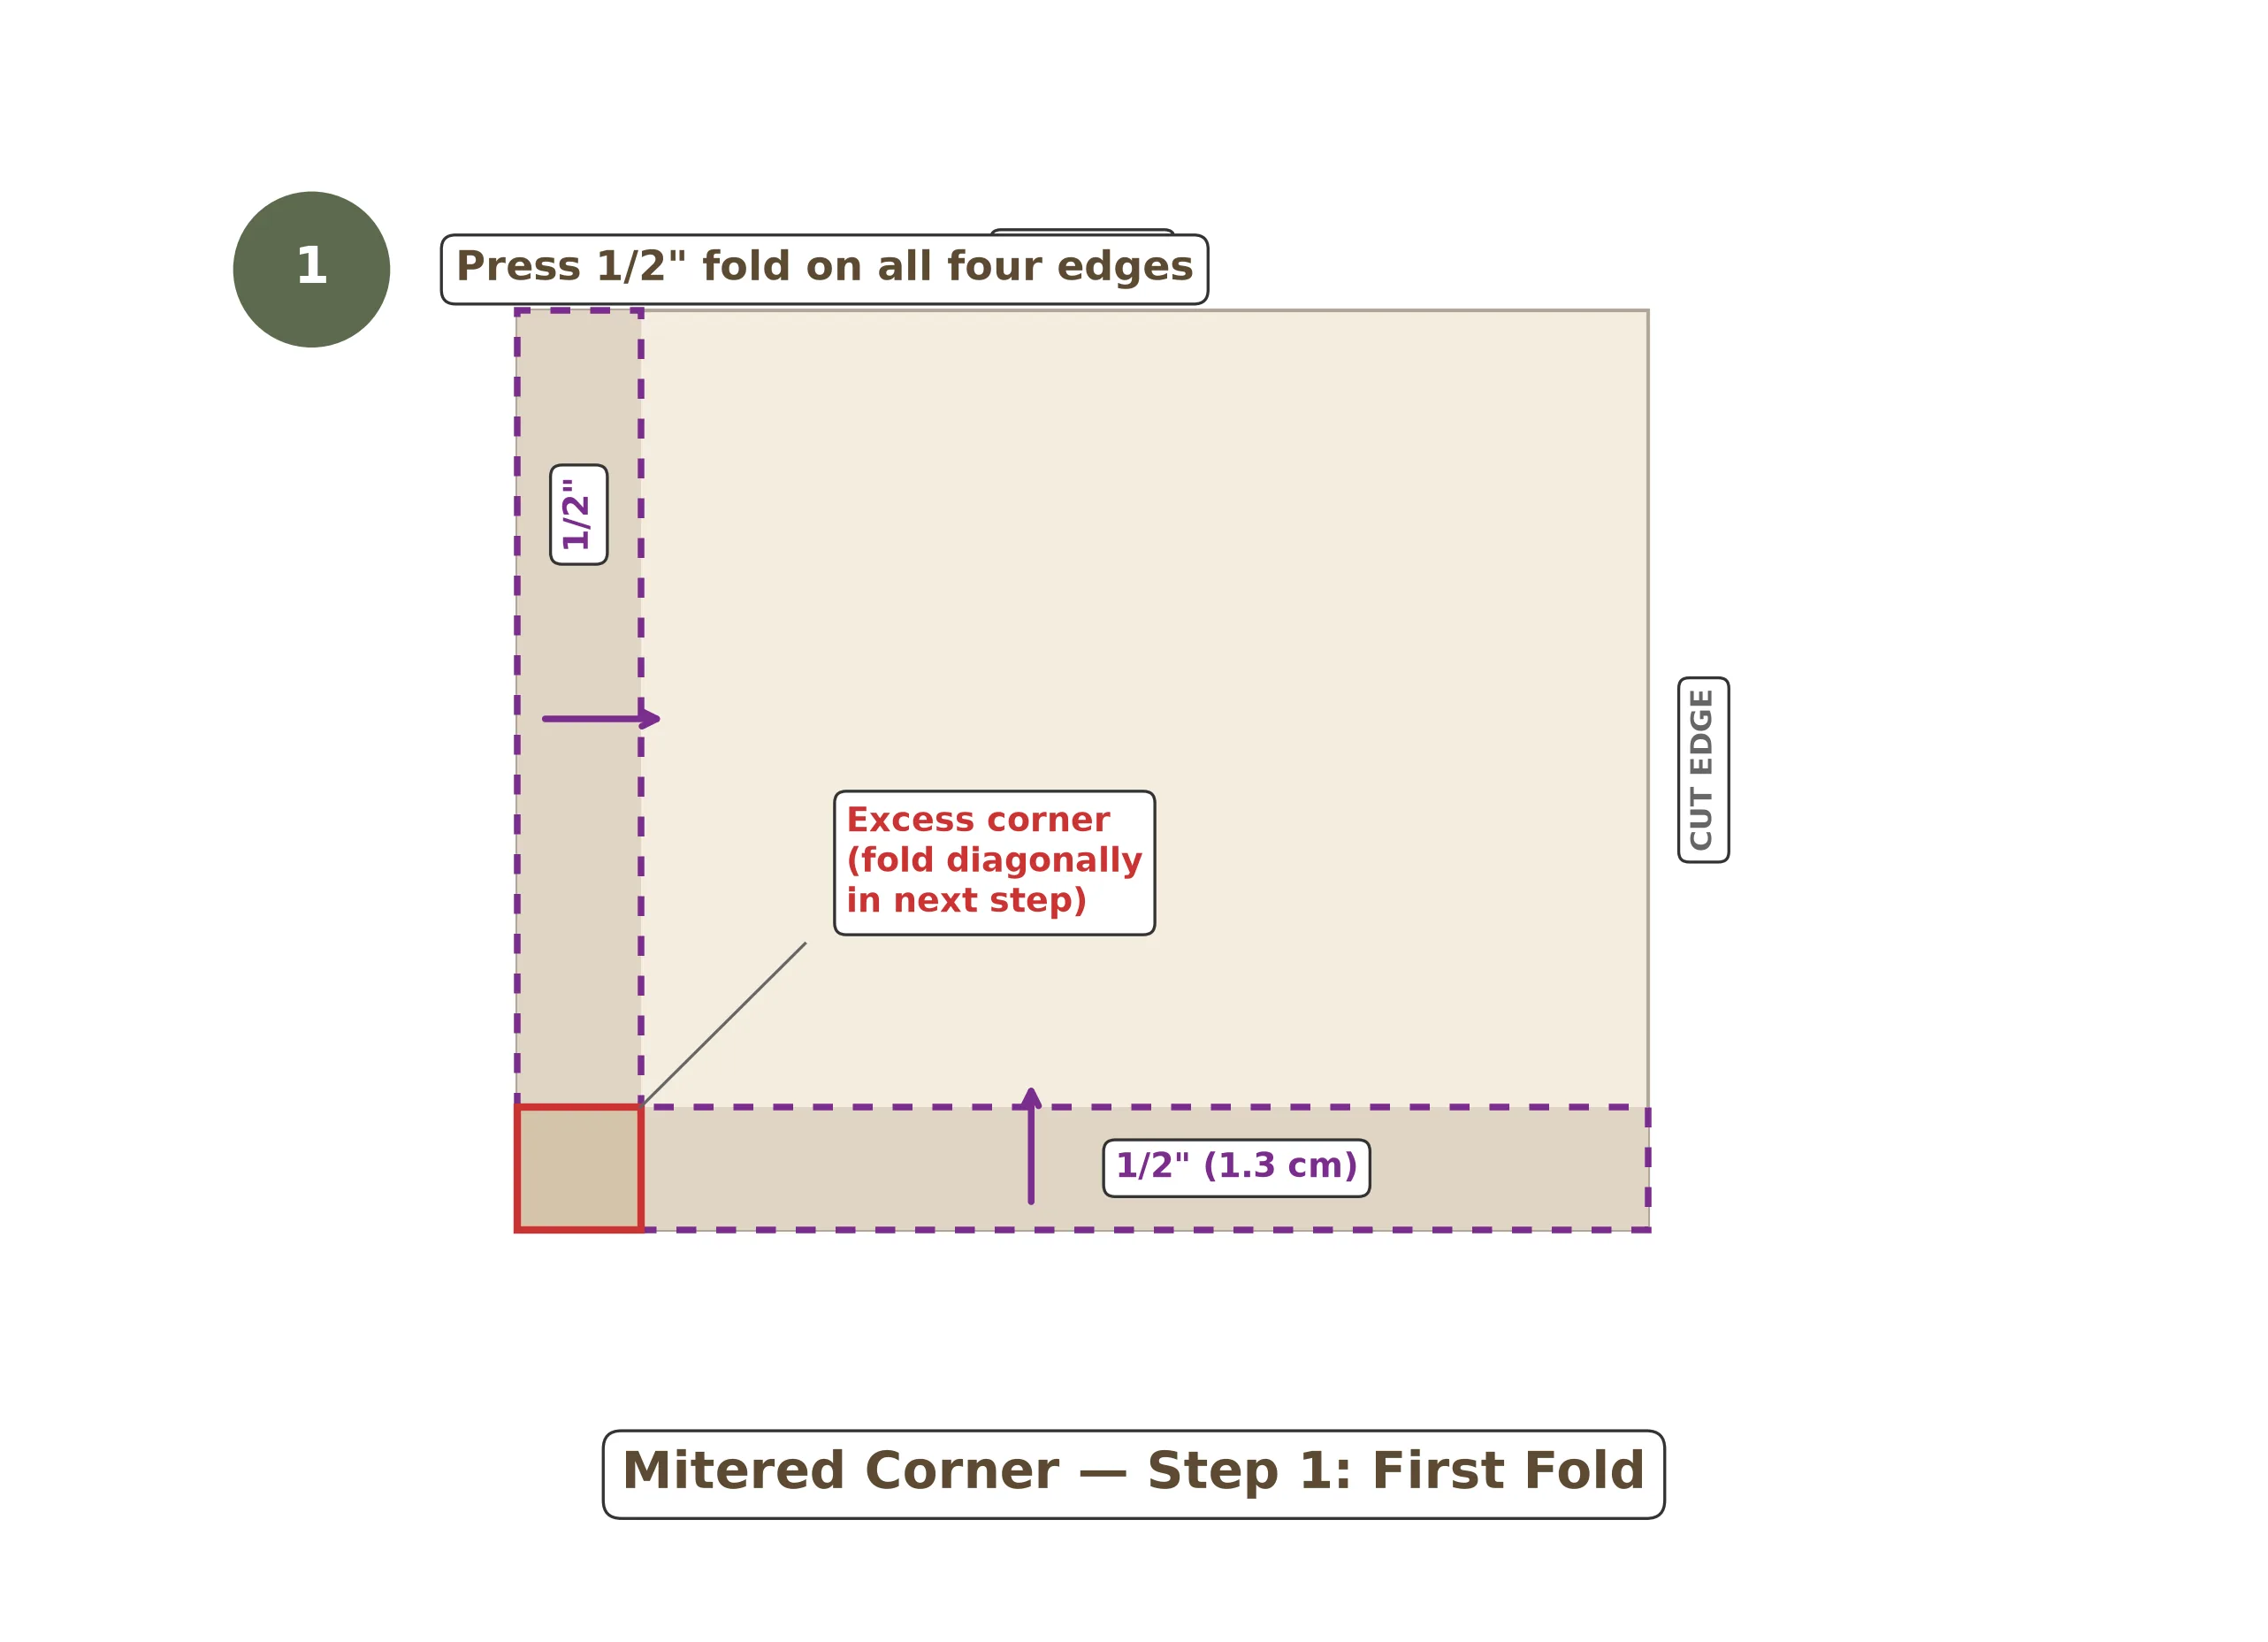
Press the First Fold — ½ inch
With your runner wrong side up, fold each raw edge under 1/2 in (1.3 cm) and press firmly. Work all four edges.
This first narrow fold tucks away the raw edge so no fraying shows on the finished hem.
Press — do not slide the iron. Lift and set it down.
Press the Second Fold — 1½ inches
Fold each edge under again by 1-1/2 in (3.8 cm) and press. All four edges now have a double-fold hem.
At each corner, the pressed creases from adjacent edges will cross — this intersection is where the magic happens next.
Make the First Miter — The Critical Step
This is the step that makes a mitered corner a mitered corner. Here is the exact sequence for one corner — you'll repeat it on all four.
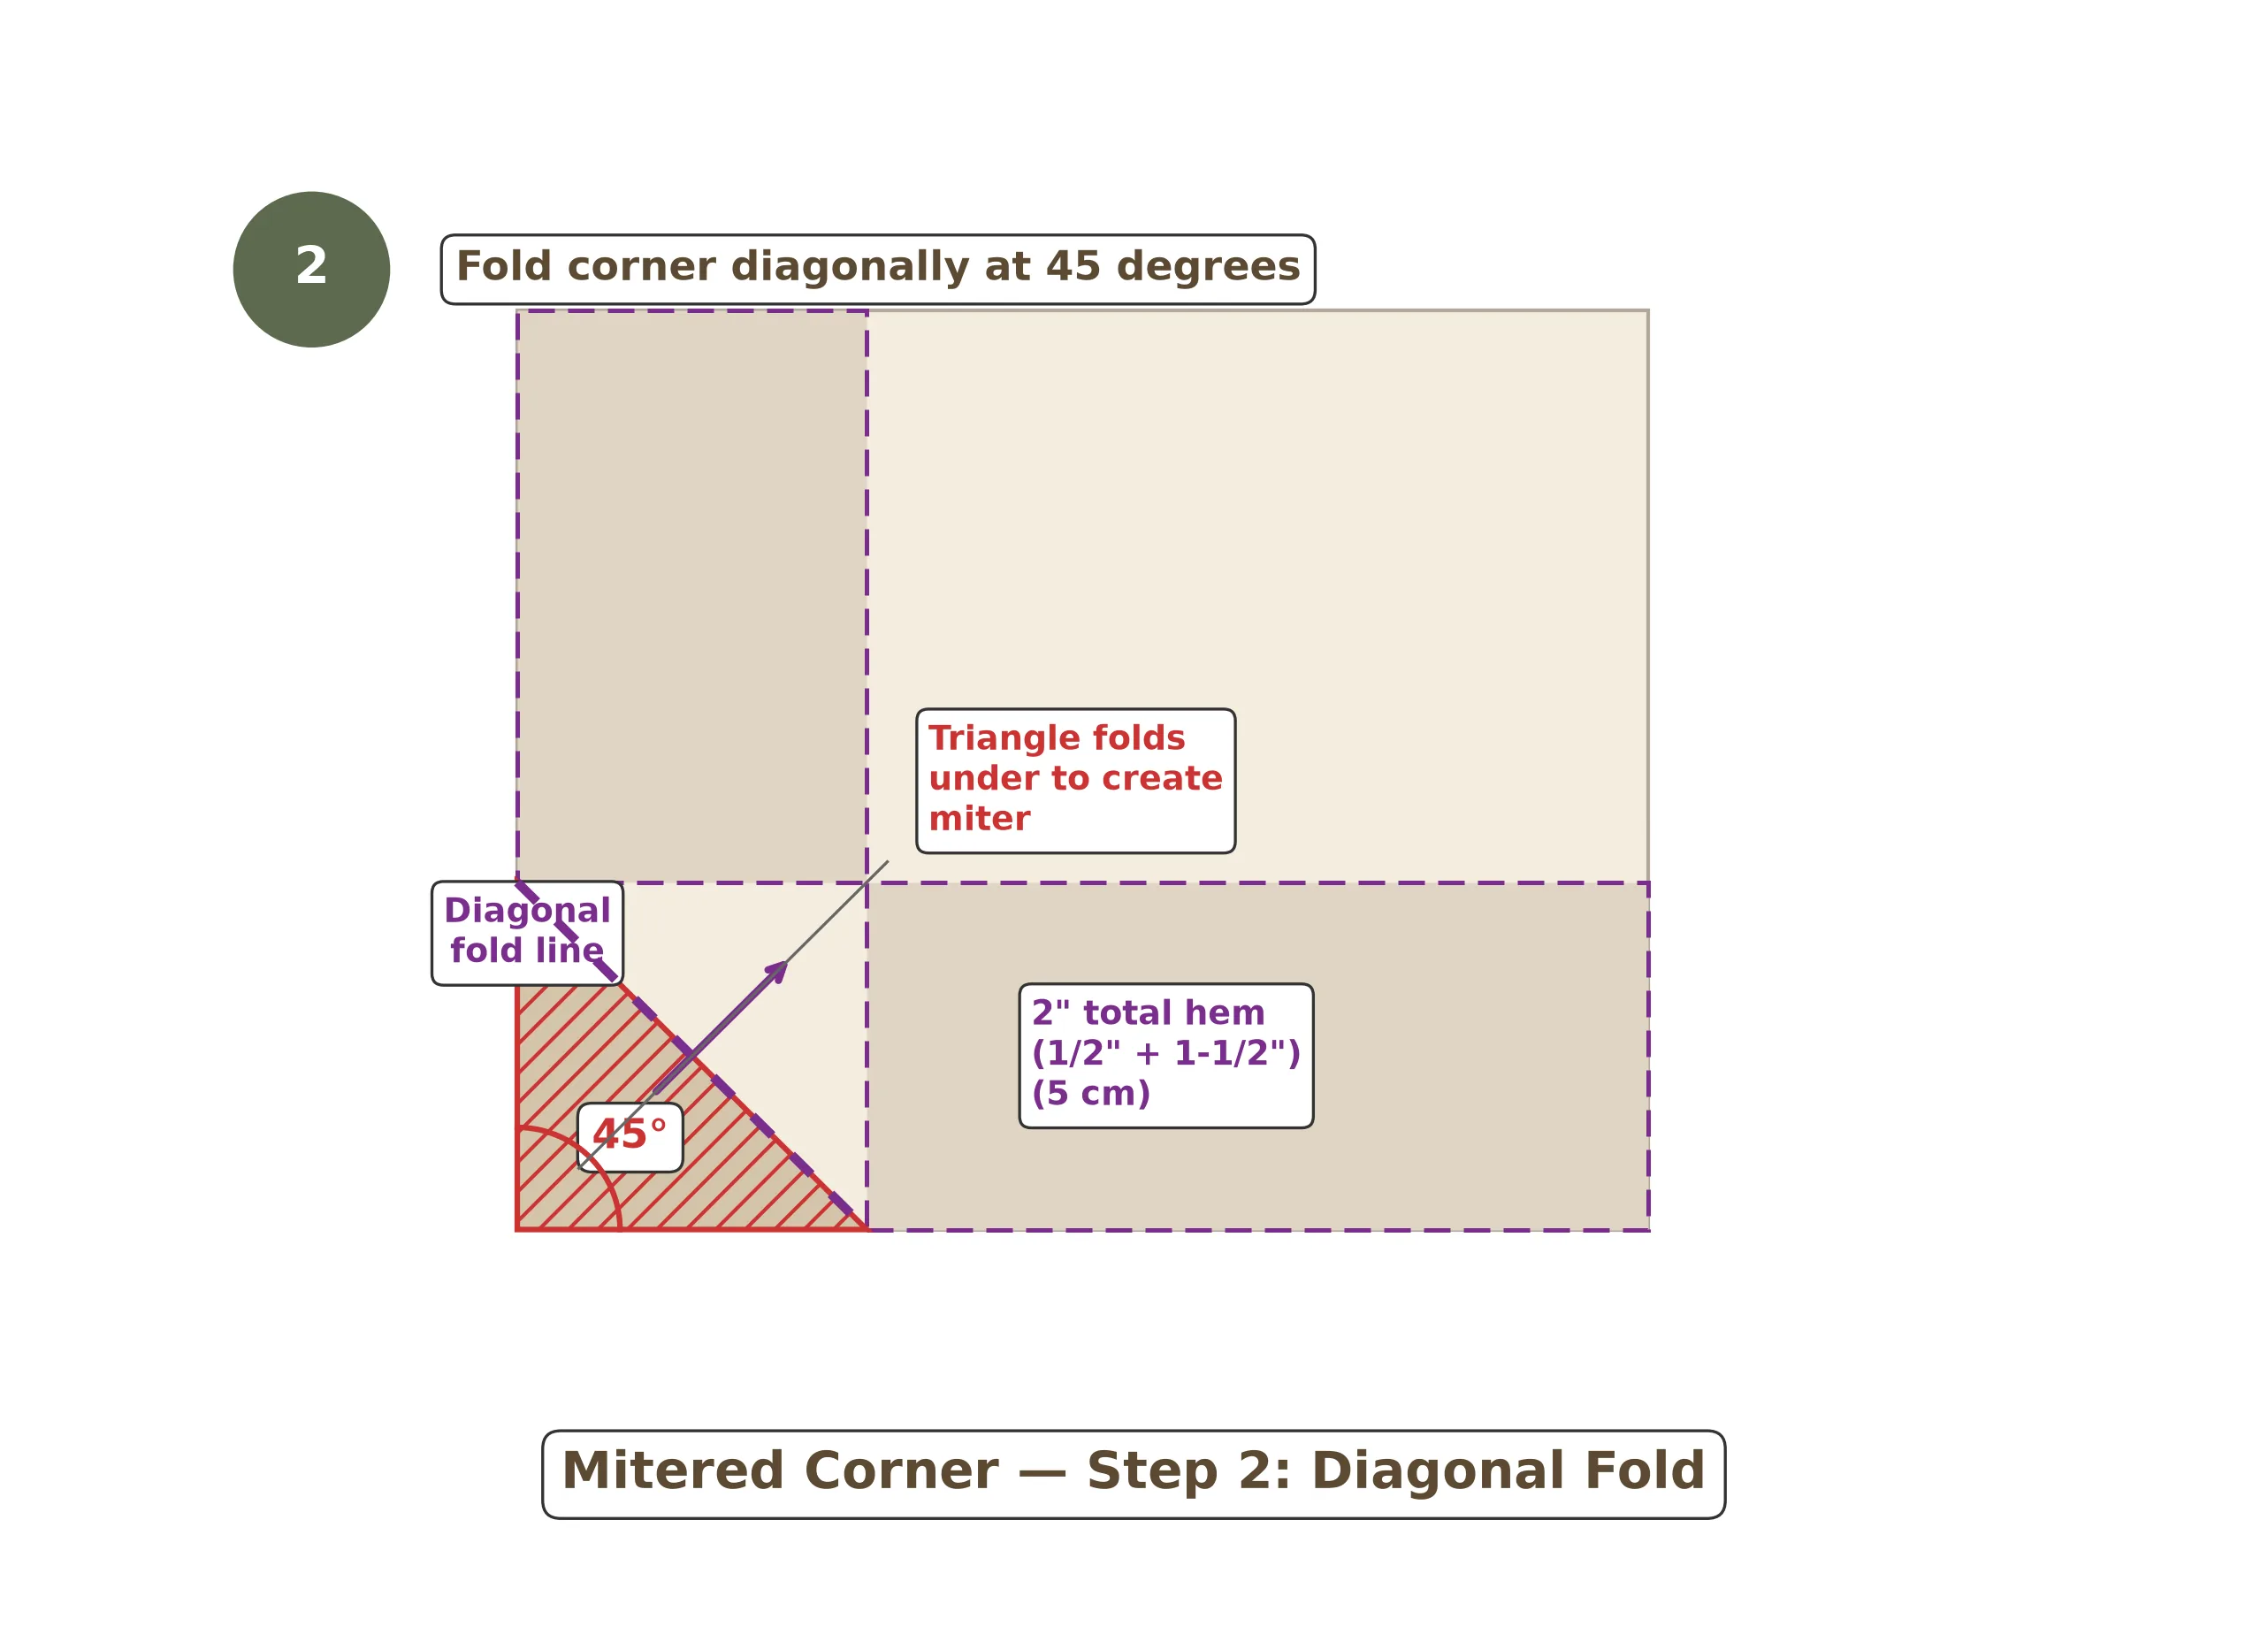
- Open the second fold at the corner (leave the first narrow fold in place). You should see the pressed crease lines from both hems forming a cross.
- Fold the corner diagonally inward so the corner point touches the inside intersection of the pressed creases. The two pressed hem creases should align perfectly along the diagonal.
- Press this diagonal fold firmly. You now have a 45-degree crease across the corner.
- Open the diagonal fold back out — you'll see a clear 45-degree crease line across the corner square.
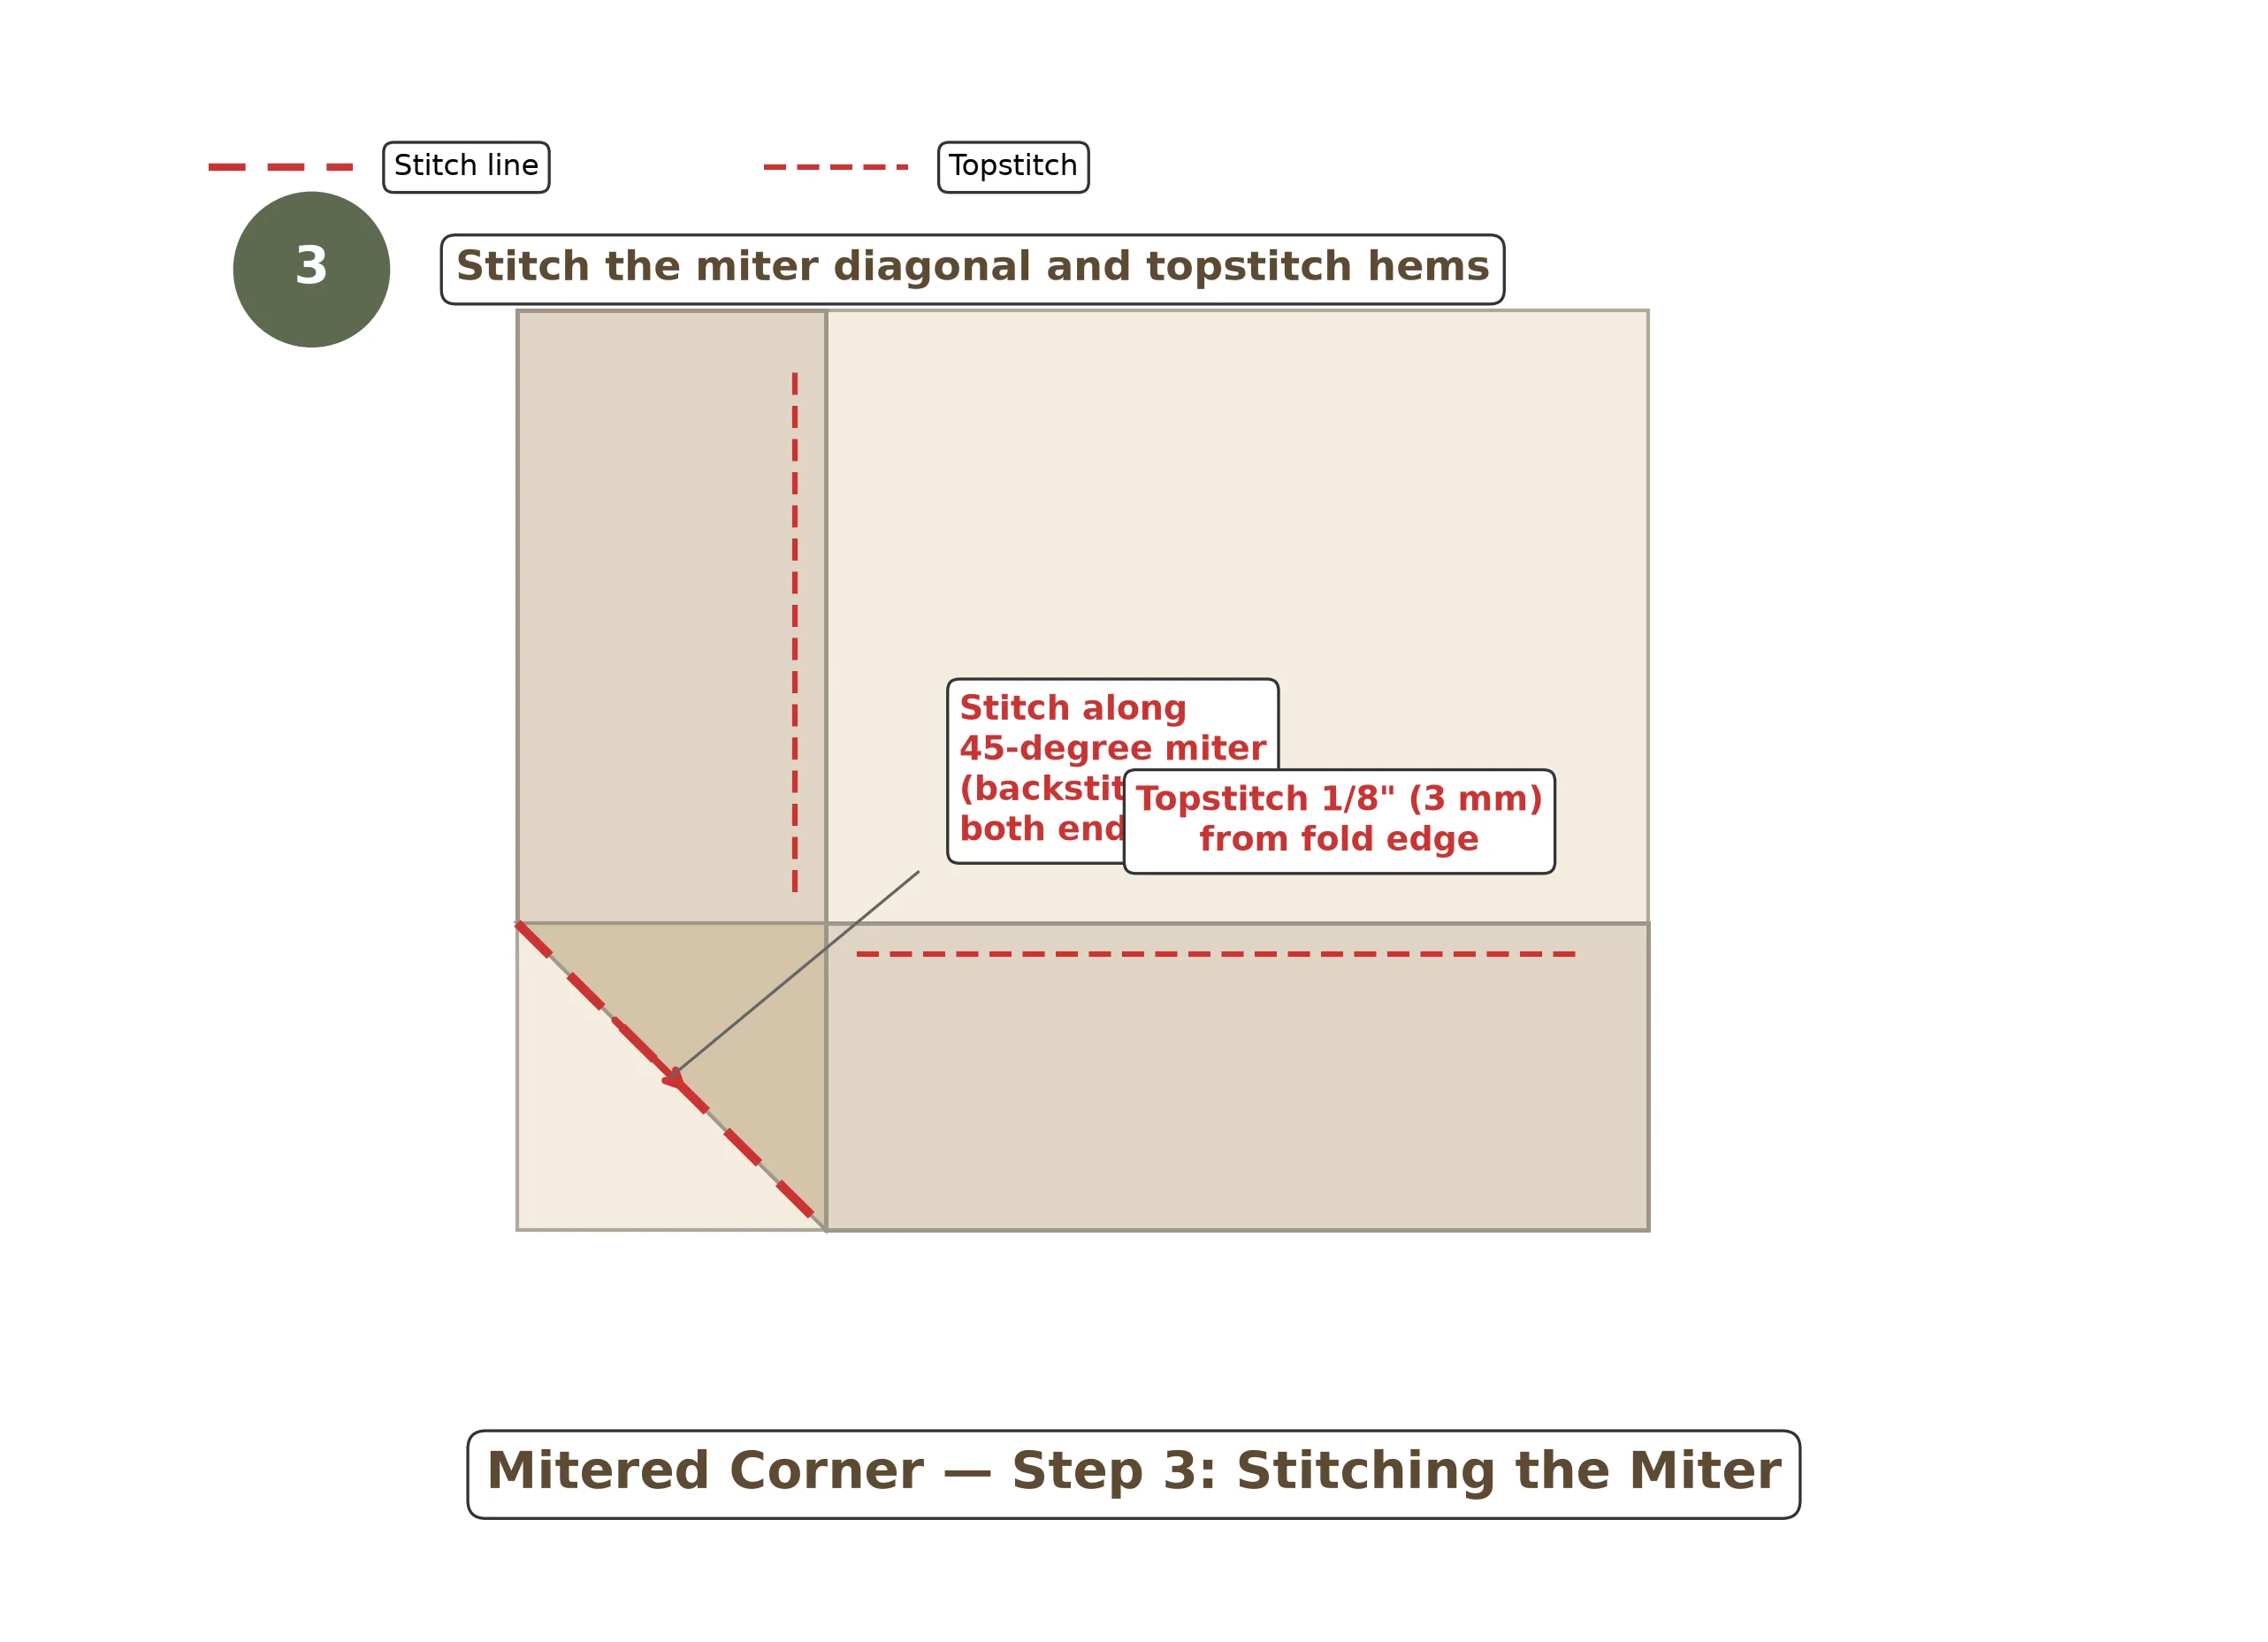
- Fold the runner diagonally in half at the corner, right sides together, so the two hem edges align. Pin along the diagonal crease.
- Stitch along the diagonal crease line from the inner corner (where the two pressed creases meet) out to the outer corner point. Backstitch at both ends.
- Trim the excess corner triangle to a 1/4 in (6 mm) seam allowance.
- Press the seam open, then turn the corner right side out. A perfect mitered corner appears.
Repeat on Remaining Three Corners
Work your way around the runner, applying the same miter sequence to each corner. By the fourth corner, the technique will feel familiar.
Keep every miter seam precisely 45 degrees — press firmly after each one so the angle locks in.
Press the Hem Flat All Around
Flip the entire hem back into its finished position (second fold toward the wrong side of the runner). The mitered seams at each corner should align perfectly on the diagonal.
Press the entire hem flat, working from the center of each edge toward the corners.
Topstitch the Hem
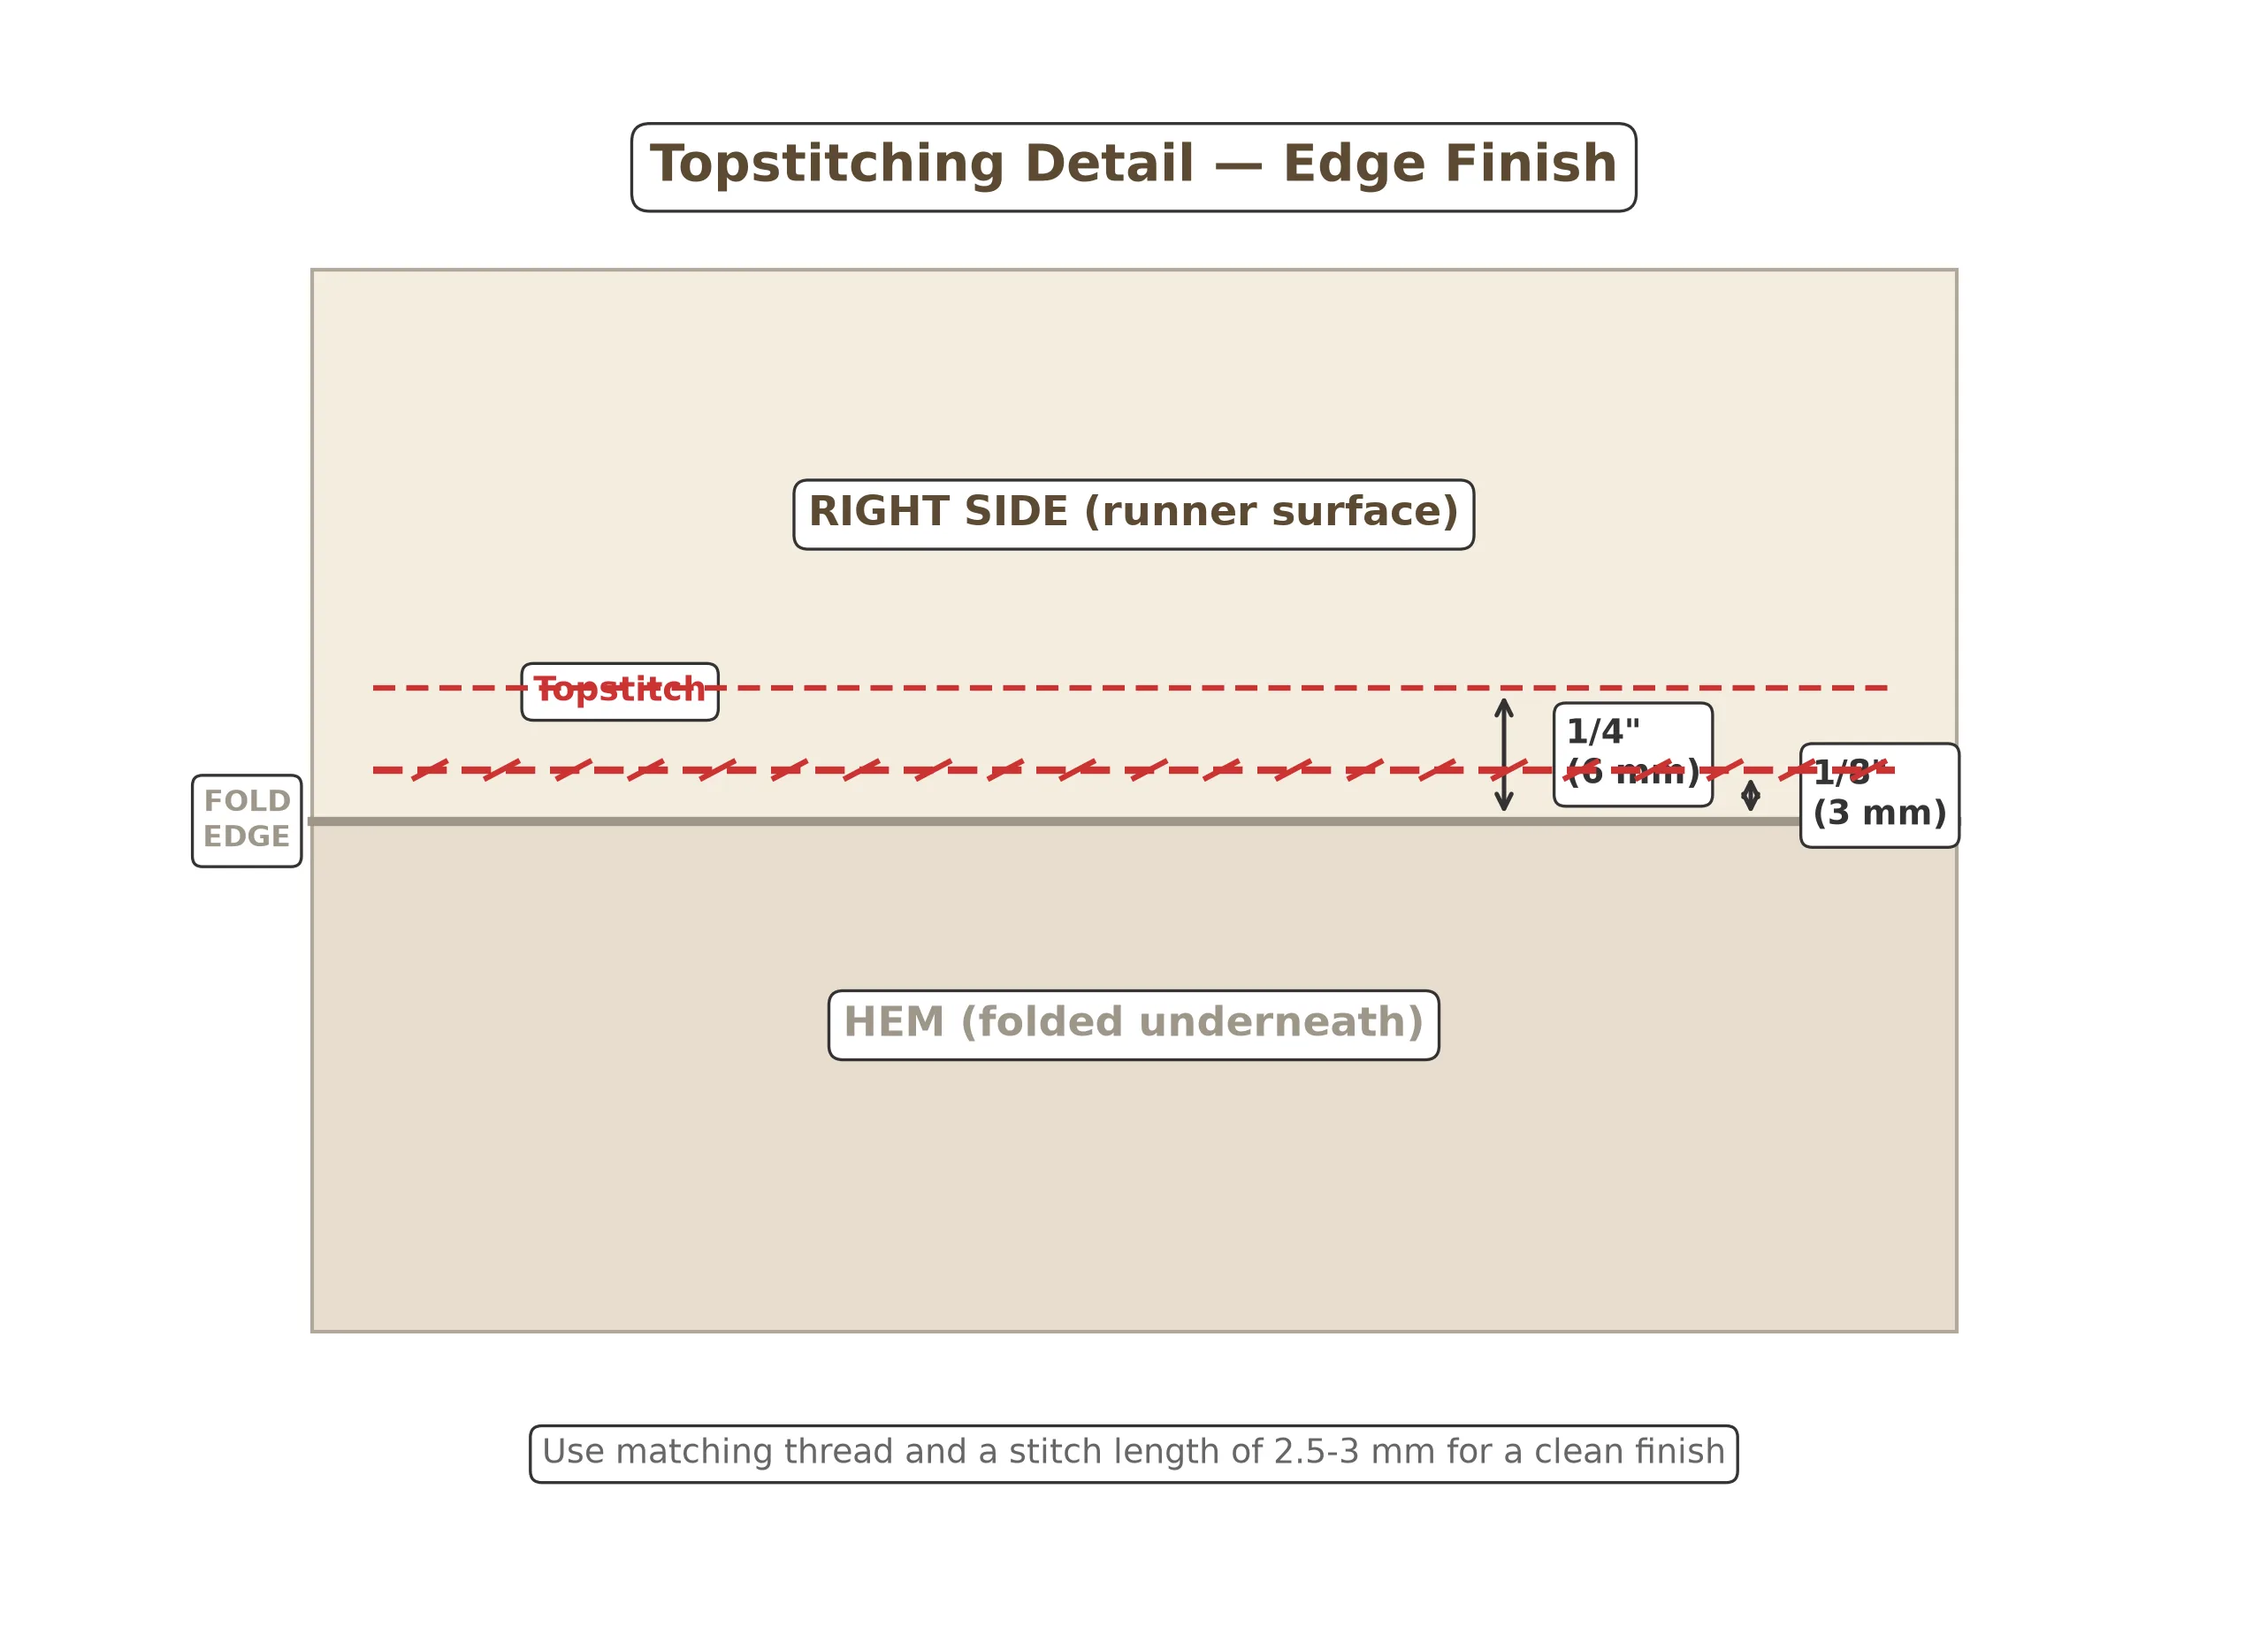
Topstitch all the way around the hem, about 1/8 in (3 mm) from the inner folded edge. Pivot carefully at each corner.
Backstitch at the start and end to lock the thread.
Variations & Ideas
Once you've mastered the basic mitered table runner, there are endless ways to vary it. Here are my four favorites:
Reversible Lined Runner
Cut two rectangles (one in each fabric), place right sides together, stitch three sides, turn, and press. Topstitch the fourth side closed. The miter method still works — just miter before layering.
Fringe or Tassel Ends
Skip the hem on the two short ends. Instead, fringe the short edges by pulling threads one at a time, or attach decorative tassels at the four corners for a boho or farmhouse look.
Decorative Topstitching
Use your machine's decorative stitches (zigzag, scallop, blanket, or triple stitch) to topstitch the hem. Match thread color for subtle texture, or contrast for visible decorative appeal.
Seasonal Appliqué
Add fabric appliqué shapes to the two overhanging ends — autumn leaves, snowflakes, botanical motifs. Use fusible web for easy raw-edge appliqué secured with a zigzag or blanket stitch.
Pair your new runner with fabric napkin rings to complete your table setting or coordinate it with matching envelope cushion covers on your dining chairs.
What Makes This Tutorial Different
Most mitered-corner tutorials show you the finished technique but skip over the two things beginners actually need: why each step matters, and what goes wrong when they don't follow the sequence. This guide includes:
- A sizing framework for any table — formulas that work for apartment tables, dining tables, and oversized banquet tables alike.
- A full fabric comparison — honest pros and cons for cotton vs. linen-cotton vs. canvas, with recommendations for your first attempt.
- The complete miter sequence broken into eight micro-steps — most tutorials condense this to "fold, stitch, trim," which hides exactly where things go wrong.
- Pressing emphasis throughout — the mitered corner is primarily a pressing technique, not a sewing technique. We press at every stage.
- Common mistakes called out before you reach them — so you avoid them on your first try instead of learning the hard way.
Frequently Asked Questions
What size should a table runner be?
A standard table runner is 12 to 16 inches (30 to 40 cm) wide and extends 6 to 12 inches (15 to 30 cm) past each end of the table. For a 60-inch table, aim for a 72–84 inch runner. For a 72-inch table, aim for 84–96 inches. The width should be about one-third of your table's width.
What is a mitered corner in sewing?
A mitered corner is a corner-finishing technique where two hems meet at a crisp 45-degree diagonal seam. It eliminates fabric bulk at the corner and creates a clean, professional, picture-frame look — the same technique used on quilt bindings, cloth napkins, and tailored shirts.
Do I need to line a table runner?
No. A single-layer mitered runner is beautifully finished because the mitered hems completely enclose all raw edges. Lining is optional and only needed if you want extra body, a heavier drape, or a reversible design with a contrasting back fabric.
How much fabric do I need for a table runner?
For a standard 14 × 72 inch table runner, you need about 1 yard (0.9 m) of 44-inch wide fabric or 3/4 yard (0.7 m) of 54-inch wide fabric. For a longer 14 × 96 inch runner, plan for 1-1/4 yards (1.15 m) of 44-inch fabric. See the sizing chart above for other dimensions.
Cotton vs. linen for table runners — which is better?
Cotton is easier to press into sharp mitered corners and comes in more prints. Linen (or linen-cotton blend) has a beautiful natural texture and drape but is slightly harder to press crisp. For beginners, start with quilting cotton. For a more upscale, natural look, use a linen-cotton blend.
Can I sew a table runner without mitered corners?
Yes. You can use a simple double-fold hem on all four sides with overlapping corners. However, overlapping corners create visible bulk and look less polished. Mitered corners add only about 2 minutes per corner and dramatically improve the finished appearance.
Your Next Projects
Congratulations — you've mastered one of sewing's most useful techniques. The mitered corner you just learned will serve you in dozens of future projects, from quilt bindings to tailored napkins. Here's what to make next:
Continue the Sewing for Your Home Series
- Sew matching envelope cushion covers for your dining chairs — a quick, zipper-free project.
- Make fabric napkin rings to complete your table setting in under two hours.
- Add rod pocket curtain panels to coordinate your dining room décor.
- Try a door draft stopper — another beginner-friendly tube project using the same hem techniques.
Explore Related Series
- Discover quilting techniques like binding and mitering in our Beginner Quilt Pattern Book series — the mitered corner you just learned is the foundation for quilt binding corners.
- Browse more beginner-friendly projects in our First Stitches series for 10 simple projects every new sewer should try.
If you make this runner, I'd love to see it. There is nothing more satisfying than that first perfectly mitered corner — and now you can make four of them, every single time.