How to Sew an Envelope Cushion Cover — Easy No-Zipper Pattern
What Is an Envelope Cushion Cover?
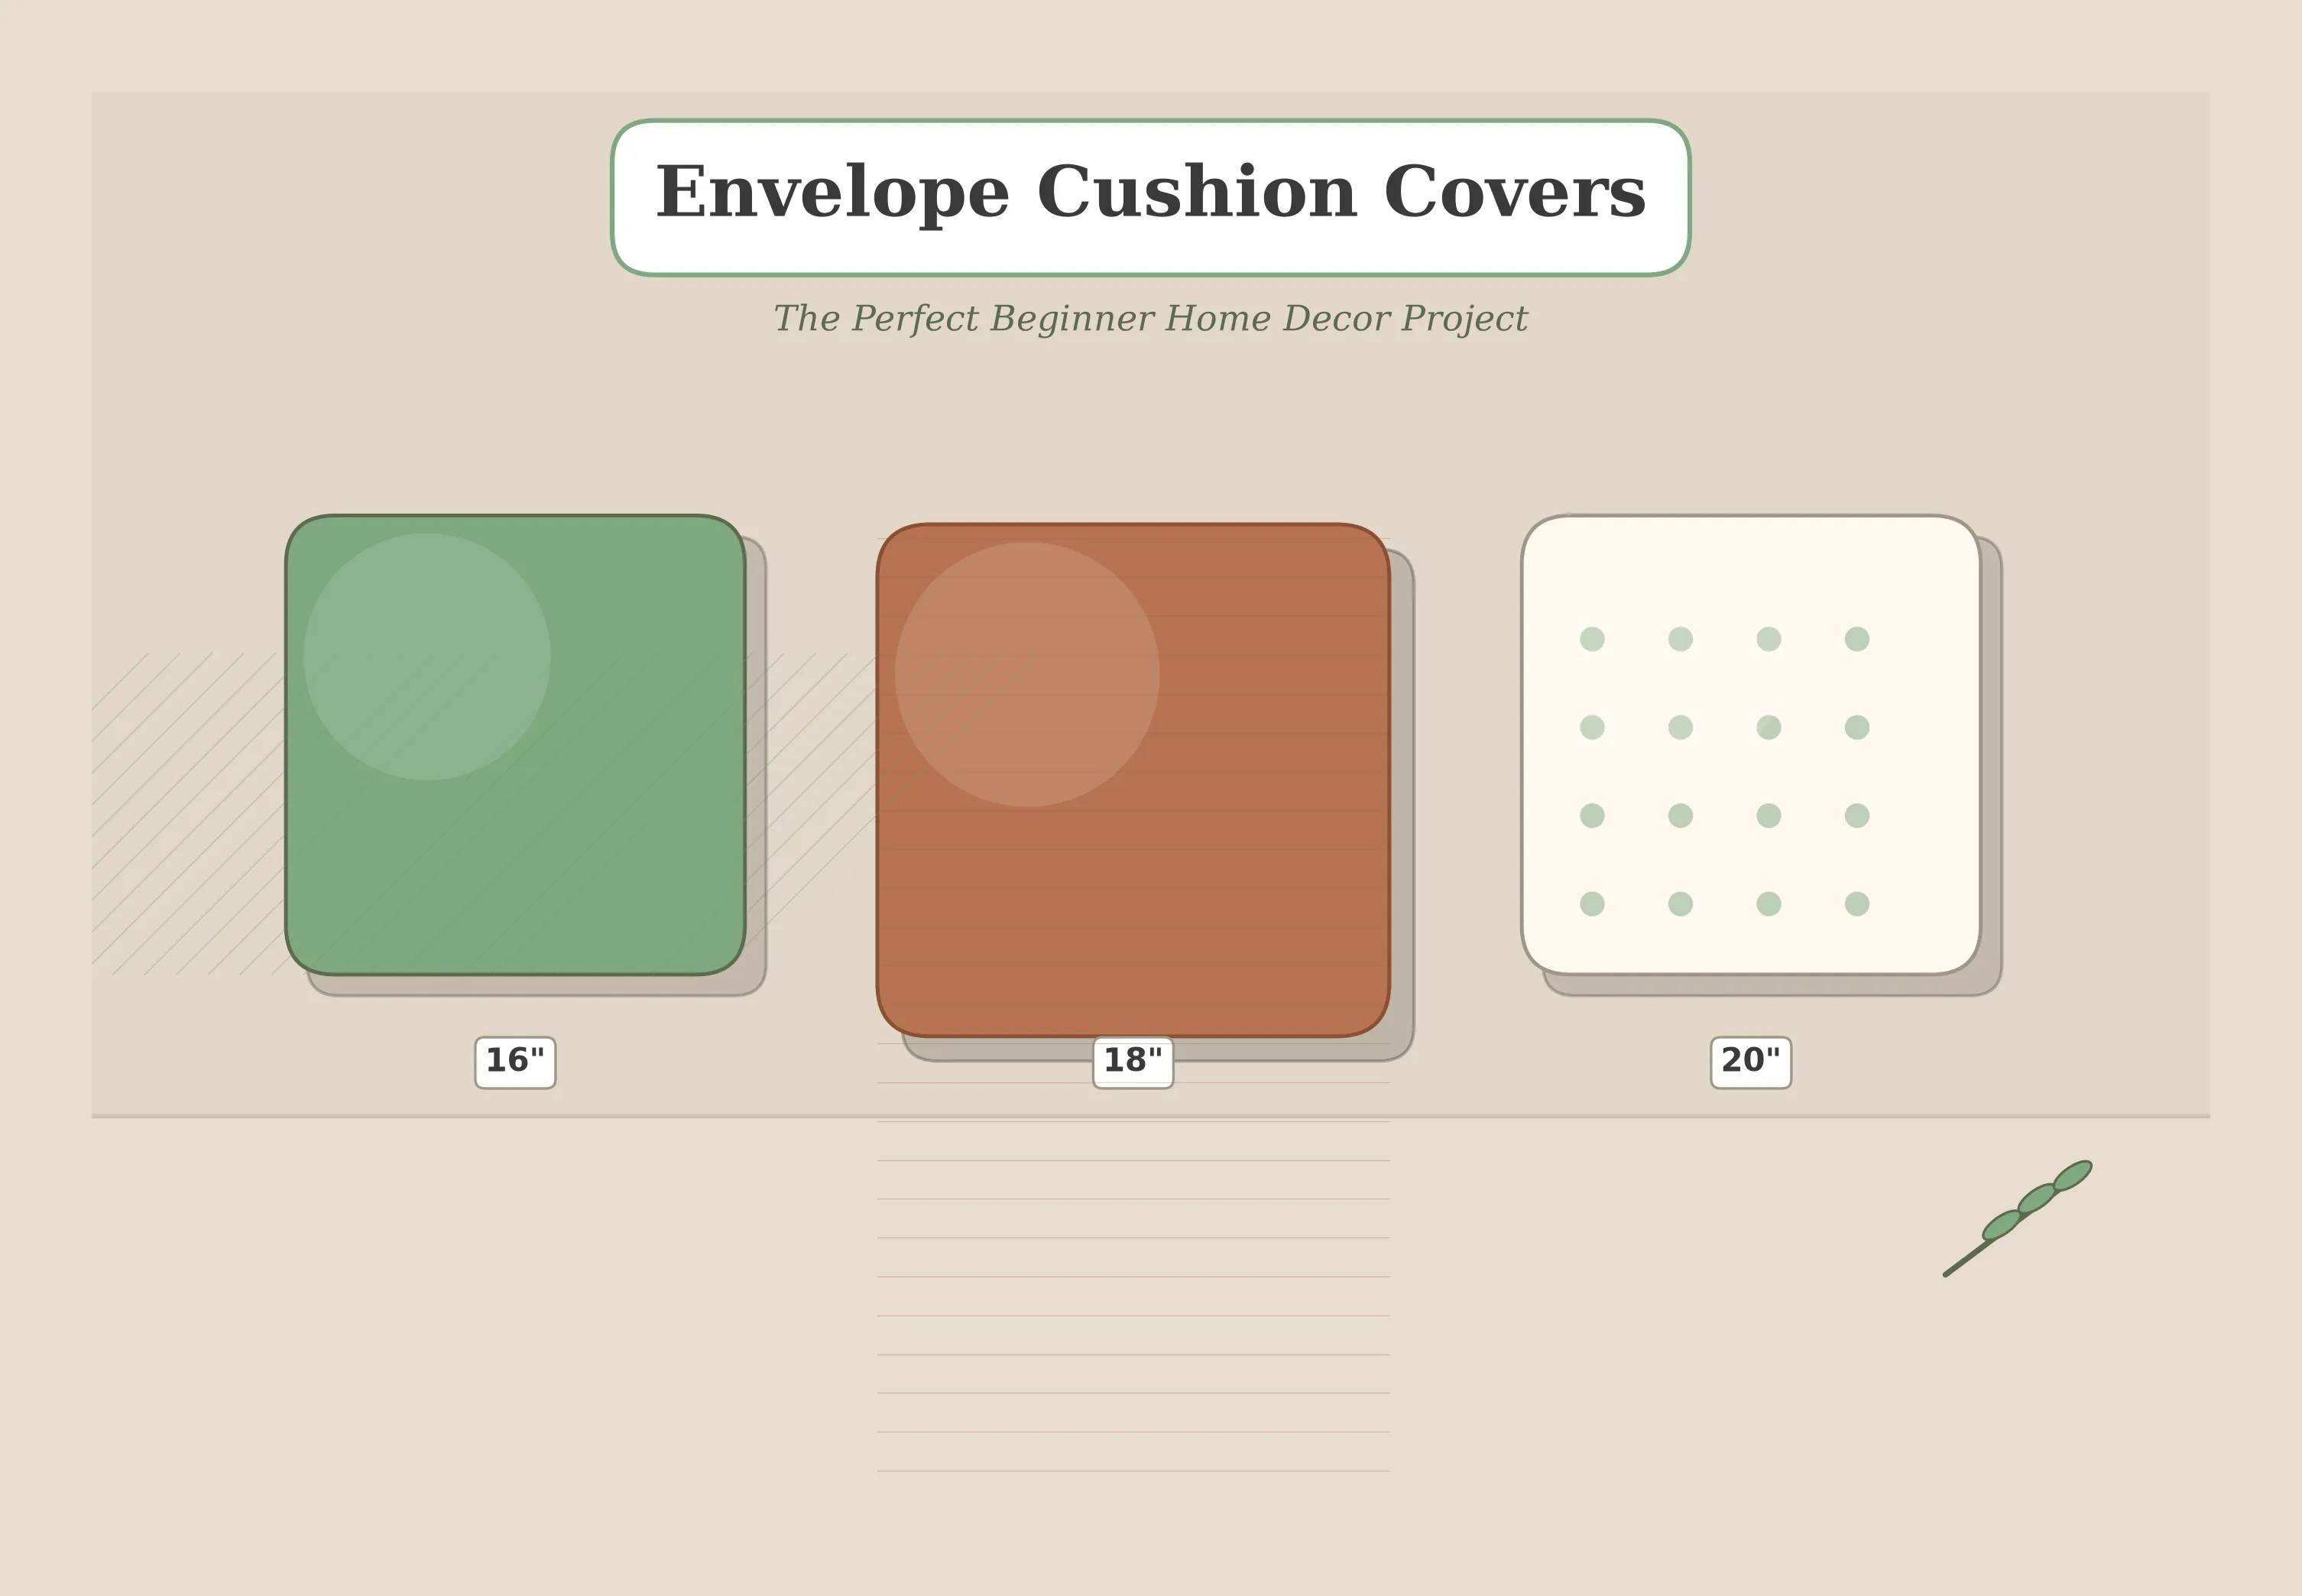
An envelope cushion cover (also called an envelope-back pillow cover) is the simplest type of removable cushion cover you can sew. Instead of a zipper, buttons, or ties, the back of the cover has two fabric panels that overlap — just like the flap of an envelope. You slip the pillow insert in through that overlapping opening, and the natural tension of the fabric holds everything in place.
This envelope cushion cover pattern is the perfect first home decor sewing project because it uses only straight seams and simple hems. If you can sew a straight line on your sewing machine, you can absolutely make this. In my experience, most beginners finish their first cover in about 45 minutes — and the second one takes half that time because you already know all the steps.
I designed this tutorial to be the most thorough envelope cushion cover pattern on the internet. We will cover sizing for three standard pillow inserts (16-inch, 18-inch, and 20-inch), walk through every cut and every stitch, and I will point out every common mistake I see beginners make so you can avoid them entirely.
Choosing Your Fabric: Cotton vs. Linen vs. Canvas
Before you cut a single thread, let's talk about the most important decision in this project: your fabric. The right fabric makes sewing easier and makes your finished cover look like it came from a boutique.
Best Fabrics for Envelope Cushion Covers
Quilting cotton is my top recommendation for your first envelope cushion cover. It is a medium-weight woven fabric — typically 3.5–5 oz/yd² — that cuts cleanly, presses into sharp creases, feeds through your sewing machine without slipping, and comes in quite literally thousands of prints and solids. If you are nervous about your first home decor project, quilting cotton will give you the most confidence.
Linen-cotton blend (sometimes labeled "cotton-linen" or "Essex linen") gives a gorgeous textured look with slubby threads that read as rustic and intentional. It is slightly harder to press crisp hems, but the finished result has a beautiful drape. I find linen blends are the best choice when you want a minimalist, modern-farmhouse aesthetic.
Cotton canvas (also called "duck cloth") is heavier — around 7–10 oz/yd² — and creates a very structured, firm cushion cover. It is excellent for high-traffic areas like dining benches. The trade-off is that the thicker fabric can be harder to push through your machine at the seam intersections where four layers meet.
Cotton vs. Linen for Cushion Covers — Quick Comparison
Quilting cotton: Easiest to sew, sharpest hems, most prints available, machine washable. Best for beginners and patterned designs.
Linen-cotton blend: Beautiful texture, slightly more challenging to press, limited prints but gorgeous solids. Best for minimalist and textured looks.
Verdict: For your very first cover, go with quilting cotton. Branch out to linen blends on your second or third cover once you are comfortable with the construction.
How Much Fabric Do I Need?
For a single 18-inch cushion cover, you need about 3/4 yard (0.7 m) of 54-inch (137 cm) wide fabric, or 1 yard (0.9 m) of 44-inch (112 cm) wide fabric. The full amounts for all three sizes are in the sizing chart below. I always recommend buying an extra 1/8 yard (12 cm) for insurance — especially if this is your first project.
Materials & Tools
What You Need
- Medium-weight fabric — quilting cotton, linen blend, or canvas (see sizing chart for yardage)
- All-purpose polyester thread in a coordinating color
- Square pillow insert — 16 in (40.5 cm), 18 in (45.7 cm), or 20 in (51 cm)
- Sewing machine with a straight stitch foot
- Fabric scissors or rotary cutter with mat
- Clear quilting ruler or measuring tape
- Iron and ironing board
- Straight pins or sewing clips
- Marking pen, chalk, or pencil
- Point turner or chopstick (for pushing out corners)
Sizing Chart for All Pillow Inserts
The math behind an envelope cushion cover pattern is simple. I will explain the formula so you can adapt it for any size insert, but here are the ready-to-use measurements for the three most common sizes:
The Envelope Cushion Cover Formula
Front panel: Pillow insert width + 1 inch (2.5 cm) for seam allowances, by pillow insert height + 1 inch (2.5 cm) for seam allowances.
Each back panel: Same width as the front, by half the pillow insert height + 5 inches (12.7 cm). That extra 5 inches provides the overlap (about 5 in / 12.7 cm of overlap) plus the hem fold.
| Pillow Insert | Front Panel | Back Panels (cut 2) | Overlap | Fabric Needed (54" wide) |
|---|---|---|---|---|
| 16 in (40.5 cm) | 17 × 17 in (43.2 × 43.2 cm) |
17 × 14 in each (43.2 × 35.6 cm) |
5 in (12.7 cm) | 5/8 yd (0.6 m) |
| 18 in (45.7 cm) | 19 × 19 in (48.3 × 48.3 cm) |
19 × 15 in each (48.3 × 38.1 cm) |
5 in (12.7 cm) | 3/4 yd (0.7 m) |
| 20 in (51 cm) | 21 × 21 in (53.3 × 53.3 cm) |
21 × 17 in each (53.3 × 43.2 cm) |
6 in (15.2 cm) | 7/8 yd (0.8 m) |
* Seam allowance is 1/2 in (1.3 cm) on all sides. Hem allowance is 1.5 in (3.8 cm) per overlap edge.
Cutting Layout & Pattern Pieces
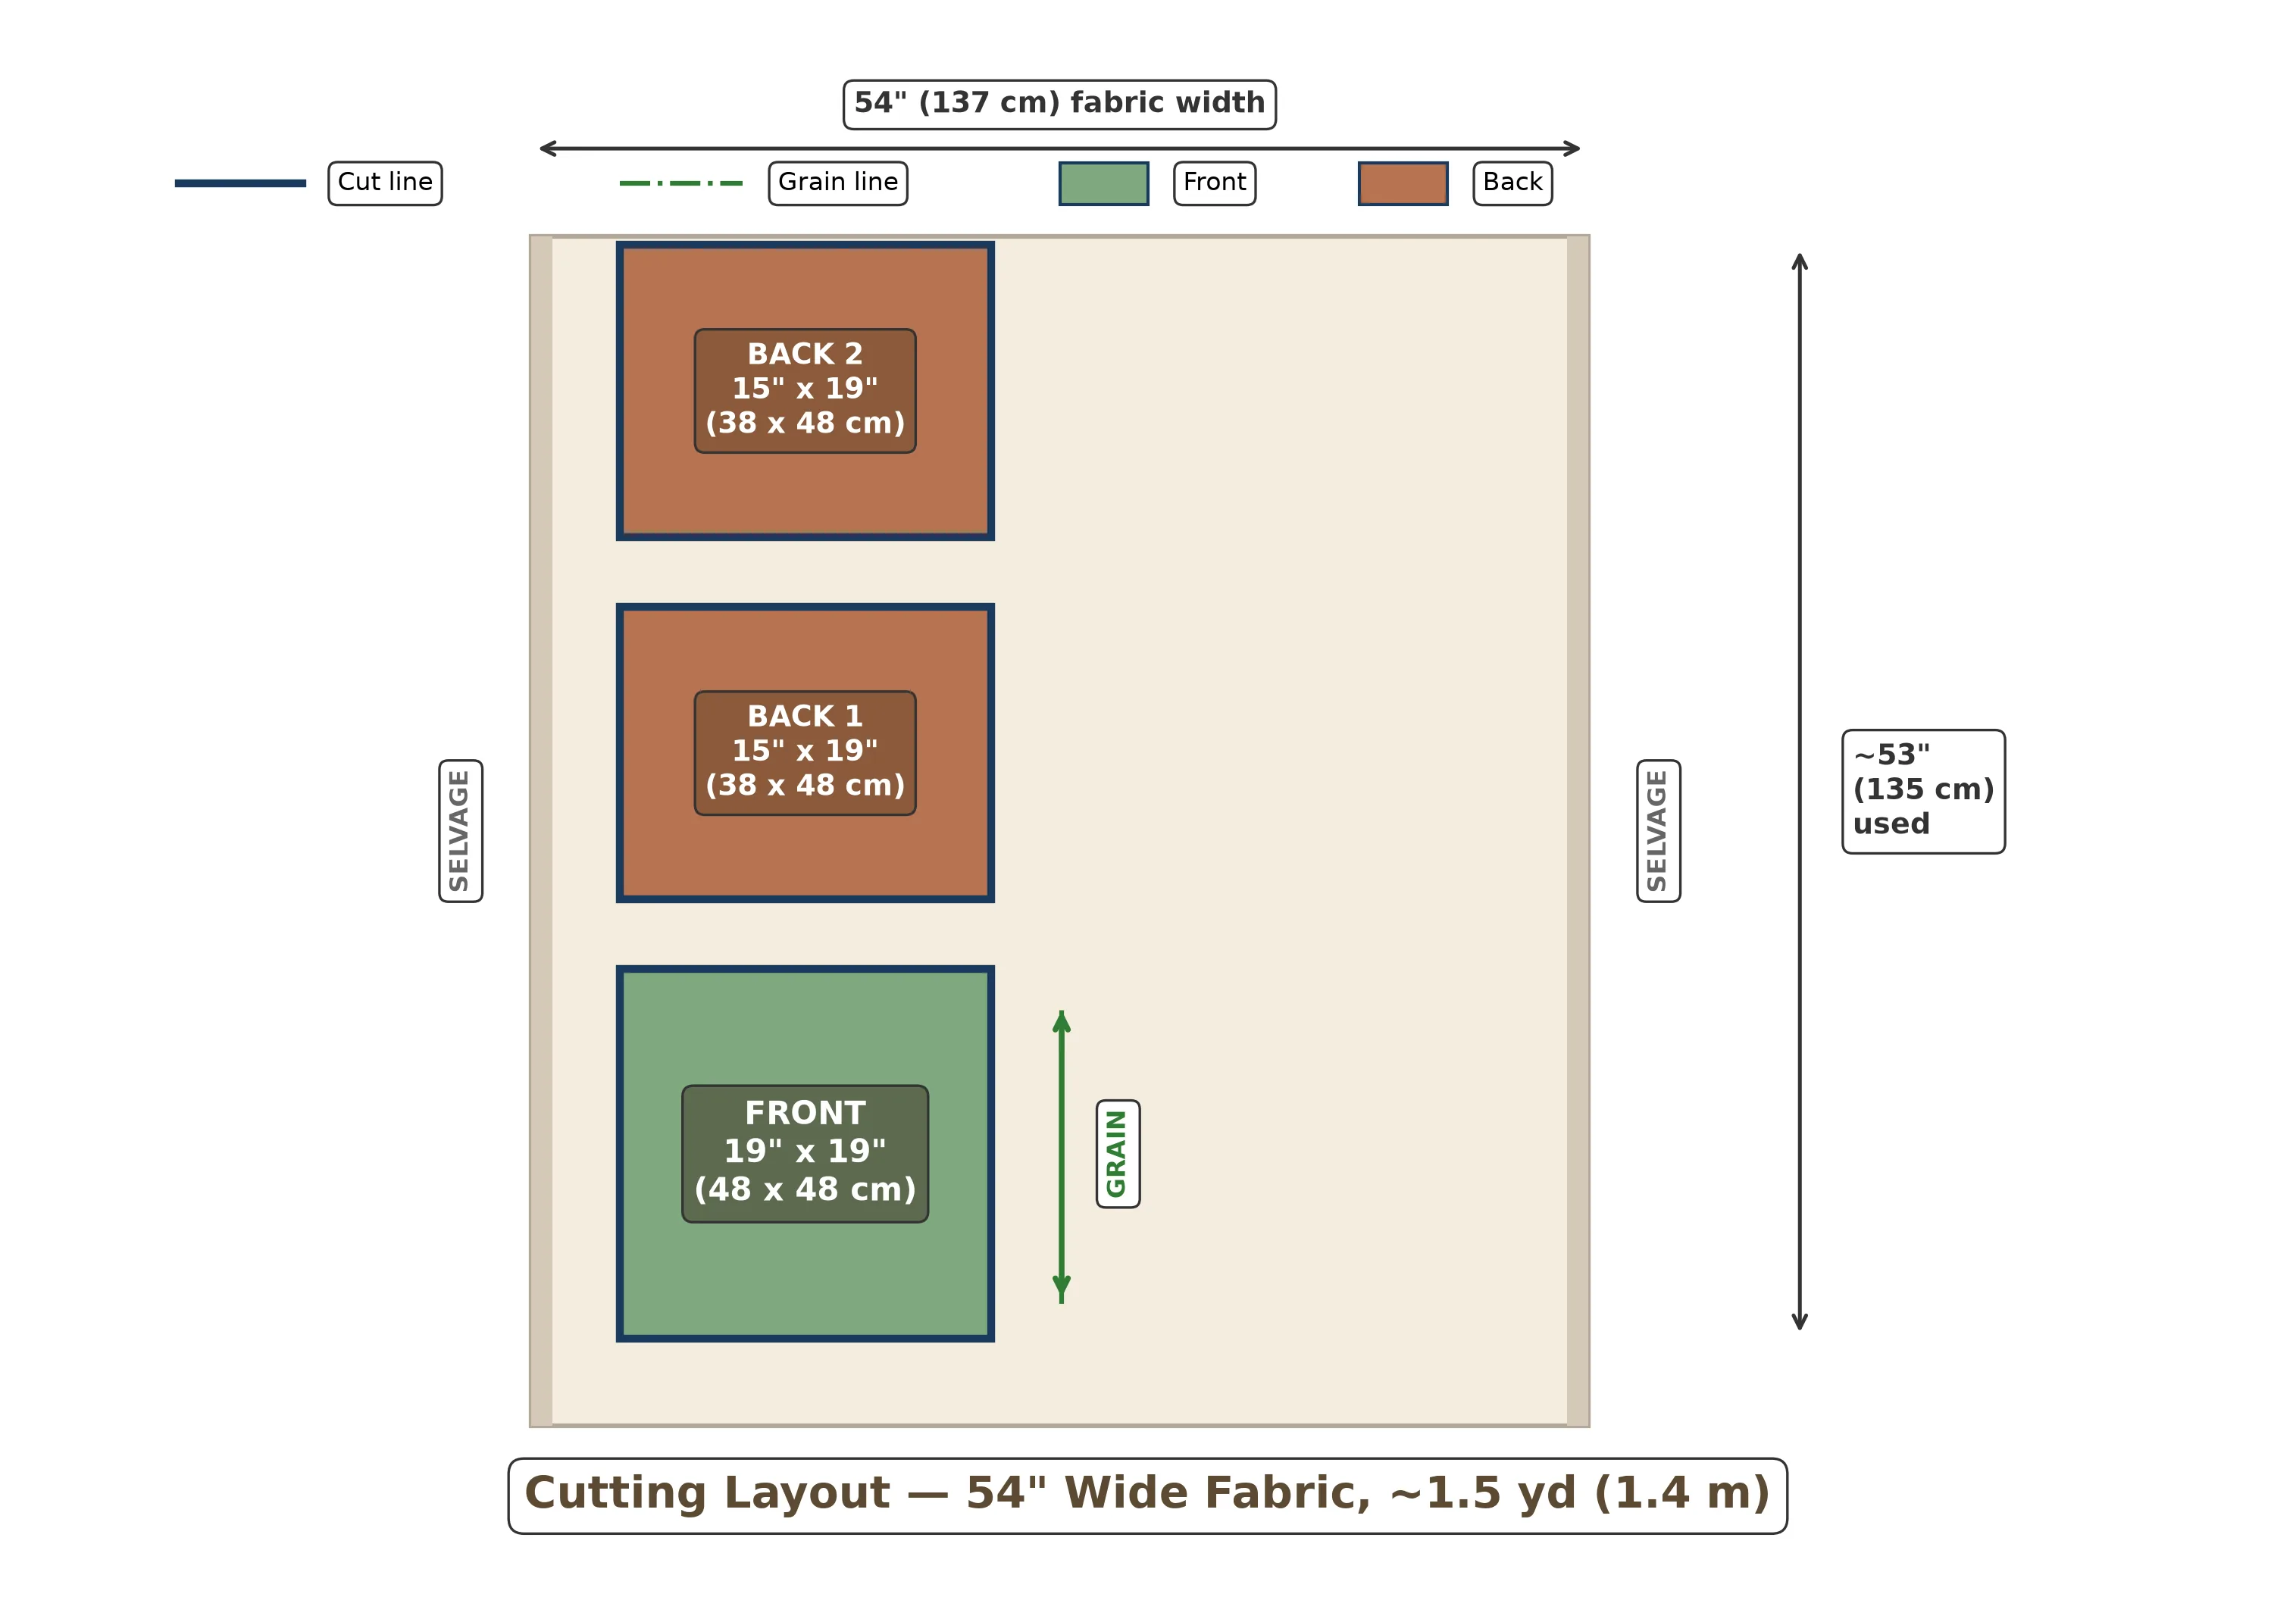
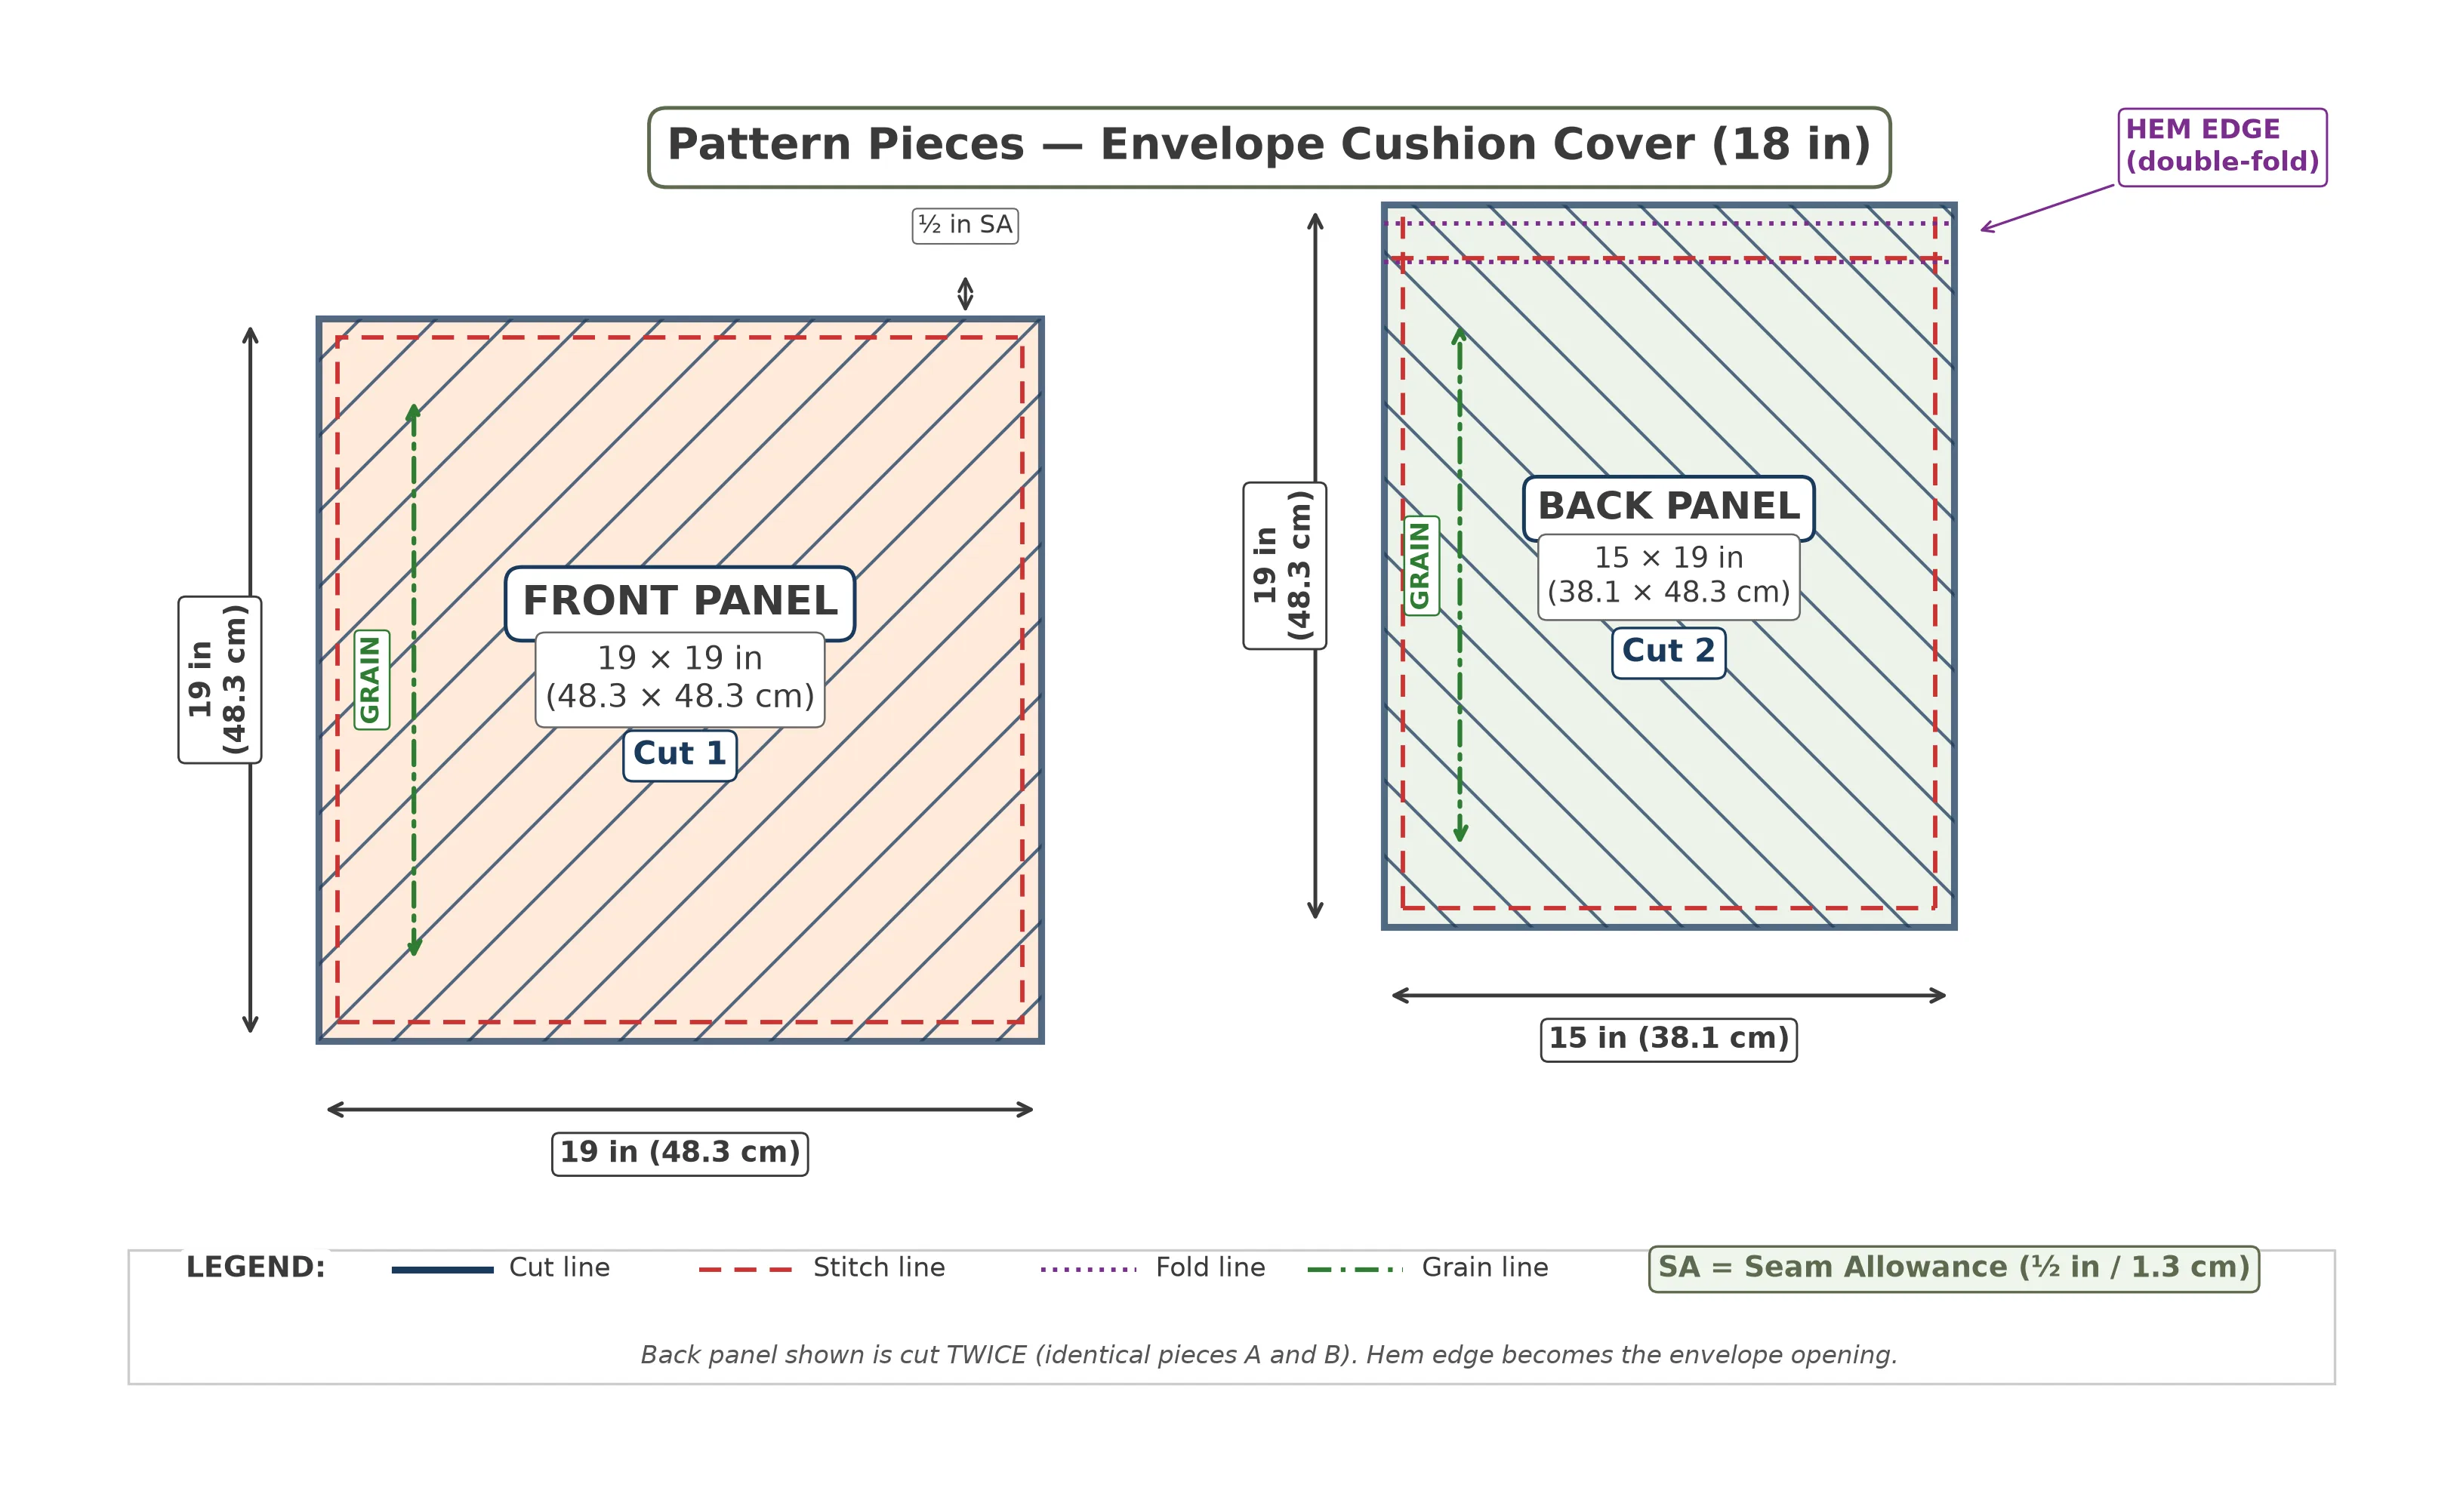
This project uses just three fabric pieces: one front panel and two identical back panels. No curves, no darts, no pattern paper — just rectangles. Let's look at the cutting layout for an 18-inch pillow insert on 54-inch (137 cm) wide fabric.
How to Cut
- Straighten your fabric edge. Pull a crosswise thread or use a quilting ruler to cut a perfectly straight line across the width. This ensures your pieces are on grain (the thread of the fabric, which means the weave runs perfectly straight — this prevents your finished cover from twisting).
- Mark and cut the front panel at 19 × 19 in (48.3 × 48.3 cm) using your ruler and marking pen. Cut along the marked lines with sharp fabric scissors or a rotary cutter.
- Mark and cut both back panels at 19 × 15 in (48.3 × 38.1 cm) each. If your fabric has a directional print (a pattern with a clear "up"), make sure both back panels are oriented the same way.
Step-by-Step Construction
Now for the satisfying part — let's actually build this cushion cover. The entire construction takes six straightforward steps, and I'll walk you through every single one. Set your sewing machine to a straight stitch with a stitch length of 2.5–3.0 mm (about 8–10 stitches per inch).
Hem the Overlap Edges on Both Back Panels
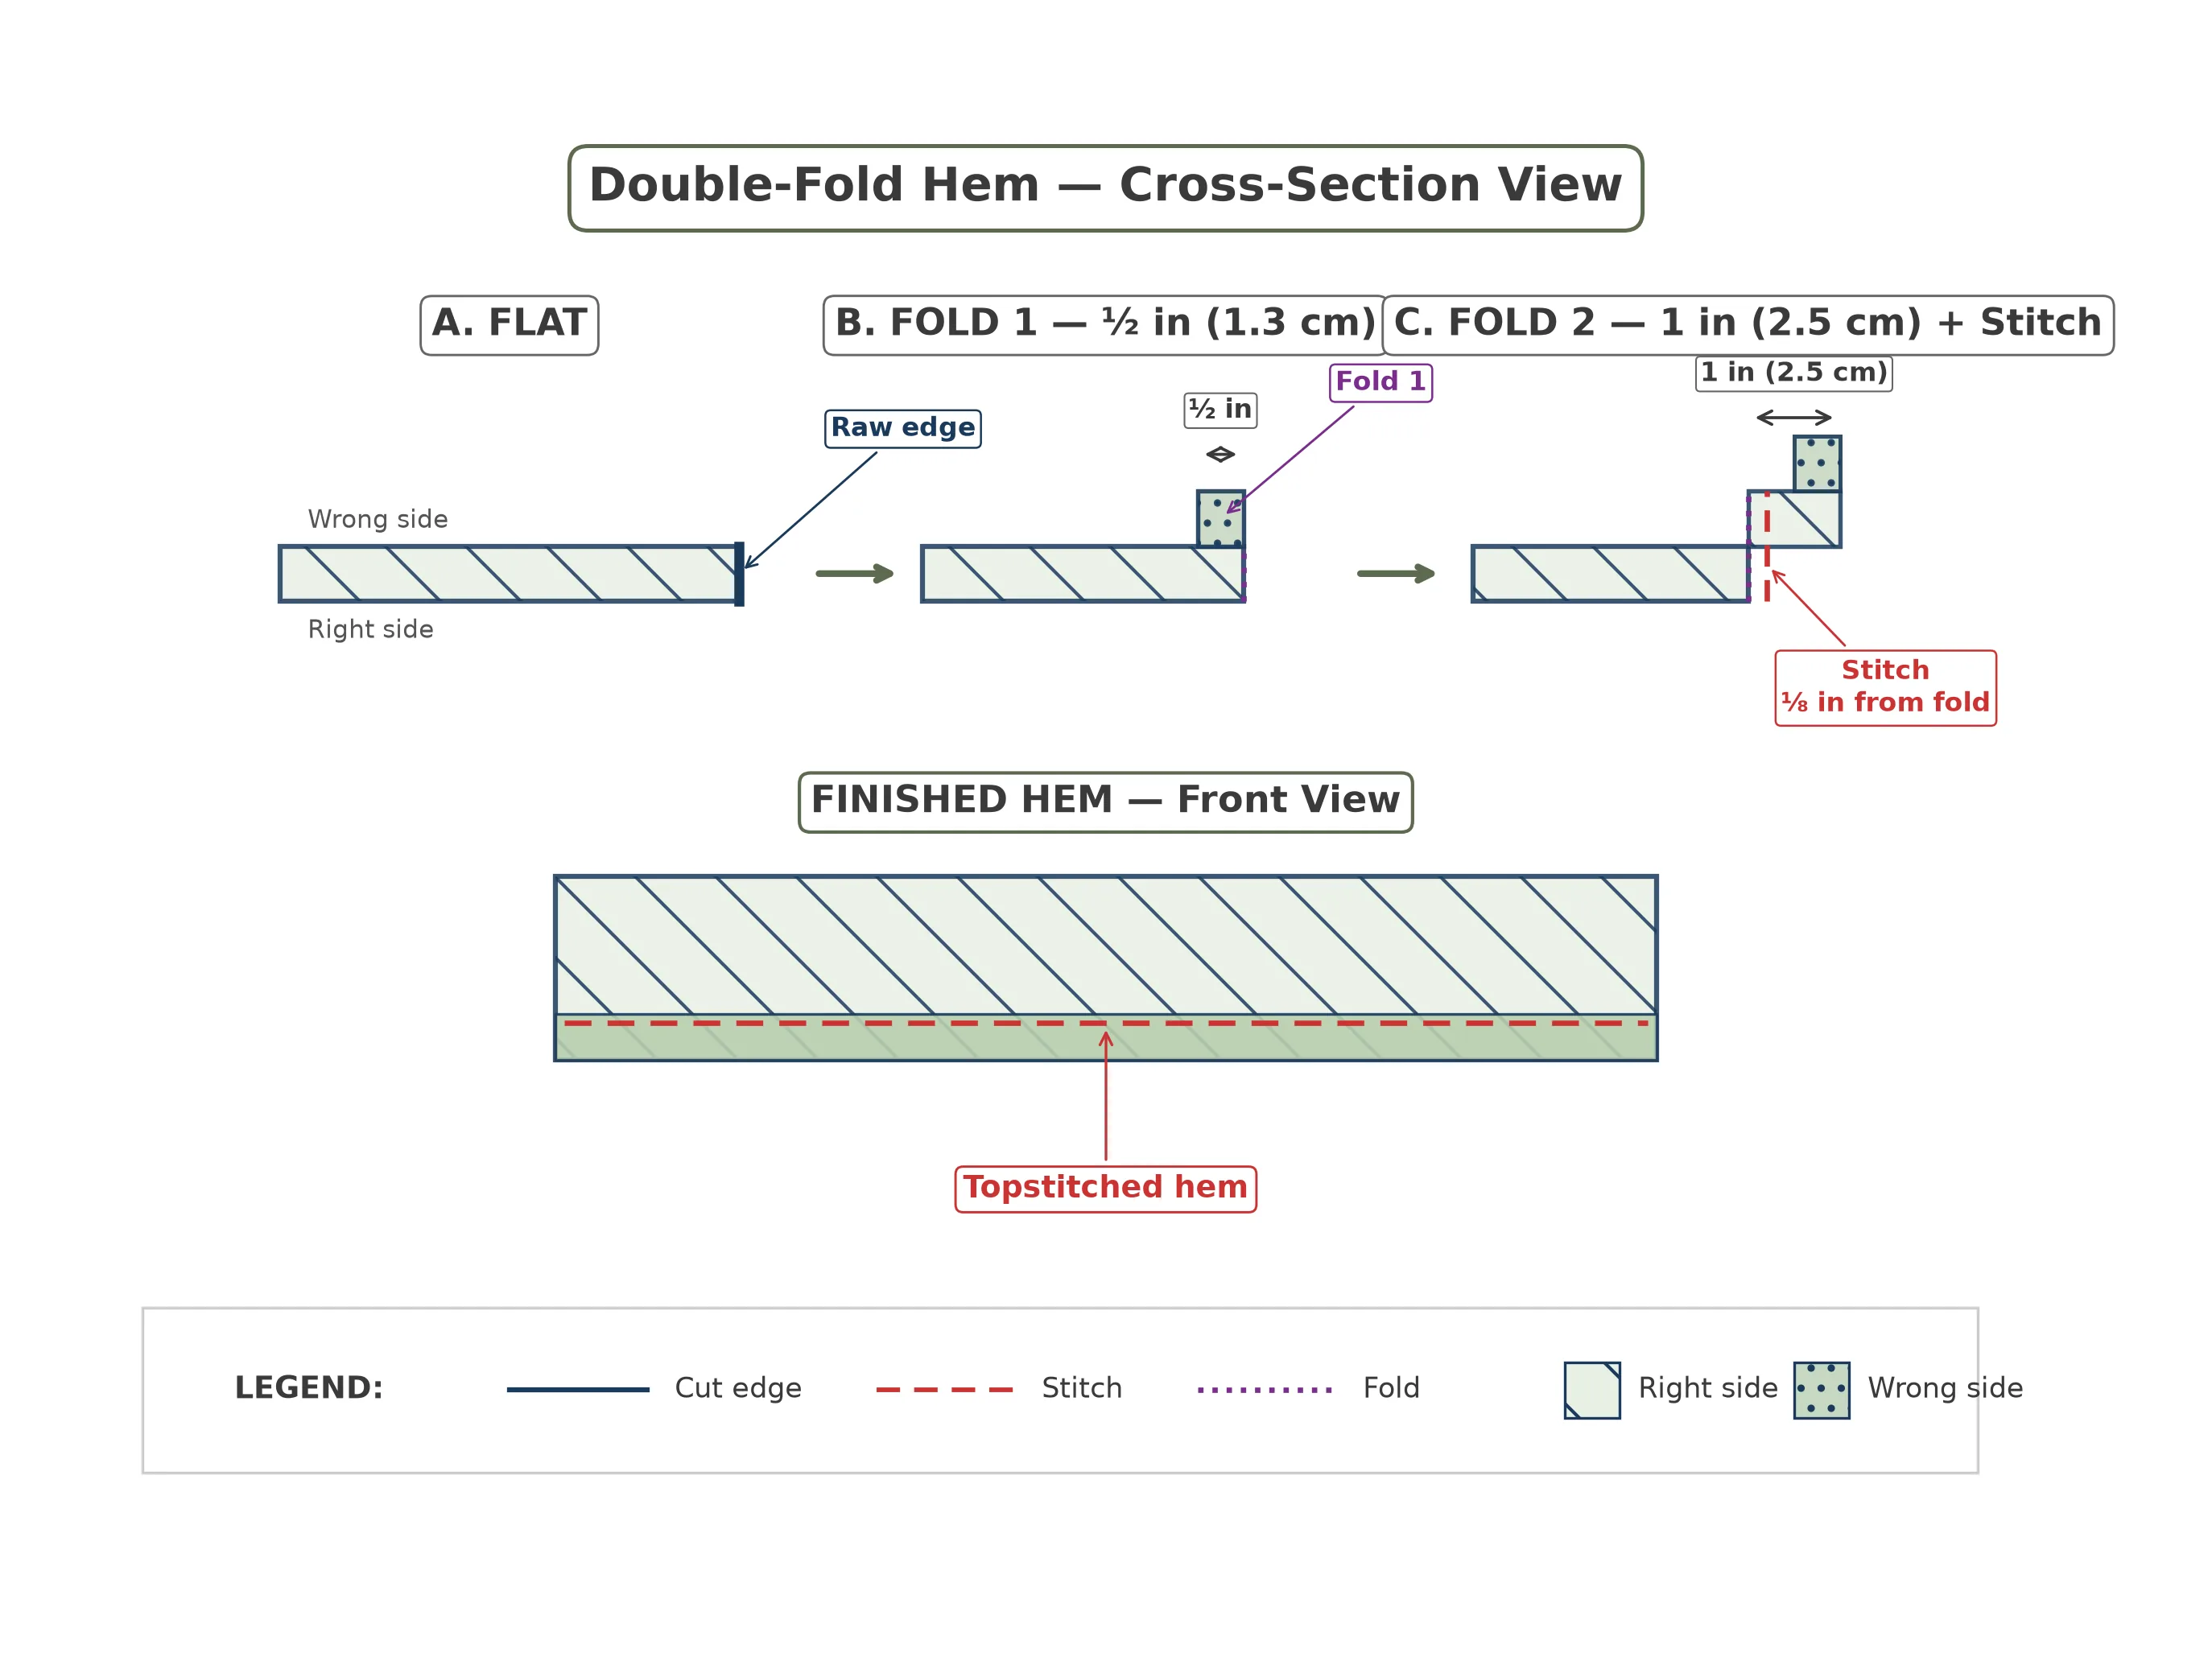
Pick up one back panel. Along one of the 19-inch (48.3 cm) edges, you are going to create a double-fold hem (folding the raw edge under twice so no raw fabric is visible). This hemmed edge will become the inside of the envelope opening.
- Fold the edge 1/2 inch (1.3 cm) toward the wrong side of the fabric. Press with your iron.
- Fold again 1 inch (2.5 cm) toward the wrong side. Press again to create a crisp, clean fold.
- Pin the fold in place with 3–4 pins to keep it from shifting while you sew.
- Stitch close to the inner folded edge — about 1/8 inch (3 mm) from the fold. Backstitch (sew 2–3 stitches in reverse at the start and end) to lock the thread so the hem doesn't unravel.
Repeat this identical hem on the second back panel. You should now have two hemmed back panels.
Position the Front Panel Right Side Up
Place your front panel on a flat surface (your cutting table or ironing board works well) with the right side facing up. The right side is the "pretty" side of the fabric — the side with the bolder, brighter print. If you are using a solid fabric, pick the side that looks smoother and richer in color.
Smooth the panel flat and make sure it is not bunched or twisted. All four edges should lie flat and even.
Layer the Back Panels — Creating the Envelope Overlap
This is the step that creates the "envelope" — and it's the only part that might feel unfamiliar if you have never sewn a pillow cover before. Here is exactly what to do:
- Take back panel A. Place it on top of the front panel with the right side facing down (so the right sides of the front and back panel A are touching). Align the top, left, and right edges. The hemmed edge of panel A should be somewhere around the center of the front panel.
- Take back panel B. Place it on top, also right side facing down, aligned with the bottom, left, and right edges. The hemmed edge of panel B should overlap the hemmed edge of panel A by about 5 inches (12.7 cm) in the center.
- You should now have a sandwich: front panel (right side up) → back panel A (right side down, hemmed edge toward center) → back panel B (right side down, hemmed edge toward center, overlapping A).
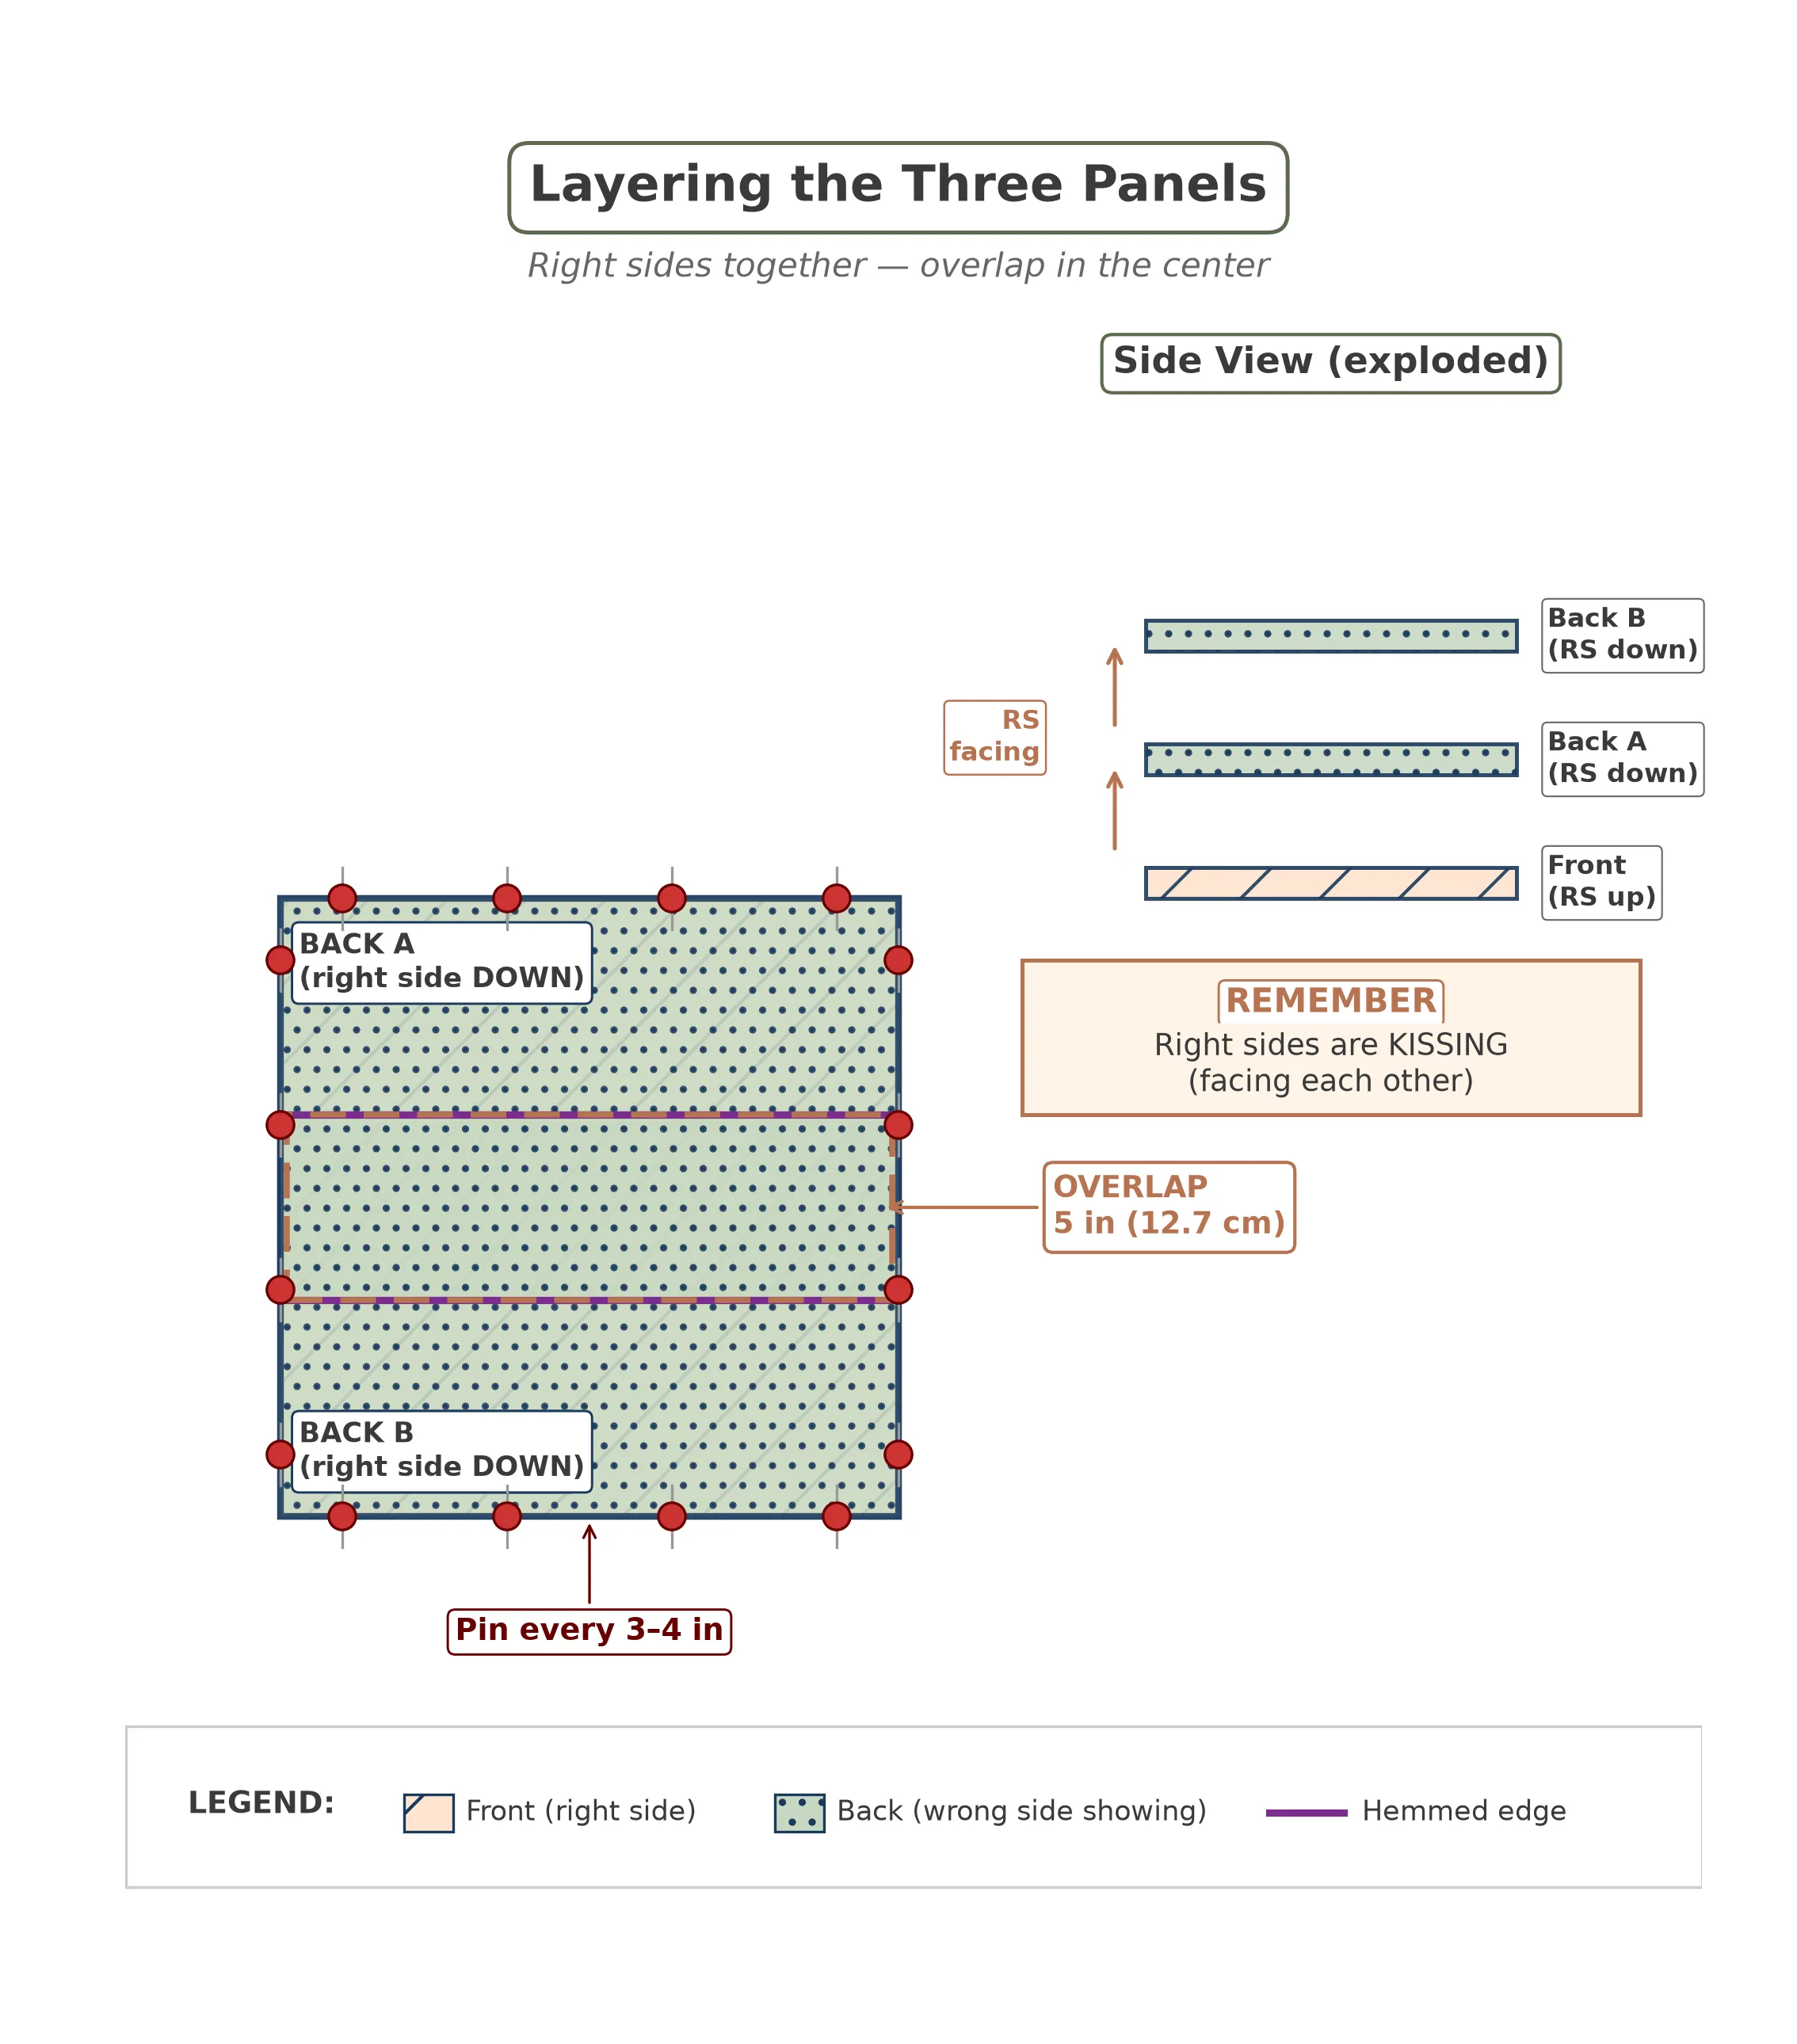
Pin all four outer edges together through all three layers. Place pins every 3–4 inches (7.5–10 cm), with the pin heads pointing outward so you can remove them easily as you sew.
Stitch Around All Four Sides
Bring your pinned sandwich to the sewing machine. You are going to sew all the way around the perimeter using a 1/2-inch (1.3 cm) seam allowance.
- Start at the center of the bottom edge (not at a corner — starting mid-edge gives you a straighter beginning).
- Backstitch 2–3 stitches to lock the thread.
- Sew forward along the bottom edge, removing pins as you approach them (never sew over pins — it can break your needle or damage your machine).
- When you reach a corner, stop with the needle down in the fabric, exactly 1/2 inch (1.3 cm) from the next edge. Lift the presser foot (the metal piece that holds the fabric flat), pivot the fabric 90 degrees, lower the presser foot, and continue sewing along the next edge. This is called a pivot turn.
- Continue around all four sides until you return to where you started.
- Backstitch 2–3 stitches at the end to lock.
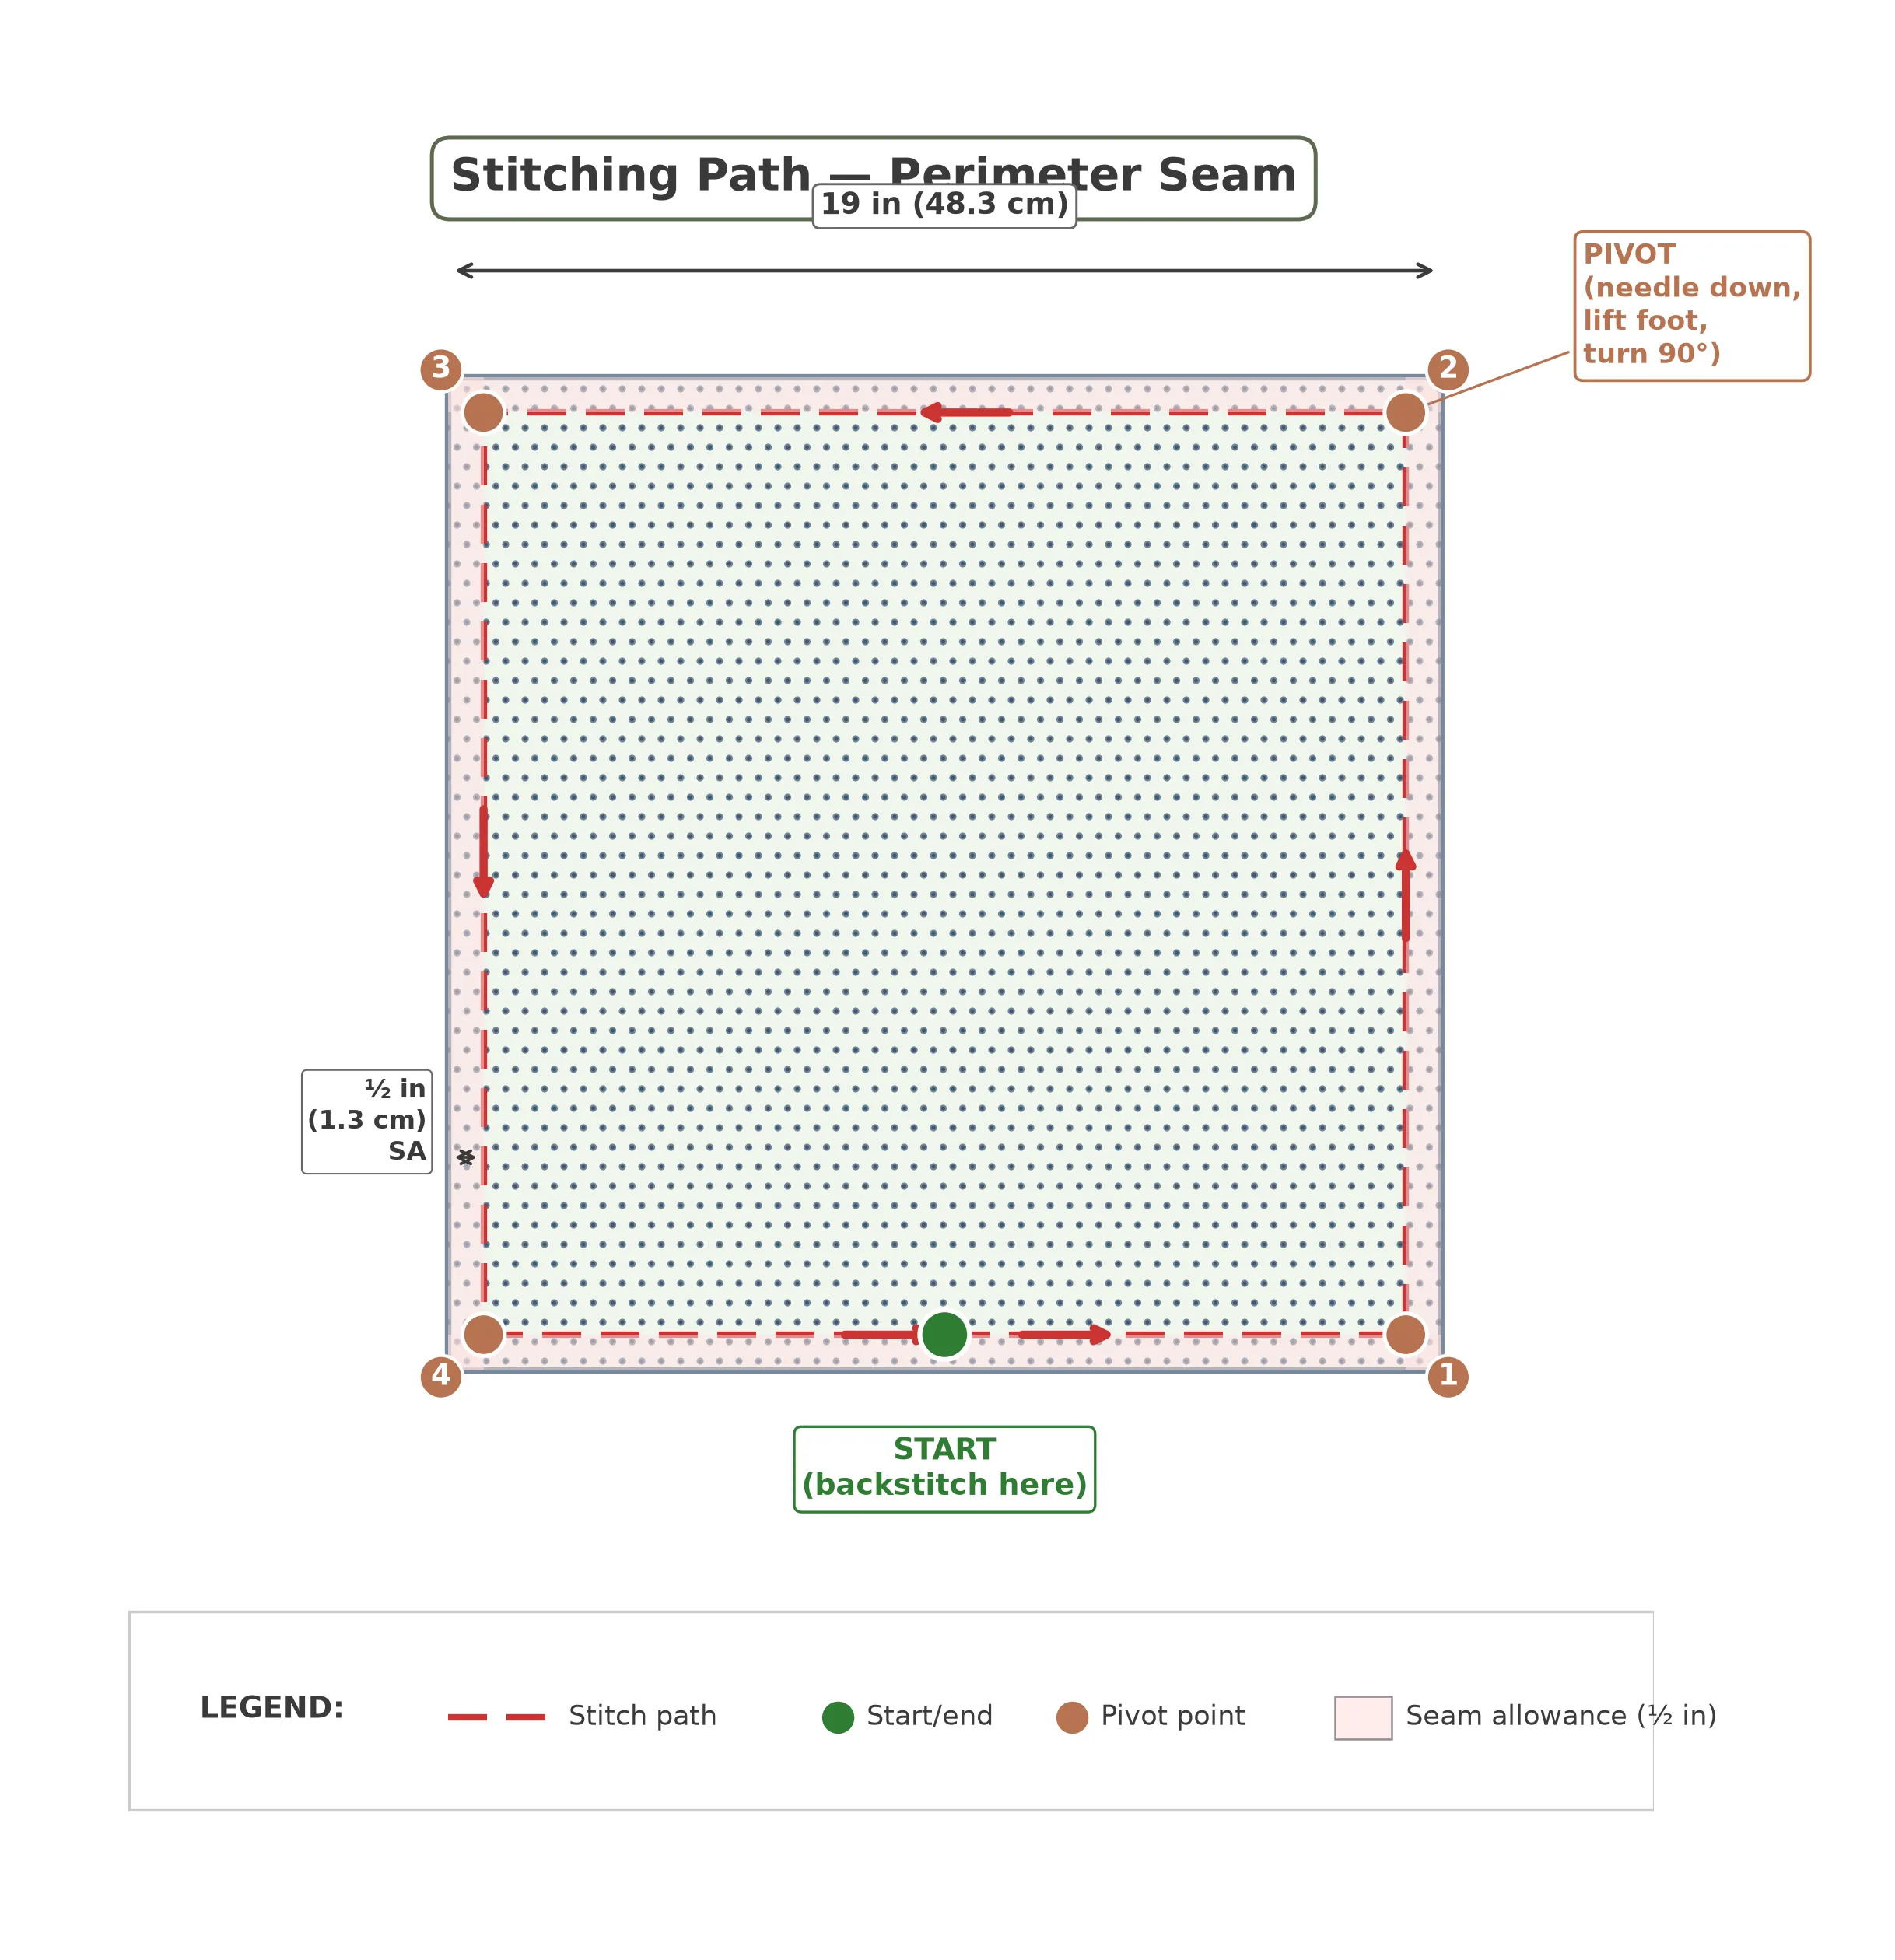
Where the back panels overlap in the center, you will be sewing through five layers of fabric (front panel + two hemmed layers from each back panel). Slow down through these thick sections and let your machine feed at its own pace. If your machine struggles, switch to a size 16/100 universal needle — it handles multiple layers much better than the standard size 11/75.
Clip the Corners and Finish the Raw Edges
Before you turn the cover right side out, you need to clip the corners. This step removes bulk from the seam allowance at each corner so that when you turn the cover, the corners are sharp and pointed instead of rounded and lumpy.
- At each of the four corners, cut diagonally across the seam allowance, snipping from the corner point toward the stitching. Get close to the stitching — about 1/8 inch (3 mm) away — but do not cut through the stitches.
- Optionally, trim the seam allowance along all four sides down to 3/8 inch (1 cm) to reduce bulk inside the finished cover.
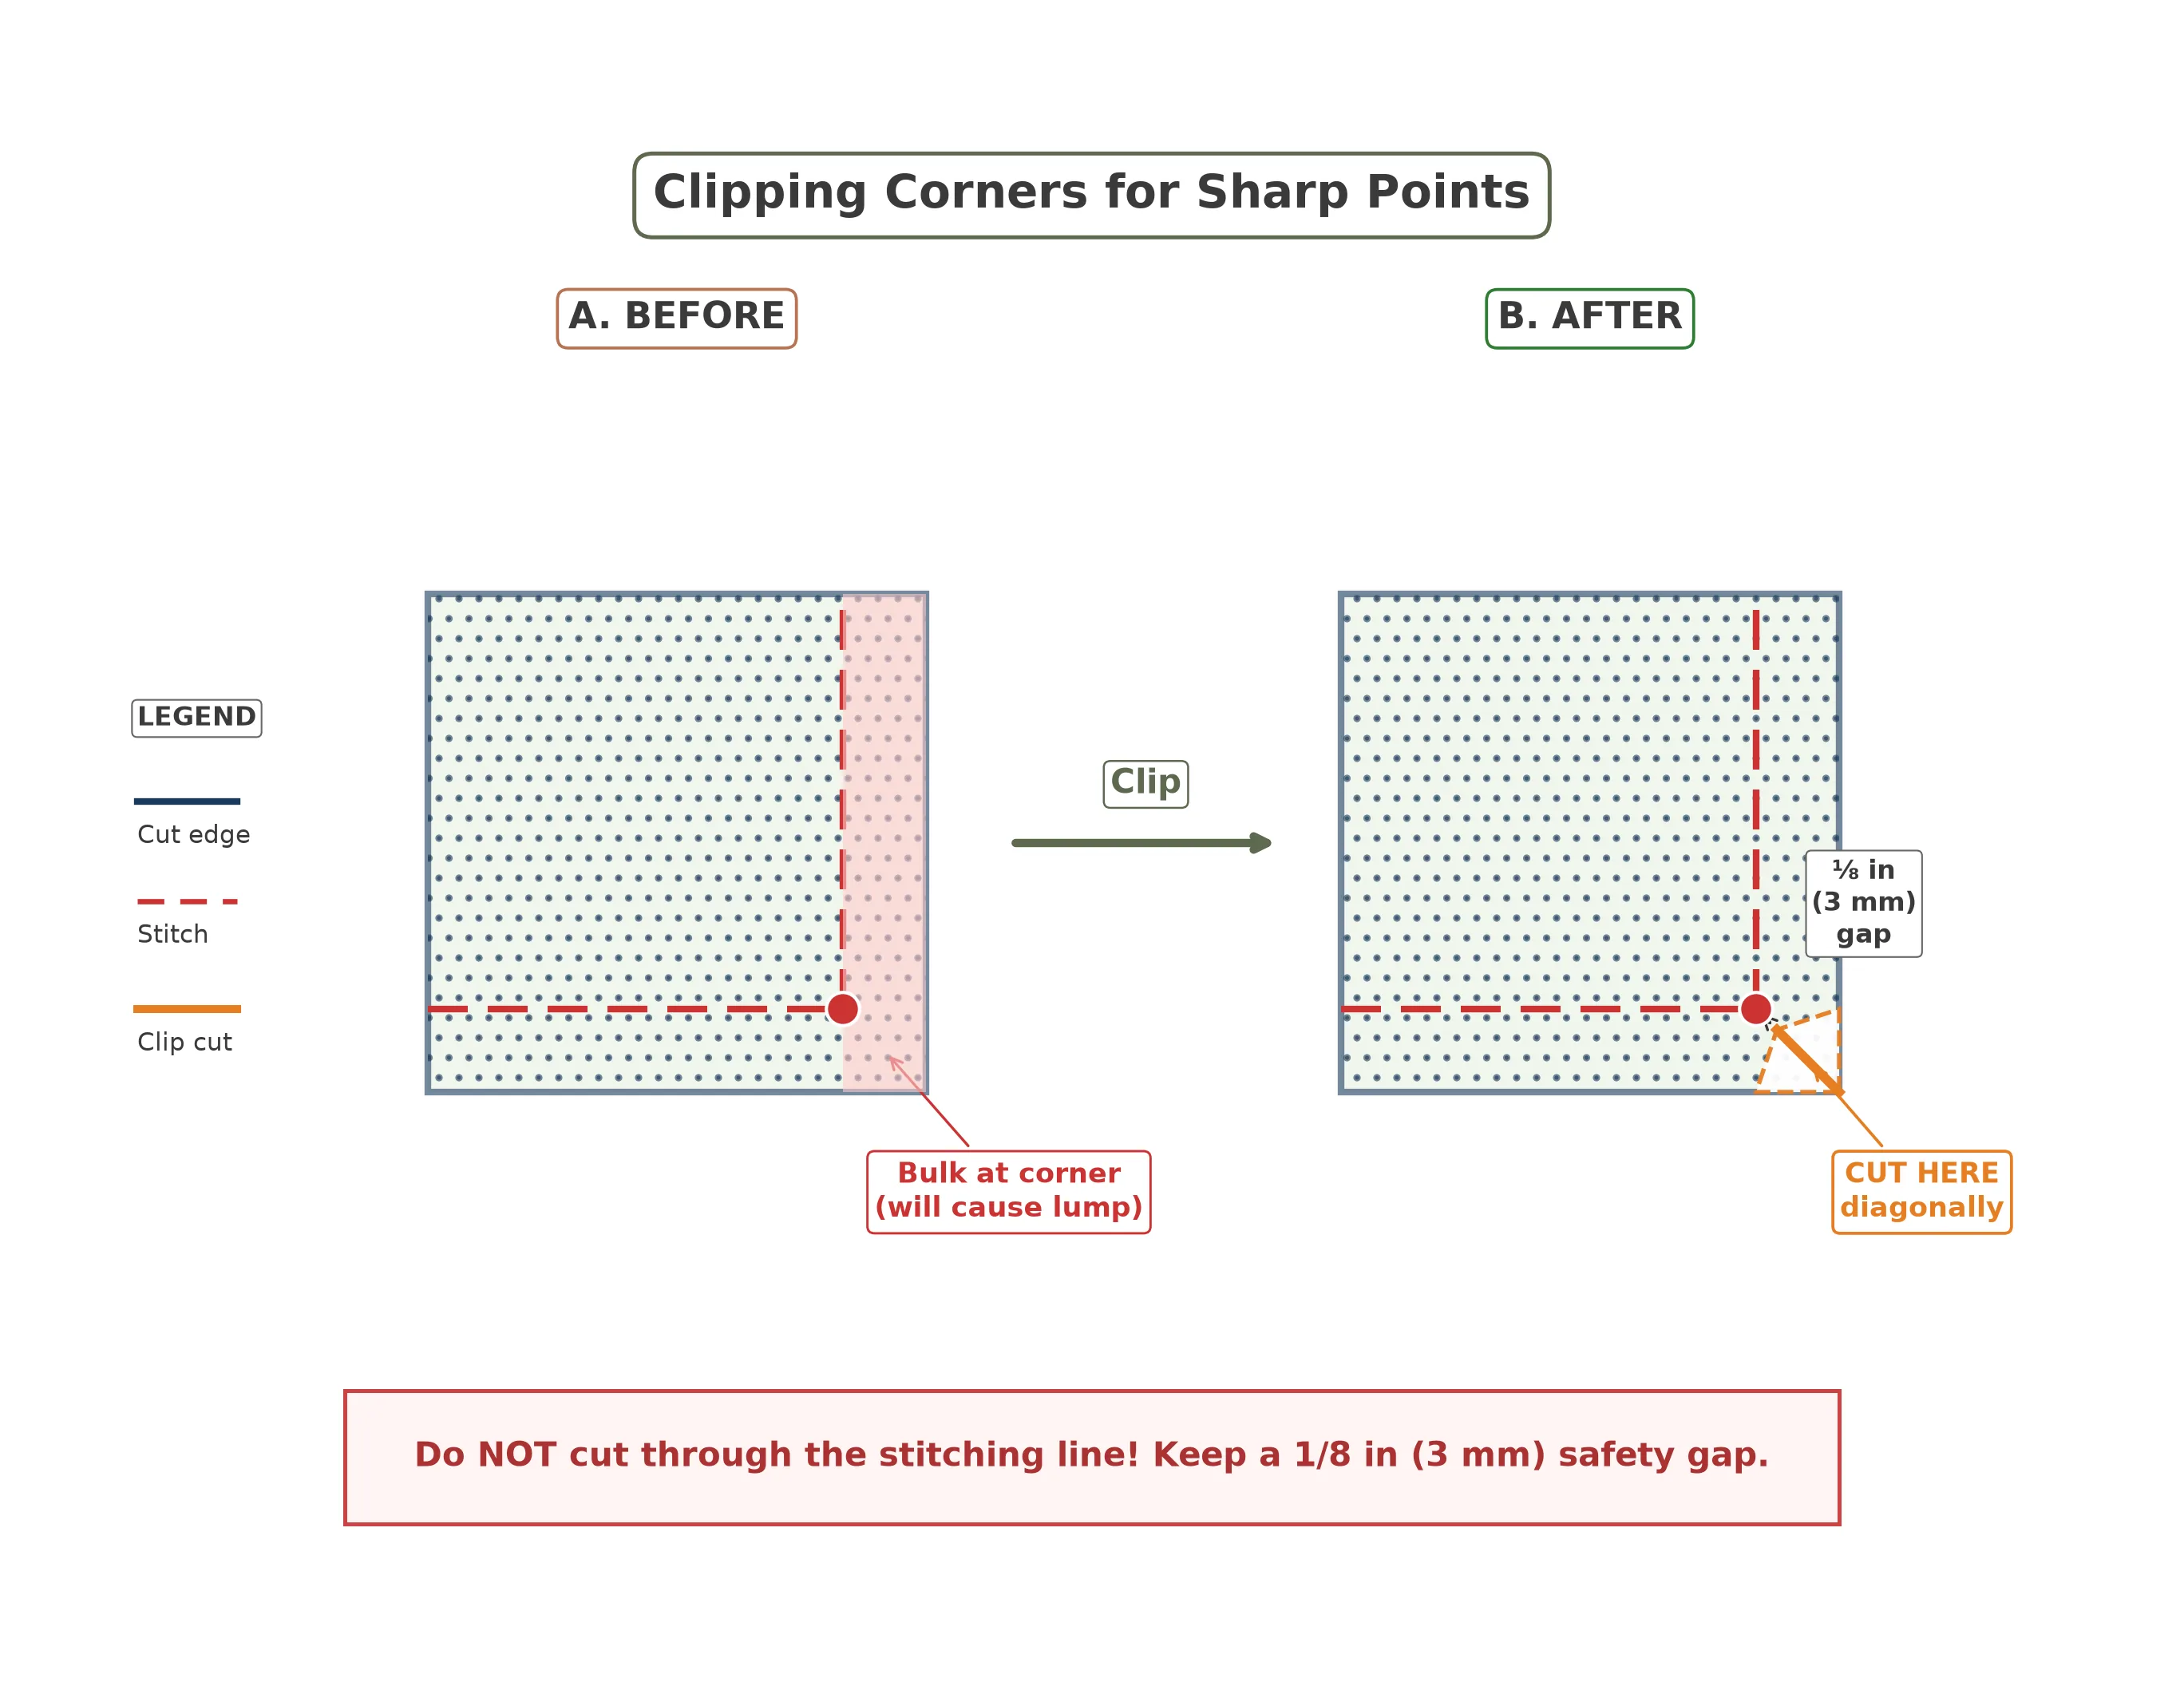
Next, finish the raw edges to prevent fraying. You have several options:
- Zigzag stitch: Sew a zigzag stitch along all the raw edges, just inside the seam allowance. This is the fastest method.
- Pinking shears: Trim the raw edges with pinking shears (scissors with a zigzag blade) to slow down fraying.
- Serger/overlocker: If you have one, serge the edges for the cleanest finish.
Turn, Press, and Insert Your Pillow
This is the best part — the reveal!
- Reach through the envelope opening on the back and gently pull the fabric through to turn the entire cover right side out.
- Use a point turner (or a chopstick, or the blunt end of a pencil) to push out each corner from the inside. Gently poke until the corner is crisp and defined. Do not use anything too sharp, like scissors, which could poke through the stitching.
- Press the entire cover with your iron. Pay special attention to the seam edges — roll the seam between your fingers so the stitching sits right at the edge (not rolling to the front or back), then press flat. This is called understitching by hand and it is the secret to a polished, professional finish.
- Insert your pillow form through the envelope opening. Squeeze the insert to compress it, slide it through, then fluff and adjust so it fills all four corners evenly.
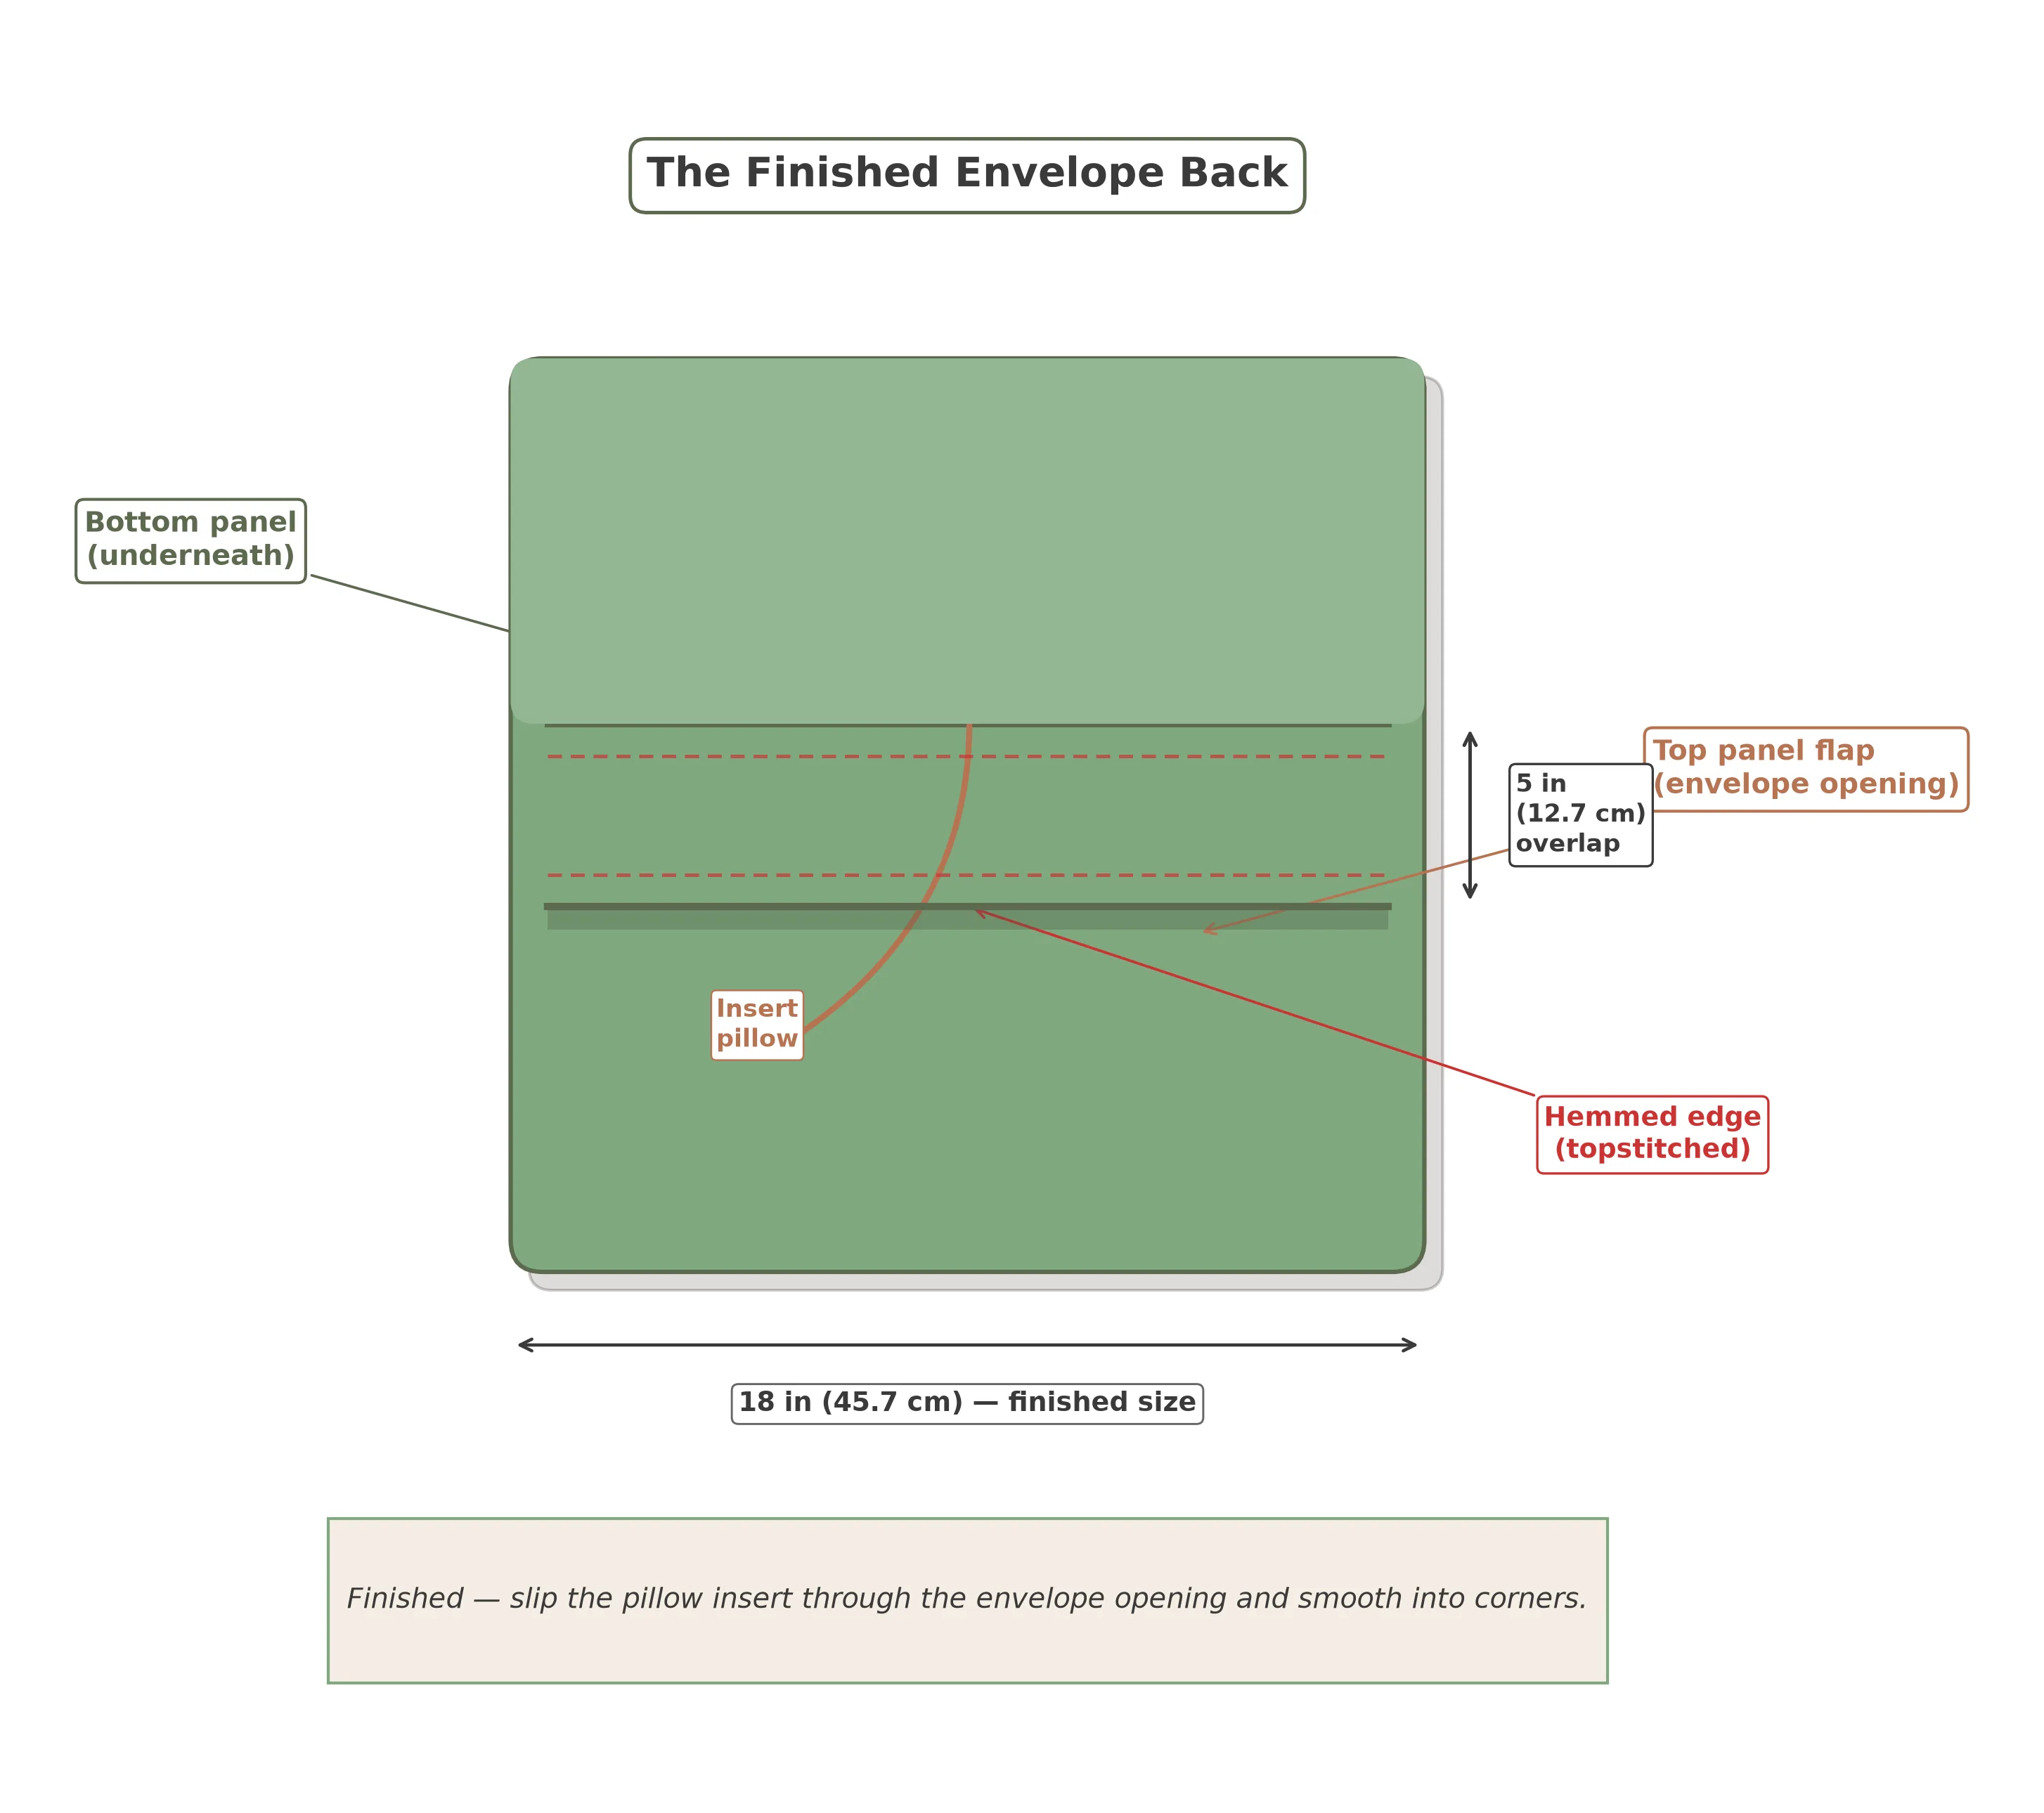
Variations & Ideas
Once you have mastered the basic envelope cushion cover, there are dozens of ways to customize it. Here are my four favorite variations — all beginner-friendly and all starting from the same base pattern:
Two-Tone / Contrast Back
Use a coordinating fabric for the back panels. The front shows your "feature" print, and the envelope back reveals a complementary solid or smaller-scale print when the cushion is flipped. This gives you two looks from one cover.
Color-Block Front
Instead of cutting a single front panel, sew two or three fabric strips together to create a color-blocked front. Sew the strips with 1/2-inch (1.3 cm) seams, press seams to one side, then treat the pieced panel as your front.
Contrast Flange Border
Add a 1-inch (2.5 cm) flat border (called a flange) around the front. Cut the front panel 2 inches larger on all sides, then stitch a topstitched border 1 inch from the edge after construction. The flange creates a "frame" effect.
Button Accent Closure
Add 2–3 decorative buttons to the outside of the overlap opening. These are purely decorative (the envelope still holds the insert), but they add a charming, finished look. Sew them through the top overlap layer only so you can still remove the cover for washing.
Once you are ready to add piping for a truly professional finish, check out our tutorial on how to add piping to your cushion covers — it takes this same basic pattern and elevates it with a tailored corded edge.
What Makes This Tutorial Different
You can find dozens of envelope cushion cover tutorials online. Many of them give you a quick diagram and a vague instruction like "sew around the edges." So why did I write this one?
- Complete sizing math — not just one size, but a formula you can use for any pillow insert, plus a ready-to-use chart for the three most common sizes.
- Fabric selection guidance — a real comparison of cotton vs. linen vs. canvas with honest pros and cons, not just "use any fabric."
- Every mistake anticipated — I have taught this project to dozens of beginner sewers, and I know exactly where people go wrong. Each common mistake is called out before you reach that step.
- Professional finishing tips — the overstuffing trick, corner clipping, seam rolling, pressing techniques. These are the details that separate a handmade-looking cover from a boutique-quality one.
- Part of a complete series — this cover is your starting point for 12 home decor projects that build on each other, giving you the skills to furnish an entire room.
Frequently Asked Questions
How much fabric do I need for an envelope cushion cover?
For an 18-inch pillow insert, you need approximately 3/4 yard (0.7 m) of 54-inch wide fabric, or 1 yard (0.9 m) of 44-inch wide fabric. The front panel is 19 × 19 inches and the two back panels are each 19 × 15 inches. For 16-inch inserts, you need about 5/8 yard; for 20-inch inserts, about 7/8 yard. Always buy an extra 1/8 yard for squaring up your fabric.
What is the best fabric for a beginner cushion cover?
Medium-weight quilting cotton is the ideal choice for beginners. It cuts cleanly, presses into sharp creases, holds its shape, and comes in thousands of prints and solids. Linen-cotton blends are a beautiful upgrade once you have a bit of experience, offering a lovely texture but requiring slightly more care when pressing hems.
How much overlap should an envelope cushion cover have?
Aim for 4–6 inches (10–15 cm) of overlap. A 5-inch overlap is the sweet spot for 16-inch and 18-inch inserts — enough to completely hide the pillow without making the cover feel bulky. For 20-inch or larger inserts, increase to 6 inches. Less than 4 inches and the insert may peek through; more than 6 inches creates unnecessary bulk.
Should I wash fabric before sewing a cushion cover?
Yes, always pre-wash and dry your fabric before cutting. Cotton can shrink up to 5% in the first wash, and linen can shrink even more. Pre-washing ensures your finished cover retains its fit after laundering. Wash on the same cycle you will use for the finished cover (usually warm wash, tumble dry medium), then press the fabric smooth before cutting.
Can I make an envelope cushion cover without a sewing machine?
Absolutely. Hand-sew the hems with a slip stitch and the perimeter seams with a backstitch using strong all-purpose thread. It will take roughly 3–4 hours instead of 45 minutes, but the result is identical. Use small, even stitches (about 8 per inch) and a sharp hand-sewing needle (size 7 or 8 sharp).
What size should I cut fabric for an 18-inch pillow insert?
Cut the front panel at 19 × 19 inches (48.3 × 48.3 cm) — that is 18 inches for the insert plus 1/2 inch seam allowance on each side. Cut two back panels at 19 × 15 inches (48.3 × 38.1 cm) each. The extra width on the back panels accounts for the hem fold and the 5-inch overlap.
Your Next Home Decor Projects
Congratulations — you just sewed your first piece of home decor! The skills you used here (measuring, cutting rectangles, hemming, seaming, clipping corners, pressing) are the foundation for every project in this series. Here is what to make next:
Continue the Series
- Sew a table runner with mitered corners — learn the mitered corner technique that applies to napkins, quilts, and more.
- Make rod pocket curtains to match your new cushion covers — same straight seams, just on longer fabric.
- Build a fabric storage basket — introduces interfacing and boxing corners for 3D structure.
- Add piping to your cushion covers — take this same pillow pattern and upgrade it with professional piped edges.
Explore Other Series
- Try our beginner envelope pillowcase in the First Stitches series — a similar envelope technique on a bed pillow.
- Discover more projects you can finish in an afternoon in our Weekend Sewing Projects series.
If you found this tutorial helpful, I would love to see your finished cushion covers. Every cover you make is a step toward transforming your home with your own handmade touches — and there is nothing more satisfying than that.