How to Sew a Throw Pillow with Piping — Complete Tutorial
In This Tutorial
- What Is Piping and Why Use It?
- Materials and Tools
- Piping Cord Size Guide
- Cut the Fabric Pieces
- Cut Bias Strips
- Join Bias Strips
- Wrap the Piping Cord
- Baste Piping to Front
- Navigate the Corners
- Join the Piping Ends
- Install the Invisible Zipper
- Sew Front to Back
- Turn and Stuff
- Pro Tips
- Frequently Asked Questions
What Is Piping and Why Use It?
Piping is one of those small details that instantly elevates a handmade pillow from "I made this in my living room" to "I bought this at a designer home store." In its simplest form, piping (sometimes called welting) is a thin cord wrapped in a strip of fabric and sewn into a seam. It creates a crisp, raised edge that defines the shape of your pillow and adds a tailored, professional finish.
In this throw pillow with piping tutorial, I will walk you through every stage of the process, from cutting bias strips to navigating those tricky corners and installing an invisible zipper. I have been sewing piped cushions for years, and I can tell you that the technique is far more approachable than it looks. Once you understand the basic principle — sandwich the piping between two layers of fabric and stitch close to the cord — you will find yourself adding piping to everything from chair seat cushions to tote bags and even garment seams.
This project builds naturally on the skills you learned in our envelope cushion cover tutorial. If you can sew a straight seam and press a hem, you are ready to tackle piping. The invisible zipper adds a slightly more advanced element, but I will break it down into manageable steps so you never feel lost.
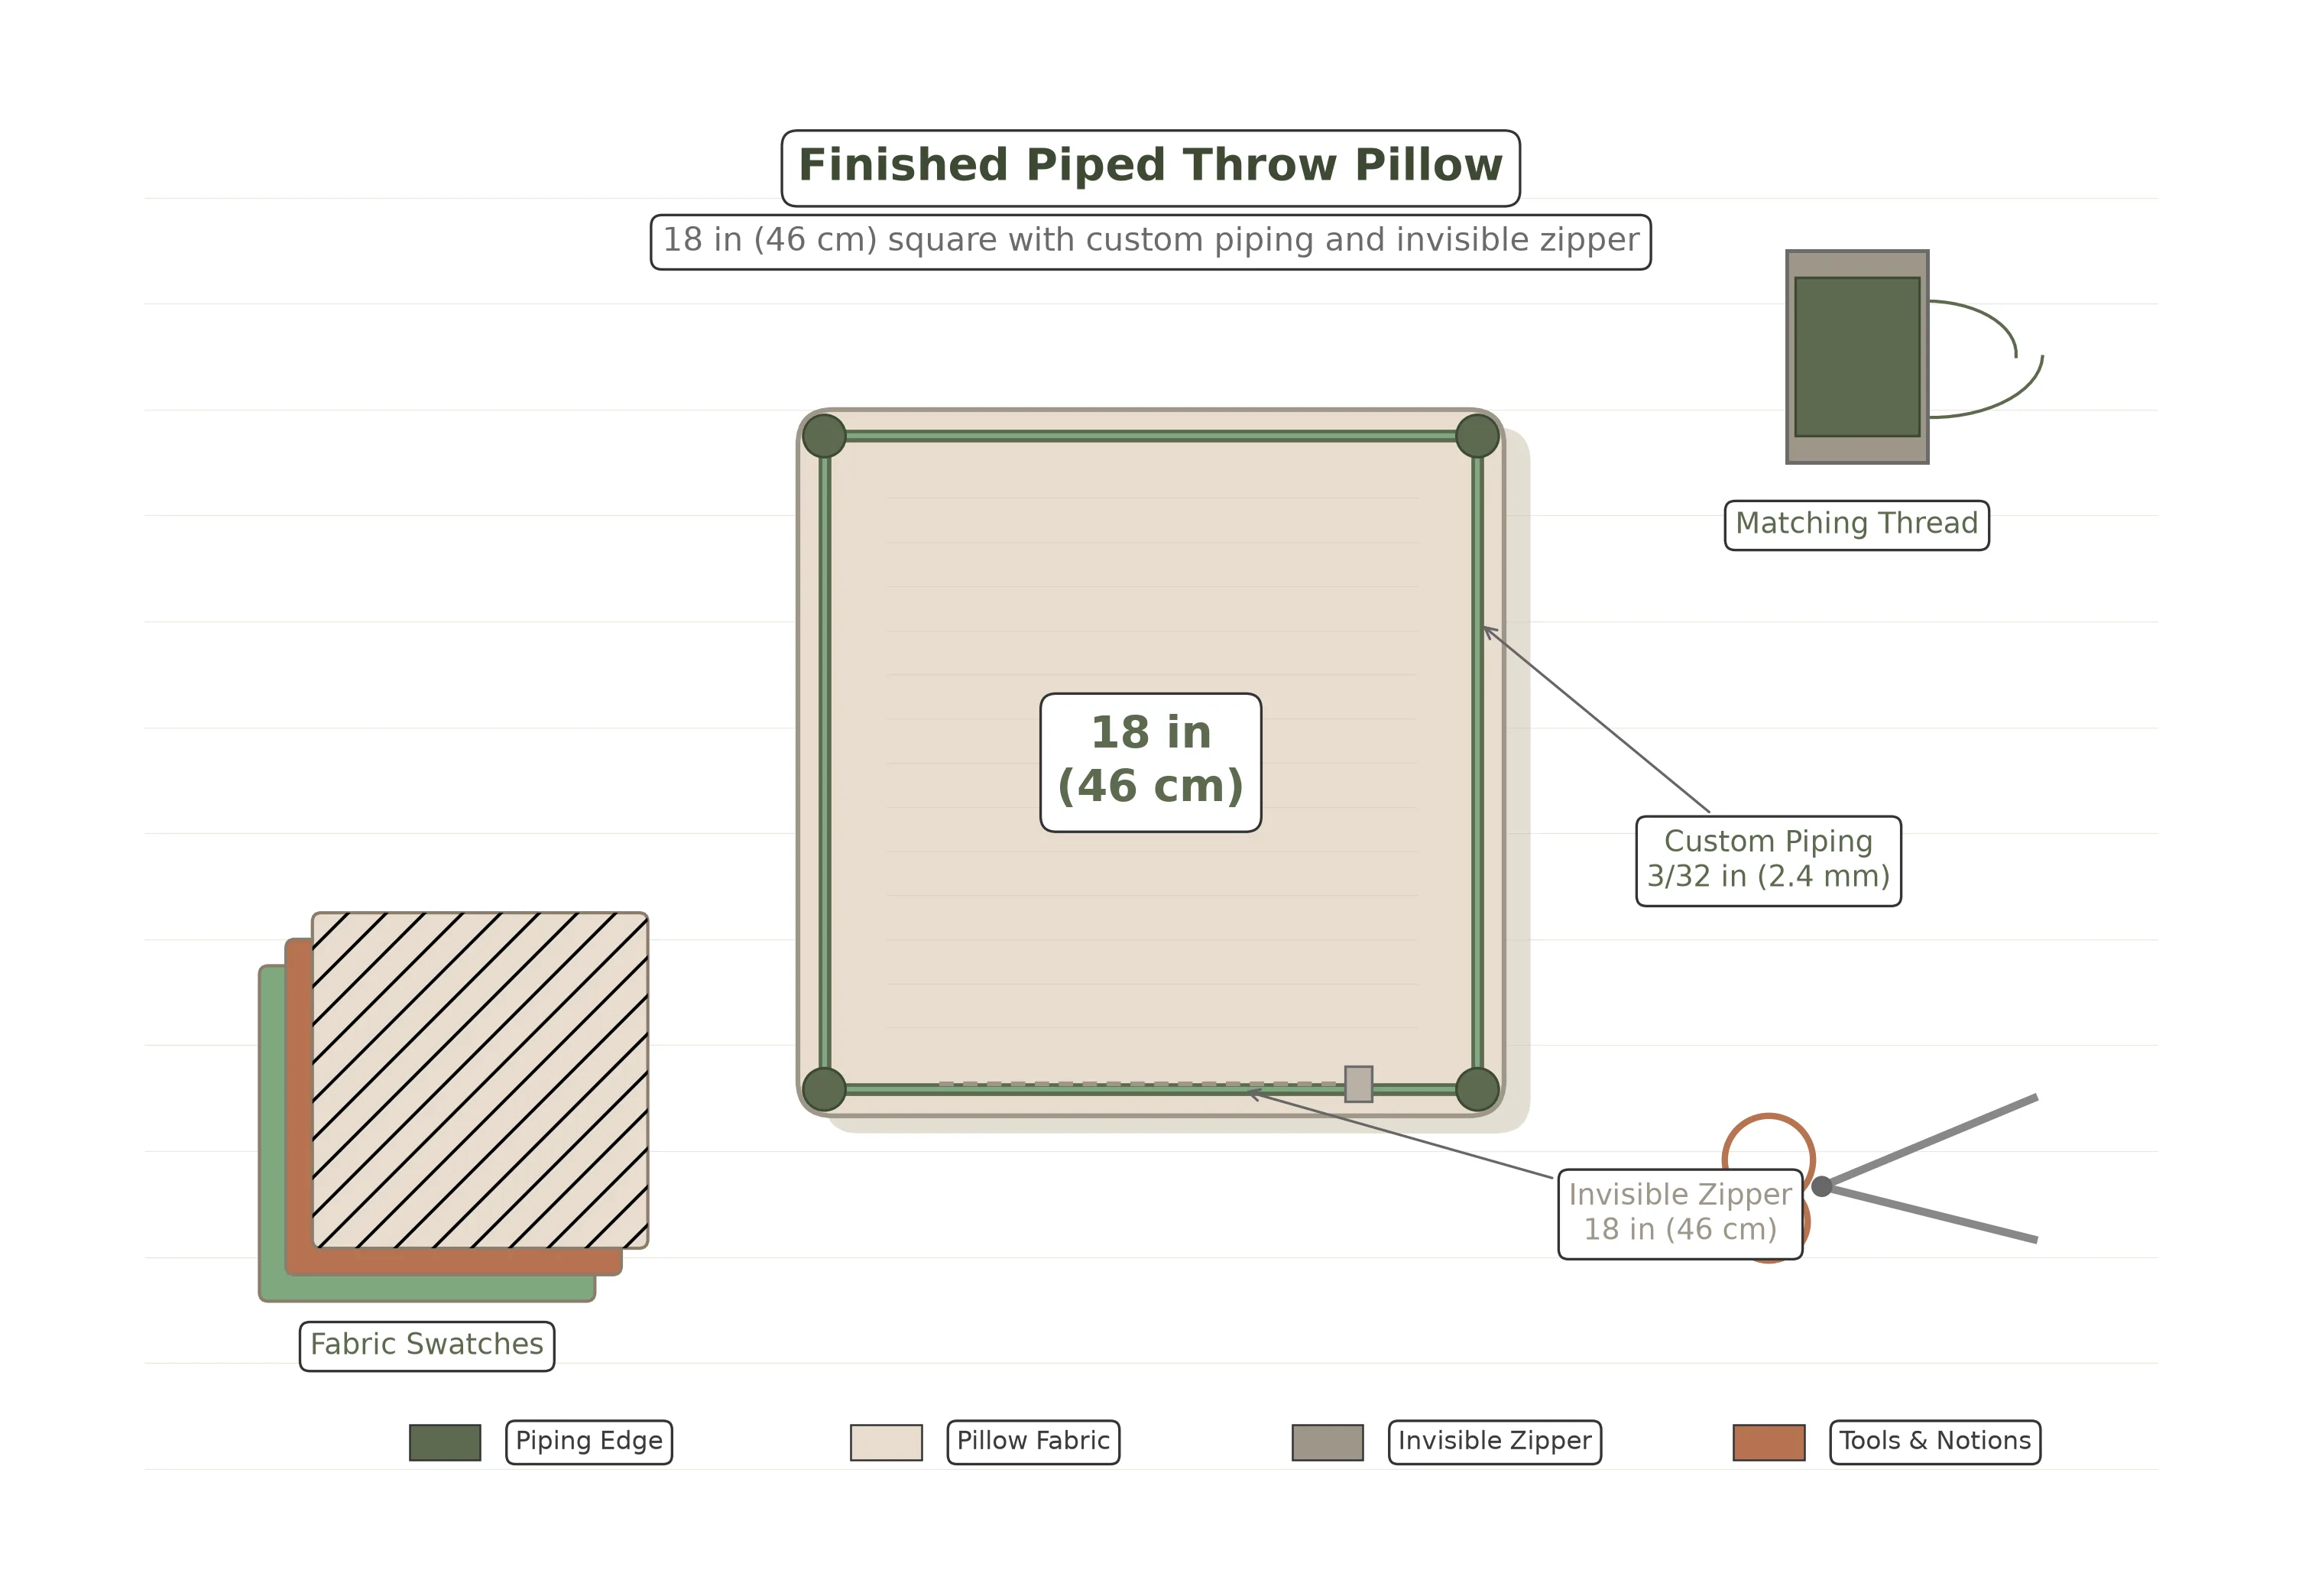
By the end of this tutorial, you will have a beautiful 18 in (46 cm) piped throw pillow cover with a hidden zipper closure, and you will have mastered a piping corners technique that you can apply to any future sewing project. Let us get started.
Materials and Tools
Before you begin your piped cushion cover pattern, gather everything you need. I find that having all materials laid out on my cutting table before I start saves me from those frustrating mid-project trips to the craft store.
Fabric and Notions
- Decorative fabric, 1 yard (0.9 m) — medium-weight cotton, linen, or upholstery fabric
- Piping cord, 3 yards (2.7 m) — 3/32 in (2.4 mm) diameter recommended
- Invisible zipper, 18 in (46 cm)
- Matching all-purpose thread
- Pillow form, 20 in (51 cm) for a plump fit
Tools
- Sewing machine with zipper foot
- Rotary cutter, ruler, and self-healing mat
- Fabric scissors
- Iron and ironing board
- Straight pins or sewing clips
- Seam ripper (just in case!)
- Tape measure
- Fabric marking pen or chalk
For your first piped pillow, I recommend a medium-weight cotton or cotton-linen blend. These fabrics press beautifully and are forgiving to work with. Avoid very slippery fabrics like satin or very thick upholstery fabrics until you are comfortable with the technique. If you want to coordinate your pillow with window treatments, check out our rod pocket curtain panel tutorial for matching fabric suggestions.
Piping Cord Size Guide
One of the most common questions I get about making your own piping cord is, "What size should I use?" The answer depends on the scale of your project and the look you want. Here is a quick reference chart I keep pinned above my sewing machine:
| Cord Diameter | Bias Strip Width | Best For | Look |
|---|---|---|---|
| 1/16 in (1.6 mm) | 1 1/2 in (3.8 cm) | Delicate garments, doll clothes | Subtle, refined |
| 3/32 in (2.4 mm) | 2 in (5 cm) | Throw pillows, cushion covers | Classic, tailored |
| 5/32 in (4 mm) | 2 1/4 in (5.7 cm) | Upholstery, box cushions | Bold, structured |
| 1/4 in (6.4 mm) | 2 1/2 in (6.4 cm) | Outdoor furniture, heavy-duty | Chunky, statement |
For this throw pillow with piping tutorial, the 3/32 in (2.4 mm) cord is my top recommendation. It gives a noticeable but elegant edge that suits most home decor styles. You can find piping cord at most fabric stores or order it from specialty suppliers like Wawak Sewing Supplies, which carries a wide range of sizes at very reasonable prices.
Cut the Fabric Pieces
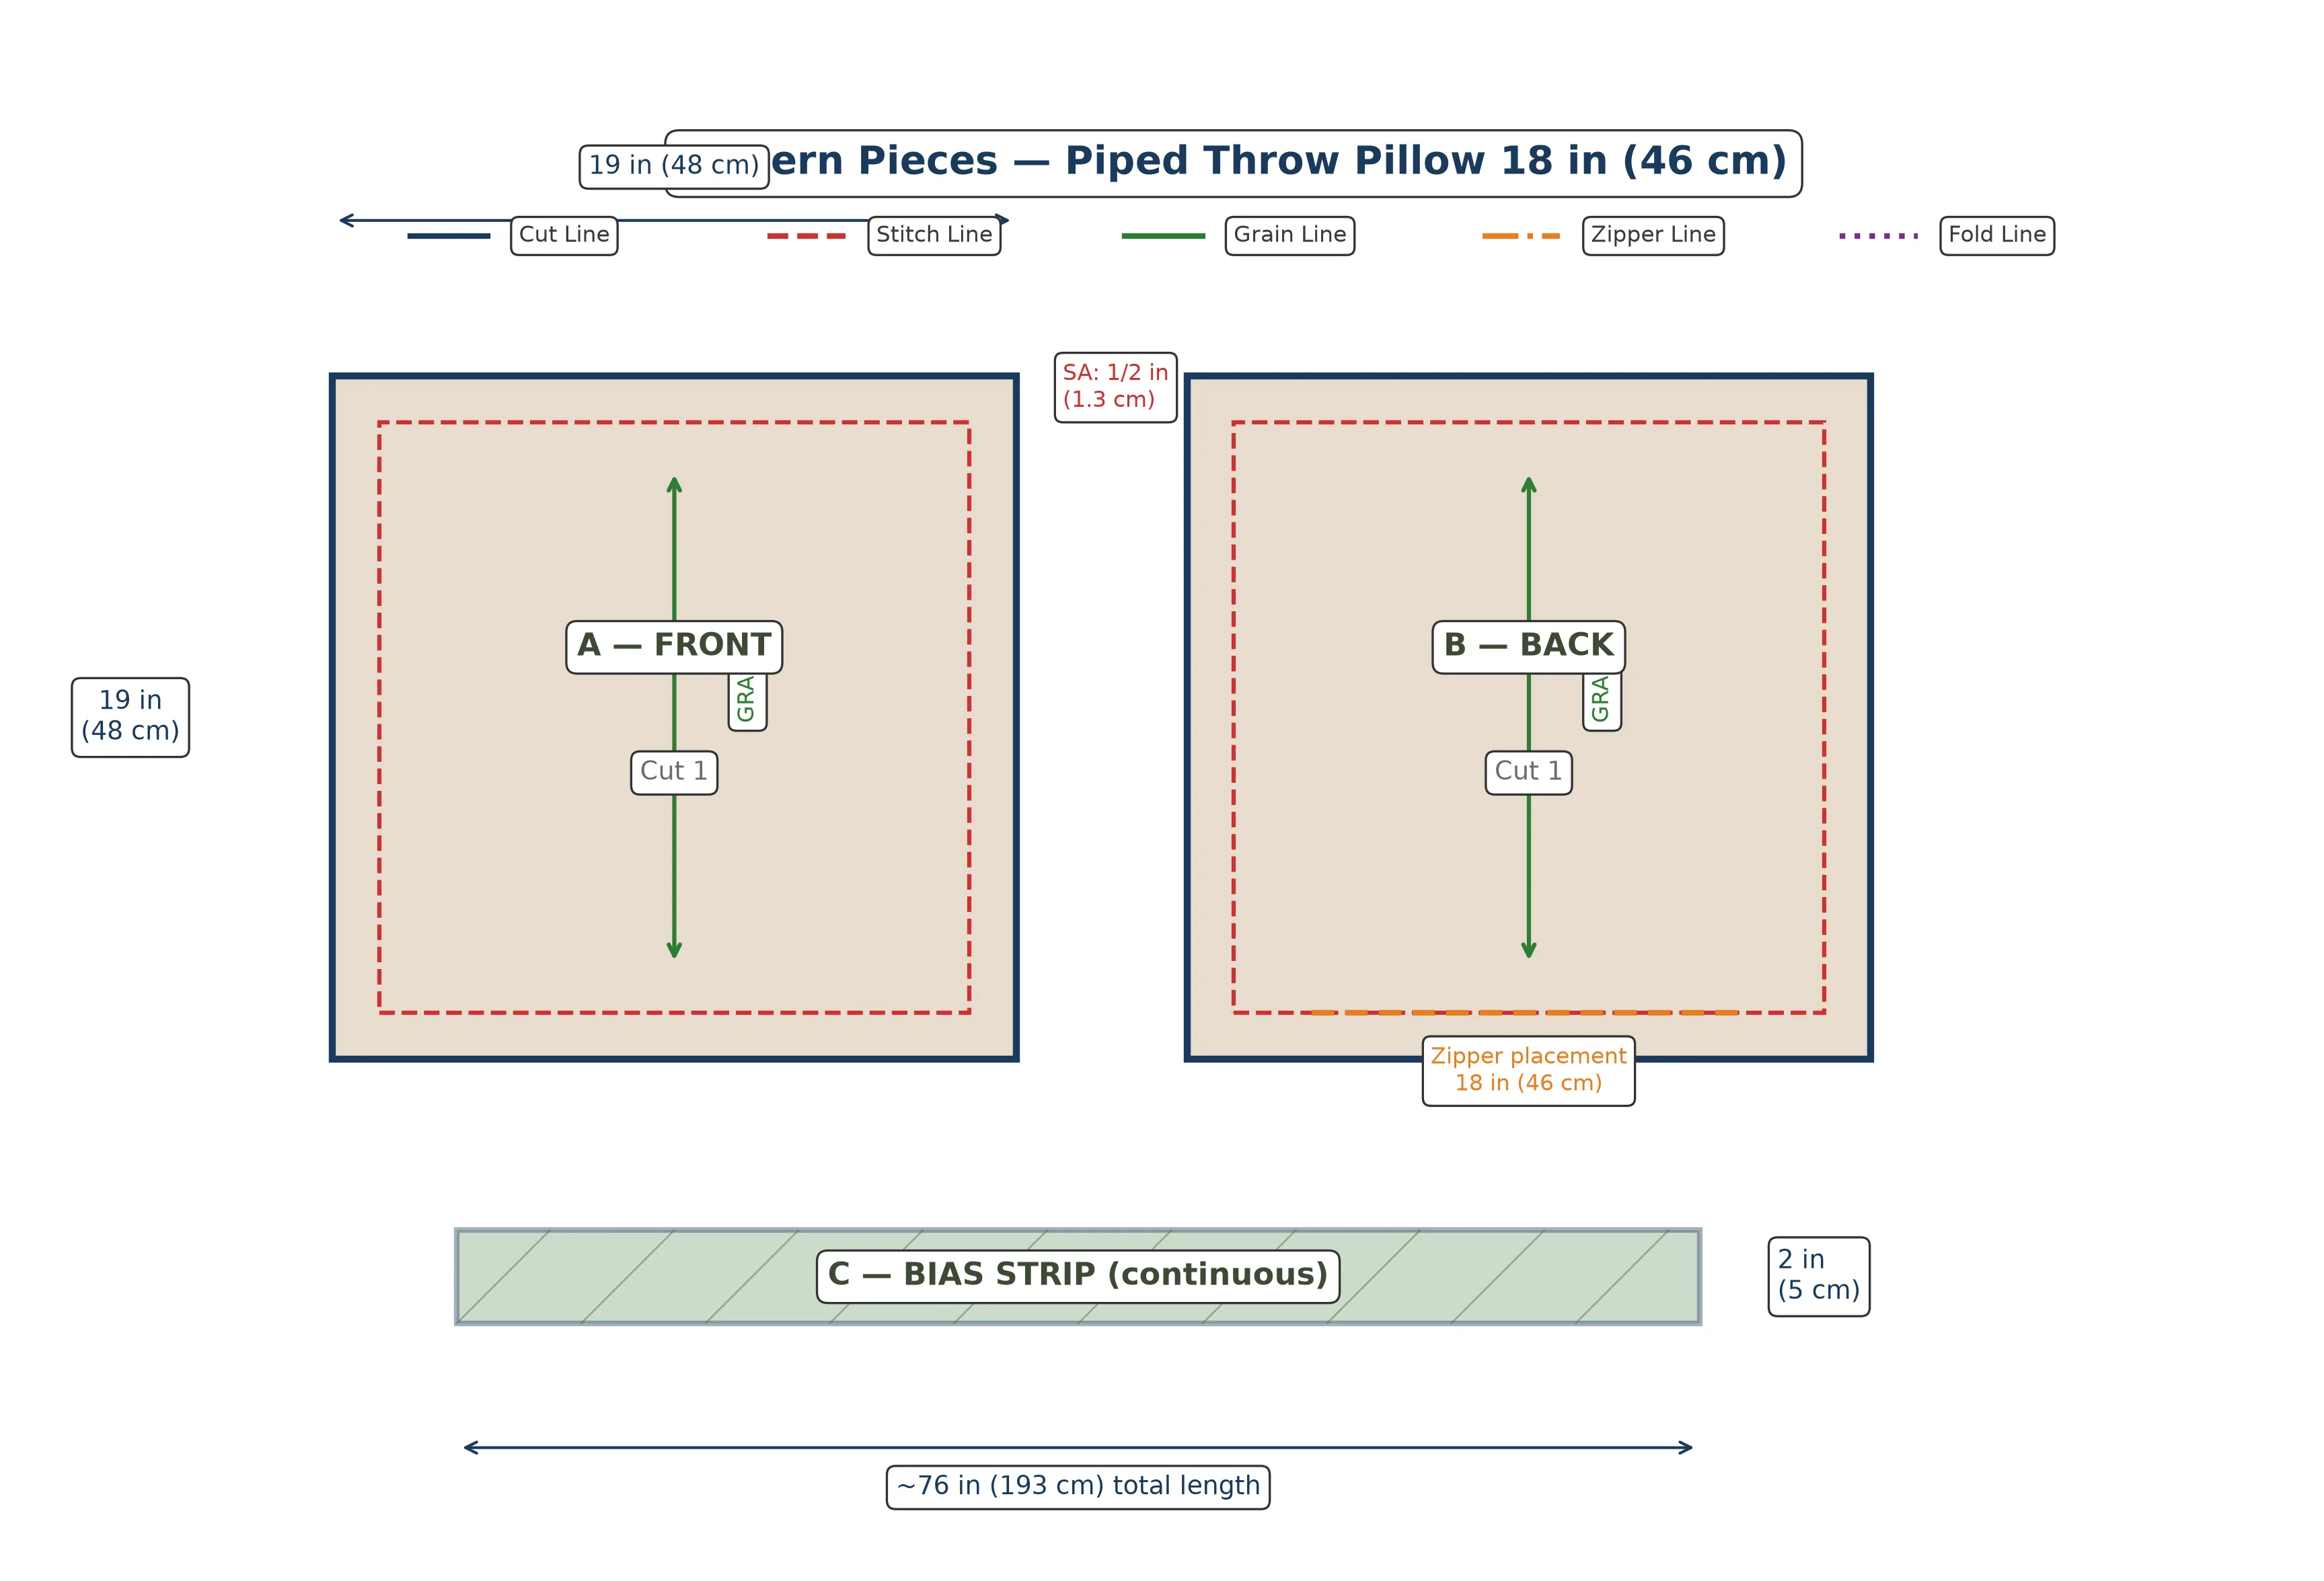
Start by pressing your fabric to remove any wrinkles. Using your rotary cutter and ruler, cut two squares measuring 19 × 19 in (48 × 48 cm). These will become the front and back of your pillow cover. The extra 1/2 in (1.3 cm) on each side beyond the 18 in (46 cm) finished size is your seam allowance.
Mark the wrong side of each piece with a small "X" in chalk so you do not accidentally sew them together inside out later. I have done this more times than I care to admit, and it is always frustrating to discover after the fact.
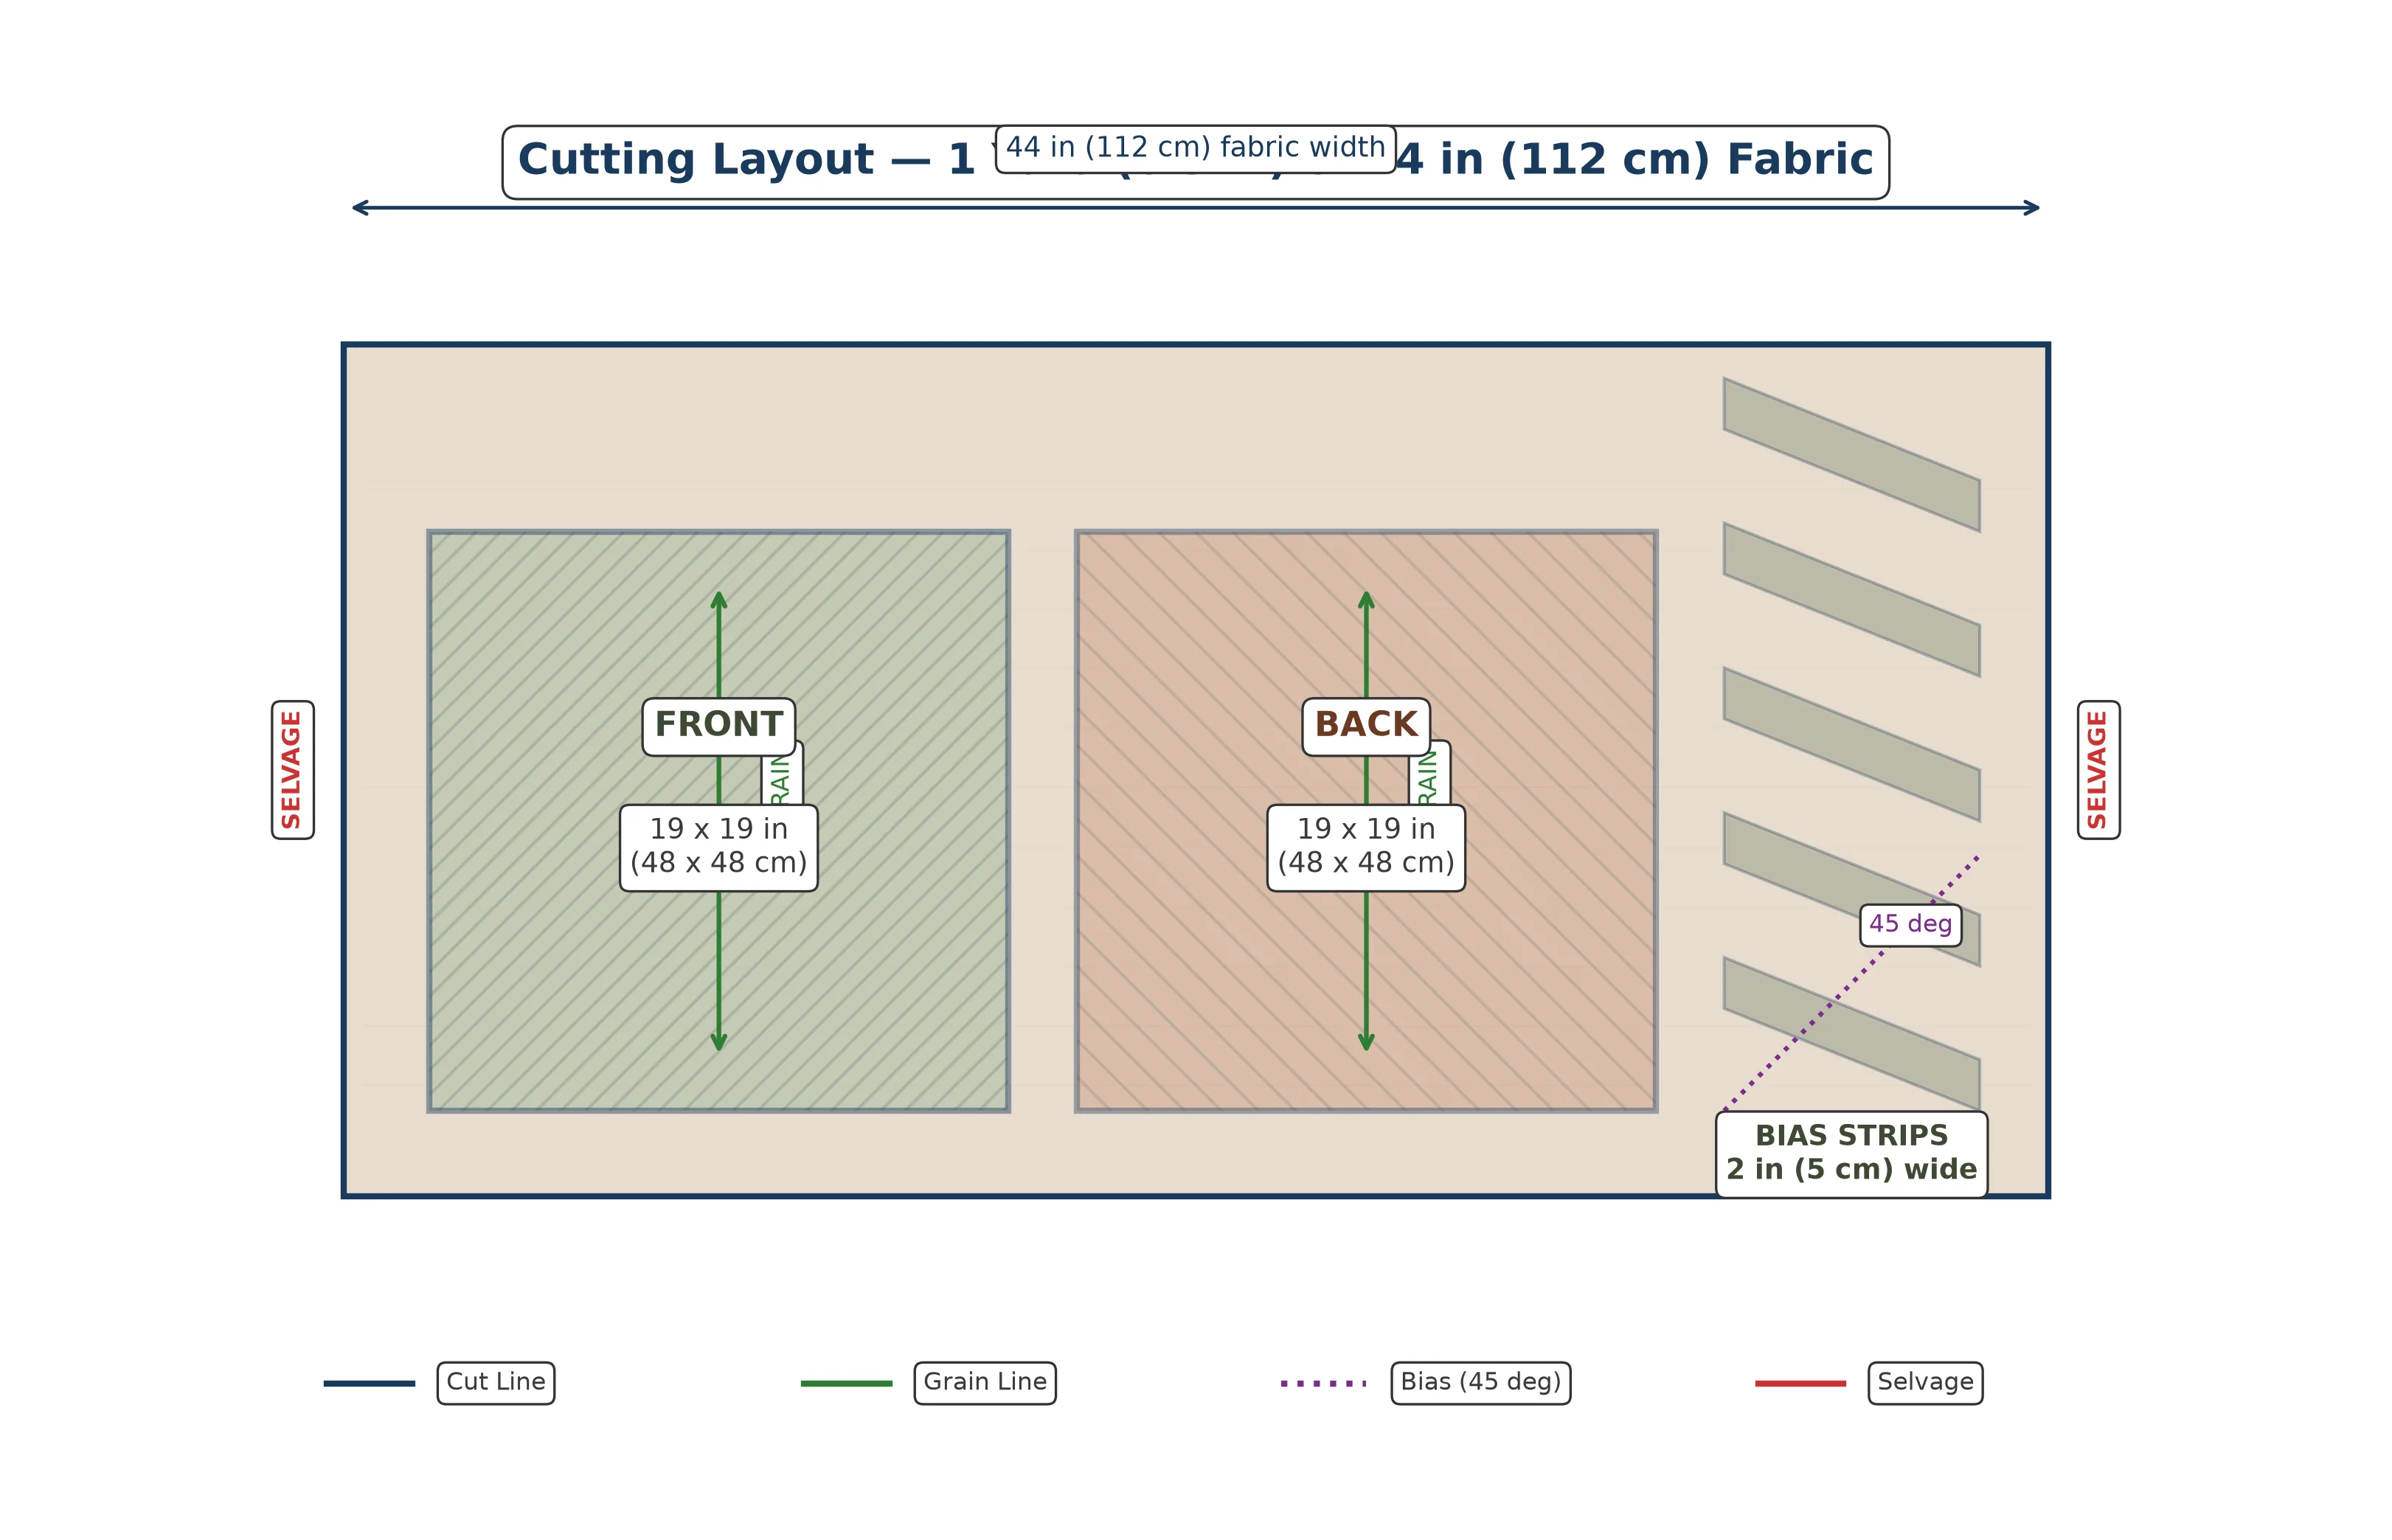
If your fabric has a directional print — meaning the pattern has a definite "up" and "down" — make sure both squares are oriented the same way. There is nothing worse than finishing a pillow only to realize the floral motif on the back is upside down relative to the front.
Cut Bias Strips for Piping
This is where the magic of how to sew piping into a seam really begins. Piping must be cut on the bias — the 45-degree diagonal of the fabric — because bias-cut strips stretch and curve smoothly around corners. Strips cut on the straight grain will pucker and resist bending, which is the number one cause of wavy piping.
To find the bias, fold one corner of your fabric so the selvage aligns with the cut edge. The fold line is your true bias. Using a ruler and rotary cutter, cut 2 in (5 cm) wide strips along this diagonal. You will need approximately 76 in (193 cm) of continuous bias strip to go around all four sides of the 18 in (46 cm) pillow, plus a little extra for joining.
If you are not getting long enough strips from a single cut, do not worry. In the next step, I will show you how to join shorter strips into one continuous length. This is completely normal and expected.
Join Bias Strips
Lay two bias strips right sides together at a 90-degree angle, forming an "L" shape. The ends should overlap slightly at the corner. Stitch across the diagonal where the strips intersect, using a 1/4 in (6 mm) seam allowance.
Trim the seam allowance to about 1/8 in (3 mm) and press it open. Repeat until all your strips are joined into one long, continuous piece. The diagonal seams distribute bulk more evenly than straight seams, which is why they are the standard for making your own piping cord.
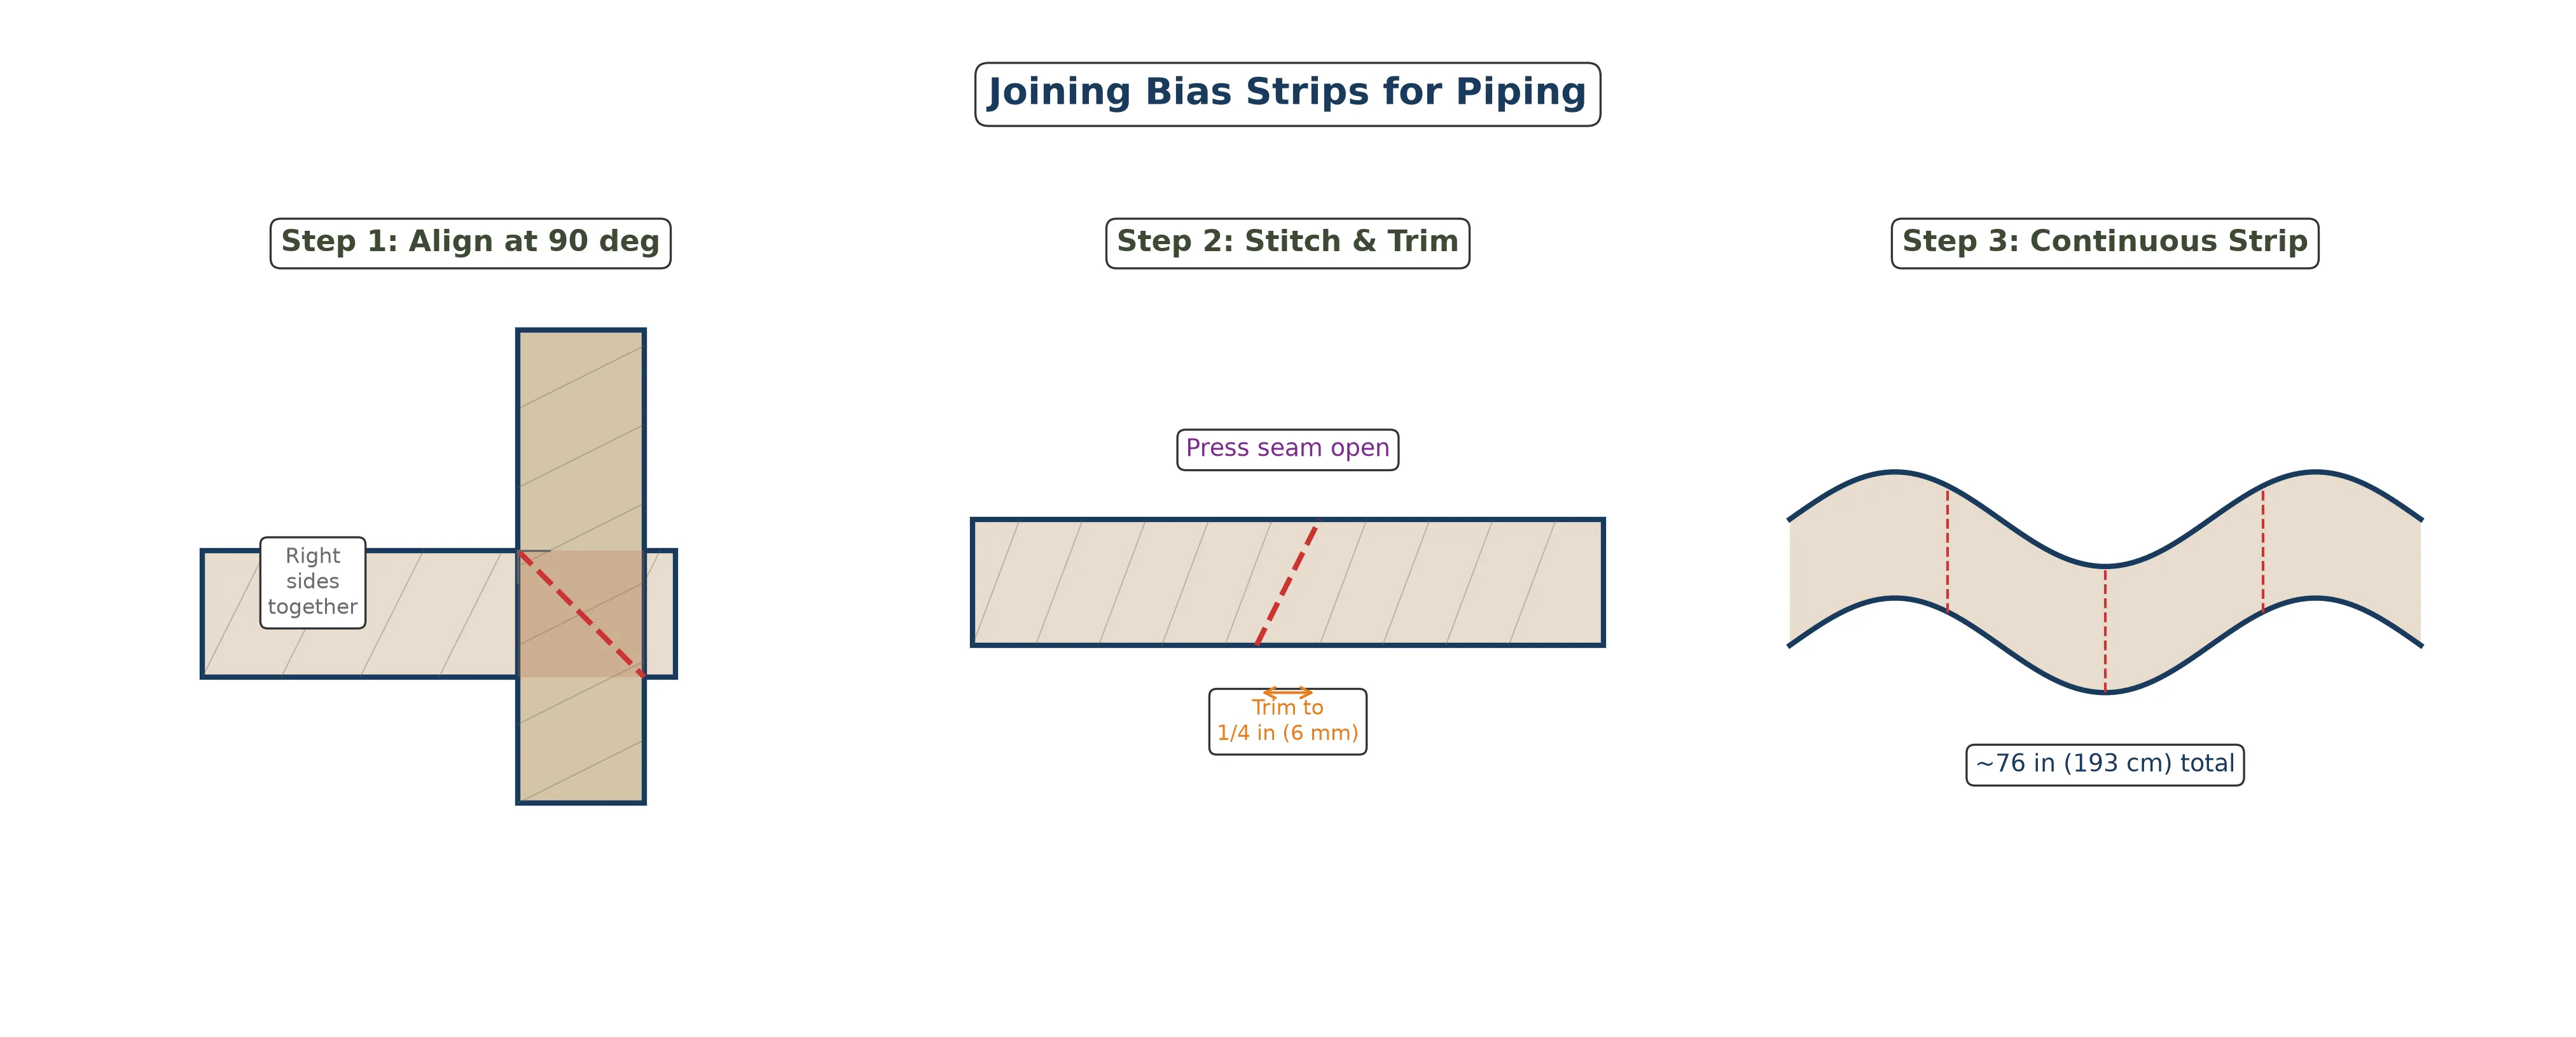
Once all strips are joined, press the entire length flat. Run your fingers along the strip to check for any twisted seams or lumps. A smooth strip now means smooth piping later.
Wrap the Piping Cord
Fold your bias strip in half lengthwise, wrong sides together, and press lightly. Place the piping cord inside the fold, snug against the crease. The raw edges of the bias strip should be even on both sides.
Switch to your zipper foot on the sewing machine. Position the needle so it stitches as close to the cord as possible without actually sewing over it. Stitch the entire length of the bias strip, keeping the cord pushed firmly against the fold as you sew. This creates your finished piping.
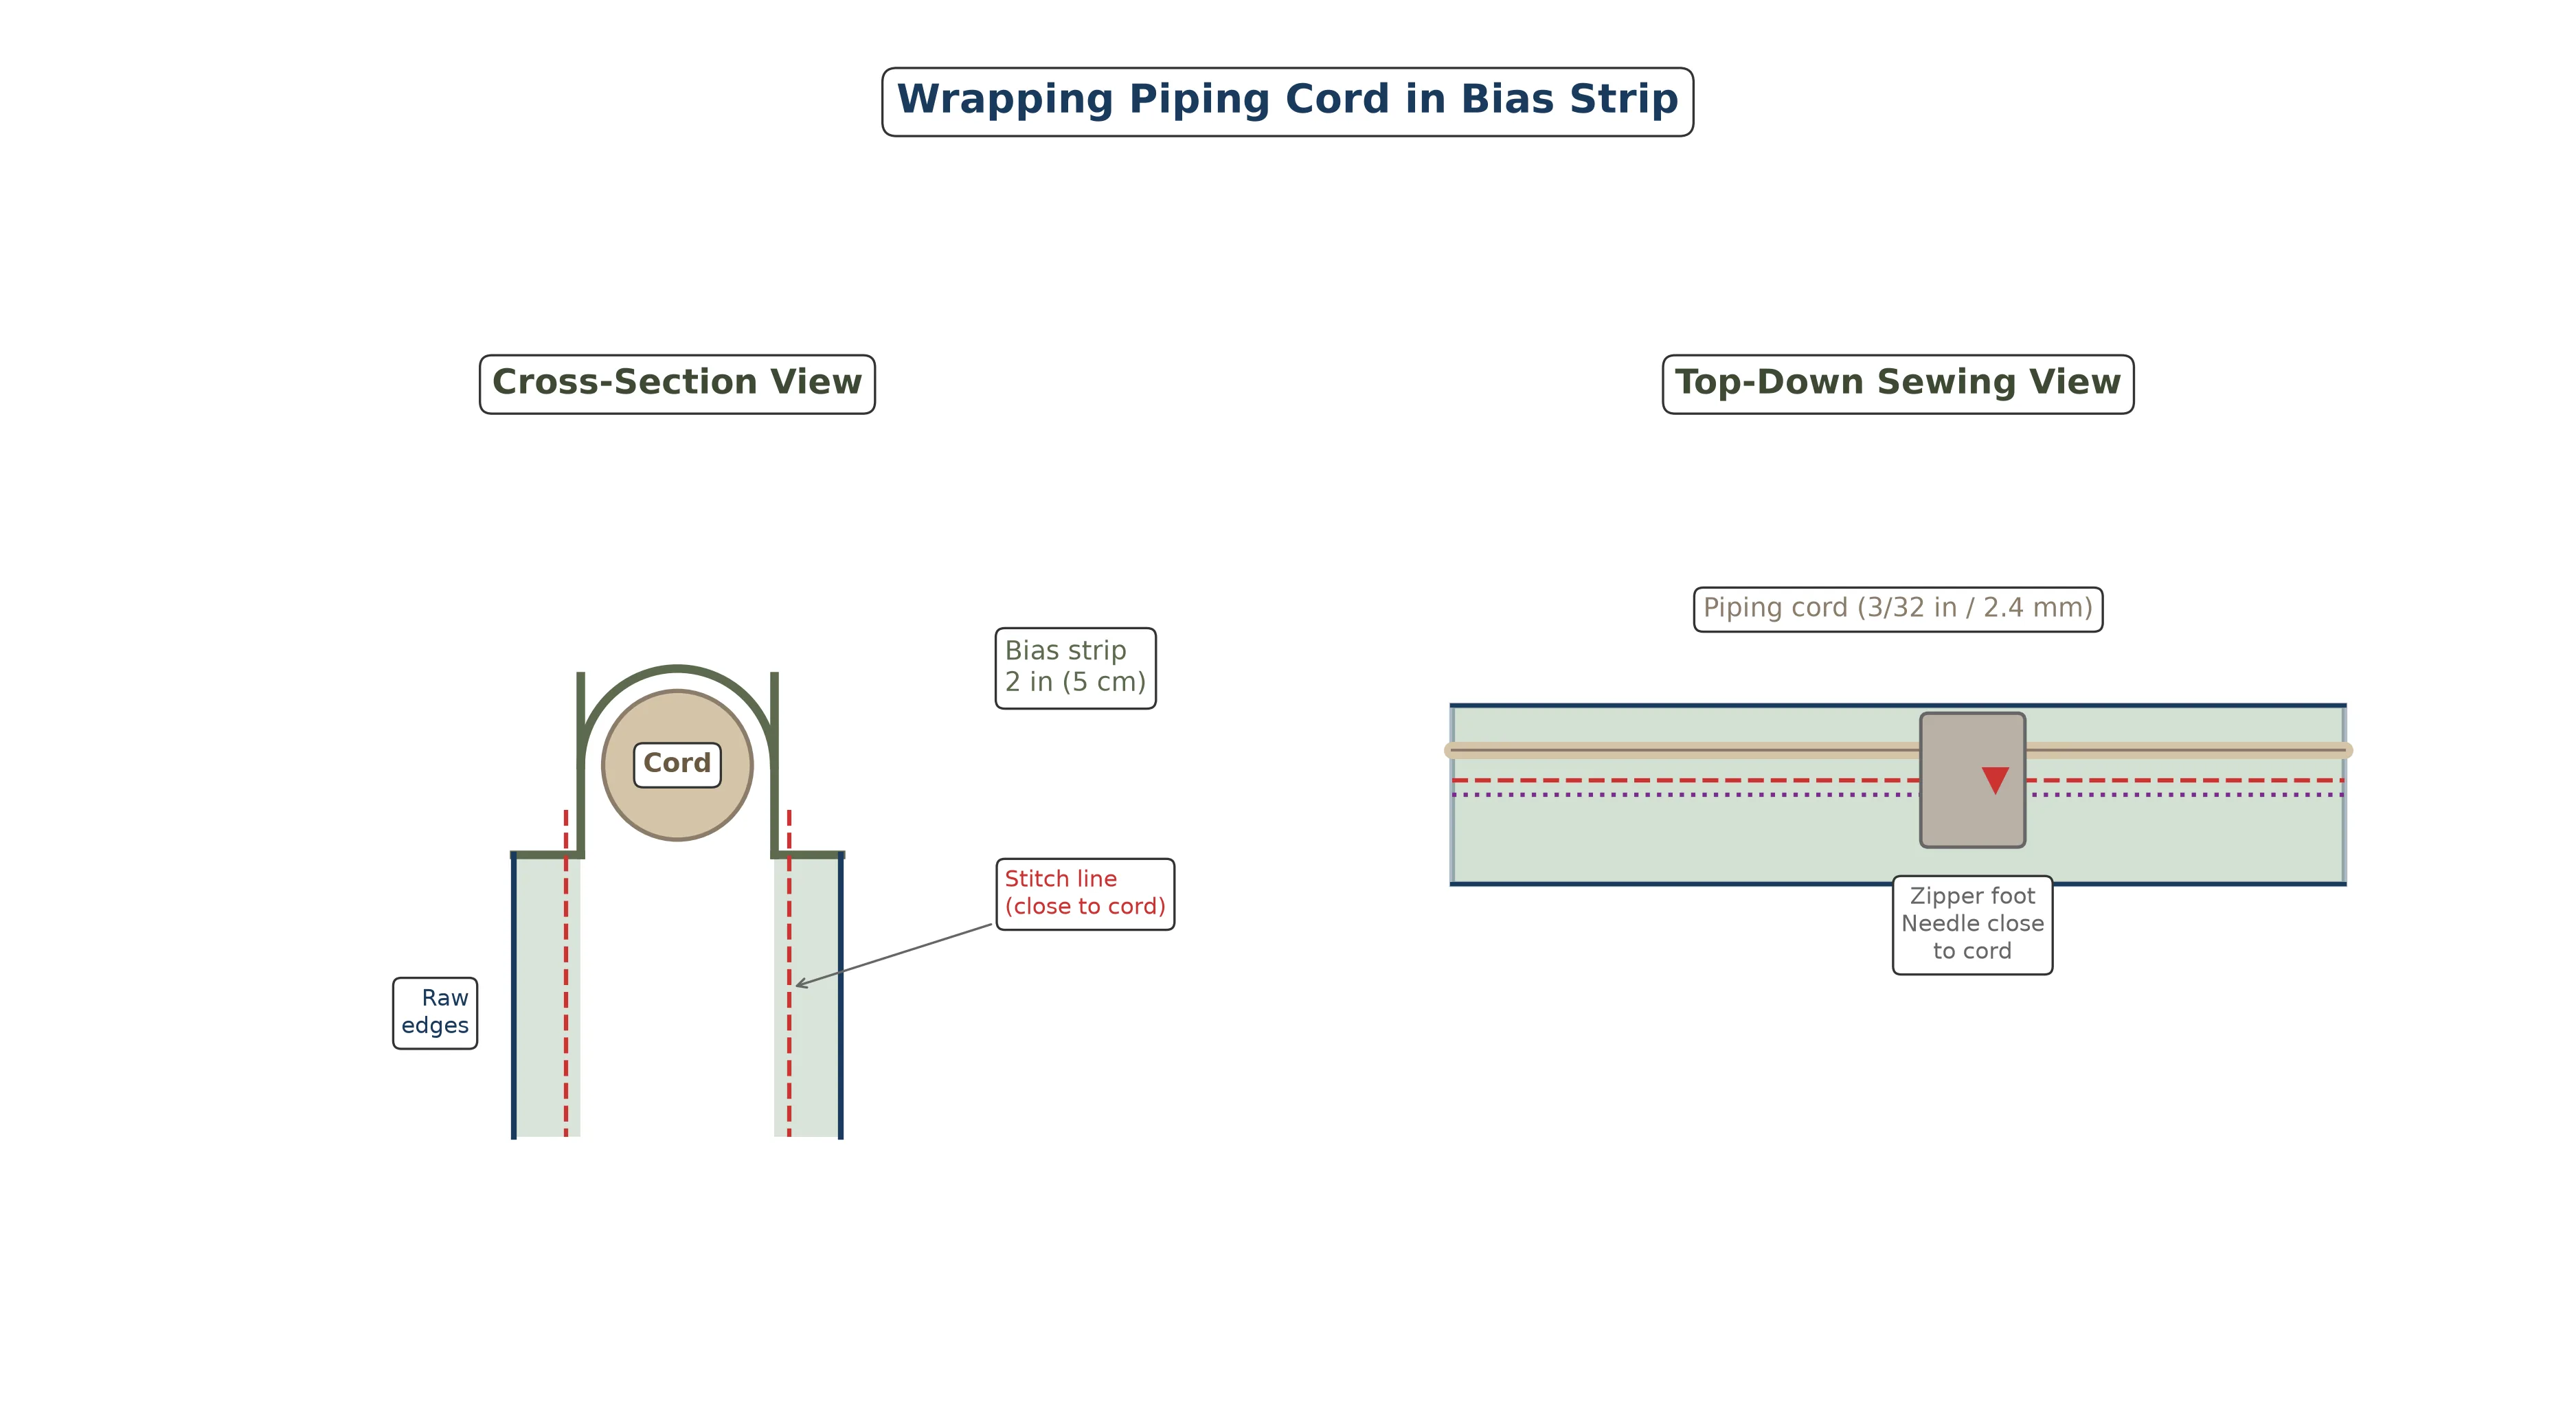
Do not stretch the bias strip as you sew. Let the feed dogs move the fabric at their own pace. Stretching the bias will cause the finished piping to twist and ripple once it is sewn into the seam. If you want a deeper dive into piping foot vs. zipper foot options, Sailrite has an excellent comparison guide.
Baste Piping to the Front Piece
Place the front pillow square right side up on your work surface. Starting at the center of one edge (not at a corner — this makes the join easier to hide later), align the raw edges of the piping with the raw edge of the fabric. The cord should face inward toward the center of the square.
Pin the piping in place every 2 to 3 in (5 to 7.5 cm). Using your zipper foot, baste the piping to the front piece with a 3/8 in (1 cm) seam allowance. Basting means sewing with a long stitch length (about 4 mm) so you can easily remove the stitches later if needed.
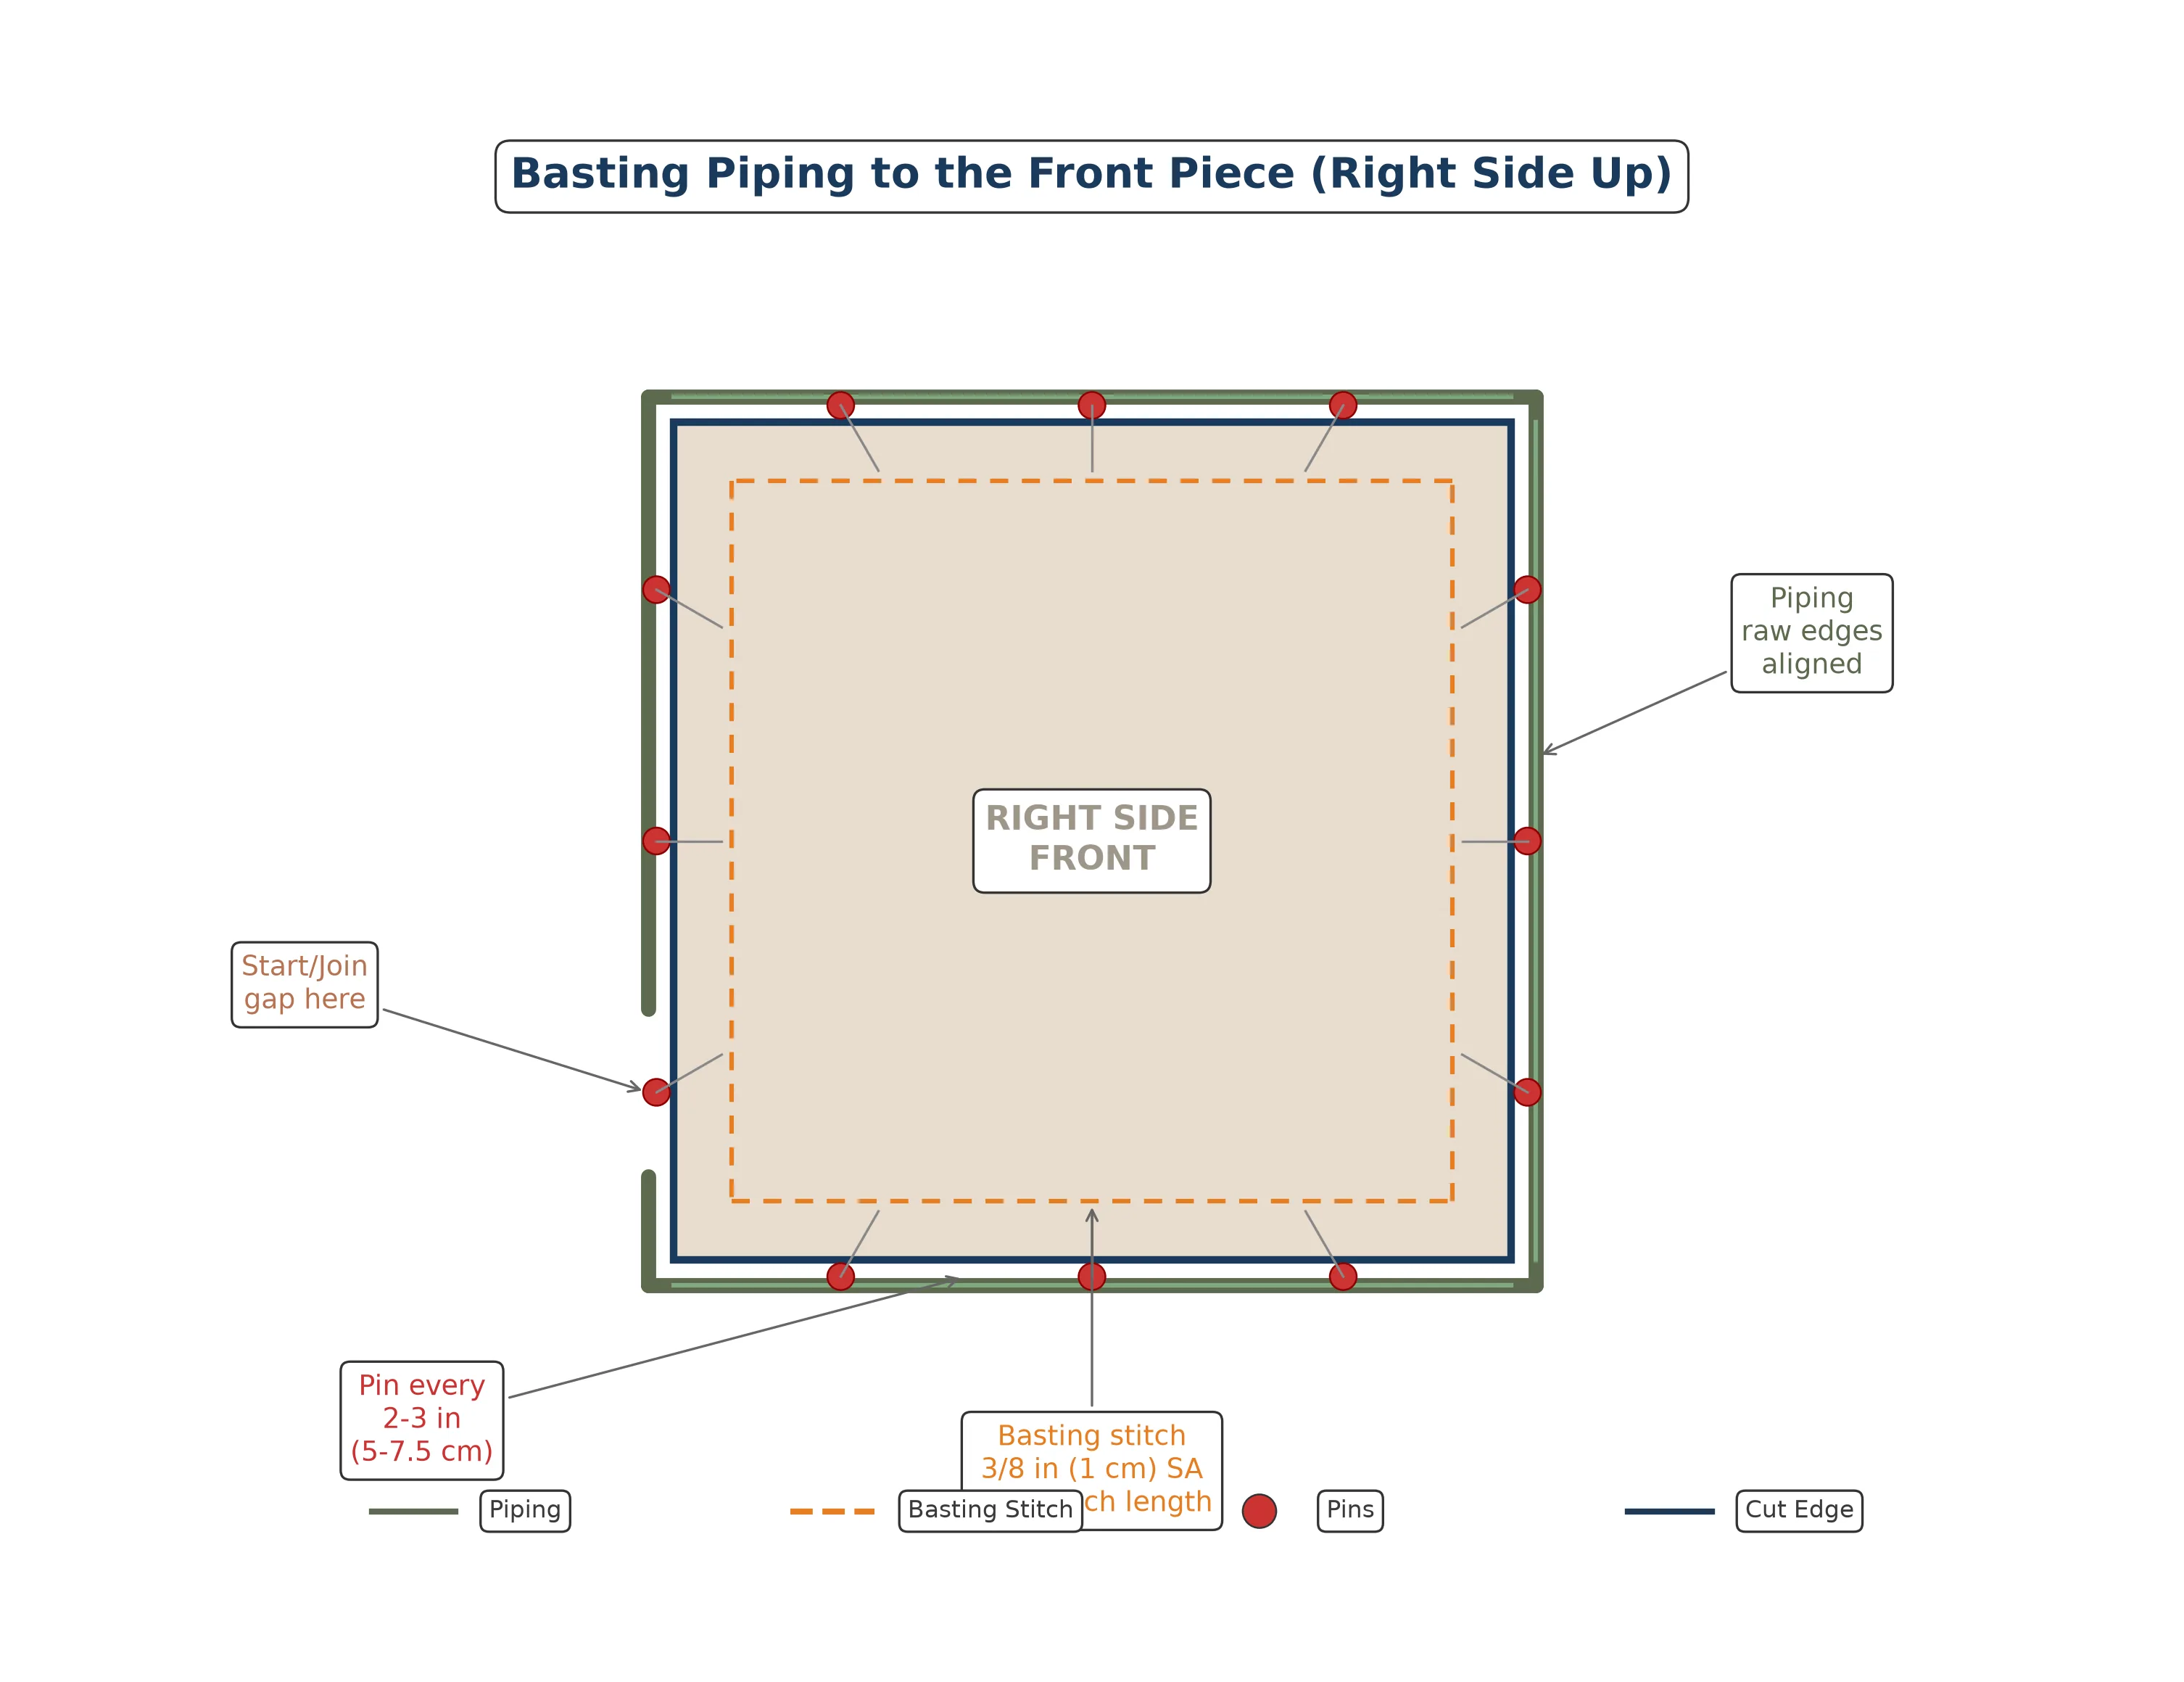
Take your time on this step. A neatly basted piping line is the foundation of a professional-looking pillow. In my experience, rushing the basting stage is the single biggest reason beginners end up with uneven piping.
Navigate the Corners
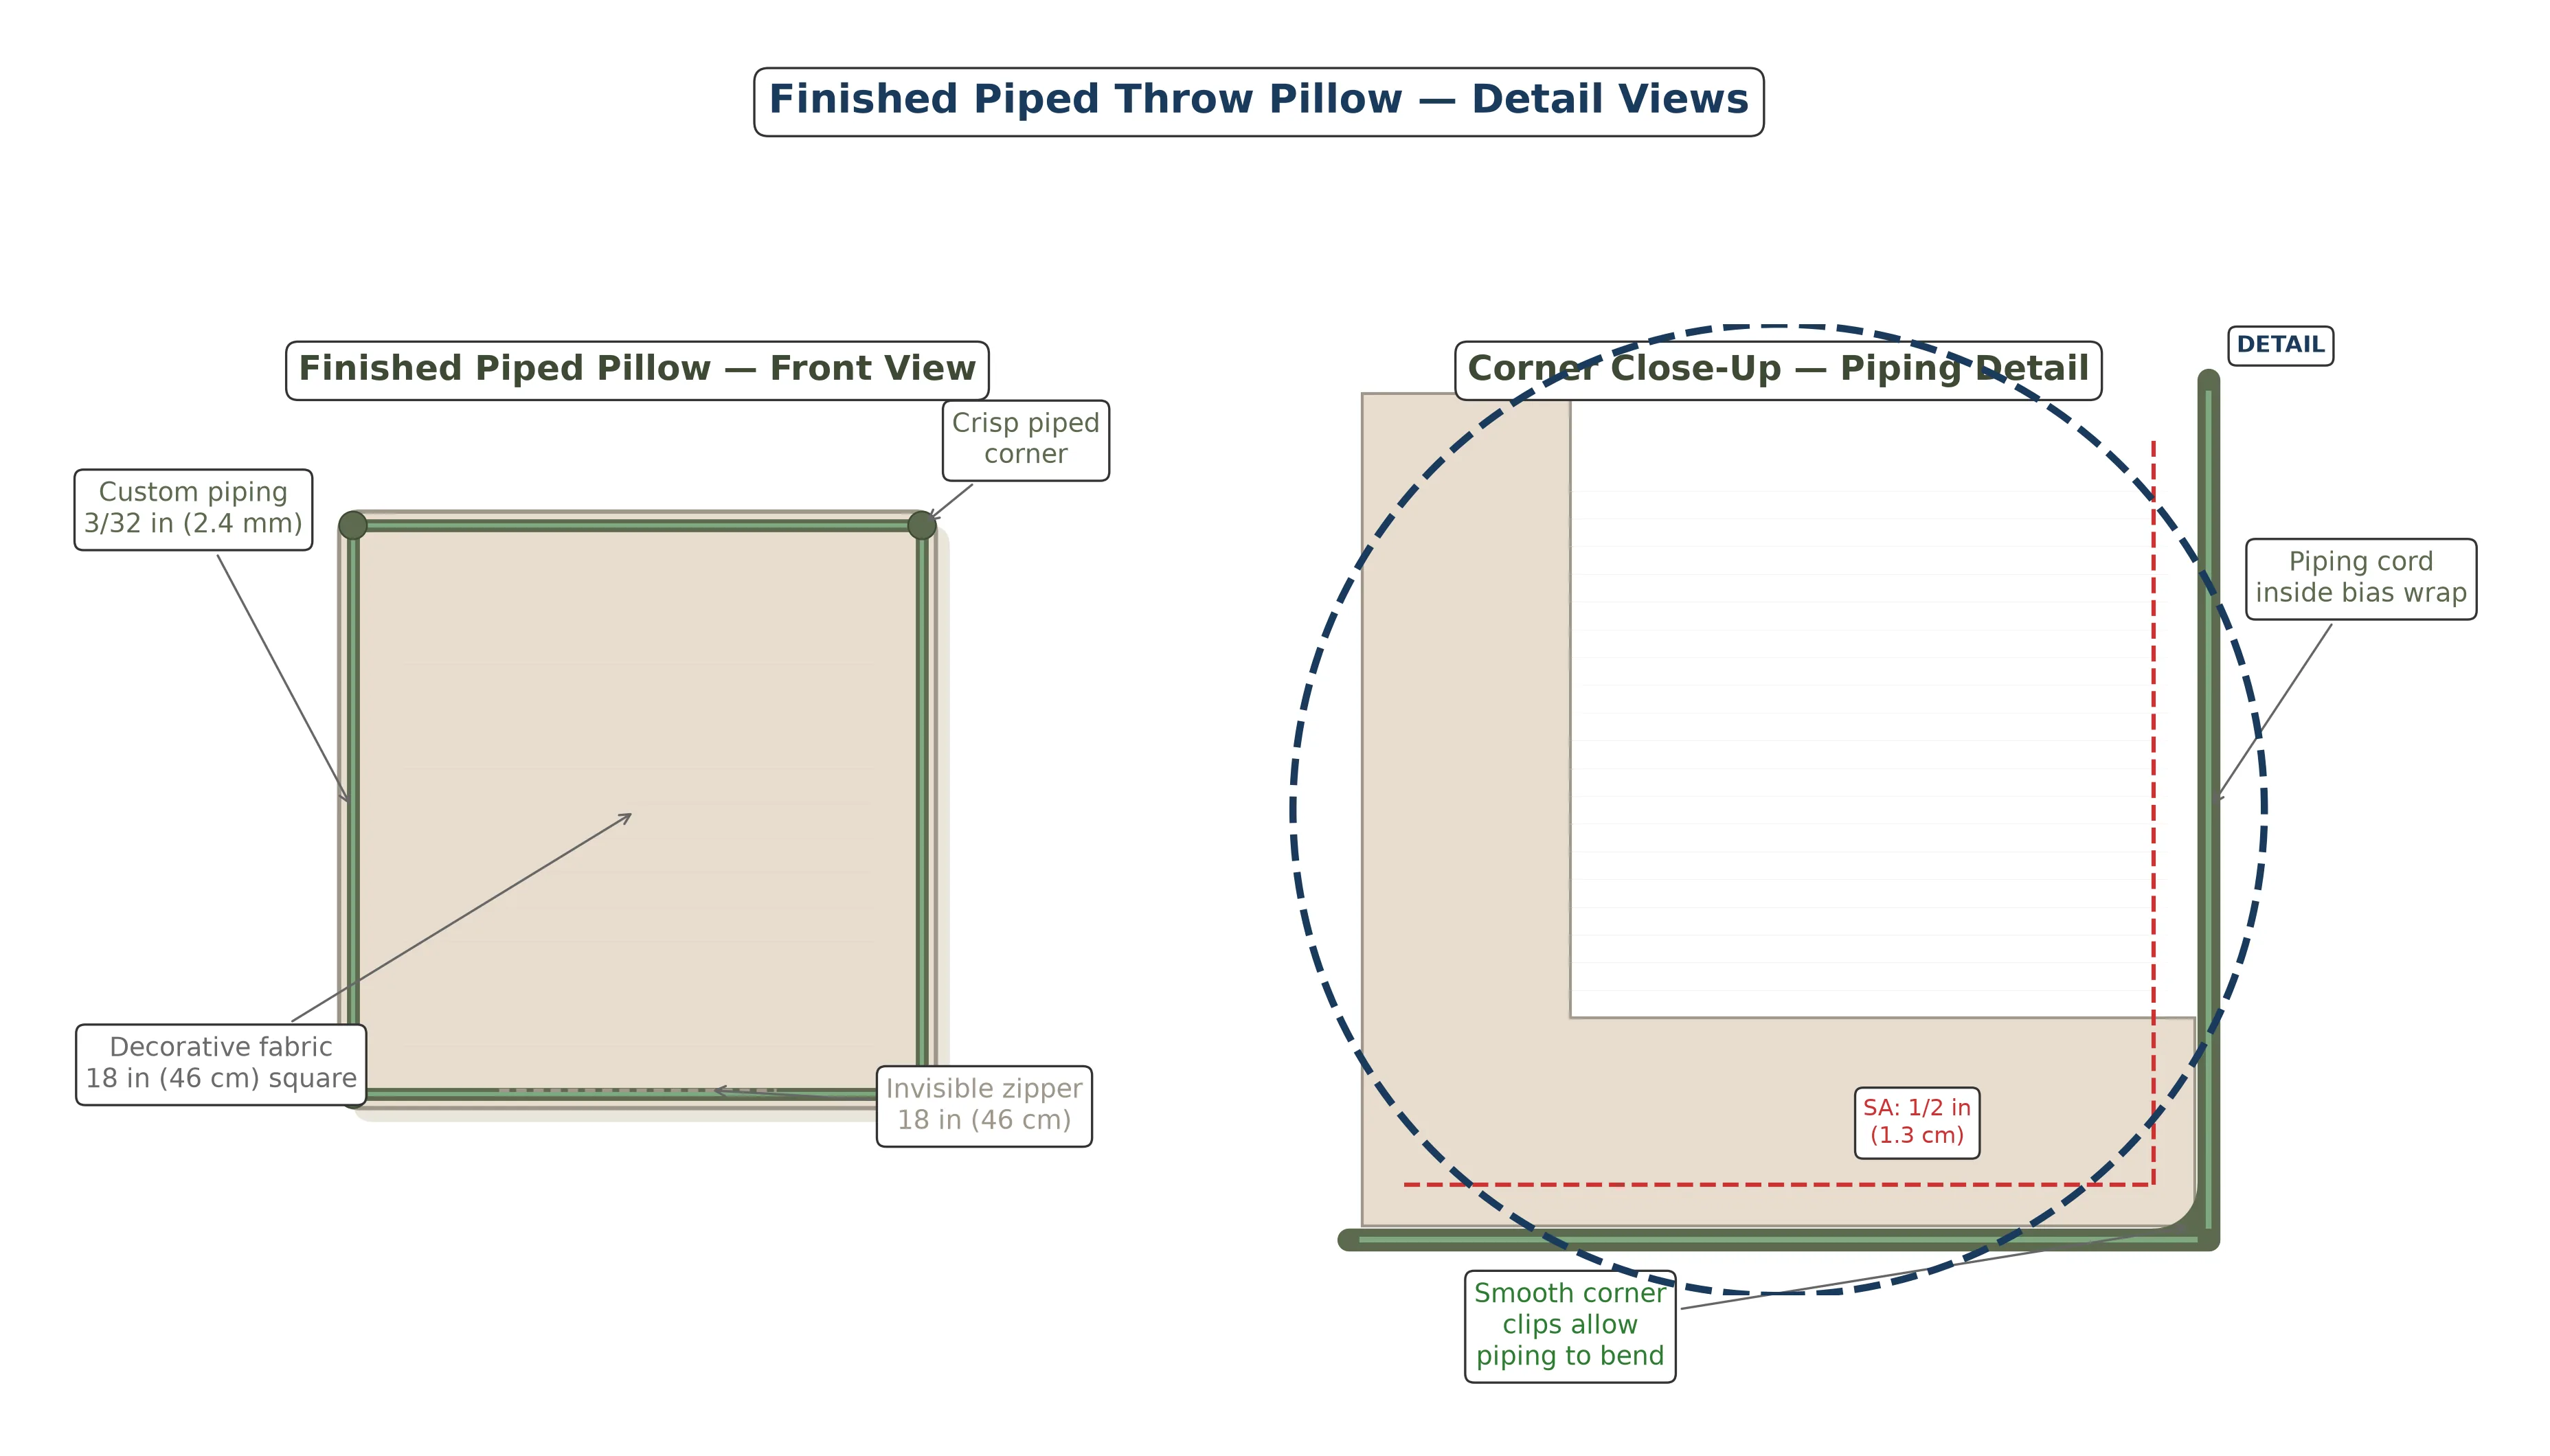
When you reach a corner, stop stitching about 1 in (2.5 cm) before the edge. Clip the piping seam allowance — the flat fabric part, not the cord — at a 45-degree angle, cutting to within 1/8 in (3 mm) of the stitching line. This single clip releases the tension and allows the piping to bend smoothly around the 90-degree turn.
Pivot the fabric, ease the piping around the corner, and continue stitching along the next edge. You will find that the clipped seam allowance fans out slightly on the outside of the corner, which is exactly what you want.
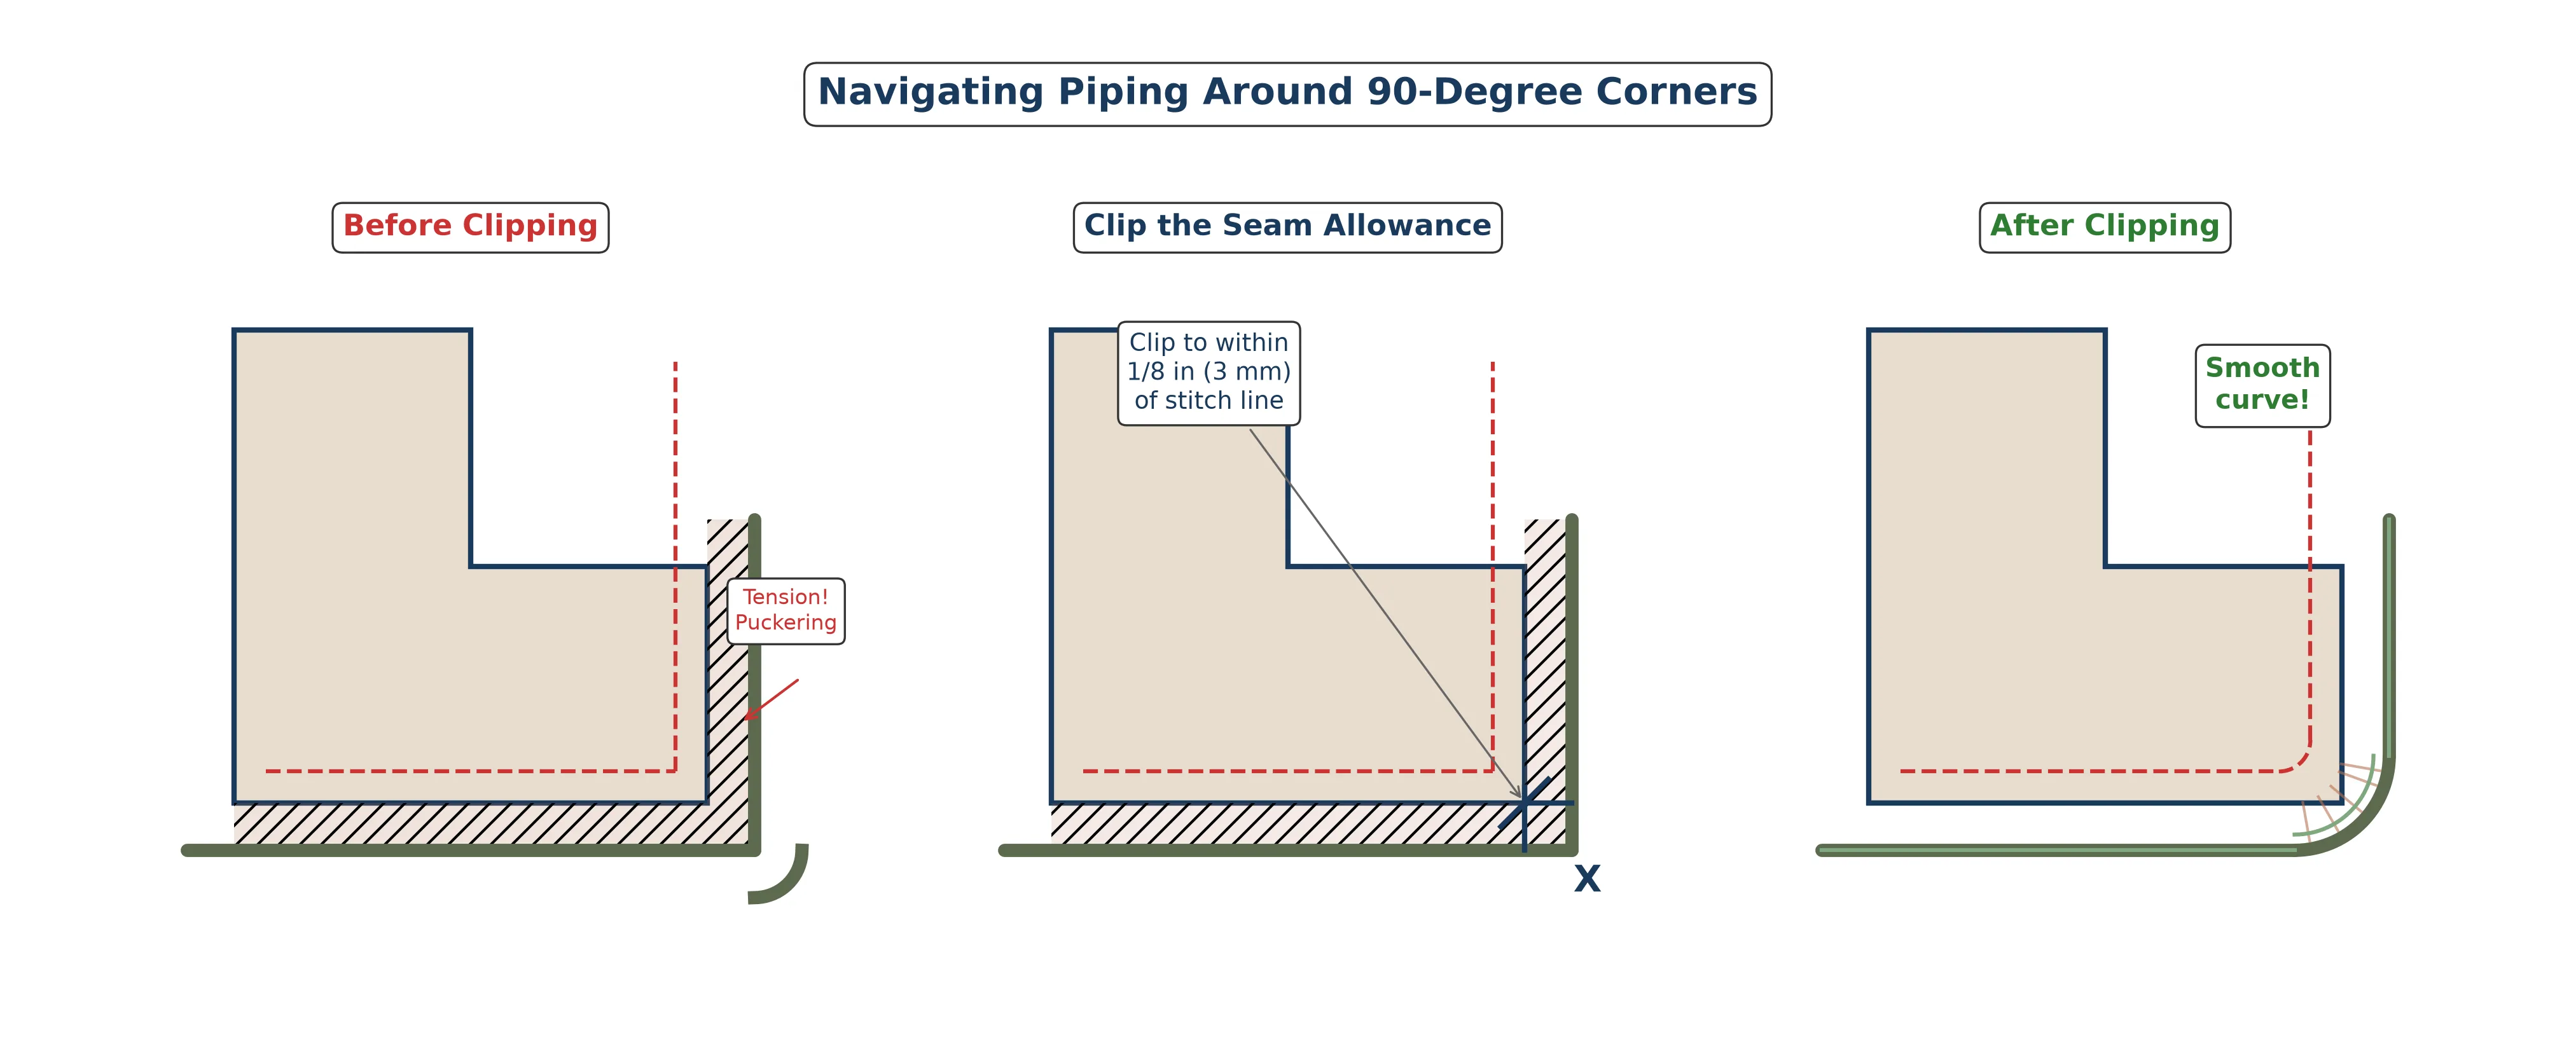
If the corner still looks tight after clipping, make a second clip about 1/4 in (6 mm) away from the first. Two shallow clips work better than one deep clip, which can weaken the seam allowance and cause fraying.
Join the Piping Ends
When you return to your starting point, you need to join the two ends of the piping seamlessly. Here is the method I find produces the cleanest result:
First, trim the piping cord so the two ends butt together without overlapping. Then, fold under the raw edge of the bias fabric on the top end by about 1/2 in (1.3 cm) and overlap it over the starting end. Stitch through all layers to secure.
The goal is a join that is virtually invisible once the pillow is finished. If you can feel a bump where the ends meet, trim a little more cord and try again. A smooth join is worth the extra minute of effort.
Install the Invisible Zipper
Before you sew the front and back together, install the invisible zipper into the back piece. This is the step that intimidates most beginners, but I promise it is simpler than it looks. An invisible zipper is designed to disappear into the seam when closed, giving your pillow a clean, professional finish.
Press the zipper tape open with a warm iron (use a pressing cloth to protect the nylon teeth). Place the right side of the zipper tape against the right side of the back fabric, aligning the teeth with the seam line. Using an invisible zipper foot — or your regular zipper foot if that is all you have — stitch as close to the teeth as possible from the top of the zipper to the bottom. Repeat on the other side.
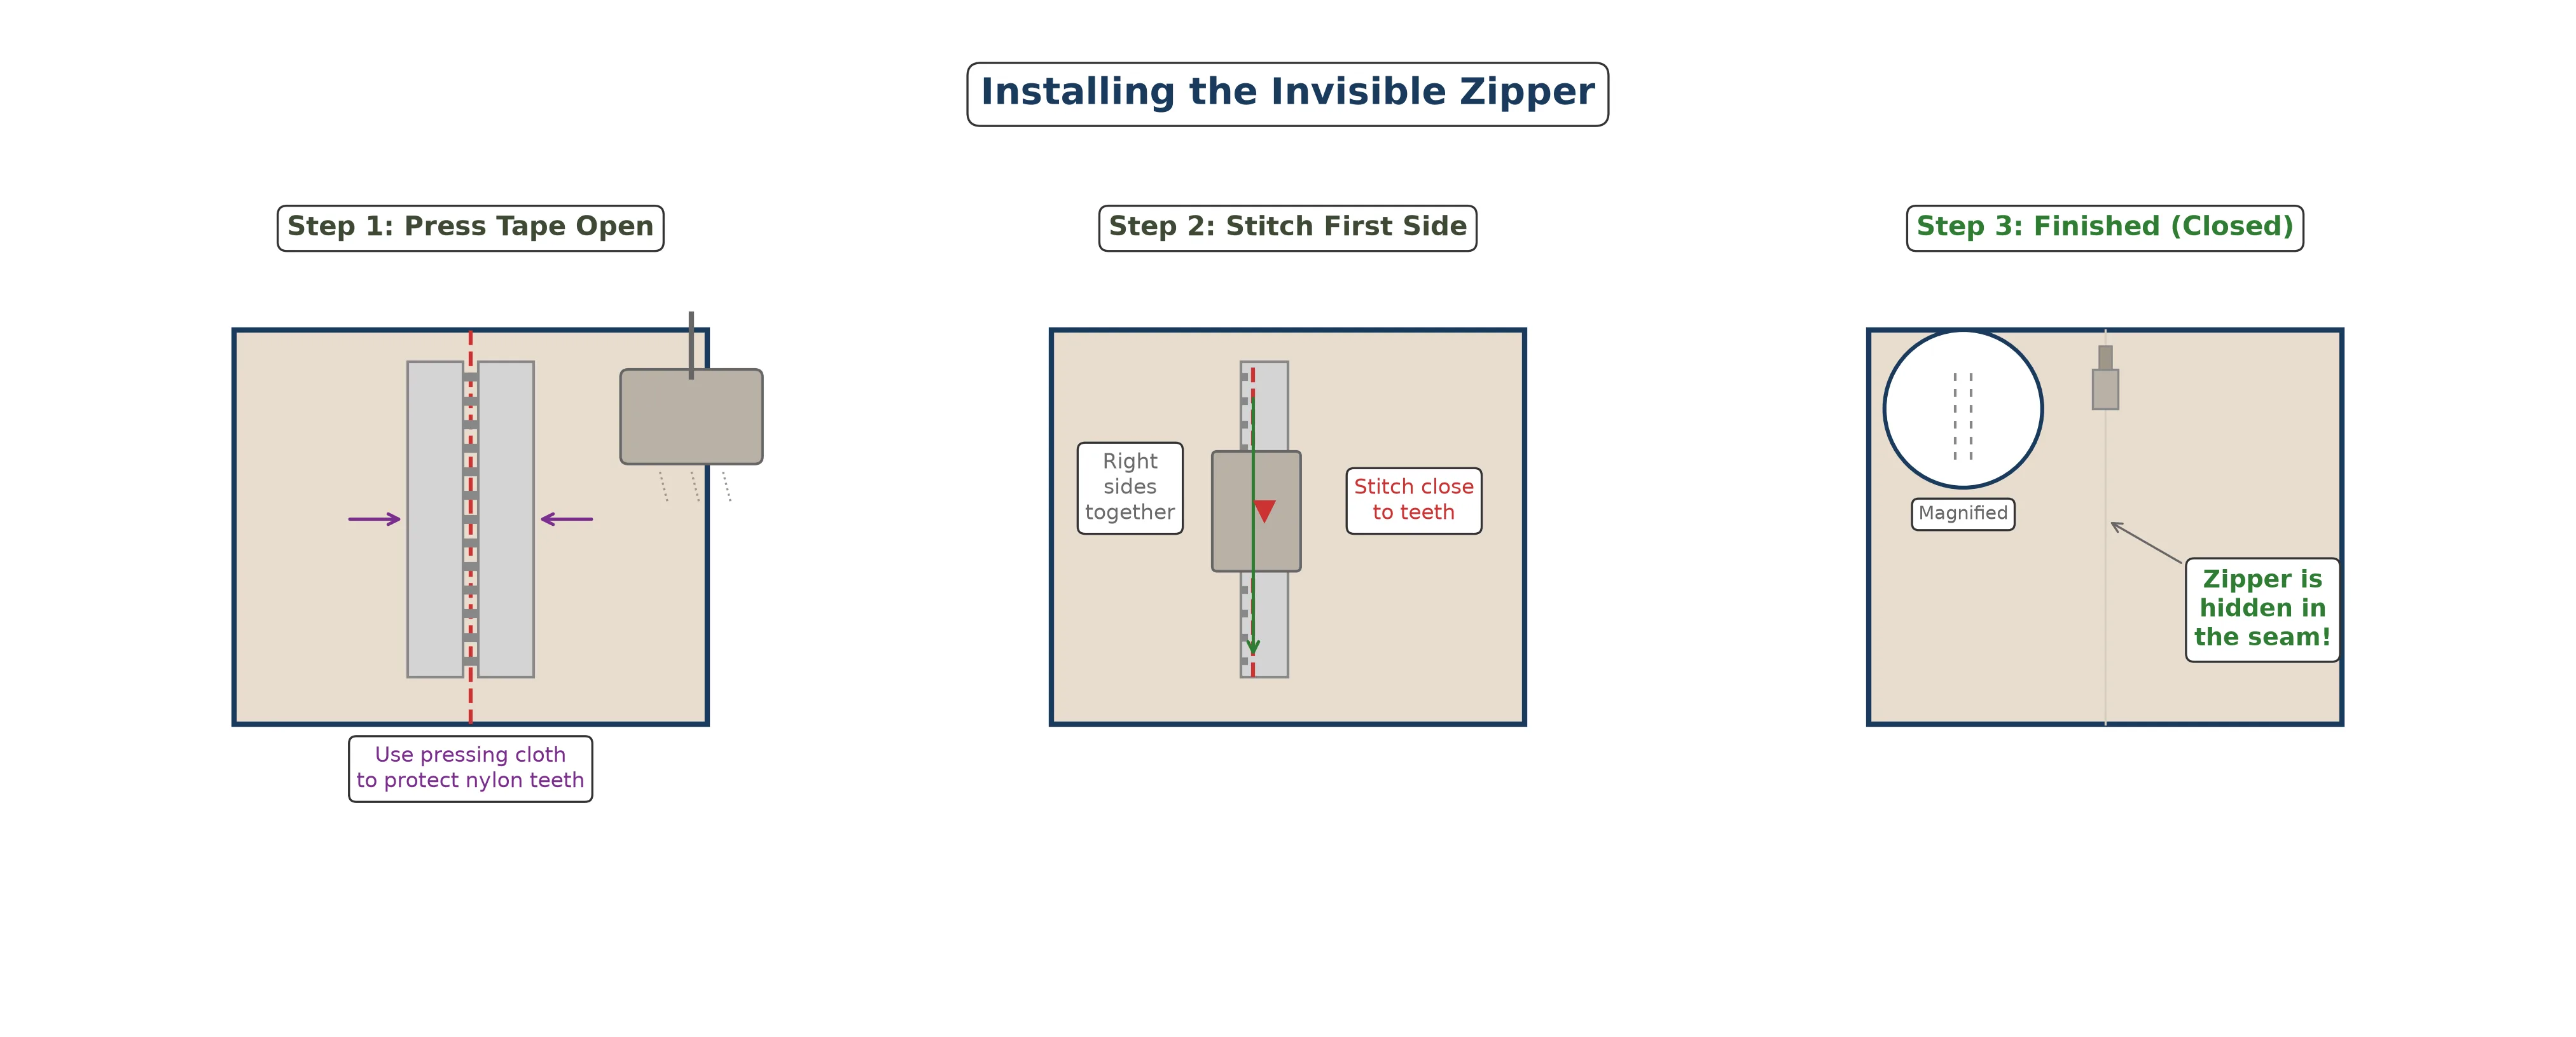
Test the zipper by pulling it closed. The teeth should be completely hidden from the right side of the fabric. If you can see them, reposition the tape slightly closer to the teeth and stitch again. The Threads Magazine website has a wonderful video tutorial on perfecting invisible zipper installation if you want additional visual guidance.
Sew Front to Back
Now for the moment of truth. Place the front piece (with piping attached) and the back piece (with zipper installed) right sides together. The piping should be sandwiched between the two layers, with the cord facing inward toward the center of the pillow.
Pin all around the perimeter, making sure the raw edges are perfectly aligned. Using your zipper foot, stitch just inside the basting line you created in Step 5 — about 1/16 in (1.5 mm) closer to the cord. This second line of stitching hides the basting stitches and pulls the piping tight against the seam for a crisp, professional edge.
Leave the zipper partially open before you sew the final seam. You will need the opening to turn the cover right side out in the next step. I always leave mine about halfway open so I do not accidentally sew it shut.
Turn and Stuff
Reach through the open zipper and carefully turn the pillow cover right side out. Use a blunt tool like a chopstick or the eraser end of a pencil to gently push out each corner. Take your time — rushing this step can tear the seam allowance at the corners, especially where you clipped the piping.
Give the cover a final press with your iron, paying special attention to the piped edges. The heat will help the piping settle into its final shape and smooth out any minor wrinkles.
Insert your 20 in (51 cm) pillow form through the zipper opening. The slightly oversized insert will give your pillow a full, plump look that holds its shape beautifully. Zip the cover closed, fluff, and admire your work!
Pro Tips for Perfect Piping
After making dozens of piped pillows over the years, here are the lessons I keep coming back to:
1. Press at Every Stage
I cannot overstate how much pressing matters. Press your bias strips after joining, press the piping after wrapping the cord, and press the seams after each major step. A well-pressed project looks professional even if your stitching is not yet perfect. Pressing is the great equalizer in sewing.
2. Use Contrast Piping for Impact
While matching piping is classic and elegant, a contrasting piping color can add a striking design element. Try a terracotta piping on a sage green pillow, or a cream piping on a deep navy fabric. The piping becomes a decorative frame that draws the eye to the pillow's shape.
3. Practice on Scraps First
If you have never sewn piping before, make a small practice square with scrap fabric and a short piece of cord. Practice wrapping the cord, stitching close to it, and turning a corner. Ten minutes of practice can save you an hour of frustration on the real project.
4. Grade Your Seam Allowances
After sewing the final seam, trim the seam allowances to different widths — the piping allowance slightly wider than the fabric allowances. This technique, called grading, reduces bulk and helps the seam lie flat. It is a small extra step that makes a noticeable difference in the finished look.
5. Pre-Wash Your Fabric
If your pillow cover will need regular washing, pre-wash and dry your fabric before cutting. This removes any shrinkage so your cover does not distort after the first wash. Piping cord can also shrink slightly, so consider pre-soaking it in warm water and letting it air dry before wrapping.
Frequently Asked Questions
Do I need a special foot to sew piping?
A zipper foot works well for most piping projects and is included with nearly every sewing machine. A dedicated piping foot has a deeper groove that hugs the cord more closely, which can be helpful for very thick piping cord (5/32 in or 4 mm and above). For the 3/32 in (2.4 mm) cord recommended in this tutorial, your standard zipper foot will produce excellent results.
Why does my piping look wavy at the corners?
Wavy corners usually mean the piping seam allowance was not clipped deeply enough. Clip the seam allowance of the piping to within 1/8 in (3 mm) of the stitching line at each corner. This releases the tension and allows the piping to curve smoothly around the 90-degree turn without puckering.
Can I use pre-made piping instead of making my own?
Yes, pre-made piping is a great time-saver and is available in many colors at fabric stores. The main advantage of making your own piping is that you can match it exactly to your fabric. If you use pre-made piping, skip Steps 2 through 4 and begin at Step 5.
What size pillow form should I use for an 18-inch cover?
For a plump, full look, use a pillow form that is 1 to 2 inches (2.5 to 5 cm) larger than your finished cover. An 18 in (46 cm) cover pairs beautifully with a 20 in (51 cm) insert. If you prefer a softer, more relaxed look, use the same size insert as the cover.
How do I wash a piped throw pillow?
Remove the pillow form and turn the cover inside out. Machine wash on a gentle cycle with cold water and mild detergent. Tumble dry on low heat or air dry flat. Avoid high heat, which can shrink the piping cord and cause the cover to pucker. If your fabric is delicate, hand wash and lay flat to dry.
Can I add piping to a pillow with an envelope closure instead of a zipper?
Absolutely. The piping technique is the same regardless of closure type. Sew the piping to the front piece, then construct the envelope back as usual. If you are new to cushion covers, you may want to start with the simpler envelope method from our envelope cushion cover tutorial before tackling the invisible zipper.
Ready for Your Next Home Decor Project?
Now that you have mastered piping, try applying the technique to a chair seat cushion with box piping or a set of fabric storage baskets to complete your handmade living room set.
More from Sewing for Your Home
- Envelope Cushion Cover — The Perfect Beginner Pillow (Post 1)
- Rod Pocket Curtain Panel — Complete Tutorial (Post 3)
- Fabric Storage Basket — Lined and Interfaced (Post 4)
- Chair Seat Cushion with Box Piping (Post 9 — coming soon)
Explore Other Series
- Piping on Bags and Purses — Learn to add piped edges to your handmade bags (Series 12)
- Piping in Garment Sewing — Decorative piping for necklines and seams (Series 6)