Sew a Fabric Key Fob in 20 Minutes — Beginner Hardware Project
Here's a project that converts fabric scraps into something you'll actually use every single day: a sturdy, stylish fabric key fob with real metal hardware. In my experience, these are the fastest "finished object" in all of sewing — you can genuinely make one in 20 minutes, and once you've got the technique down, you can batch out five or six in an evening.
A key fob is a short fabric loop with a metal clamp at the base, designed to hold a split ring (which in turn holds your keys). You can hook it over your finger, clip it to a bag strap, hang it on a hook, or wear it on your wrist (with a longer version). It's practical, personal, and oddly addictive to make.
This tutorial is the perfect follow-up to the drawstring gift pouch from Post 1. If that project introduced you to casings, this one introduces you to hardware — specifically, metal key fob clamps that bite onto fabric and transform it into a finished accessory. Working with hardware is a huge leap in confidence; it feels professional, and it opens the door to bag making, straps, and dozens of other projects down the line.
What makes this tutorial different? I'm teaching you the four-layer folded strap technique that most beginner tutorials skip over. It produces a thicker, sturdier key fob that actually survives years of pocket wear — not the floppy two-layer version you often see online. We'll also cover hardware installation in detail, because that one squeeze with the pliers is where most first-timers get nervous.
Grab a fabric scrap and let's get started.
Materials and Tools
Fabric & Hardware
- Fabric strip — quilting cotton, canvas, or denim, 2 × 10 in (5 × 25.4 cm)
- Fusible interfacing — lightweight (Pellon SF101 or similar), 1 × 10 in (2.5 × 25.4 cm)
- Key fob hardware clamp — 1.25 in (32 mm) wide
- Split ring — usually included with hardware
- Thread — all-purpose polyester, matching or contrasting
Tools
- Sewing machine — any model with a straight stitch
- Fabric scissors or rotary cutter
- Ruler — a clear quilter's ruler is ideal
- Iron and ironing board
- Pliers — regular household or hardware-specific
- Scrap fabric — for protecting hardware during installation
Choosing Key Fob Hardware
Key fob hardware comes in a few standard widths, and the size you choose affects both the look and function of your finished fob. Here's a quick comparison to help you pick the right size for your project:
| Hardware Width | Finished Strap Width | Fabric Cut Width | Best For |
|---|---|---|---|
| 1 in (25 mm) | 3/4 in (1.9 cm) | 1.5 in (3.8 cm) | Delicate, dainty fobs |
| 1.25 in (32 mm) | 1 in (2.5 cm) | 2 in (5 cm) | Standard — most versatile |
| 1.5 in (38 mm) | 1-1/4 in (3.2 cm) | 2.5 in (6.4 cm) | Bold, chunky, bag-strap style |
This tutorial uses the standard 1.25-inch (32 mm) hardware, which is the most common and versatile size. If you have different hardware on hand, simply adjust the fabric cut width to be exactly twice the hardware's internal width.
Finish Options
Hardware comes in several finishes to match your style:
- Nickel / silver — the most common, clean and classic
- Antique brass — warm, vintage look, pairs beautifully with linen
- Matte black — modern, minimalist, great for monochrome projects
- Rose gold — on-trend, feminine, softer than silver
- Gunmetal — dark grey, industrial, pairs with denim and canvas
Cutting the Fabric
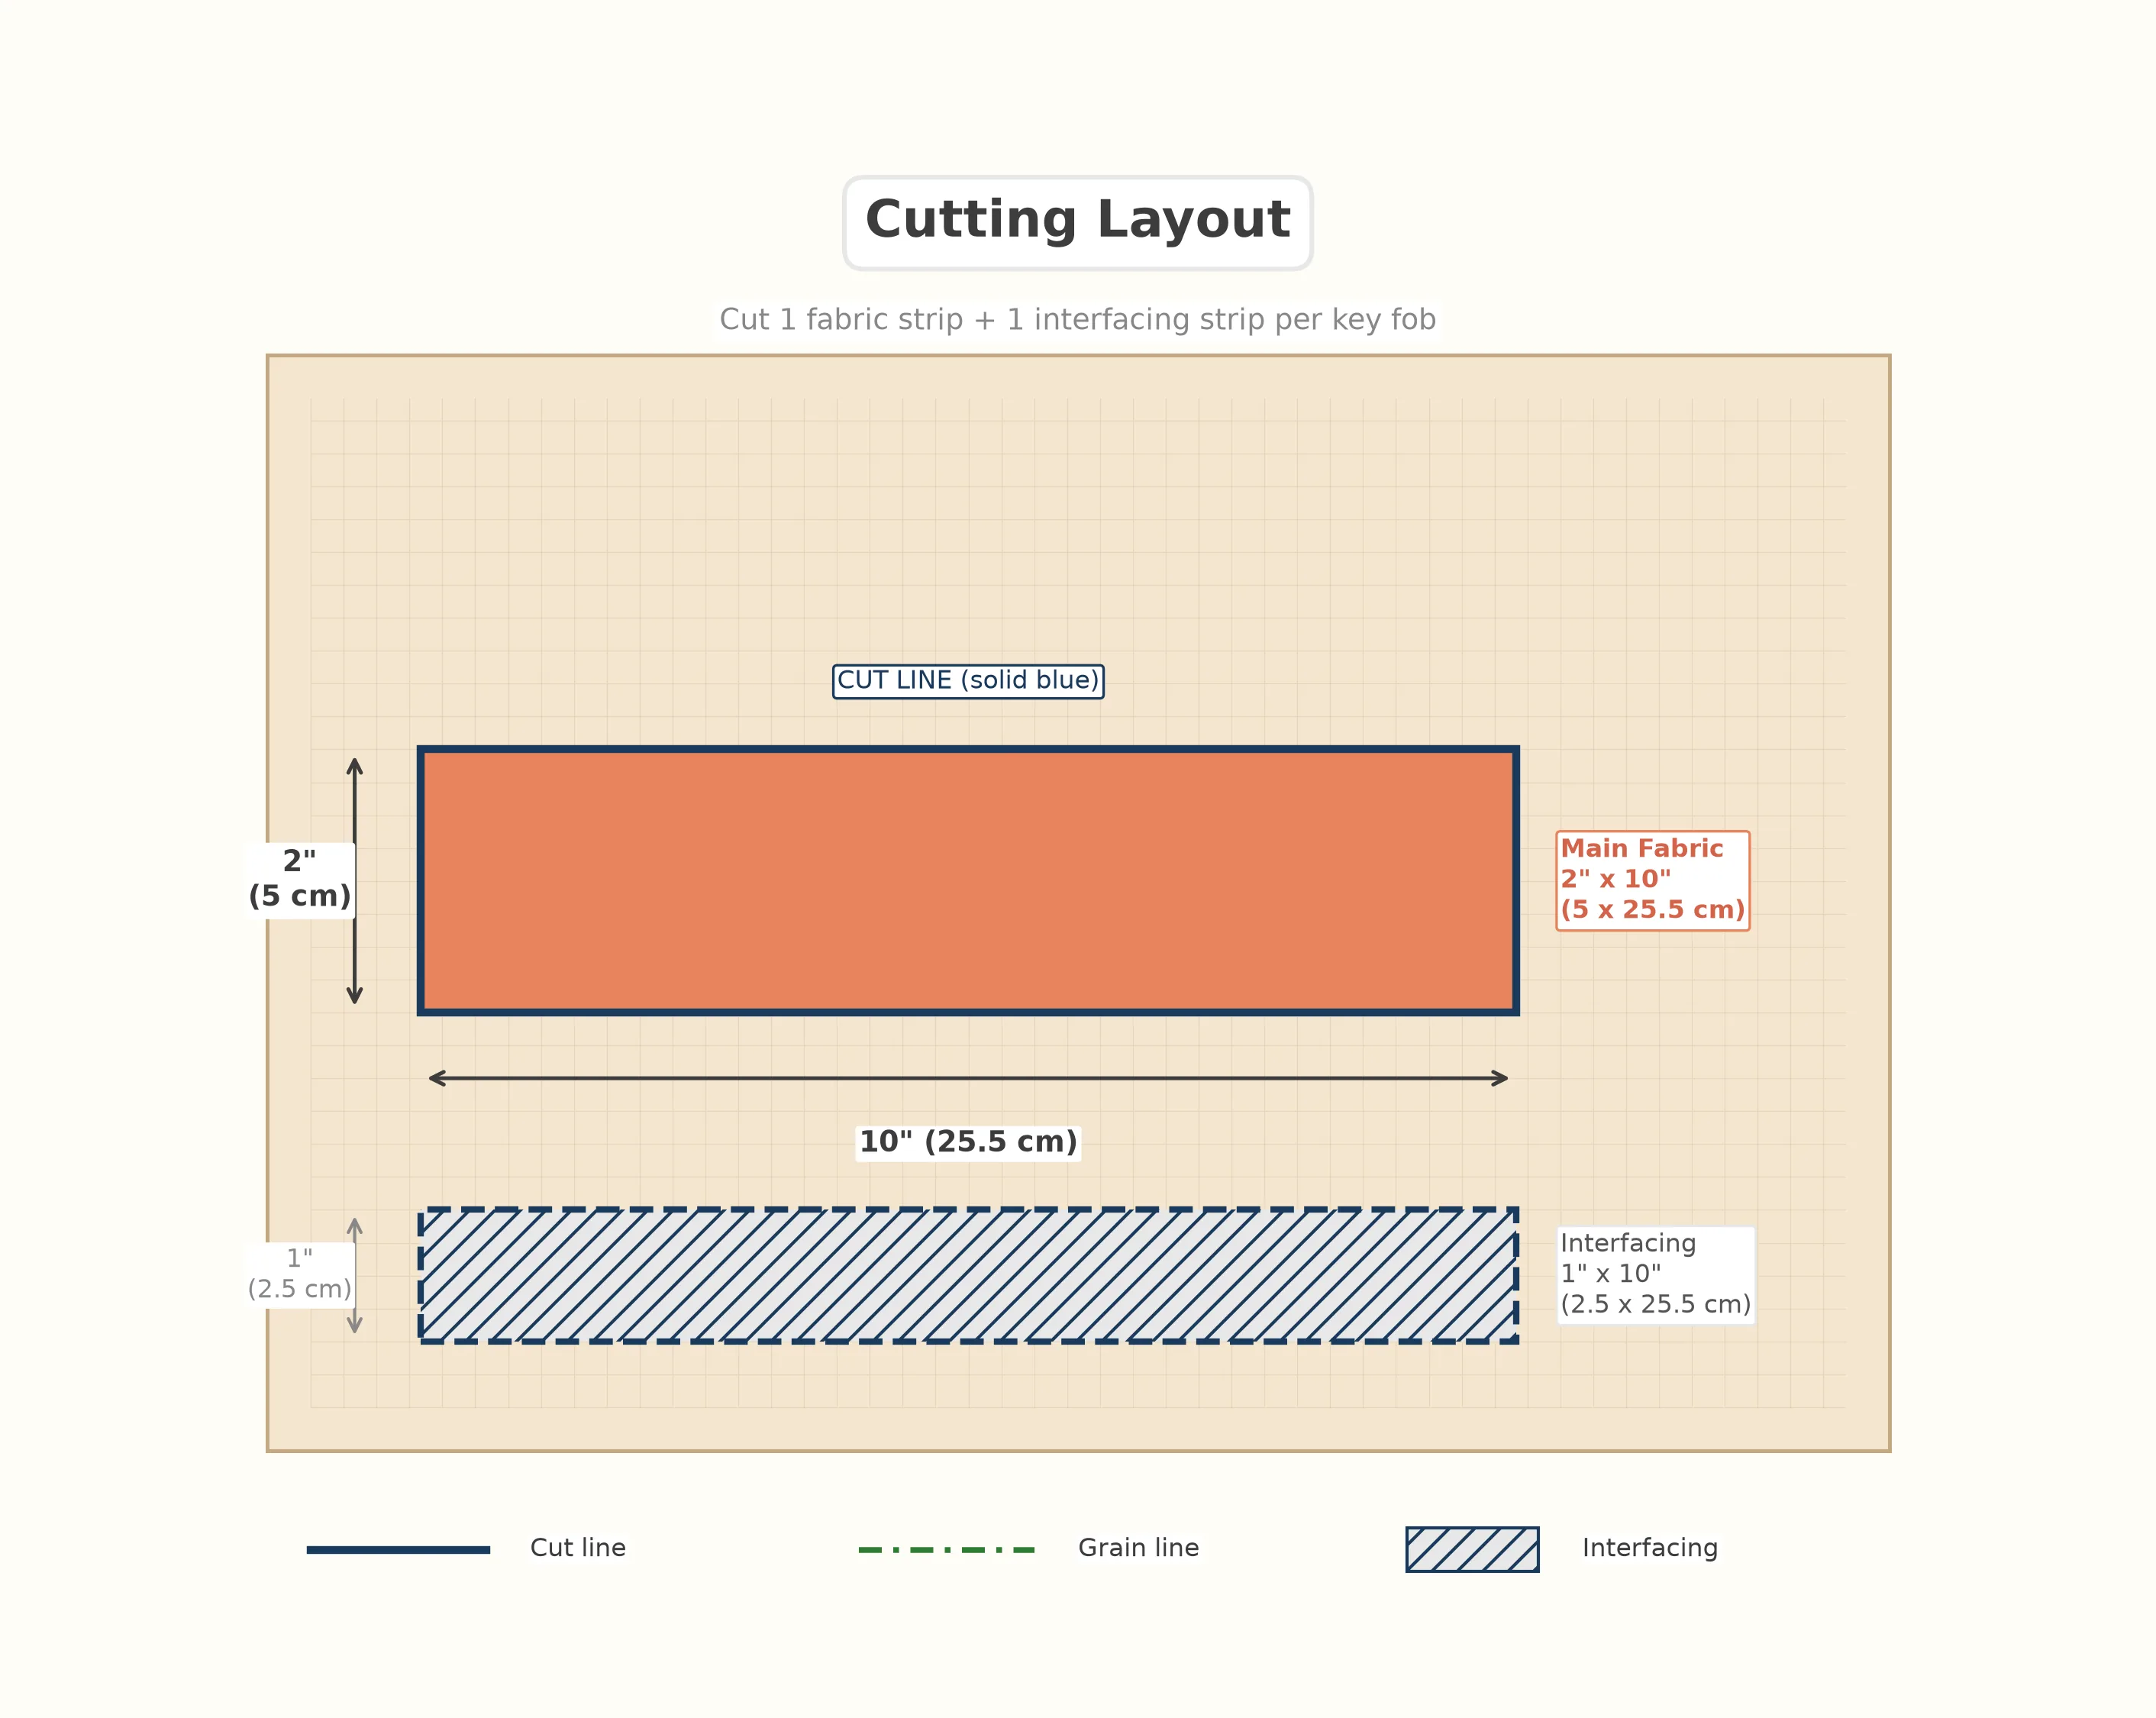
Cutting for a key fob is almost absurdly simple — just one fabric strip and one interfacing strip. The key is precision: because this is a small project, even a 1/8-inch (3 mm) error shows up in the finished fob. Use a ruler and sharp scissors (or better, a rotary cutter).
Fabric Strip
Cut one strip 2 in (5 cm) wide × 10 in (25.4 cm) long. The strip's length determines your finished loop size:
- 10 in (25.4 cm) → finished loop of ~4.5 in (11.4 cm) — standard pocket fob
- 12 in (30.5 cm) → finished loop of ~5.5 in (14 cm) — bag-clip fob
- 14 in (35.5 cm) → finished loop of ~6.5 in (16.5 cm) — wristlet fob
Interfacing Strip
Cut one strip of lightweight fusible interfacing 1 in (2.5 cm) wide × 10 in (25.4 cm) long. Notice the interfacing is half the width of the fabric strip — this is intentional. The interfacing only needs to cover half the fabric because the strip folds in half.
Pattern Piece Breakdown
With just one simple strip, understanding exactly how it folds is the key to a clean result. Let's break down what each zone becomes in the finished fob:
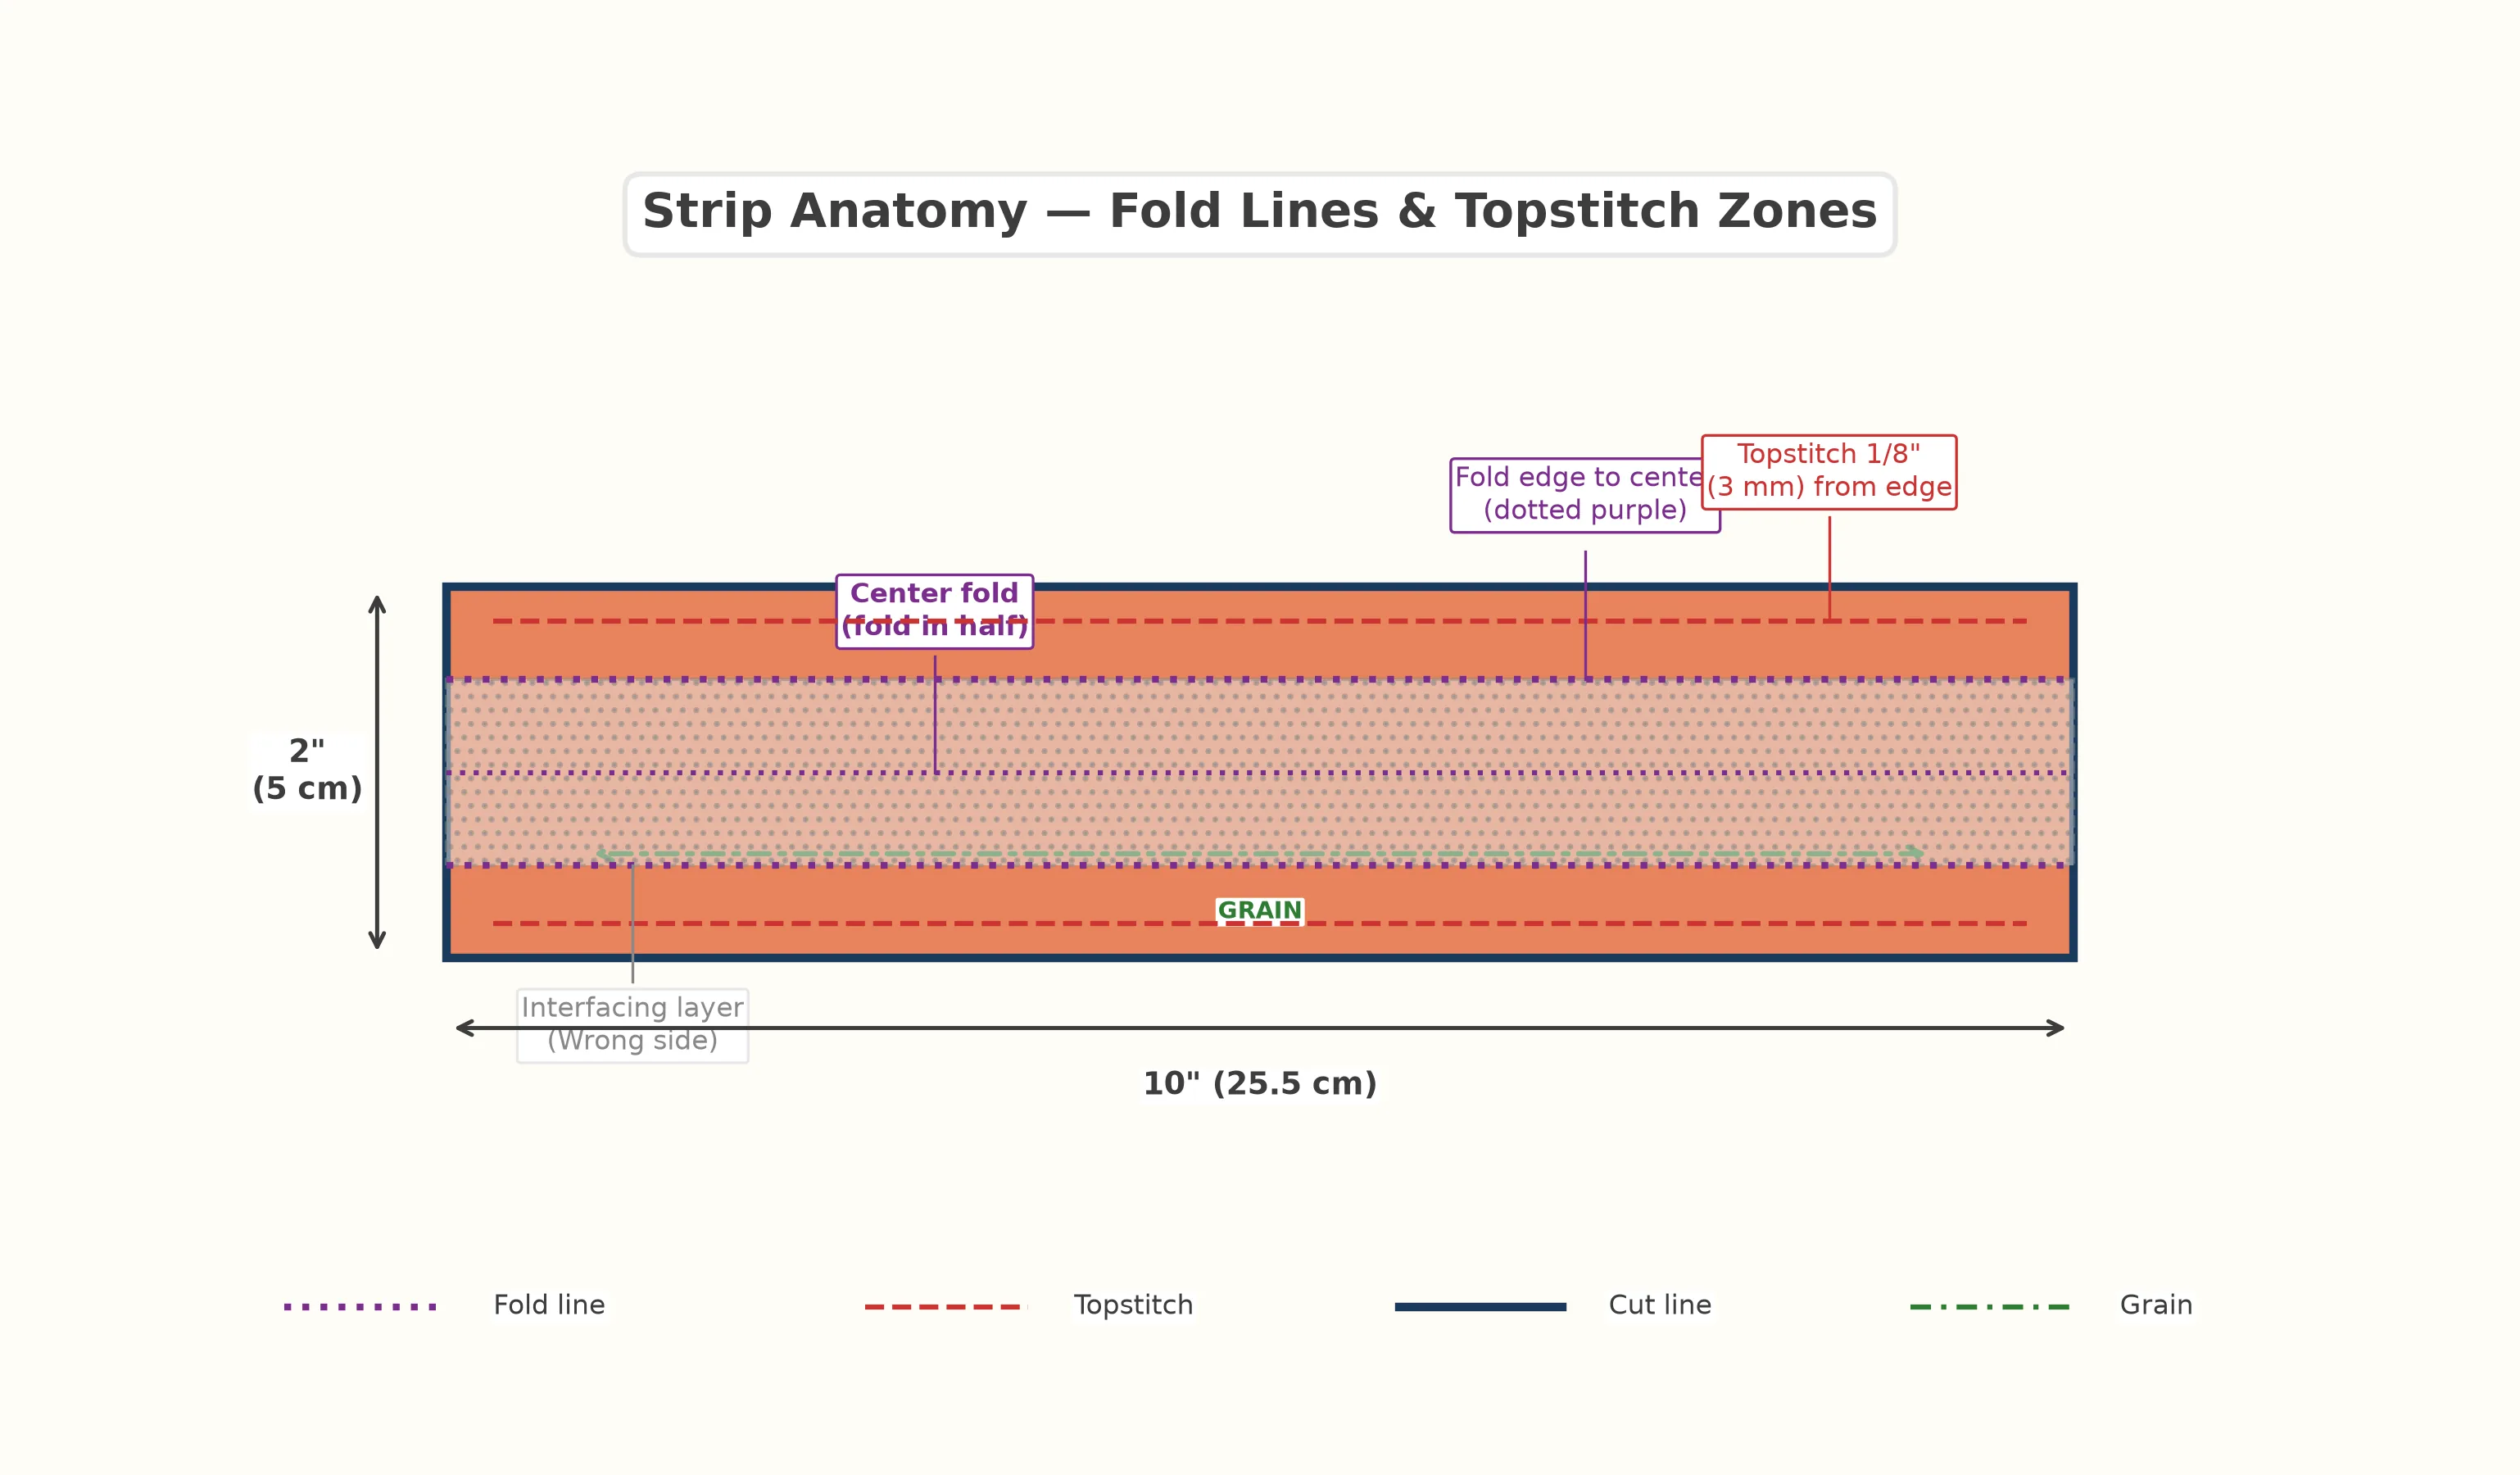
The four-layer fold works like this:
- Center line — the long centerline of the strip, where the final fold happens
- Interfacing zone — covers one half of the strip (the half that will end up on the inside)
- Side folds — the two long raw edges fold inward toward the center
- Topstitch zones — two long edges where you'll sew decorative stitching after folding
After all folding, you end up with a strap that's 1/4 of the original fabric width but 4 layers thick. All raw edges are hidden inside the folds — no exposed edges, no fraying, no finishing stitches needed on the raw sides.
Step-by-Step Instructions
Here's the full build sequence. Set your sewing machine to a straight stitch with a length of about 2.5 mm. Use a standard presser foot. The whole process takes about 15 minutes once you have your pieces cut.
Lay your fabric strip wrong side up (printed side down). Place the interfacing strip with the adhesive side down (the slightly bumpy, glue-coated side) along one long edge of the fabric strip, aligned with the raw edge. The interfacing should cover exactly half the width of the fabric — from one long edge to the center.
Press with a hot, dry iron for 10–15 seconds. Lift and press again, don't glide. The interfacing should feel firmly adhered to the fabric when it cools.
With the strip still wrong-side up (interfacing visible), find the center line down the length of the strip. Fold both long raw edges inward until they meet precisely at the center. Press each fold firmly with your iron as you go.
When you're done, the strip is now half its original width — 1 in (2.5 cm) wide — with both raw edges hidden on the inside, meeting at the center.
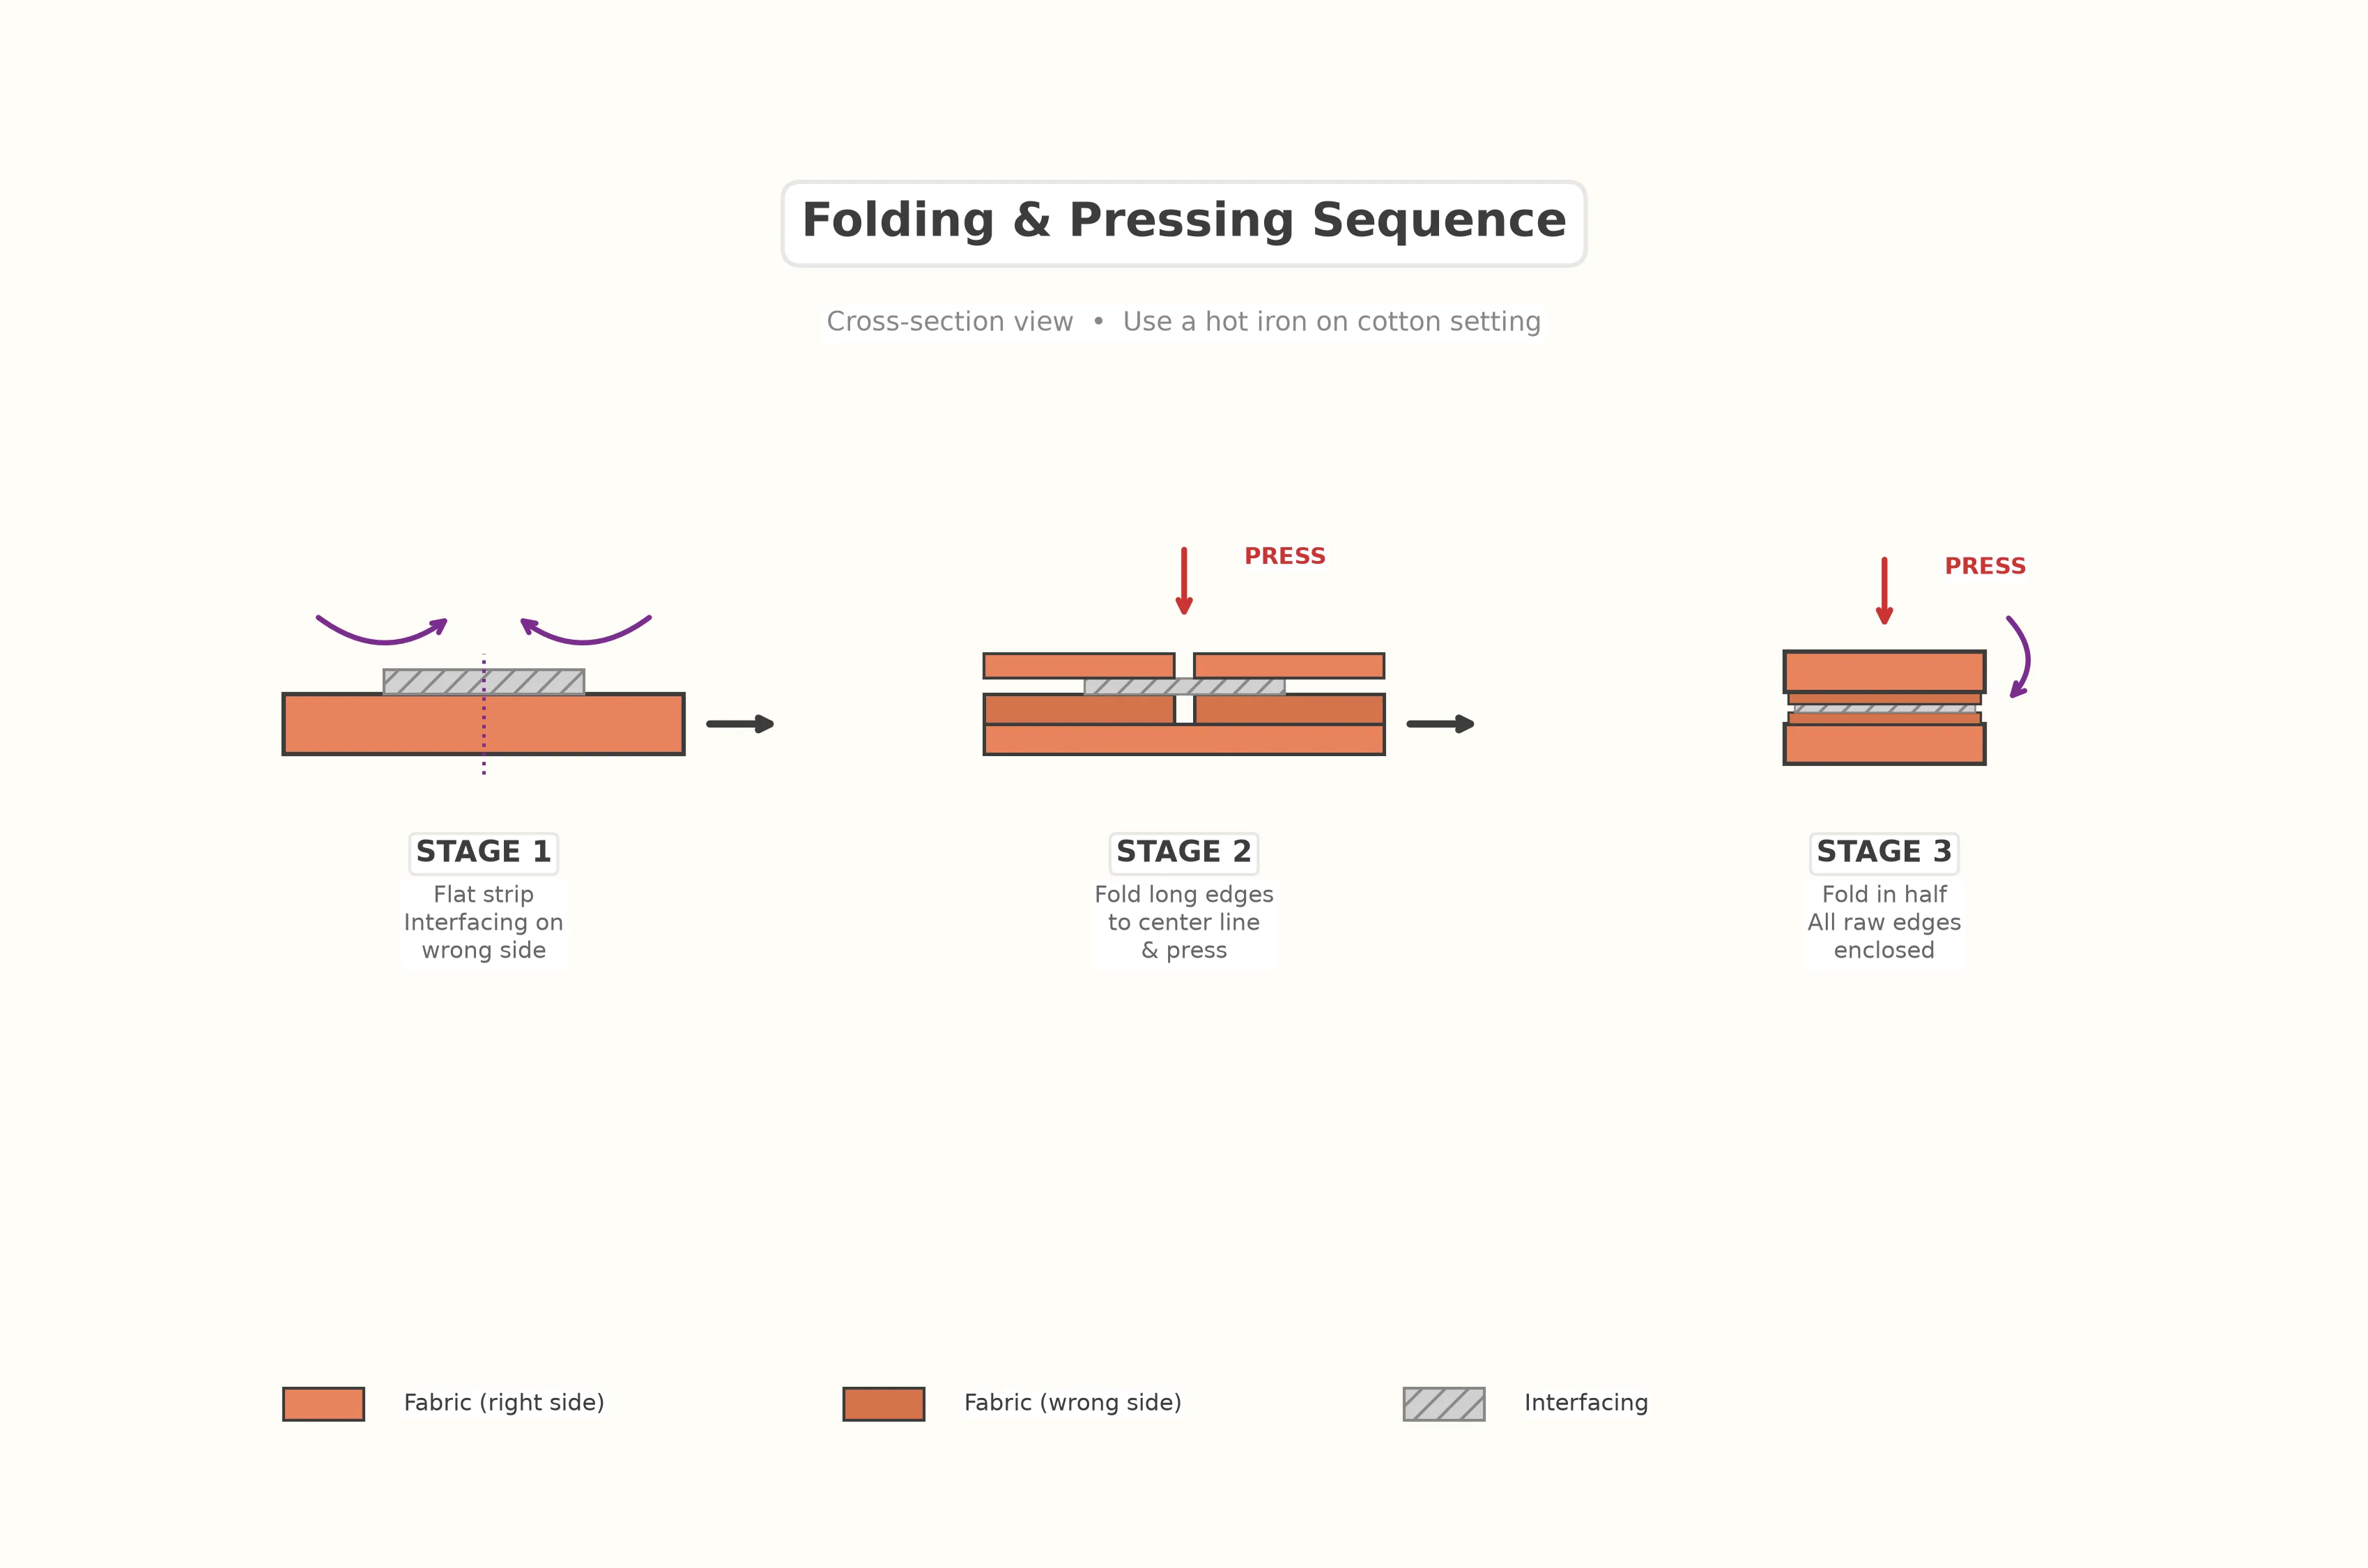
Now fold the strip in half along its length, so the two folded edges meet. The side with the interfacing fuses to itself inside; the strip is now four layers thick and 1/2 in (1.3 cm) wide — exactly the right size for your 1.25-inch hardware clamp.
Press firmly along the entire length. Give it a few extra passes to really set the fold — a crisp strap is a professional strap.
This is where your fob gets its signature professional look. Topstitching is visible decorative stitching on the right side of a project. For a key fob, you topstitch along both long edges of the folded strap.
- Start at one short end of the strap, with the needle positioned 1/8 in (3 mm) from the folded edge.
- Backstitch 2–3 stitches to lock the thread.
- Sew the full length of the strap, keeping the needle a consistent 1/8 in (3 mm) from the fold.
- Backstitch at the end.
- Repeat on the opposite long edge.
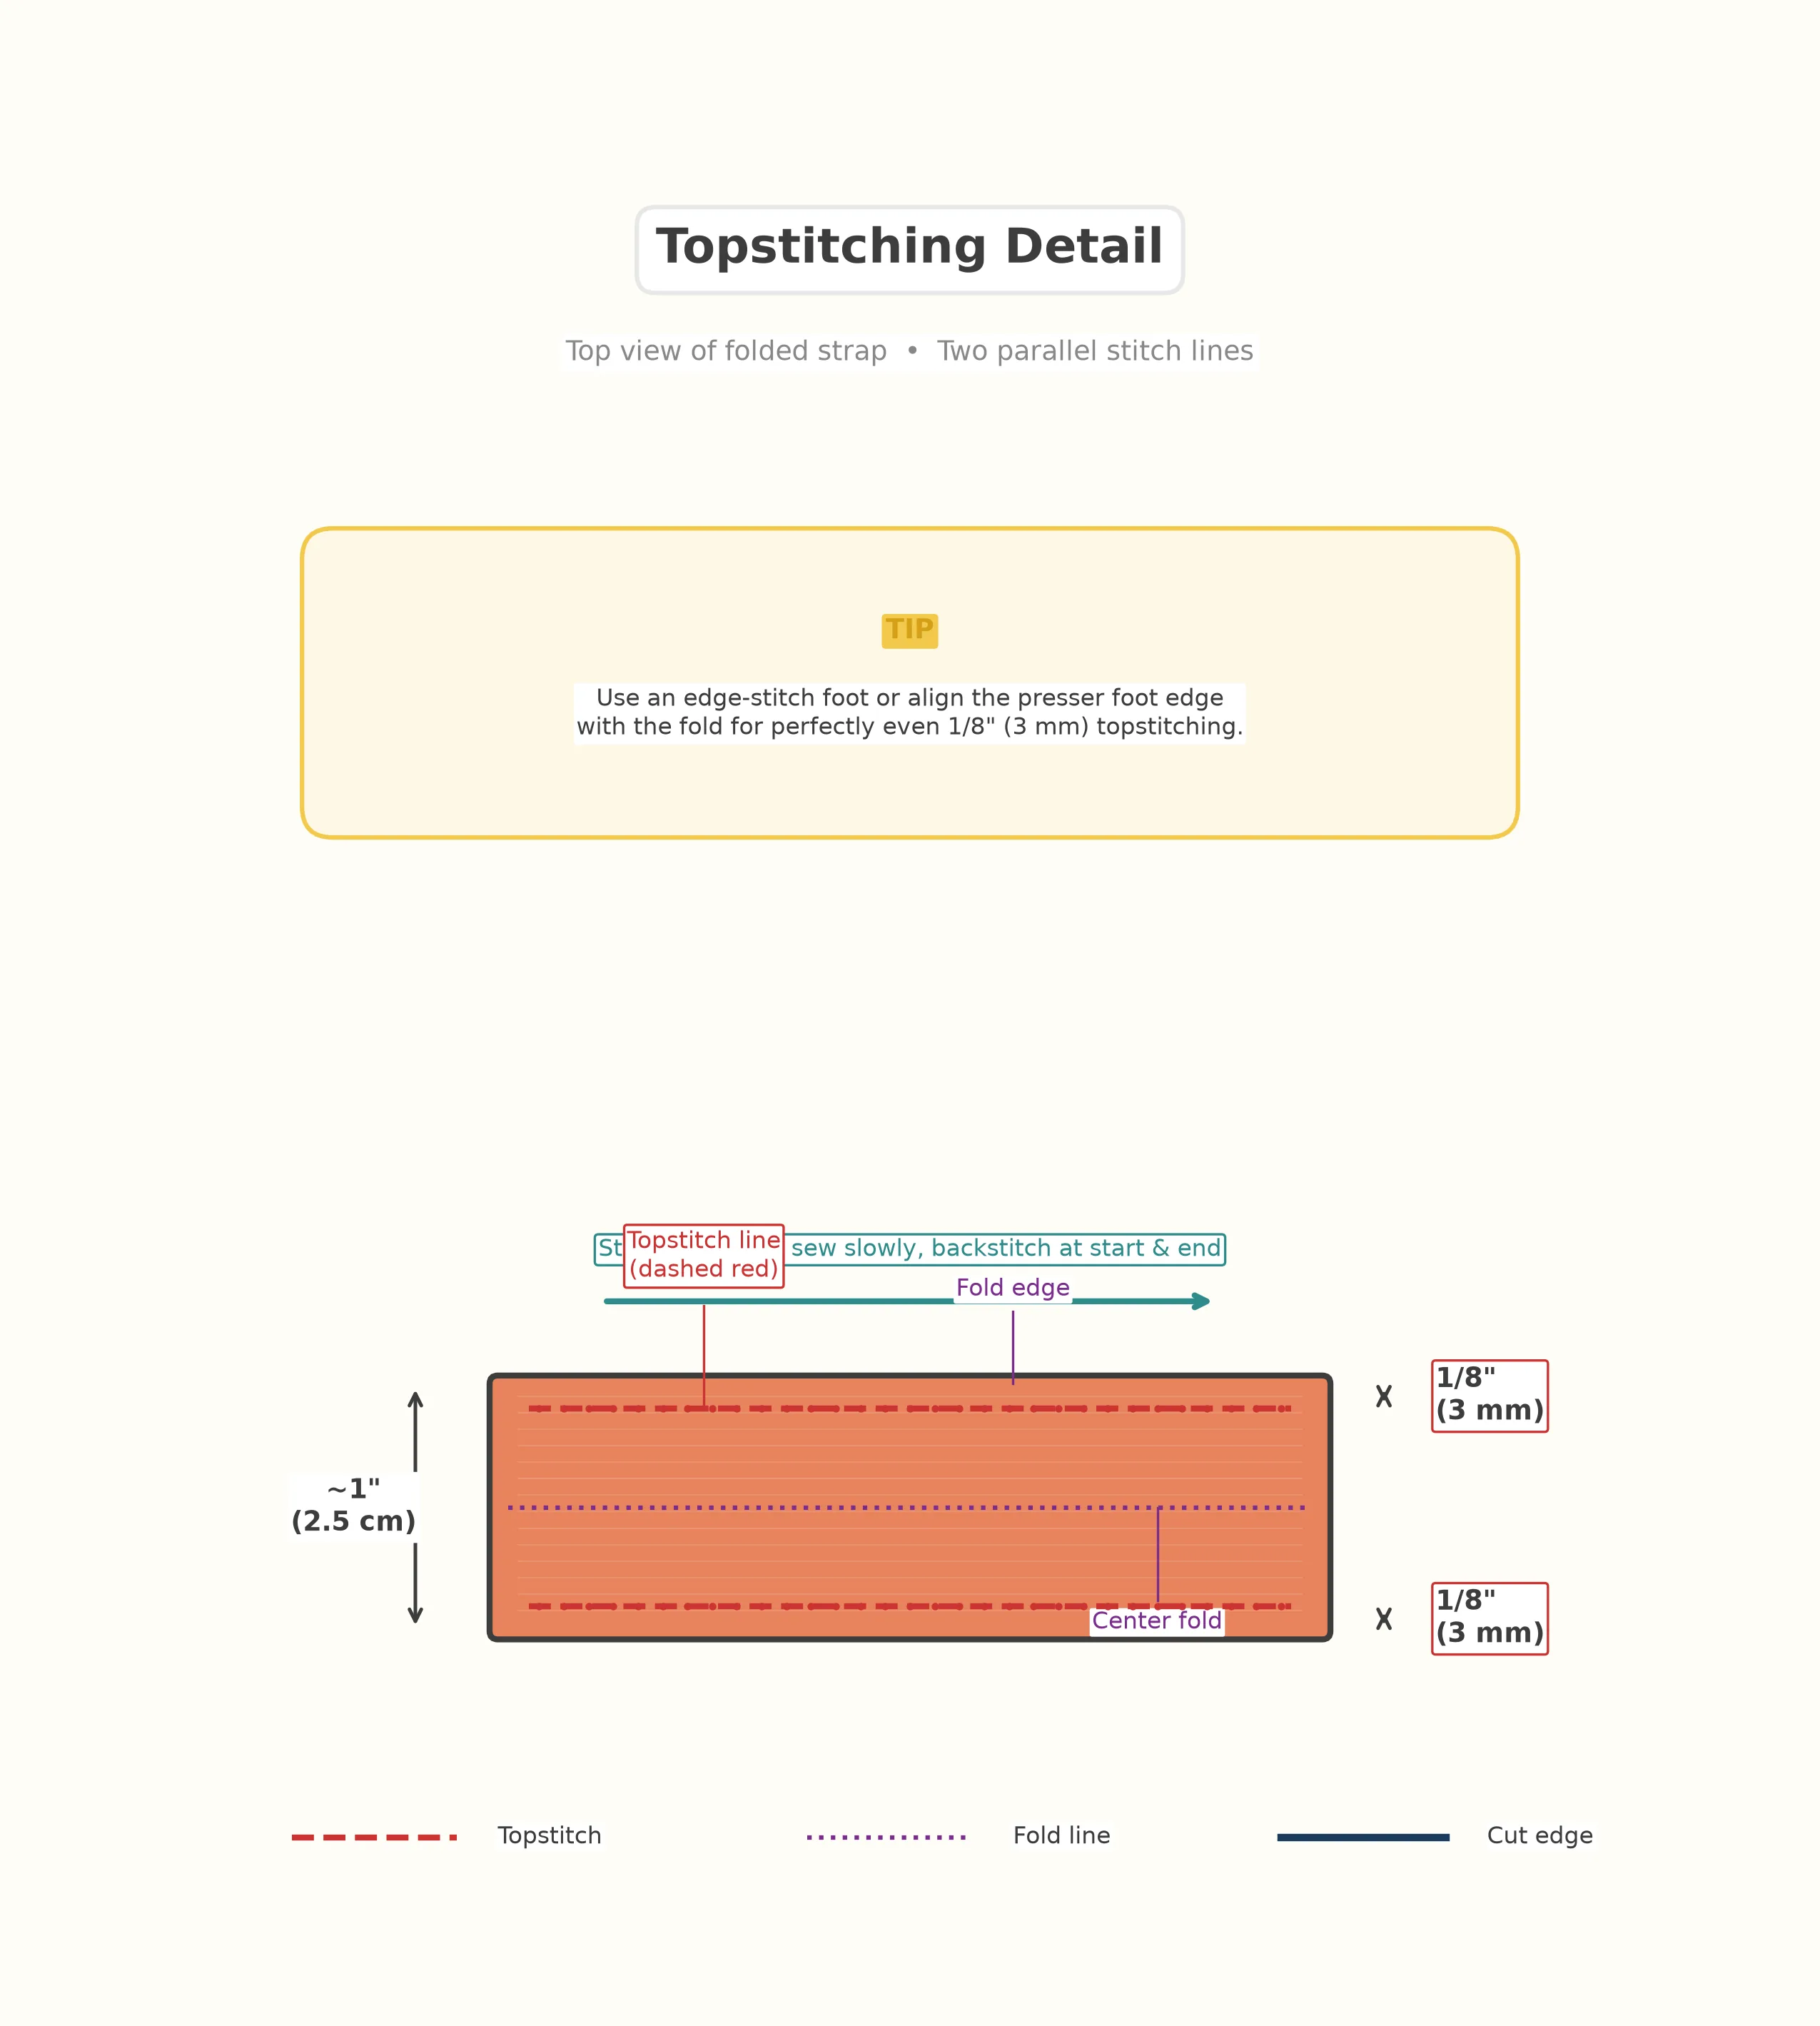
See the Topstitching Like a Pro section below for detailed tips on keeping your lines straight.
Now the moment of truth — attaching the metal clamp. This step feels intimidating the first time but is actually quite simple.
- Fold the strap in half to form a loop. The two short ends should align.
- Open the key fob clamp fully (if it isn't already open from the package).
- Insert both raw ends of the strap into the clamp. Push them all the way to the back of the clamp, so the fabric is snug against the inner edge. The clamp teeth will touch the fabric.
- Fold a scrap of fabric (any scrap, several layers thick) over the clamp to protect its finish from the pliers.
- Squeeze with pliers, applying firm, even pressure across the full width of the clamp. You should feel and hear the clamp bite into the fabric. Keep squeezing until the two halves of the clamp meet completely with no visible gap.
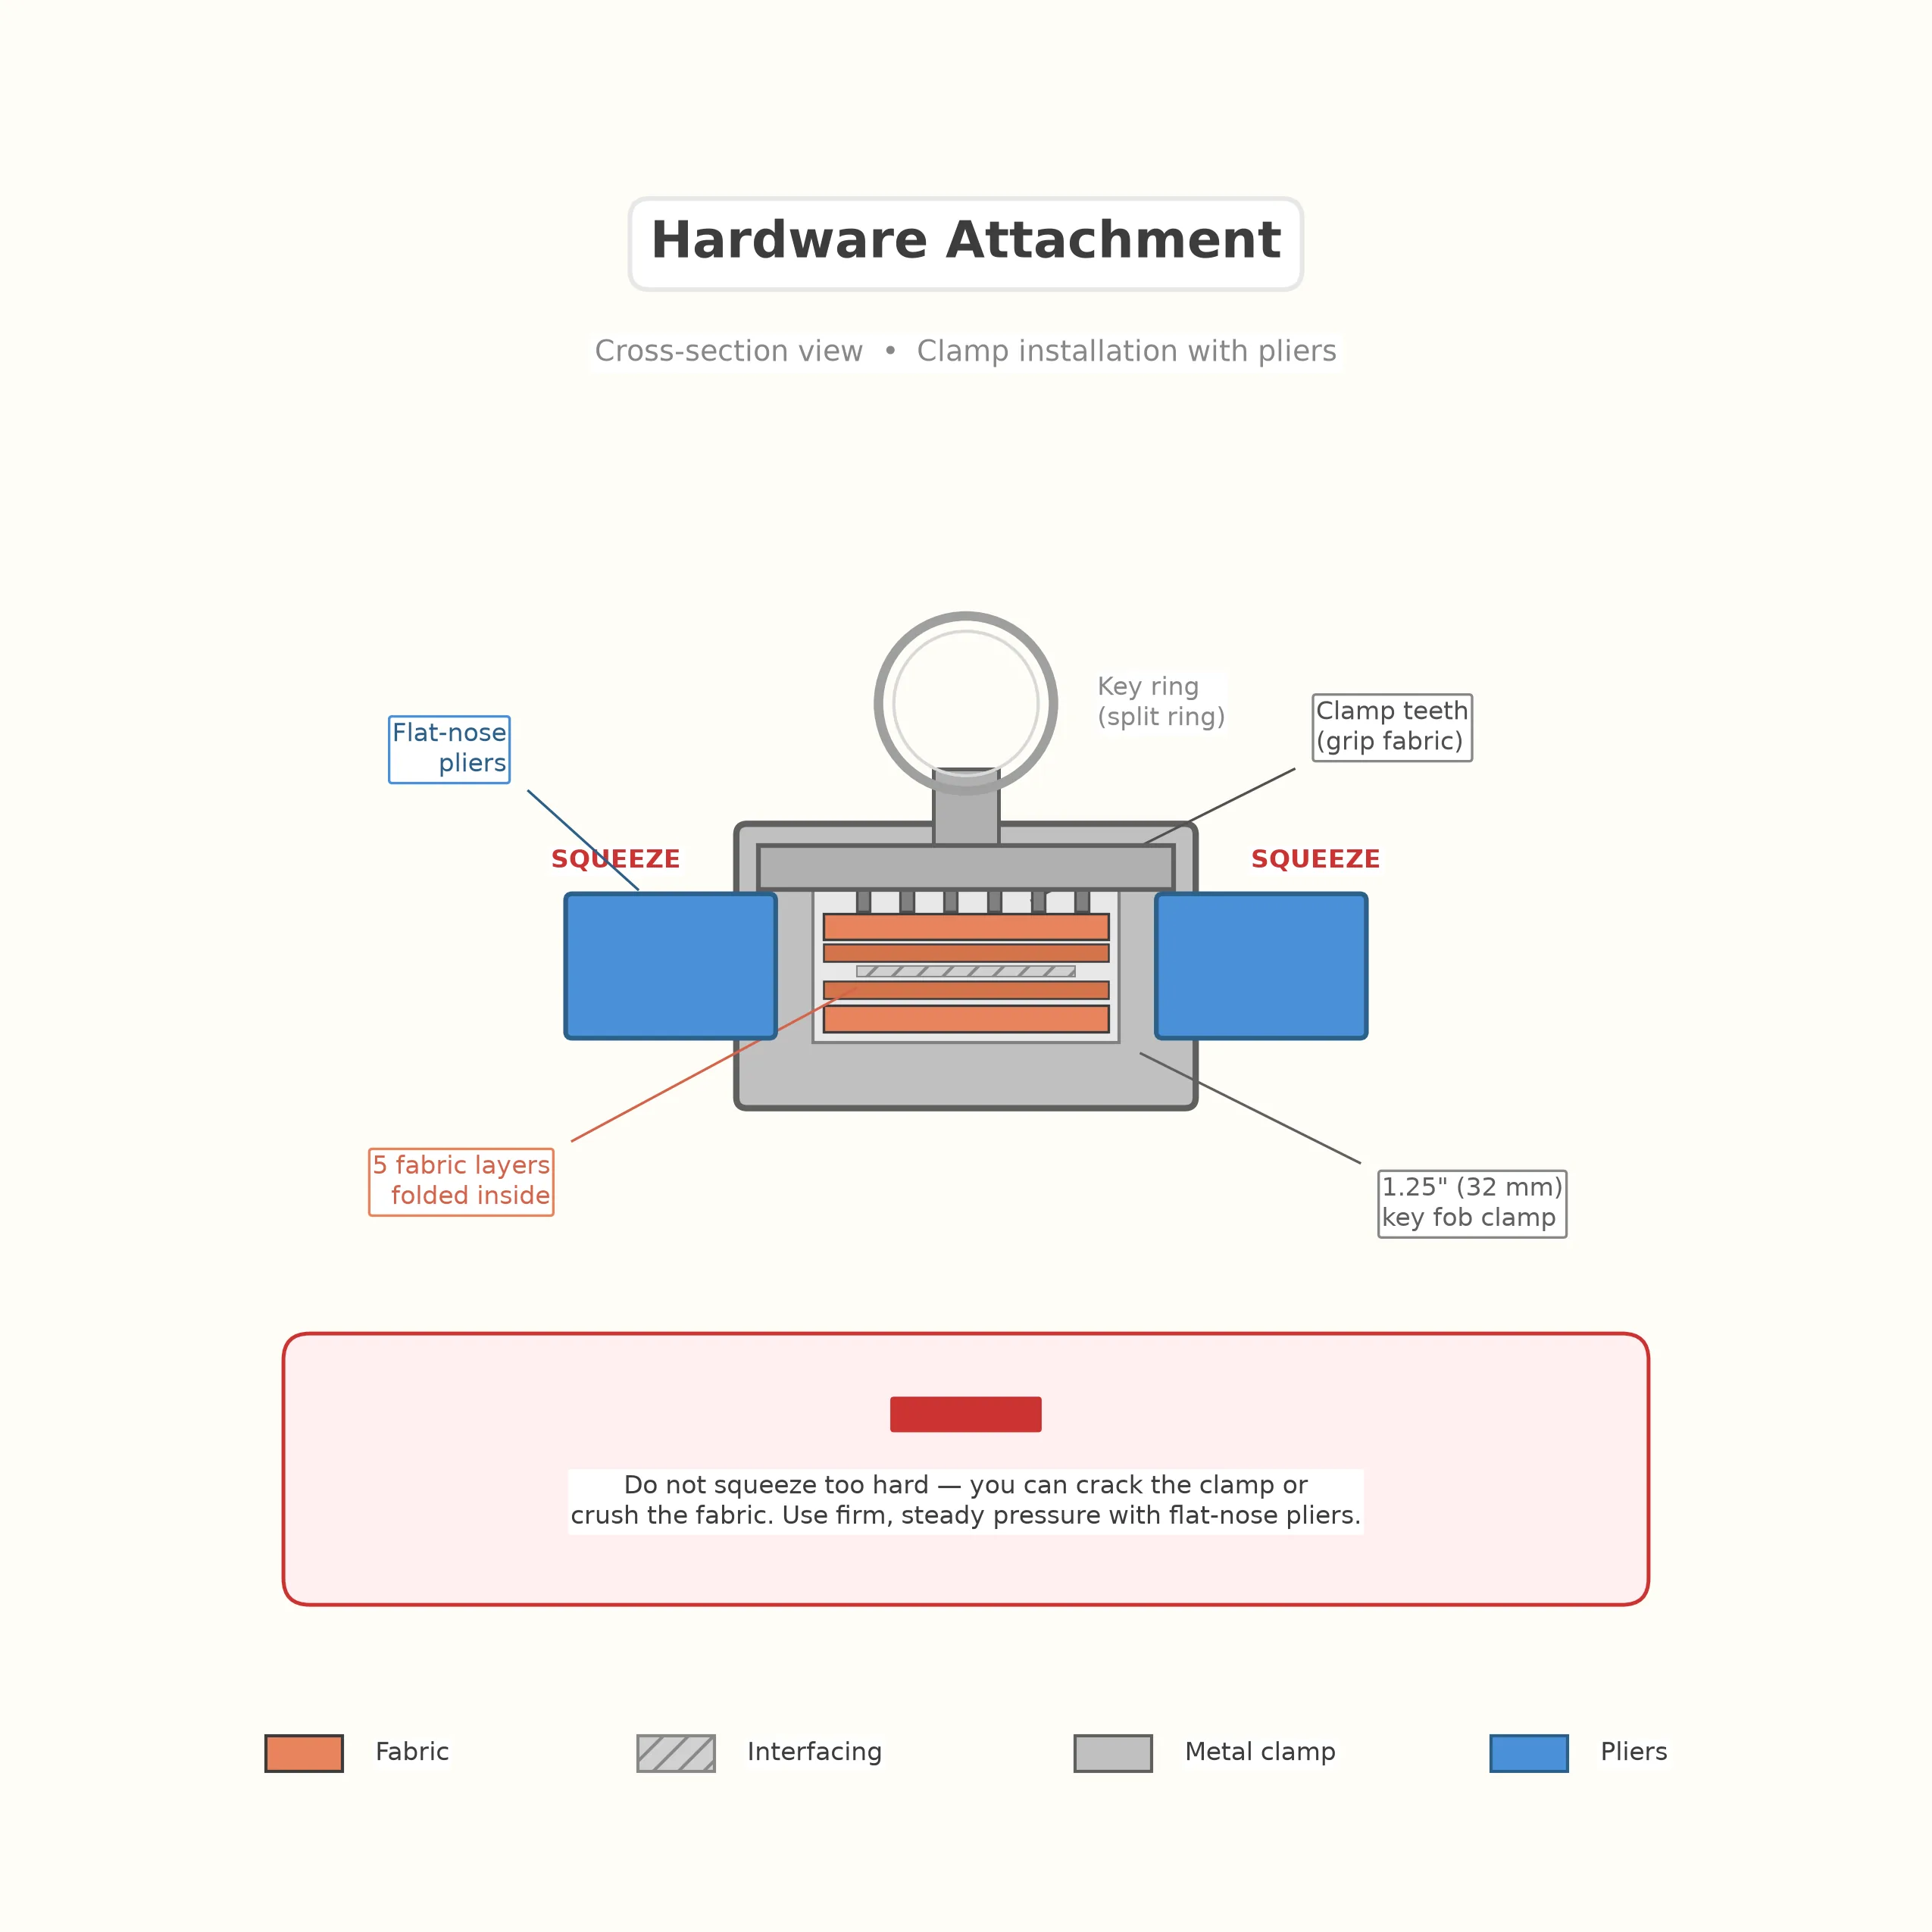
Thread the split ring (the small circular keyring that comes with most hardware) through the top loop of the clamp. If you've worked with keyrings before, you know the trick: slide a key or coin into the split to open it up slightly, then feed the hardware loop through.
That's it. Your fabric key fob is complete. Clip your keys on and admire your work.
Topstitching Like a Pro
Topstitching is the single visible stitching on your finished key fob, so getting it clean makes the difference between a project that looks homemade and one that looks handmade (there's a big difference). Here are the techniques that help:
Use a Guide
Most sewing machines have etched lines on the throat plate showing distances from the needle. Line up the folded edge of your strap with the 1/8-inch (3 mm) line and you'll naturally sew a consistent distance from the fold. If your machine doesn't have clear markings, place a small piece of painter's tape as a guide.
Watch the Fabric Edge, Not the Needle
Experienced sewists keep their eyes on the fabric edge where it meets the guide line, not on the needle. The needle will stay where it's set — you only need to control the fabric's path. Trust the machine and watch the edge.
Match or Contrast — Both Work
Thread color choice is a design decision:
- Matching thread — invisible stitching, polished and quiet, great for formal fabrics
- Contrasting thread — bold and intentional, highlights the stitching as a design feature, great for solid or neutral fabrics
Slow Down at the Ends
Starting and stopping are where mistakes happen. Begin slowly, let the machine take 2–3 stitches, backstitch, then build up speed through the middle of the strap. Slow down again at the end for a clean backstitch finish.
Four Style Variations
Once you've mastered the basic key fob, these variations add personality without adding much time. Each takes 5–10 extra minutes.
Wristlet Loop
Cut a 14-in (35.5 cm) strip instead of 10 inches. The longer finished loop (6.5 in / 16.5 cm) slips over your wrist, keeping your keys hands-free. Perfect for dog walks, trips to the mailbox, or anywhere pockets aren't an option.
Tassel Accent
Make a small embroidery-floss tassel and attach it to the split ring. Choose floss colors that complement the fabric for a boutique look. Takes about 5 extra minutes but transforms a plain fob into a thoughtful gift.
Patchwork Strip
Instead of one 10-inch fabric strip, piece together 2–3 shorter strips of coordinating fabrics (with 1/4-inch seam allowances pressed open). Creates a one-of-a-kind patchwork fob. Great for using up tiny scraps.
Monogrammed
Before folding, embroider a small initial or symbol in the center of the fabric strip using your machine's decorative stitches or hand embroidery. When the strap is folded and topstitched, the monogram appears centered on the finished fob.
Beyond fabric choice, consider mixing hardware finishes. A set of six fobs — same fabric, different hardware finishes (silver, gold, matte black, brass) — makes a beautiful gift set for a family.
What Makes This Tutorial Different
Most beginner key fob tutorials gloss over the two things that make the biggest difference in the finished product: interfacing and hardware installation. Here's what sets this guide apart:
- Interfacing on only half the strip — most tutorials either skip interfacing entirely (resulting in floppy fobs) or interface the whole strip (making the strap too stiff and hard to fold). Half-strip interfacing is the sweet spot: body where you need it, flexibility where you don't.
- Four-layer fold technique — producing a dense, durable strap that survives years of pocket wear, rather than the two-layer version that frays and softens quickly.
- Hardware sizing math — the fabric cut width is always exactly twice the hardware's internal width. Learn this ratio once, use it for any size hardware.
- Protection trick for the pliers step — the scrap-fabric buffer prevents the pliers from scratching your hardware finish (a mistake that's heartbreaking after you've spent on fancy brass or rose gold hardware).
- Topstitching confidence — the skills you learn here transfer directly to bag making, basket construction, and any project with visible stitching.
Frequently Asked Questions
What size key fob hardware do I need?
The most common and versatile size is 1.25-inch (32 mm) key fob hardware. It fits comfortably in a hand, works for both pocket and wrist use, and holds a 1-inch (2.5 cm) wide finished fabric strap perfectly. Dritz, Clover, and Emmaline Bags all sell this standard size. For a wristlet-style strap you can slip over your hand, use 1-inch (25 mm) hardware with a shorter, narrower strap.
What fabric is best for a key fob?
Quilting-weight cotton is the easiest fabric for your first key fob — it presses crisply, feeds through the machine beautifully, and the pattern looks great. Canvas, denim, and home decor weight cotton also work well and are even more durable because they're heavier. Avoid very thick fabrics like upholstery or heavy wool, which may be too bulky for the hardware clamp to grip securely.
Do I need special pliers for key fob hardware?
No, regular household pliers work fine as long as you protect the hardware finish with a scrap of fabric or a thin piece of cardboard. Some sewists use rubber-tipped jewelry pliers or hardware-specific key fob pliers for a cleaner finish, but these are not required. The key is to squeeze firmly and evenly across the full width of the clamp.
Why do I need interfacing for a fabric key fob?
Interfacing (a lightweight stabilizing material you fuse to fabric with an iron) prevents the key fob from twisting, bending, or sagging over time. Without it, the fabric strap can look limp or roll in on itself. A lightweight fusible interfacing like Pellon SF101 adds just enough body to make the fob feel professional and hold its shape, even after months of daily use.
How long should my fabric strip be for a key fob?
For a standard pocket key fob, cut a strip 10 inches (25.4 cm) long. This creates a finished loop of about 4.5 inches (11.4 cm) after folding and hardware attachment — perfect for grabbing keys from a pocket or hooking onto a bag. For a wristlet key fob you can slip over your hand, cut 14 inches (35.5 cm) long for a 6.5-inch (16.5 cm) finished loop.
Can I make a key fob without a sewing machine?
Yes, though it takes longer. Hand-sew the topstitching with a small running stitch or backstitch using matching thread. The folds and pressing stay the same. Hand-sewn key fobs have charming visible stitches and still work perfectly with the hardware. Plan on about 45 minutes instead of 20.
What to Sew Next
Congratulations — you just worked with hardware for the first time, and you've got a durable, useful accessory to show for it. The topstitching skills and hardware confidence you built here are the foundation for most bag making projects. Everything from strap construction to zipper tabs to bag handles uses these same techniques scaled up.
If you're hooked (and most beginners are after their first fob), make a batch of five or six as gifts. They're universally appreciated — I've never met anyone who didn't appreciate a thoughtfully handmade keychain. Try different fabrics, different hardware finishes, and different lengths to see what you prefer.
The next project in this series, reusable produce bags, teaches you French seams — a professional technique that fully encloses raw edges for a clean, durable finish. It's a 45-minute project with huge impact (both for your skills and for the planet). Beyond this series, when you're ready to go deeper into hardware, check out the bag-making hardware essentials guide.
Continue Exploring
Hardware Unlocked
You've just added metal hardware installation to your sewing toolkit. That's a huge leap — bag making, strap work, and dozens of other projects just became accessible to you.