How to Sew a Drawstring Gift Pouch in 30 Minutes
- Why Drawstring Pouches Are the Perfect Quick Sew
- Materials and Tools You'll Need
- Size Chart: Small, Medium, and Large
- Cutting Your Fabric
- Understanding the Pattern Pieces
- Step-by-Step Sewing Instructions
- Variations and Creative Ideas
- Cotton vs Linen: Which Fabric Is Best?
- Frequently Asked Questions
- What to Sew Next
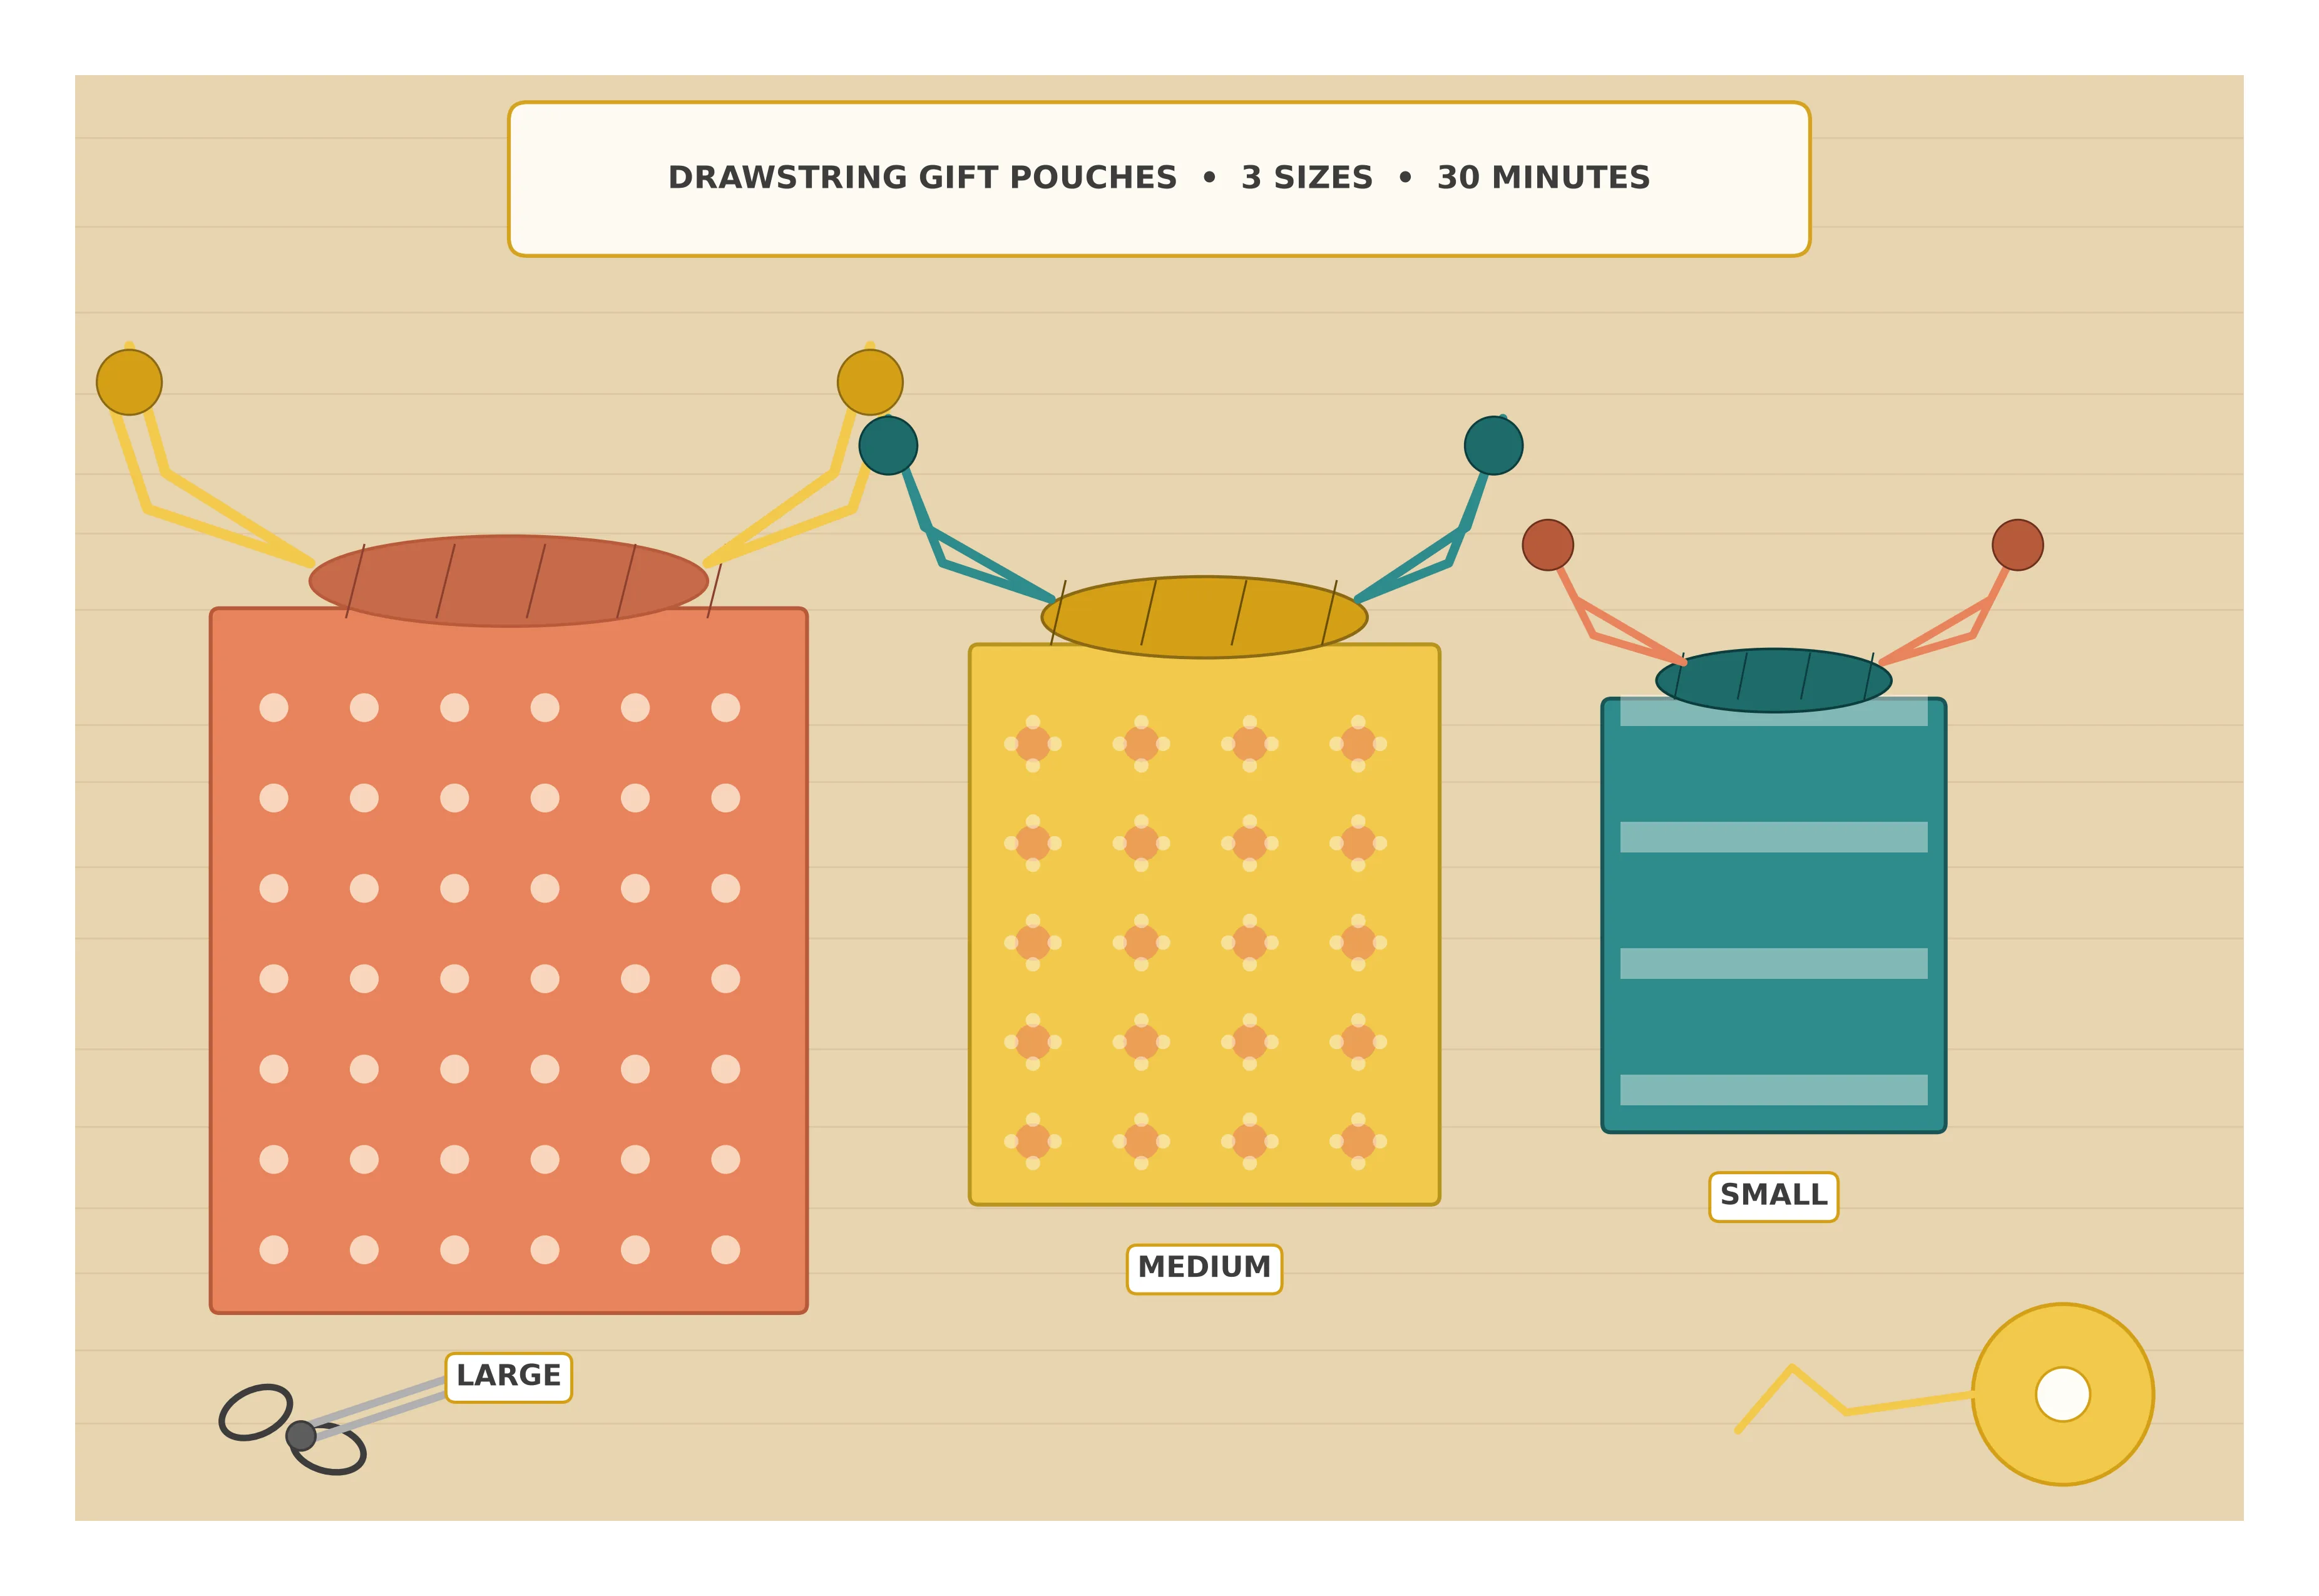
A drawstring gift pouch is simply a fabric bag with a casing (a sewn channel or tunnel) at the top, through which you thread ribbon or cord. When you pull the ribbon ends, the top cinches closed. That's it. The entire project uses only straight stitching — if you can sew a straight line, you can make this pouch.
What makes this tutorial different from the dozens of pouch tutorials out there? I'm going to teach you the double-drawstring method, which gives you two ribbons that pull from opposite sides for a beautifully even gather. I'll also give you exact measurements for three sizes so you can sew a drawstring gift pouch for jewelry, cosmetics, wine bottles, or anything in between.
This is Post 1 of 10 in the Weekend Sewing Projects series, and it's the perfect warm-up. By the end, you'll have a handmade pouch (or five — they're addictive) and a solid grasp of the casing technique you'll use again in projects like the headband with elastic and the simple elastic skirt later in this series.
Let's get started.
Materials and Tools You'll Need
Fabric & Supplies
- Cotton fabric — quilting-weight cotton, ¼ to ½ yard (0.25–0.5 m) depending on pouch size
- Ribbon or cord — 2 pieces of ¼-inch (6 mm) satin ribbon or cotton cord per pouch, each 18–30 in (46–76 cm) long
- Coordinating thread — all-purpose polyester in a matching or contrasting color
Tools
- Sewing machine — any basic model with a straight stitch
- Fabric scissors or rotary cutter with mat
- Ruler or measuring tape
- Iron and ironing board
- Straight pins or sewing clips
- Safety pin or bodkin (a blunt-tipped tool for threading cord through casings)
- Hand sewing needle (optional, for finishing)
Size Chart: Small, Medium, and Large
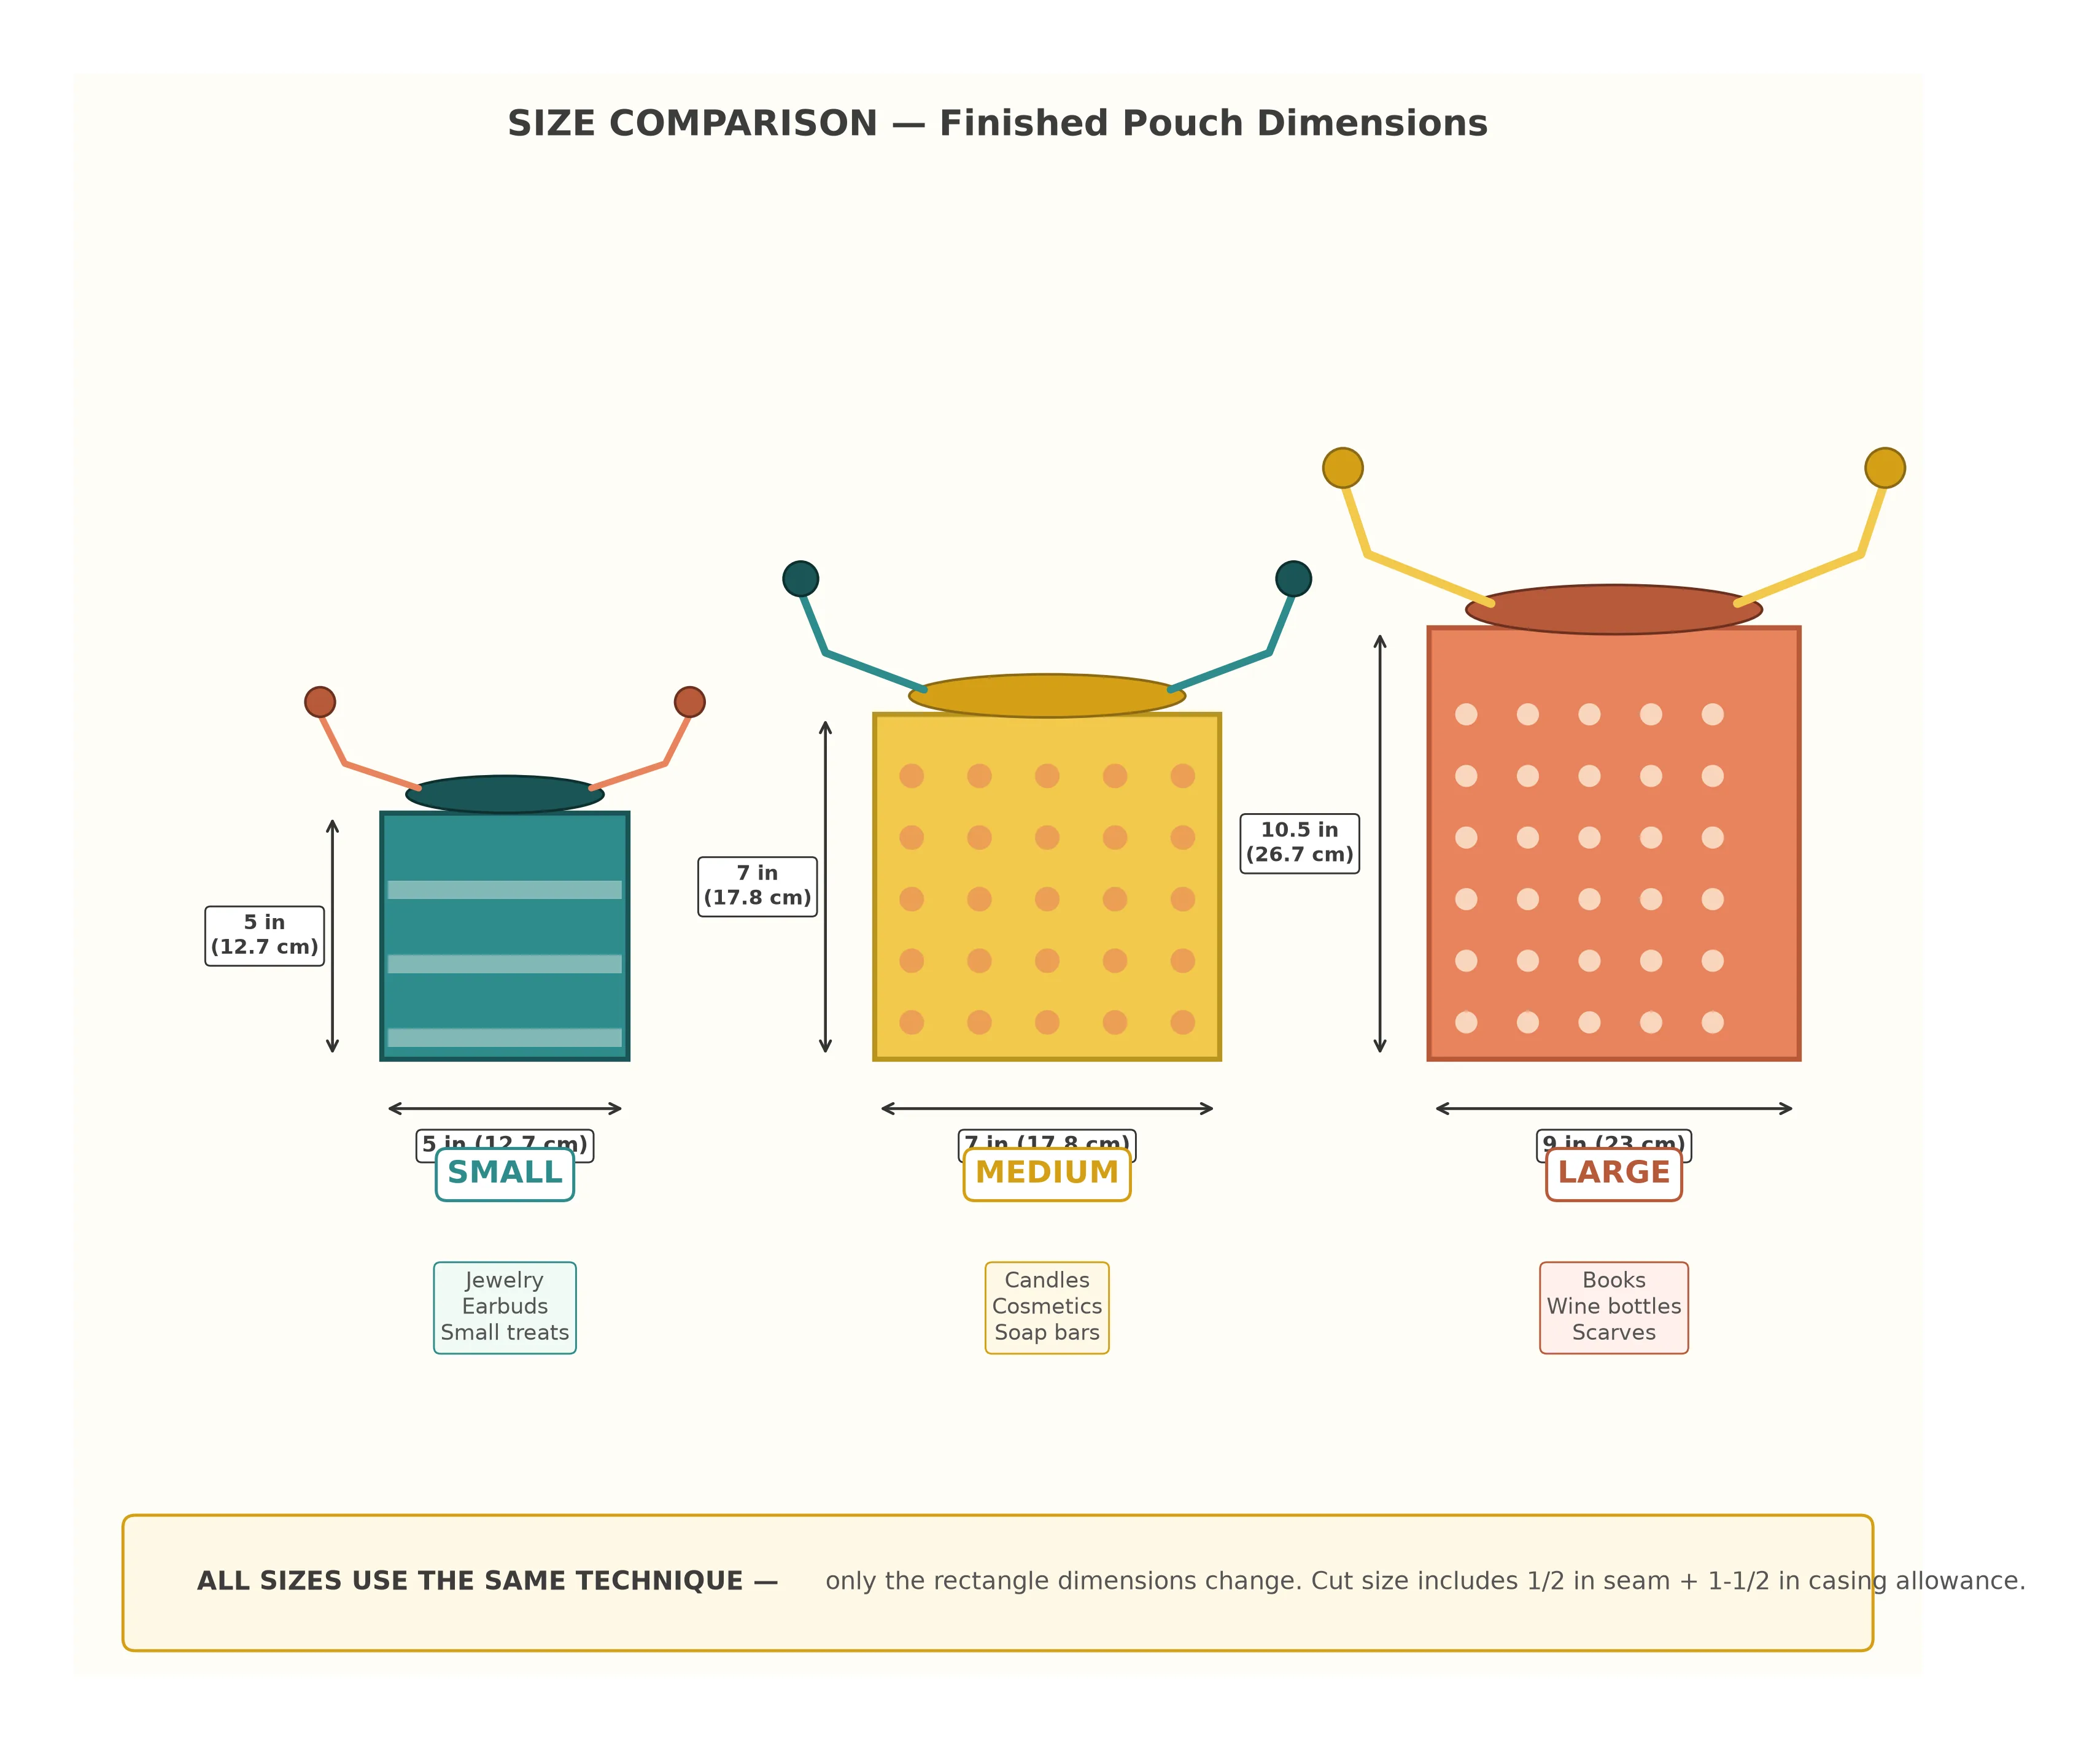
I've designed three sizes that cover the most common gift-pouch uses. Each size includes a ½ in (1.3 cm) seam allowance (the extra fabric between your stitch line and the cut edge) and a 1½ in (3.8 cm) casing allowance (the extra fabric at the top that folds over to create the drawstring channel).
| Size | Cut Size (each piece) | Finished Size | Ribbon Length (×2) | Best For |
|---|---|---|---|---|
| Small | 6 × 8 in (15 × 20 cm) | 5 × 5 in (12.7 × 12.7 cm) | 18 in (46 cm) | Jewelry, earbuds, small treats |
| Medium | 8 × 10 in (20 × 25 cm) | 7 × 7 in (17.8 × 17.8 cm) | 22 in (56 cm) | Candles, cosmetics, soap bars |
| Large | 10 × 14 in (25 × 35.5 cm) | 9 × 10.5 in (23 × 26.7 cm) | 30 in (76 cm) | Books, wine bottles, scarves |
For your first pouch, I'd recommend starting with the medium size. It's large enough to handle comfortably while sewing but small enough to finish quickly. Once you've made one, the small and large sizes are just a matter of cutting different rectangles.
Cutting Your Fabric
This project is wonderfully simple when it comes to cutting. You need two identical rectangles of fabric — that's it. No curved edges, no notches, no complicated shapes. If you're using a rotary cutter and cutting mat, this step takes about two minutes. Scissors work just as well; just follow your ruler line carefully.
How to Cut Efficiently
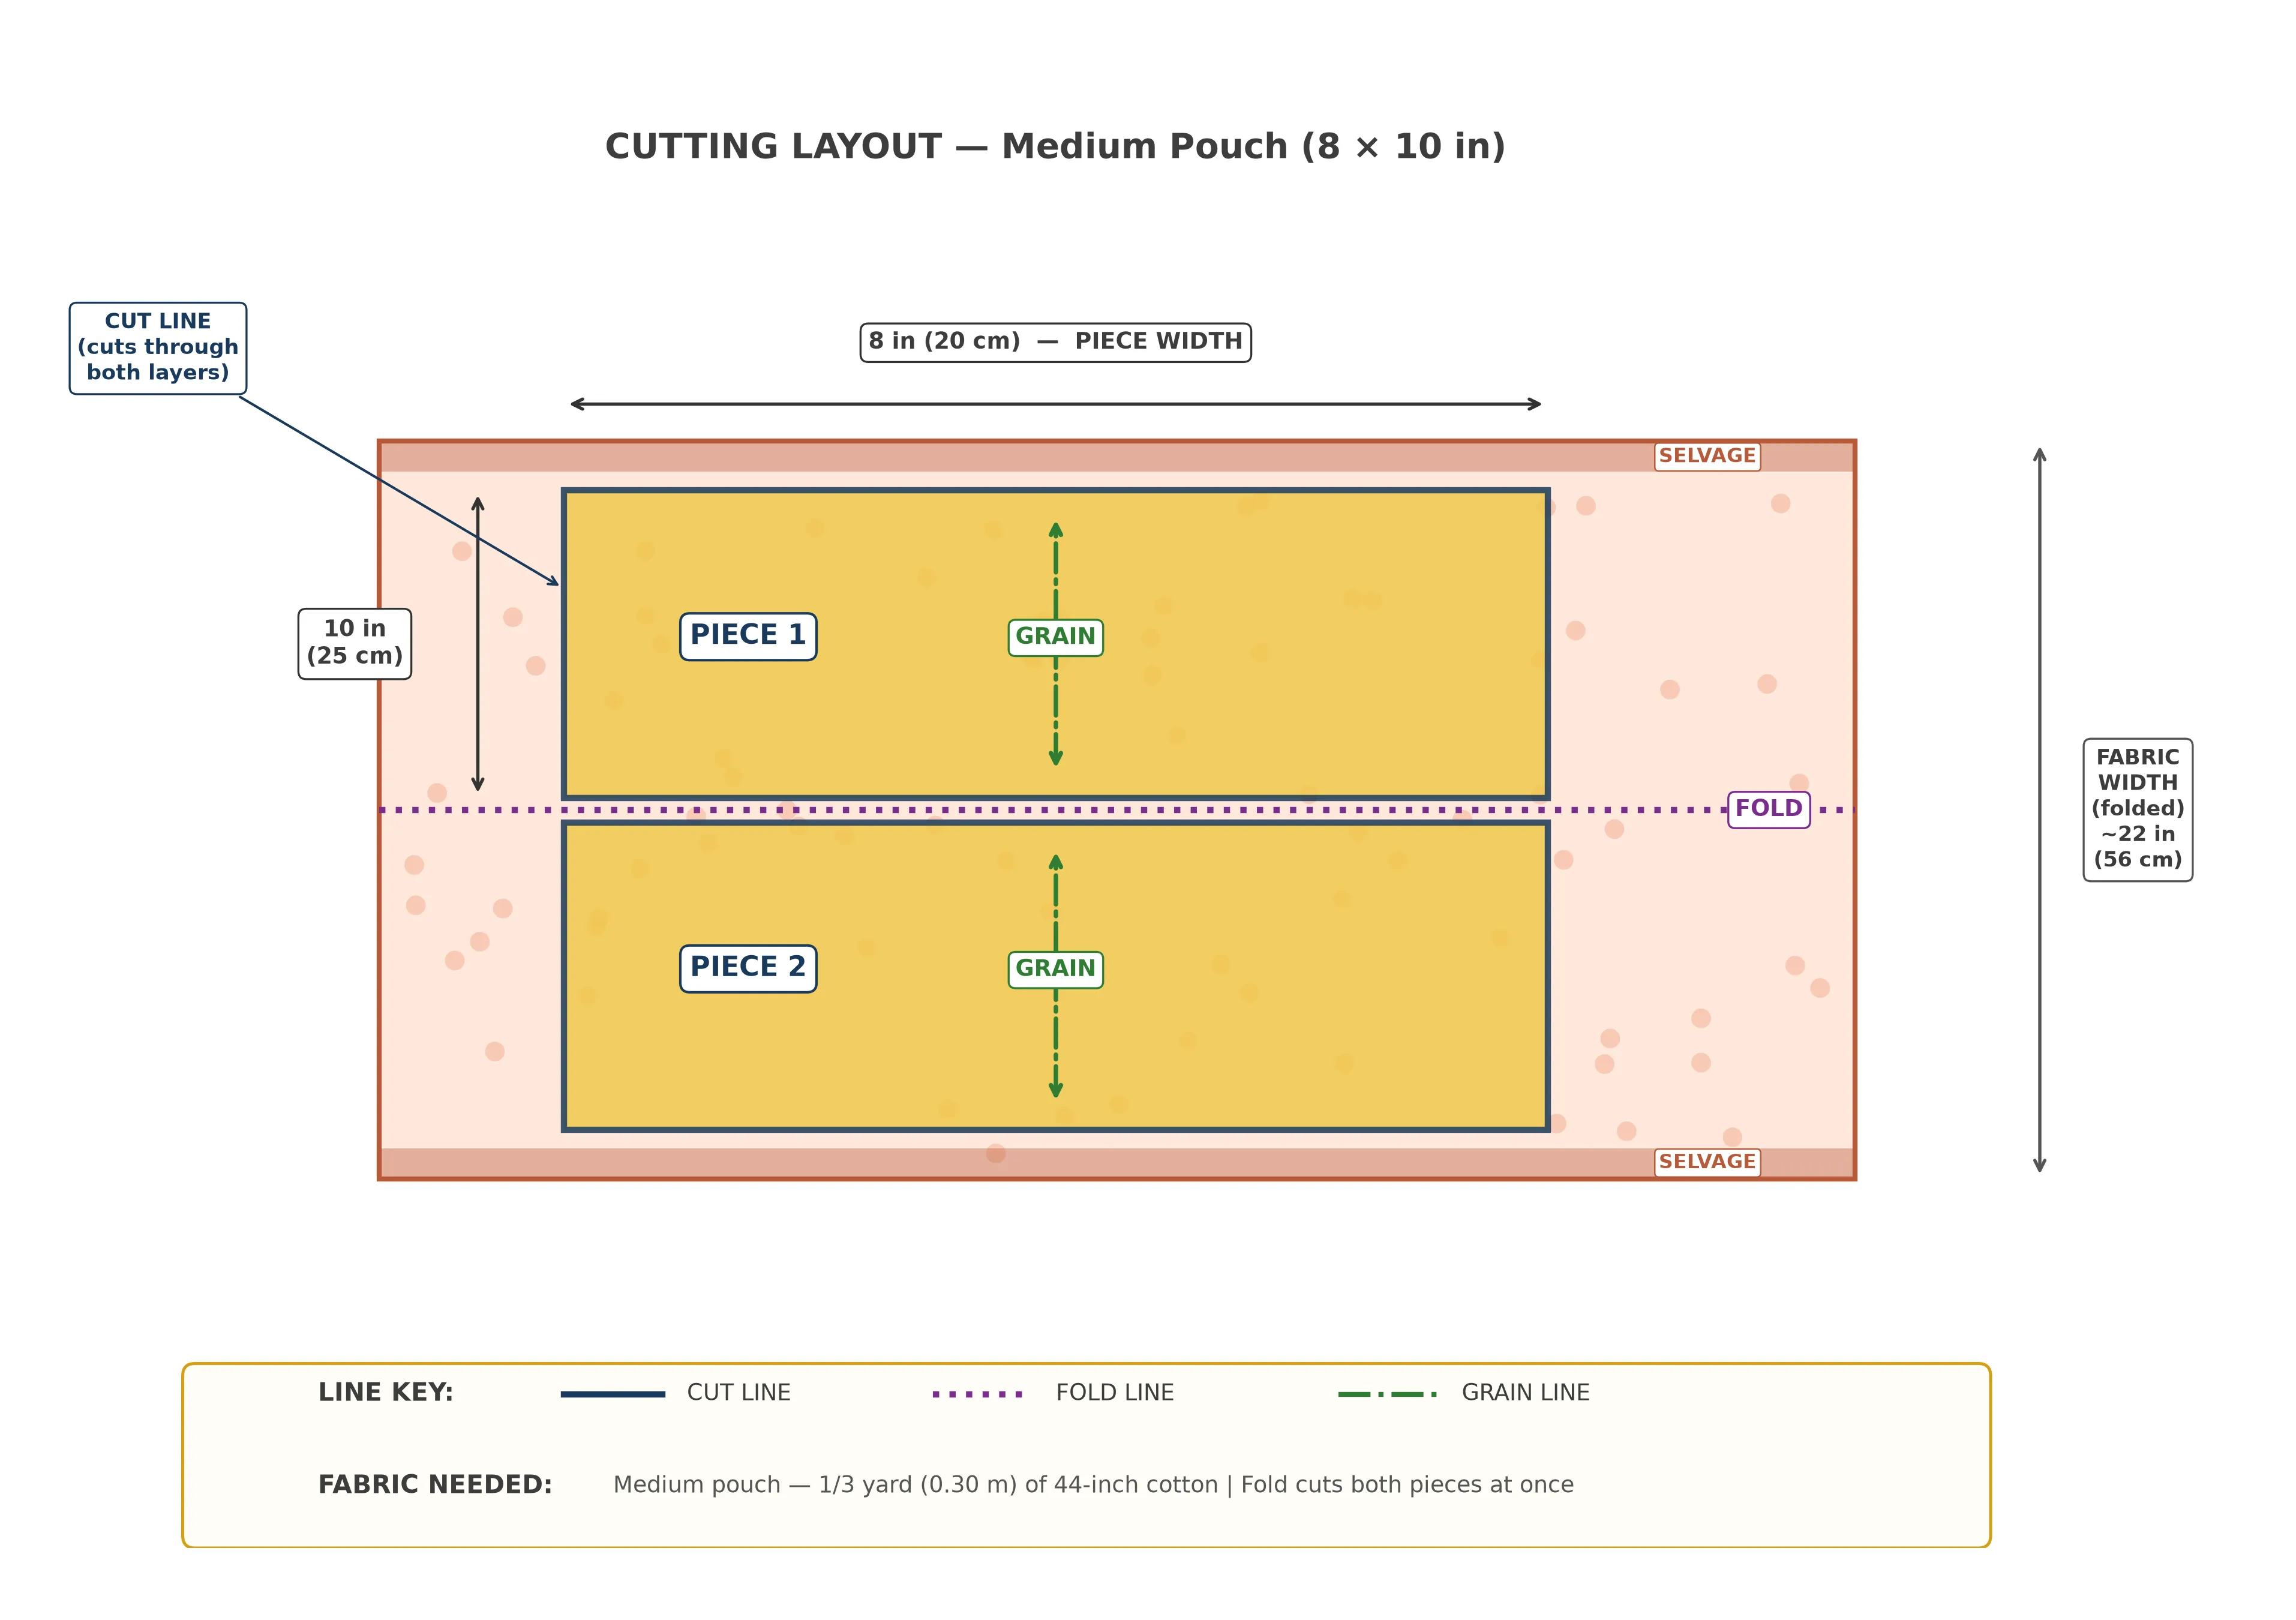
The smartest way to cut your pieces is to fold your fabric in half with the selvage edges (the tightly woven factory edges on the sides of the fabric) aligned. This way, you cut through two layers at once and get two identical rectangles with a single cut. Here's how:
- Lay your fabric flat on your cutting surface, right side (the printed or "pretty" side) facing up.
- Fold the fabric in half so the selvage edges line up. The fold creates one edge of your rectangle.
- Measure and mark your rectangle size from the fold. For medium: measure 8 in (20 cm) wide and 10 in (25 cm) tall from the fold.
- Cut along your marks through both layers. You'll have two perfectly matched rectangles.
Cutting Your Ribbon or Cord
Cut two lengths of ribbon or cord according to the size chart above. It's better to cut slightly longer than you need — you can always trim the ends later, but you can't add length back. I recommend adding an extra 2 in (5 cm) to each piece for comfort.
If you're using satin ribbon, quickly run a lighter flame or match along each cut end to melt and seal the raw edge. This prevents fraying. If you're using cotton cord, tie a small knot at each raw end instead.
Understanding the Pattern Pieces
Even though this project has only one pattern piece (a rectangle!), understanding exactly what each part of that rectangle does will make the sewing steps crystal clear. Let's break down the anatomy of your fabric rectangle:
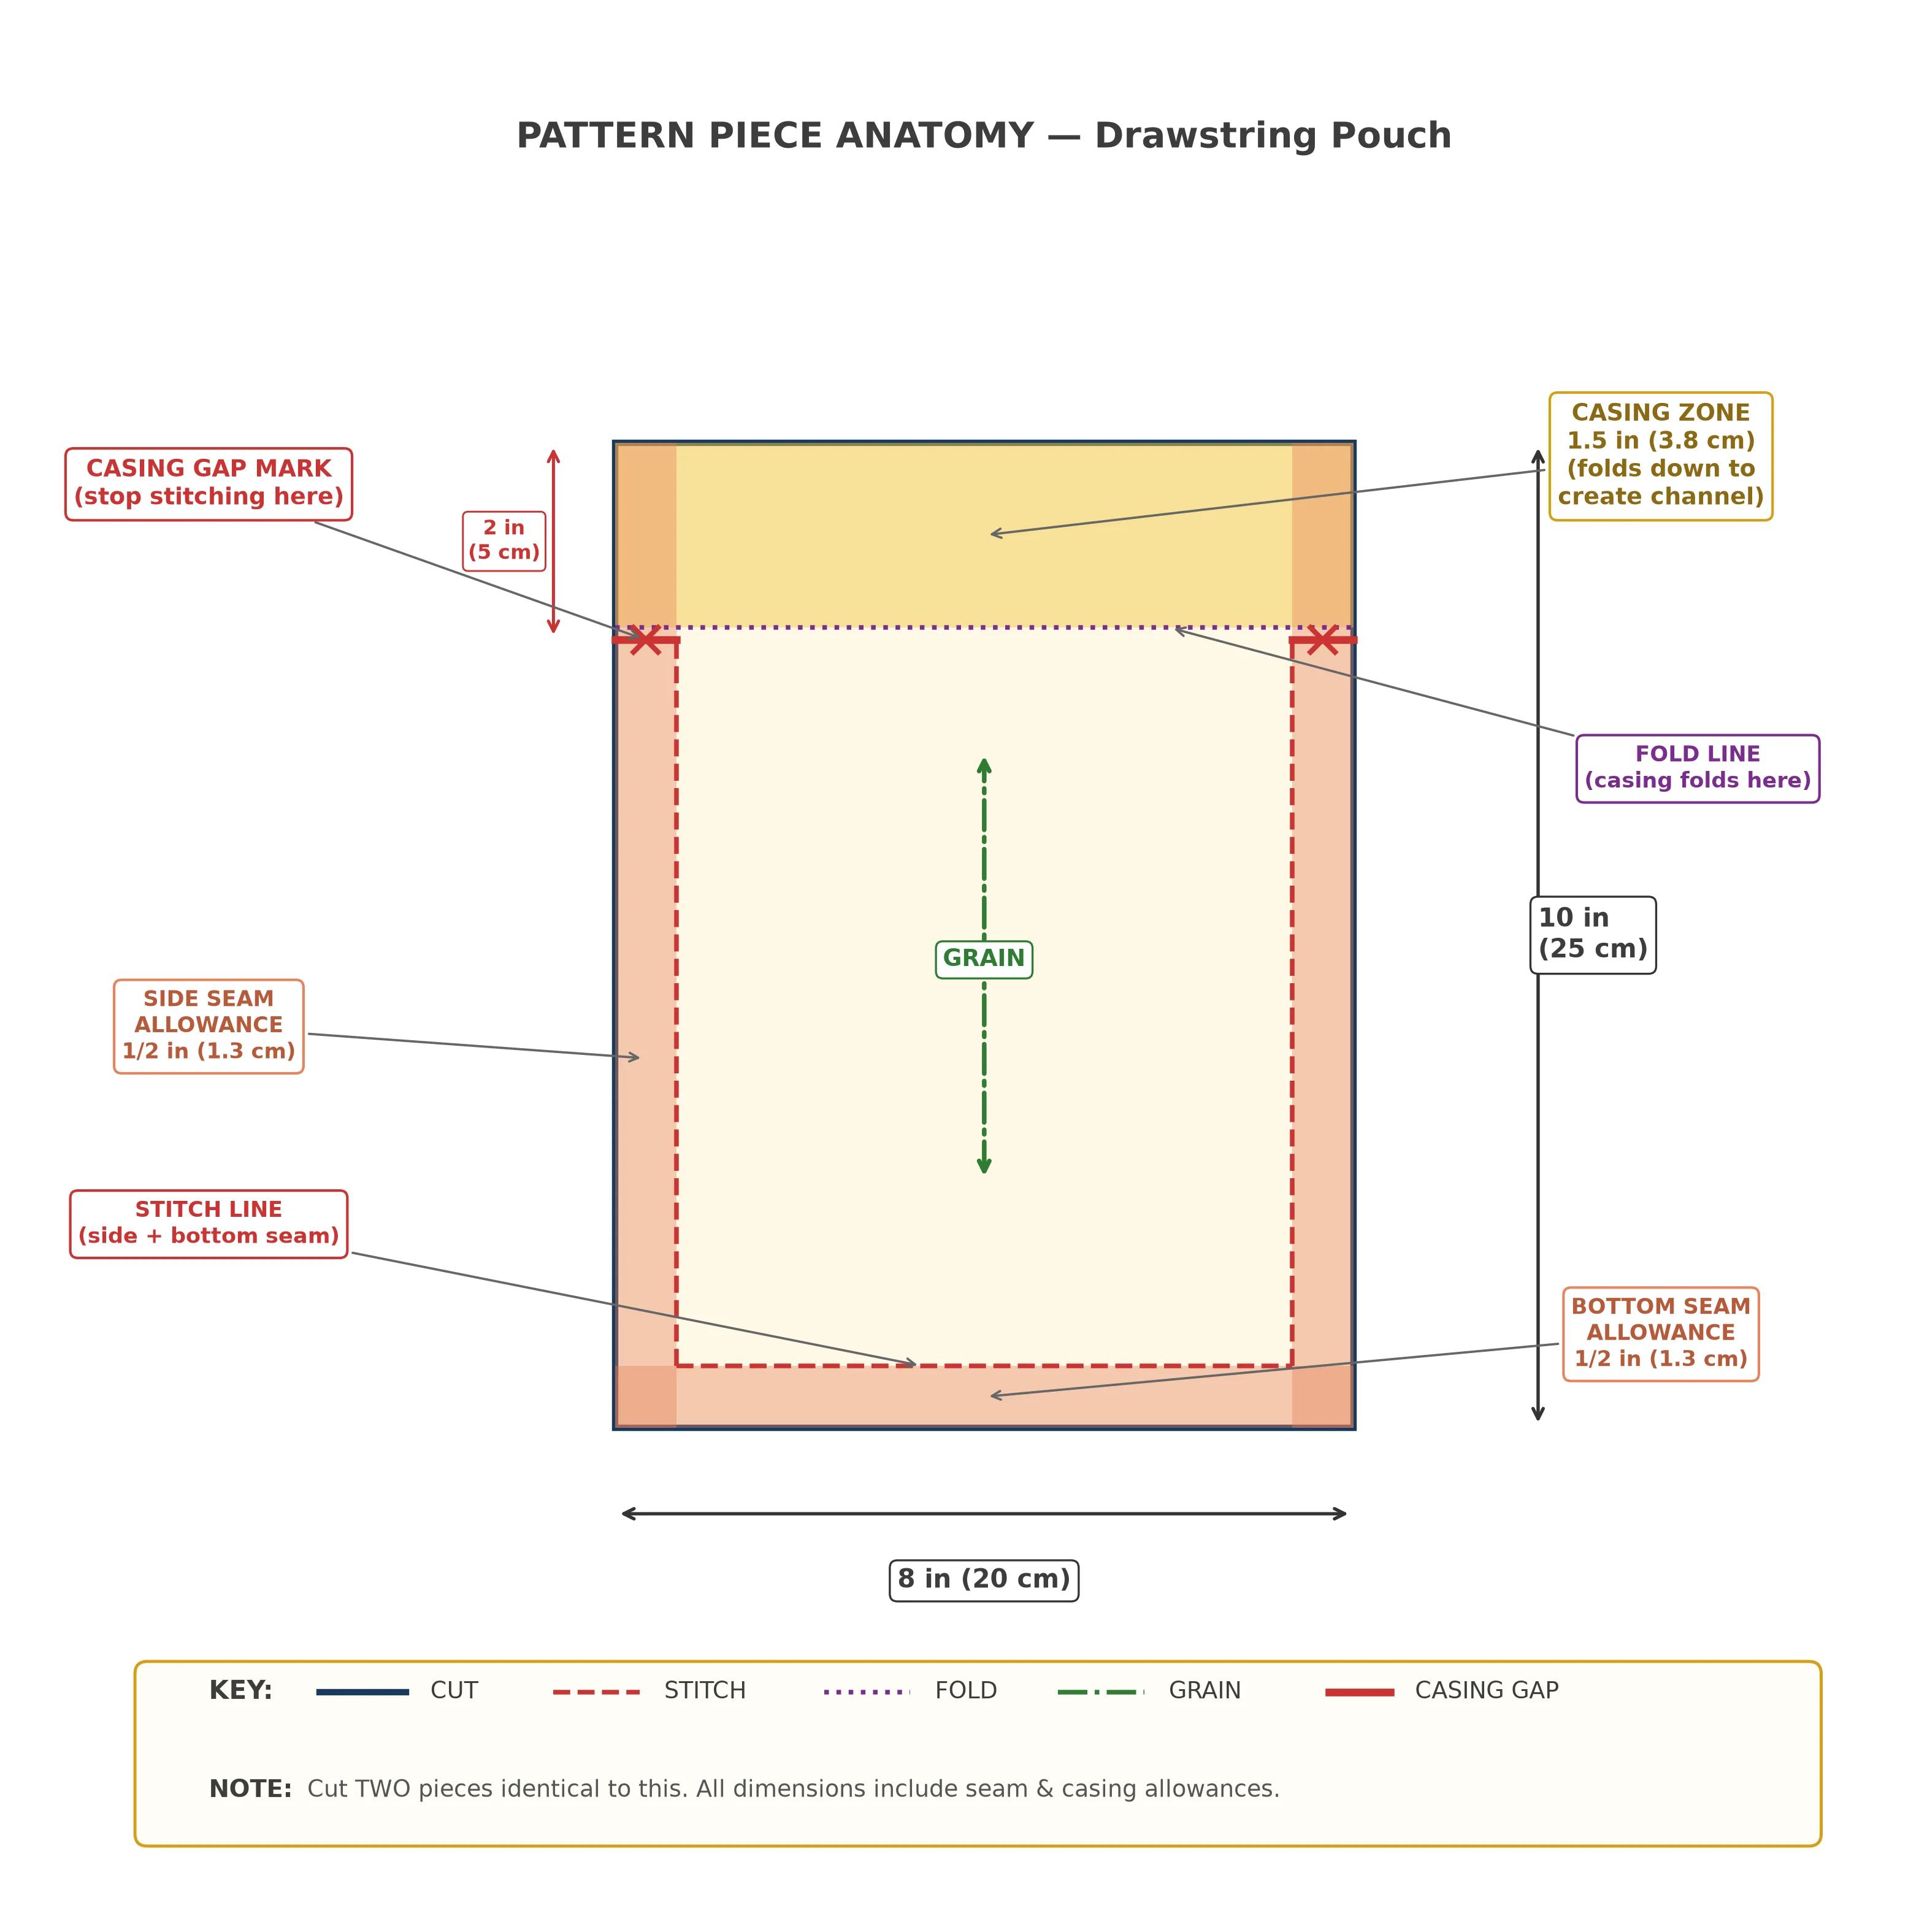
Looking at the diagram, you can see four distinct zones on the rectangle:
- Bottom seam allowance — the bottom ½ in (1.3 cm) that gets stitched to the other rectangle to form the pouch bottom.
- Side seam allowances — the left and right ½ in (1.3 cm) edges that get stitched to form the side walls of the pouch.
- Casing zone — the top 1½ in (3.8 cm) that folds over to create the drawstring channel. This area does NOT get sewn to the other rectangle.
- Casing gap marks — two marks on each side seam, 2 in (5 cm) below the top raw edge. Your side seam stitching stops at these marks. The unstitched gap above them is where your ribbon enters and exits the casing.
The Grain Line Matters — Even for Rectangles
You might think grain direction doesn't matter for a simple rectangle, but it does. The grain line (the direction the threads of the fabric run) affects how your pouch hangs and drapes. For the best-looking result:
- The lengthwise grain (parallel to the selvage) should run vertically — from top to bottom of your pouch.
- This means the longer dimension of your rectangle runs parallel to the selvage edge.
- If you cut against the grain, the pouch may stretch unevenly and the casing won't fold as crisply.
If this sounds confusing, don't worry. If you followed the cutting layout above (folding along the selvage), your grain line is automatically correct.
Step-by-Step Sewing Instructions
Here's where your pouch comes together. Every step uses a straight stitch — the most basic stitch on any sewing machine. I recommend setting your stitch length to about 2.5 mm (the default on most machines). Use a standard straight-stitch presser foot.
The entire sewing process takes about 20 to 25 minutes once your pieces are cut and marked. I'll walk you through each step in detail so there's absolutely no guesswork.
Take both fabric rectangles and lay them flat, right side up. On each rectangle, measure 2 in (5 cm) down from the top raw edge on both side edges. Place a pin or make a small pencil mark at each of these four points (two per rectangle, eight marks total across both pieces).
These marks tell you exactly where to start and stop your side seam stitching. The 2 in (5 cm) gap above these marks will become the opening where your ribbon enters the casing channel.
Place the two rectangles on top of each other with right sides together (RST). "Right sides together" means the pretty, printed side of each fabric piece faces inward, touching each other. The dull, unprinted wrong side faces outward. This way, when you flip the pouch right side out after sewing, all your seams are hidden inside.
Align all four edges carefully. Pin along the bottom edge and both side edges, placing pins every 2–3 in (5–7.5 cm). Don't pin the top edge — that's where the casing will be, and we'll handle it separately.
This is the main construction step. You'll stitch a U-shape — down one side, across the bottom, and up the other side — leaving the casing gaps open at the top.
Here's the exact stitching path:
- Start at the left casing gap mark (2 inches / 5 cm from the top). Place your fabric under the presser foot with the side edge aligned at the ½ in (1.3 cm) seam guide on your machine.
- Backstitch 2–3 stitches to lock the seam. Backstitching means stitching forward a few stitches, pressing the reverse button to stitch backward over them, then continuing forward. This prevents the stitching from unraveling.
- Stitch down the left side to the corner.
- Stop at the corner with the needle down in the fabric (most machines have a needle-down button, or just use your hand wheel). Lift the presser foot, rotate the fabric 90 degrees, lower the presser foot, and continue stitching across the bottom.
- Pivot at the right corner the same way.
- Stitch up the right side and stop at the right casing gap mark.
- Backstitch to lock the seam. Done.
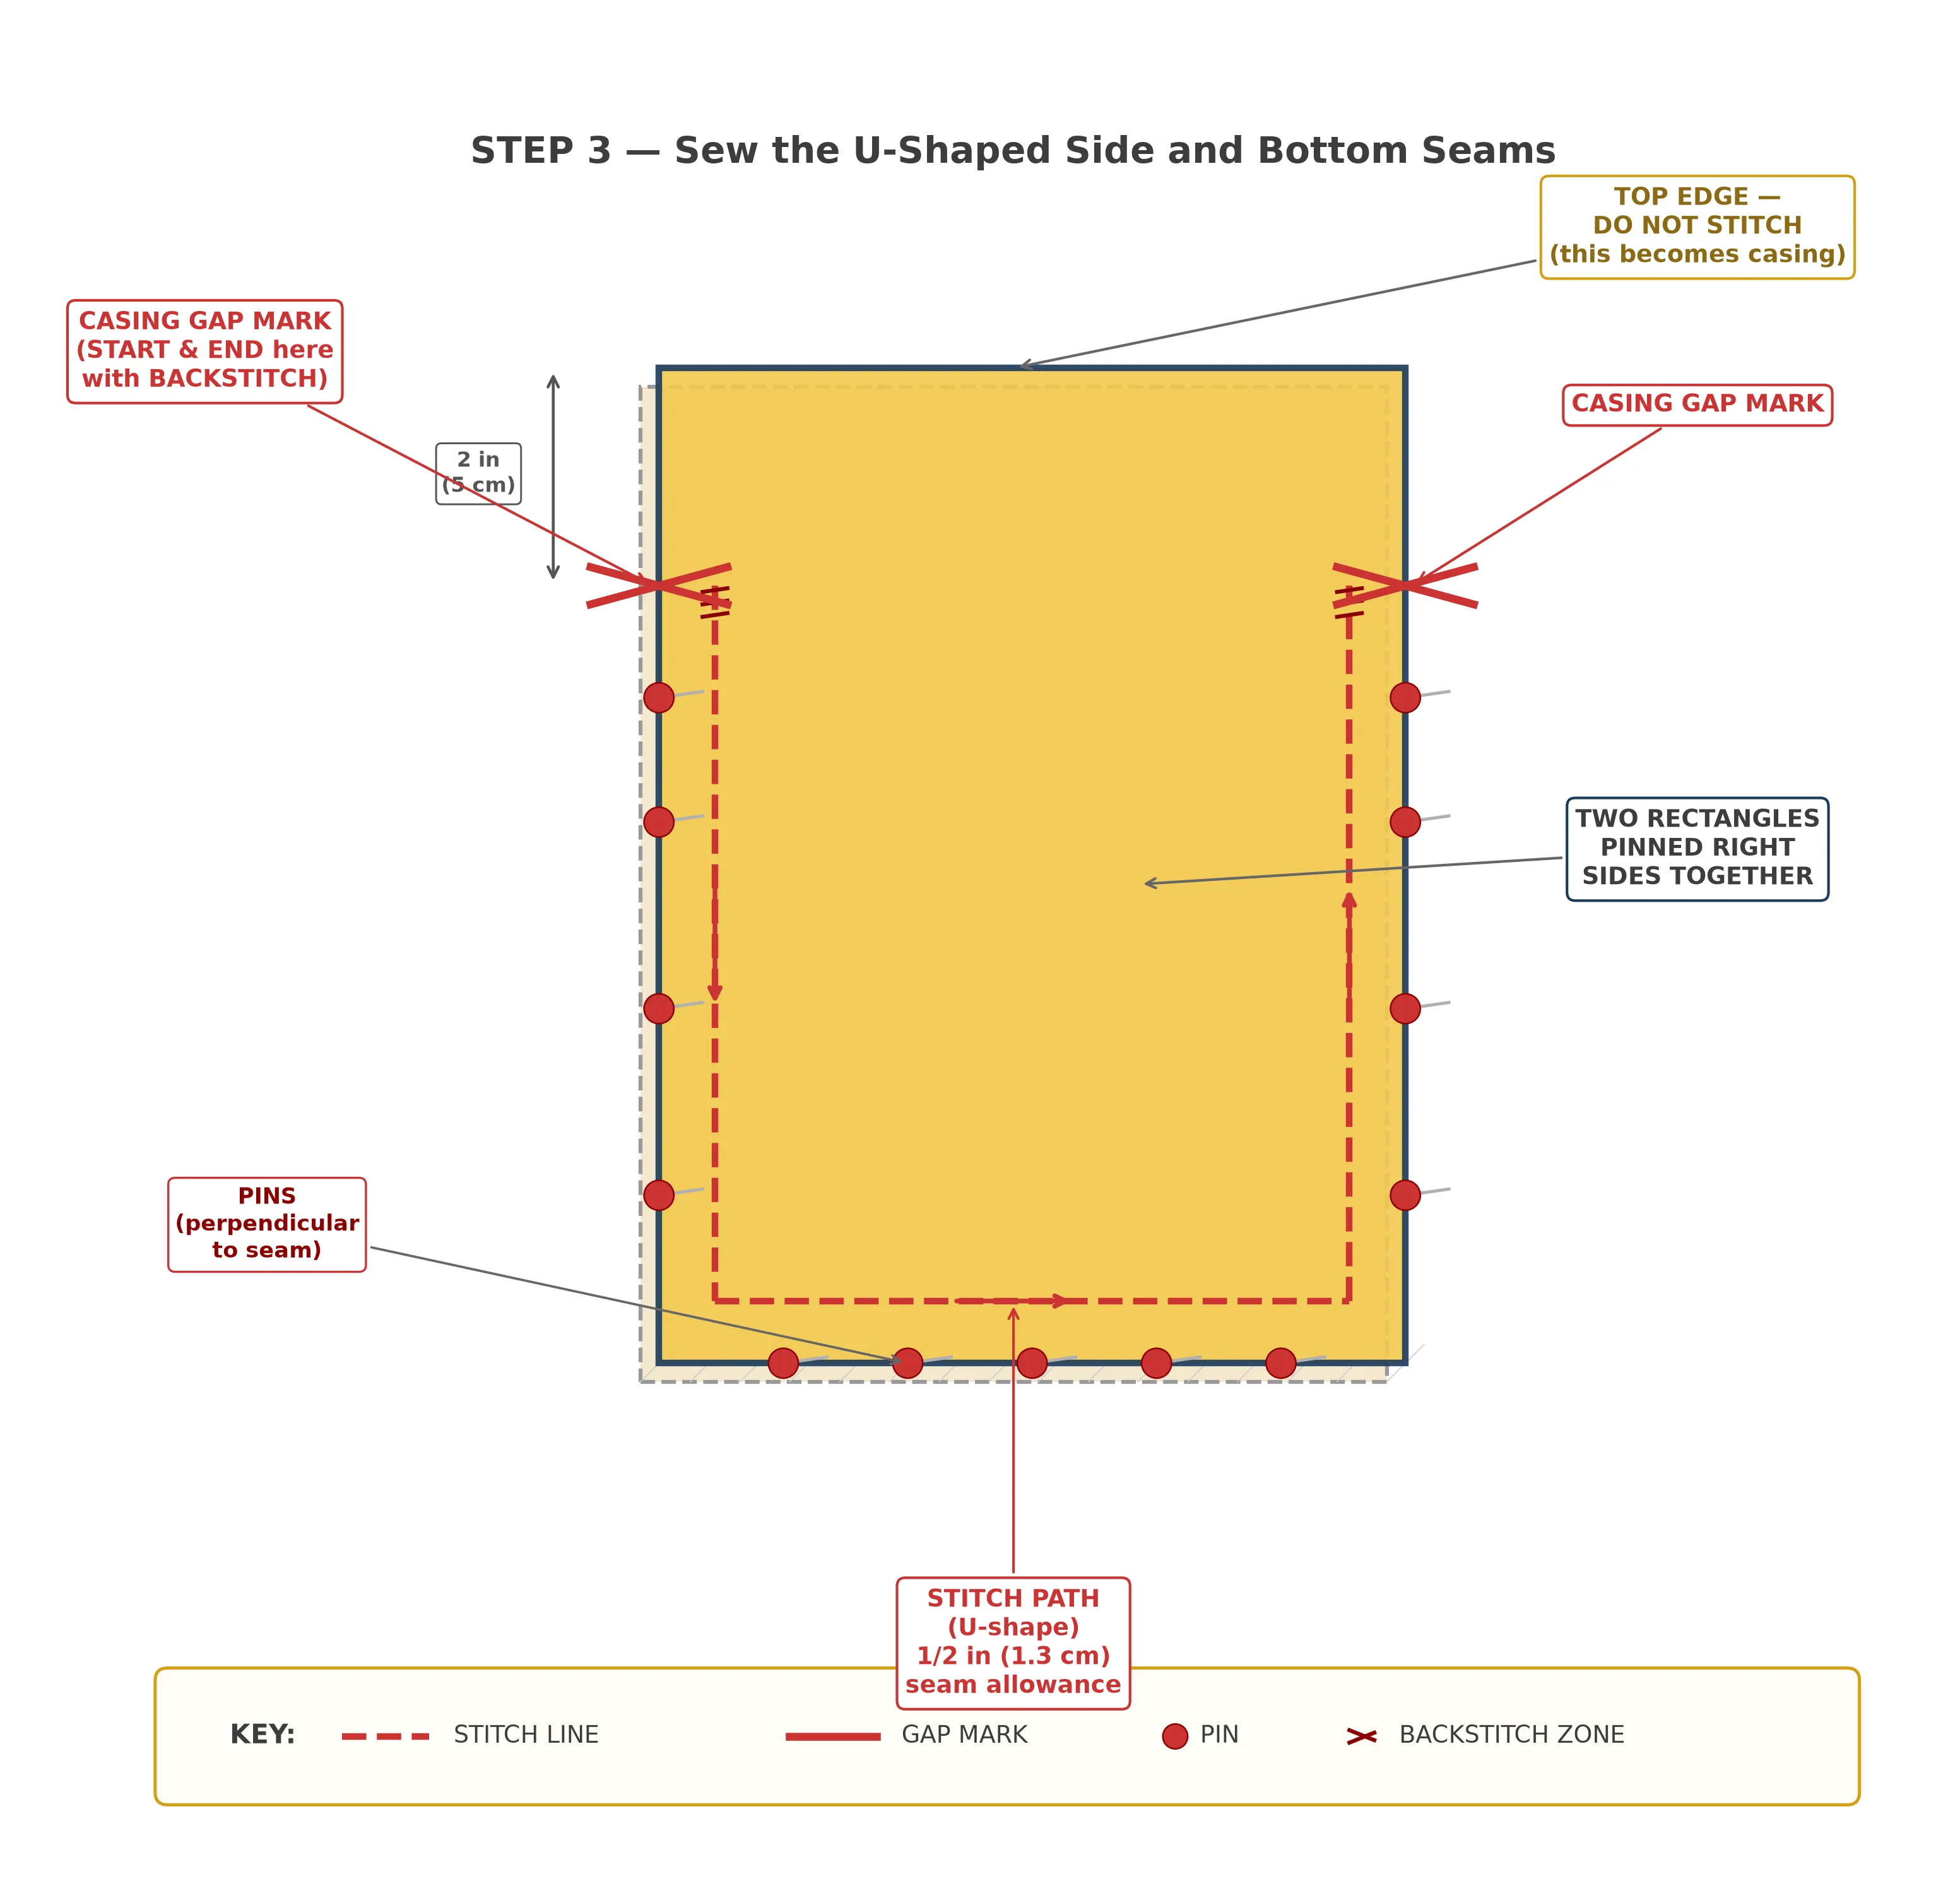
The casing gaps (the unstitched portions at the top of each side seam) have raw, exposed seam allowances. We need to tidy these up so they look clean when the pouch is turned right side out.
- Press the side seam allowances open along the entire length of each side. Open the fabric like a book at each side seam and press the two layers of seam allowance flat in opposite directions.
- At the gap area, fold each raw edge of the seam allowance under by ¼ in (6 mm) and press.
- Stitch close to the folded edge on each side of the gap — about ⅛ in (3 mm) from the fold. This creates a neat, finished frame around the opening.
When finished, each gap should look like a tidy rectangular opening in the side seam, with all raw edges turned under and stitched. This opening is where your ribbon will enter and exit the casing.
This step is where the magic happens. You'll fold the top edge of the pouch to create the casing — the channel through which your ribbon will slide.
- First fold: Fold the top raw edge down by ¼ in (6 mm) toward the wrong side of the fabric. Press with your iron. This small fold tucks the raw edge away.
- Second fold: Fold down again by 1 in (2.5 cm). Press firmly. This creates the actual channel. The raw edge is now completely hidden inside the fold.
- Pin in place around the entire top opening.
- Stitch close to the inner (lower) folded edge, about ⅛ in (3 mm) from the fold, all the way around the top of the pouch. Backstitch where you started to lock the stitch.
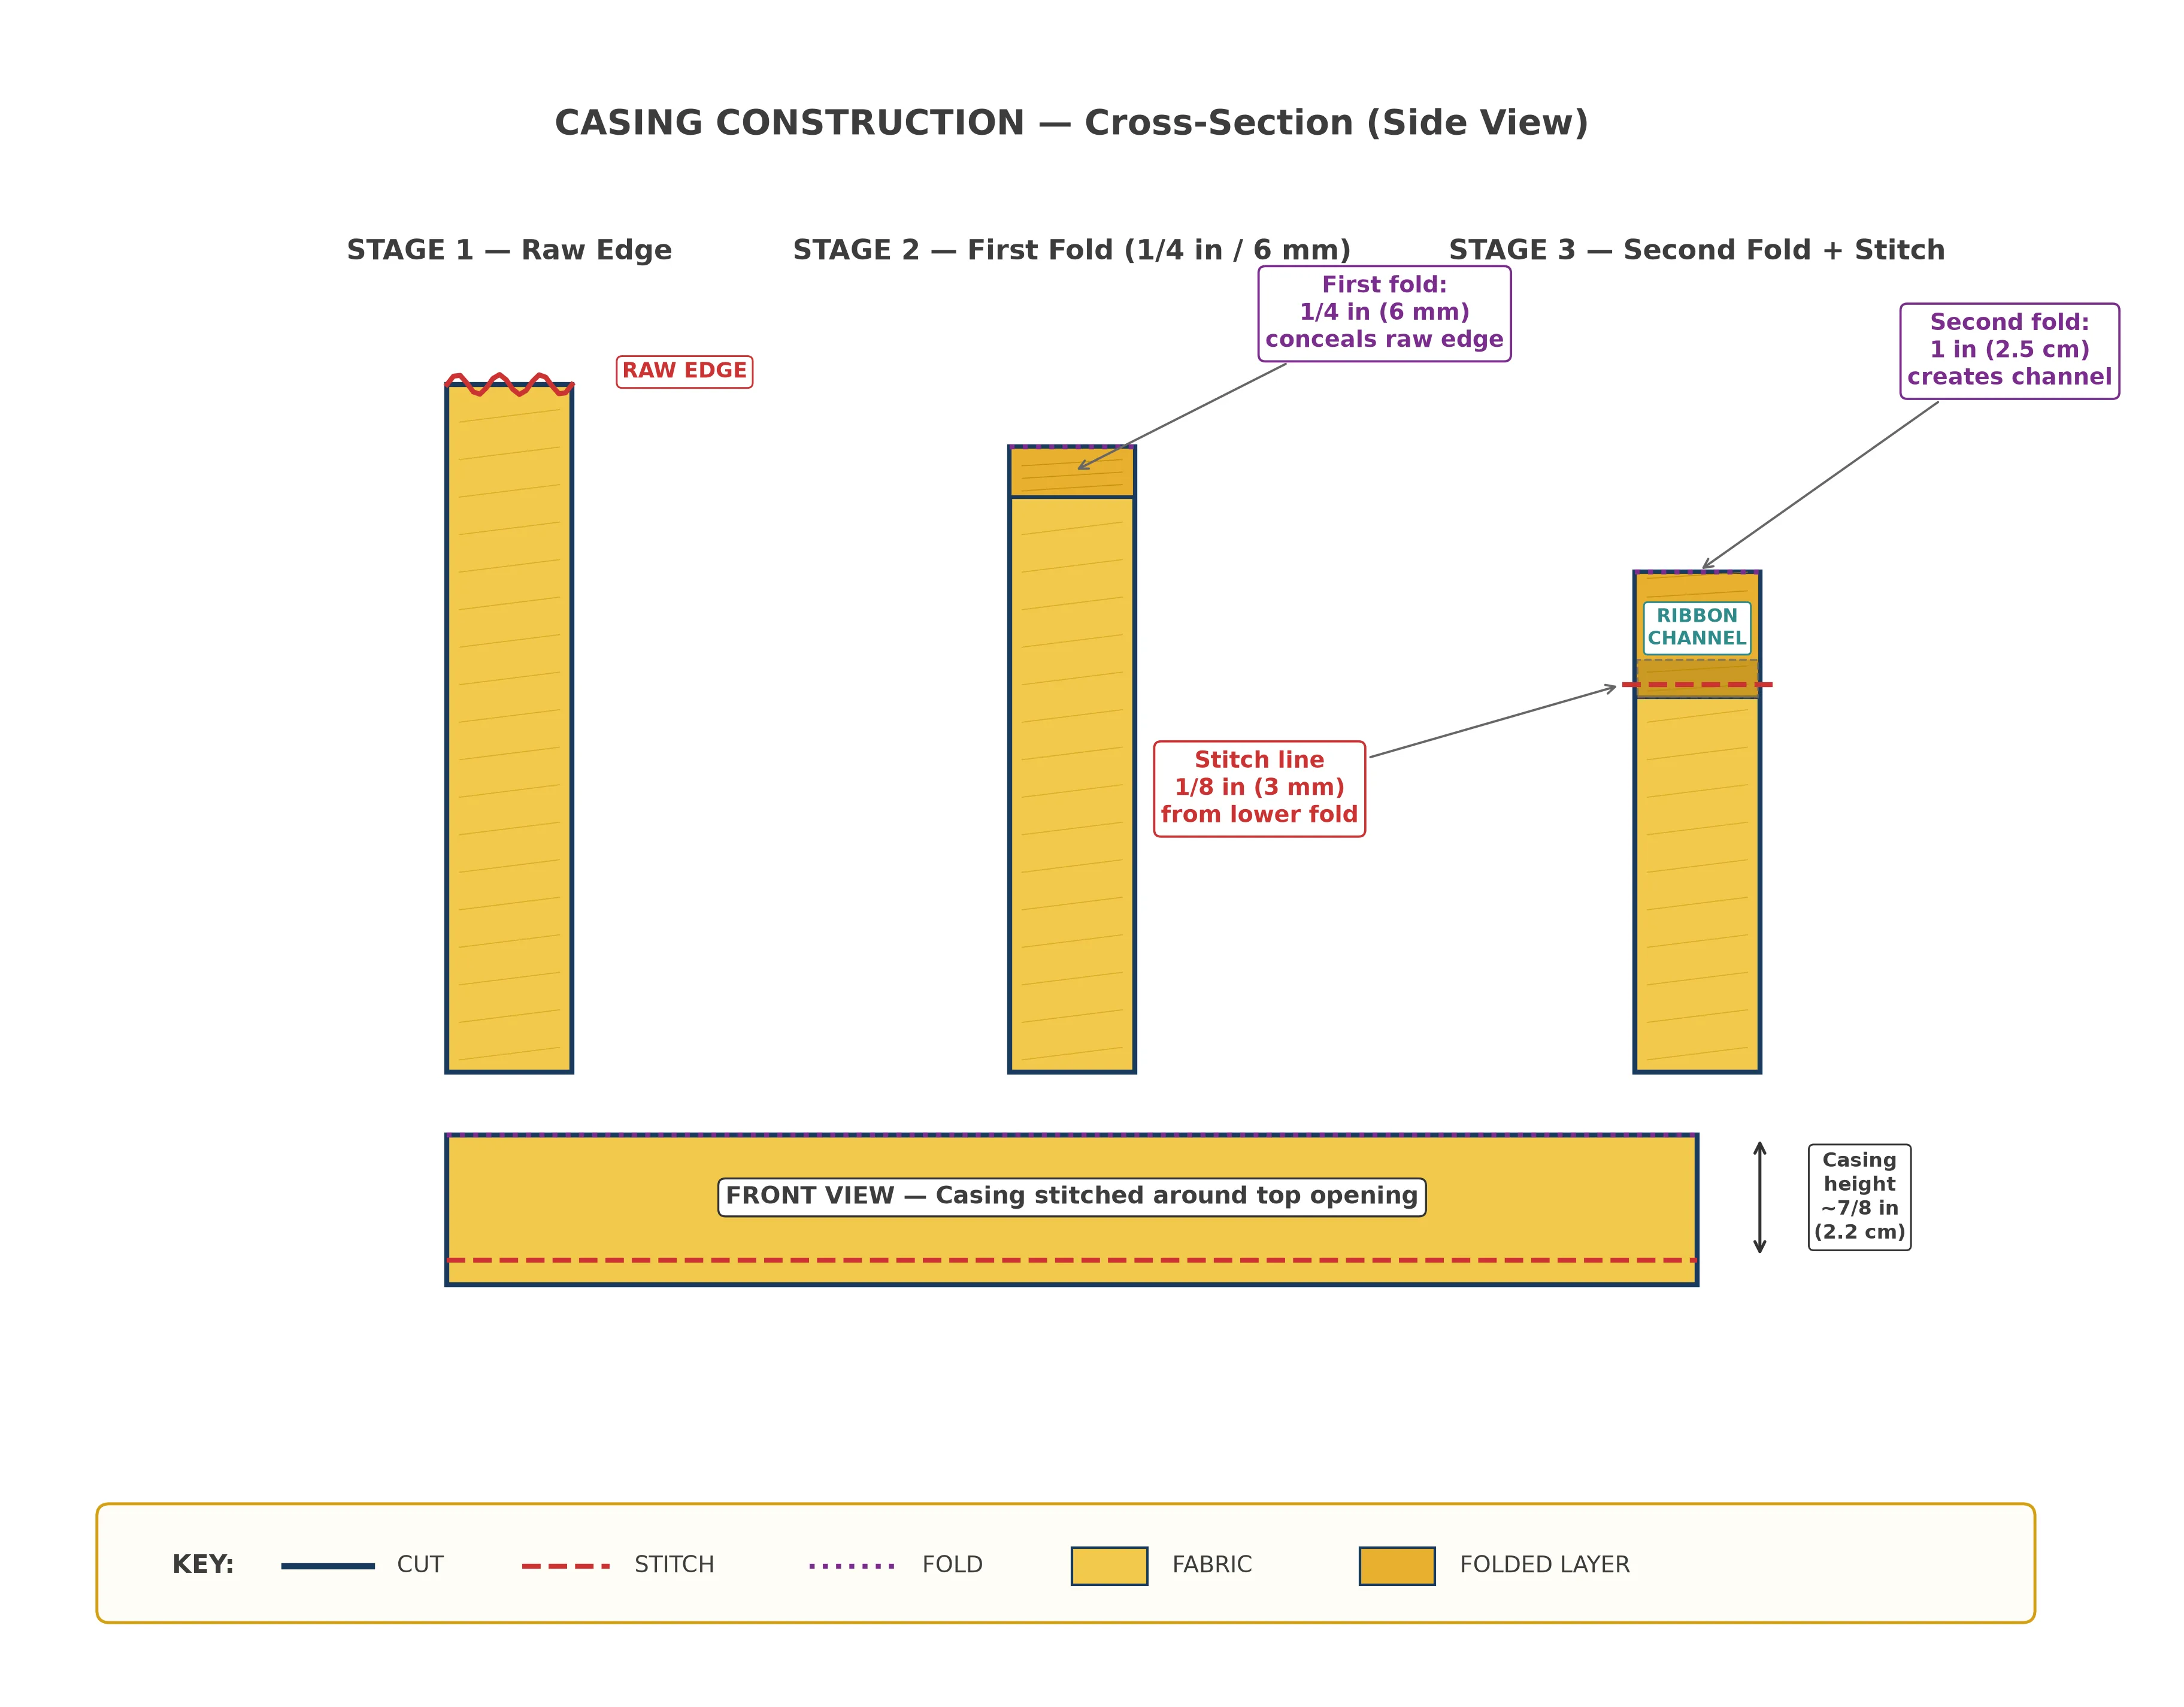
When you've stitched all the way around, you should see a continuous channel running around the entire top of the pouch, interrupted only by the two casing gap openings on the side seams. The channel should be wide enough for your ribbon to slide through freely.
Now for the satisfying part. The double-drawstring method uses two separate ribbons, each threaded from a different side, so the pouch cinches evenly from both directions. Here's how:
- Take Ribbon A. Attach your safety pin to one end. Insert the safety pin into the left casing gap.
- Thread it all the way around — through the front casing, past the right gap, through the back casing, and back out the left gap where you started. Both ends of Ribbon A now hang out from the left side.
- Take Ribbon B. Attach the safety pin to one end. Insert it into the right casing gap.
- Thread it all the way around the opposite direction — through the back casing, past the left gap (pushing past Ribbon A), through the front casing, and back out the right gap. Both ends of Ribbon B now hang out from the right side.
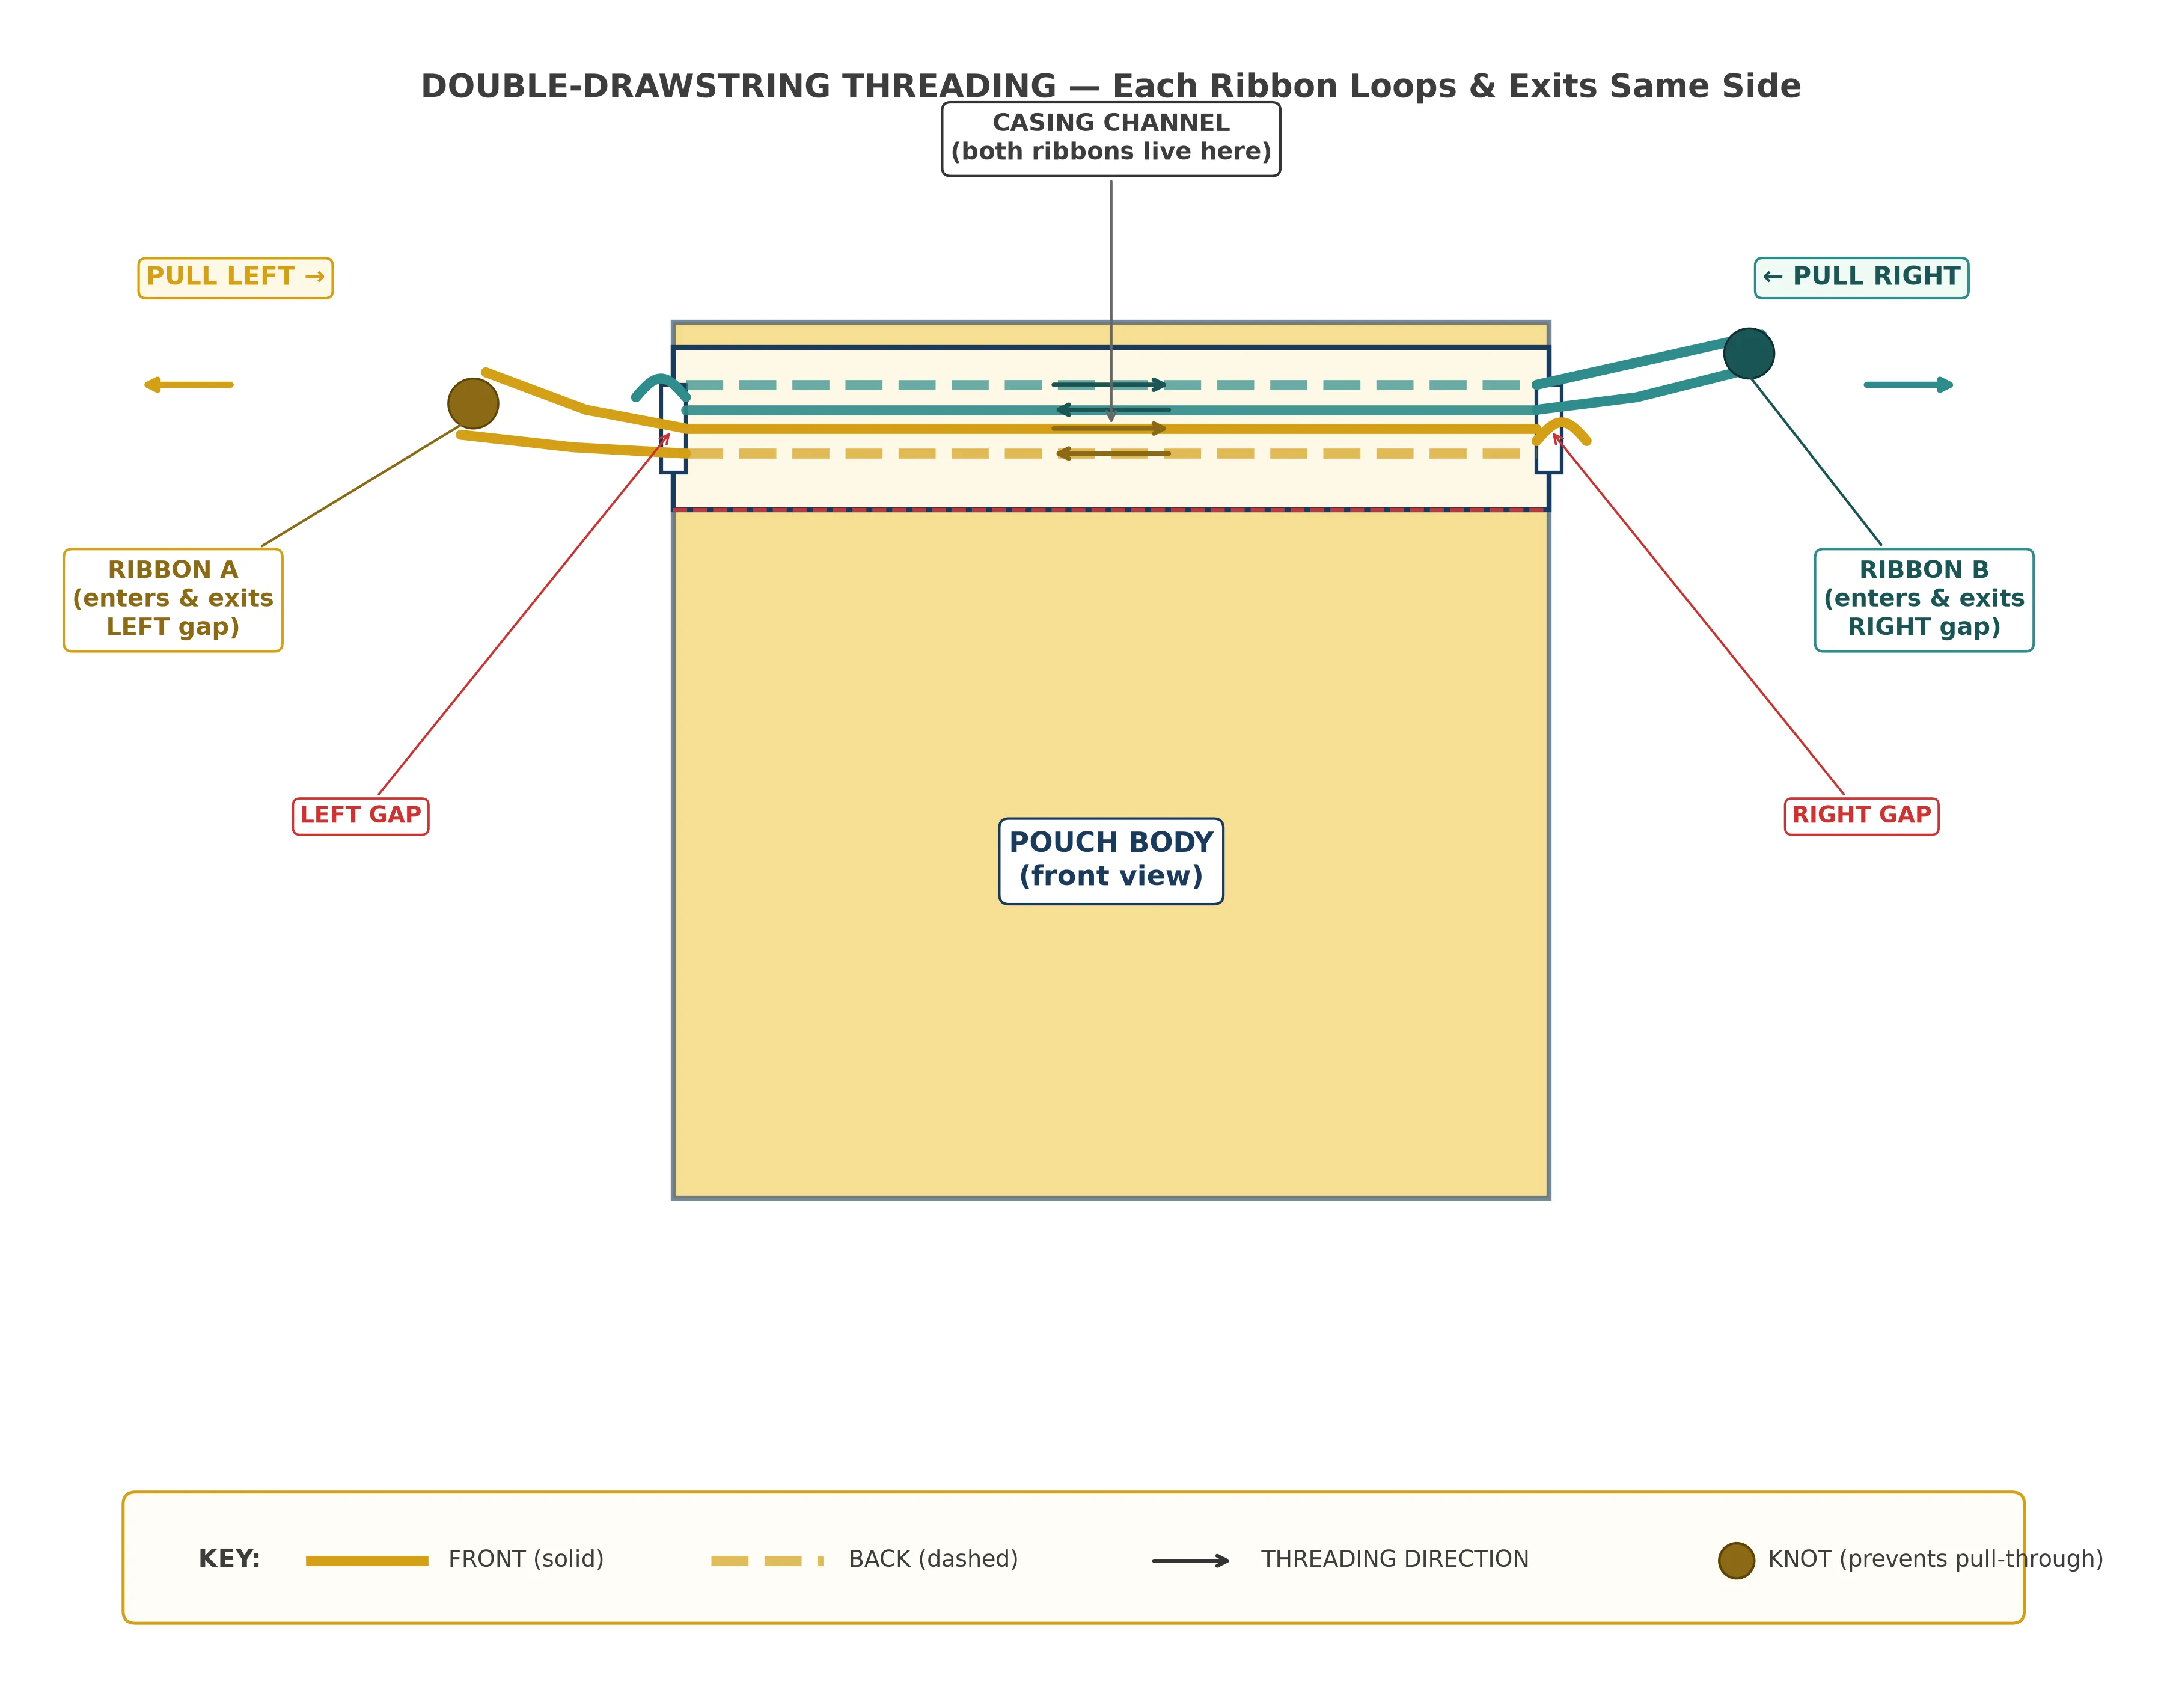
To close the pouch, pull Ribbon A's ends to the left and Ribbon B's ends to the right simultaneously. The top gathers evenly from both sides, creating that beautiful symmetrical cinch.
Almost done! A few finishing touches will make your pouch look polished and gift-ready:
- Knot the ribbon ends: Tie each pair of ribbon ends together in a simple overhand knot. Pull the knot snug so it sits close to the casing gap. This prevents the ribbon from accidentally pulling all the way through the casing.
- Trim the ribbon tails to an even length — about 2–3 in (5–7.5 cm) past the knot looks nice.
- Seal satin ribbon ends: If using satin ribbon, carefully run a lighter flame along each cut end to melt-seal and prevent fraying. Hold the flame near — not touching — the ribbon for just one second.
- Turn right side out: Push the pouch through from the inside so the right side (printed side) faces out. Use a chopstick or the eraser end of a pencil to gently push out the bottom corners so they're nice and crisp.
- Press: Give the finished pouch a final press with your iron for a crisp, professional look. Avoid pressing directly on satin ribbon — press around it, or lay a pressing cloth (any thin cotton fabric) over the ribbon area.
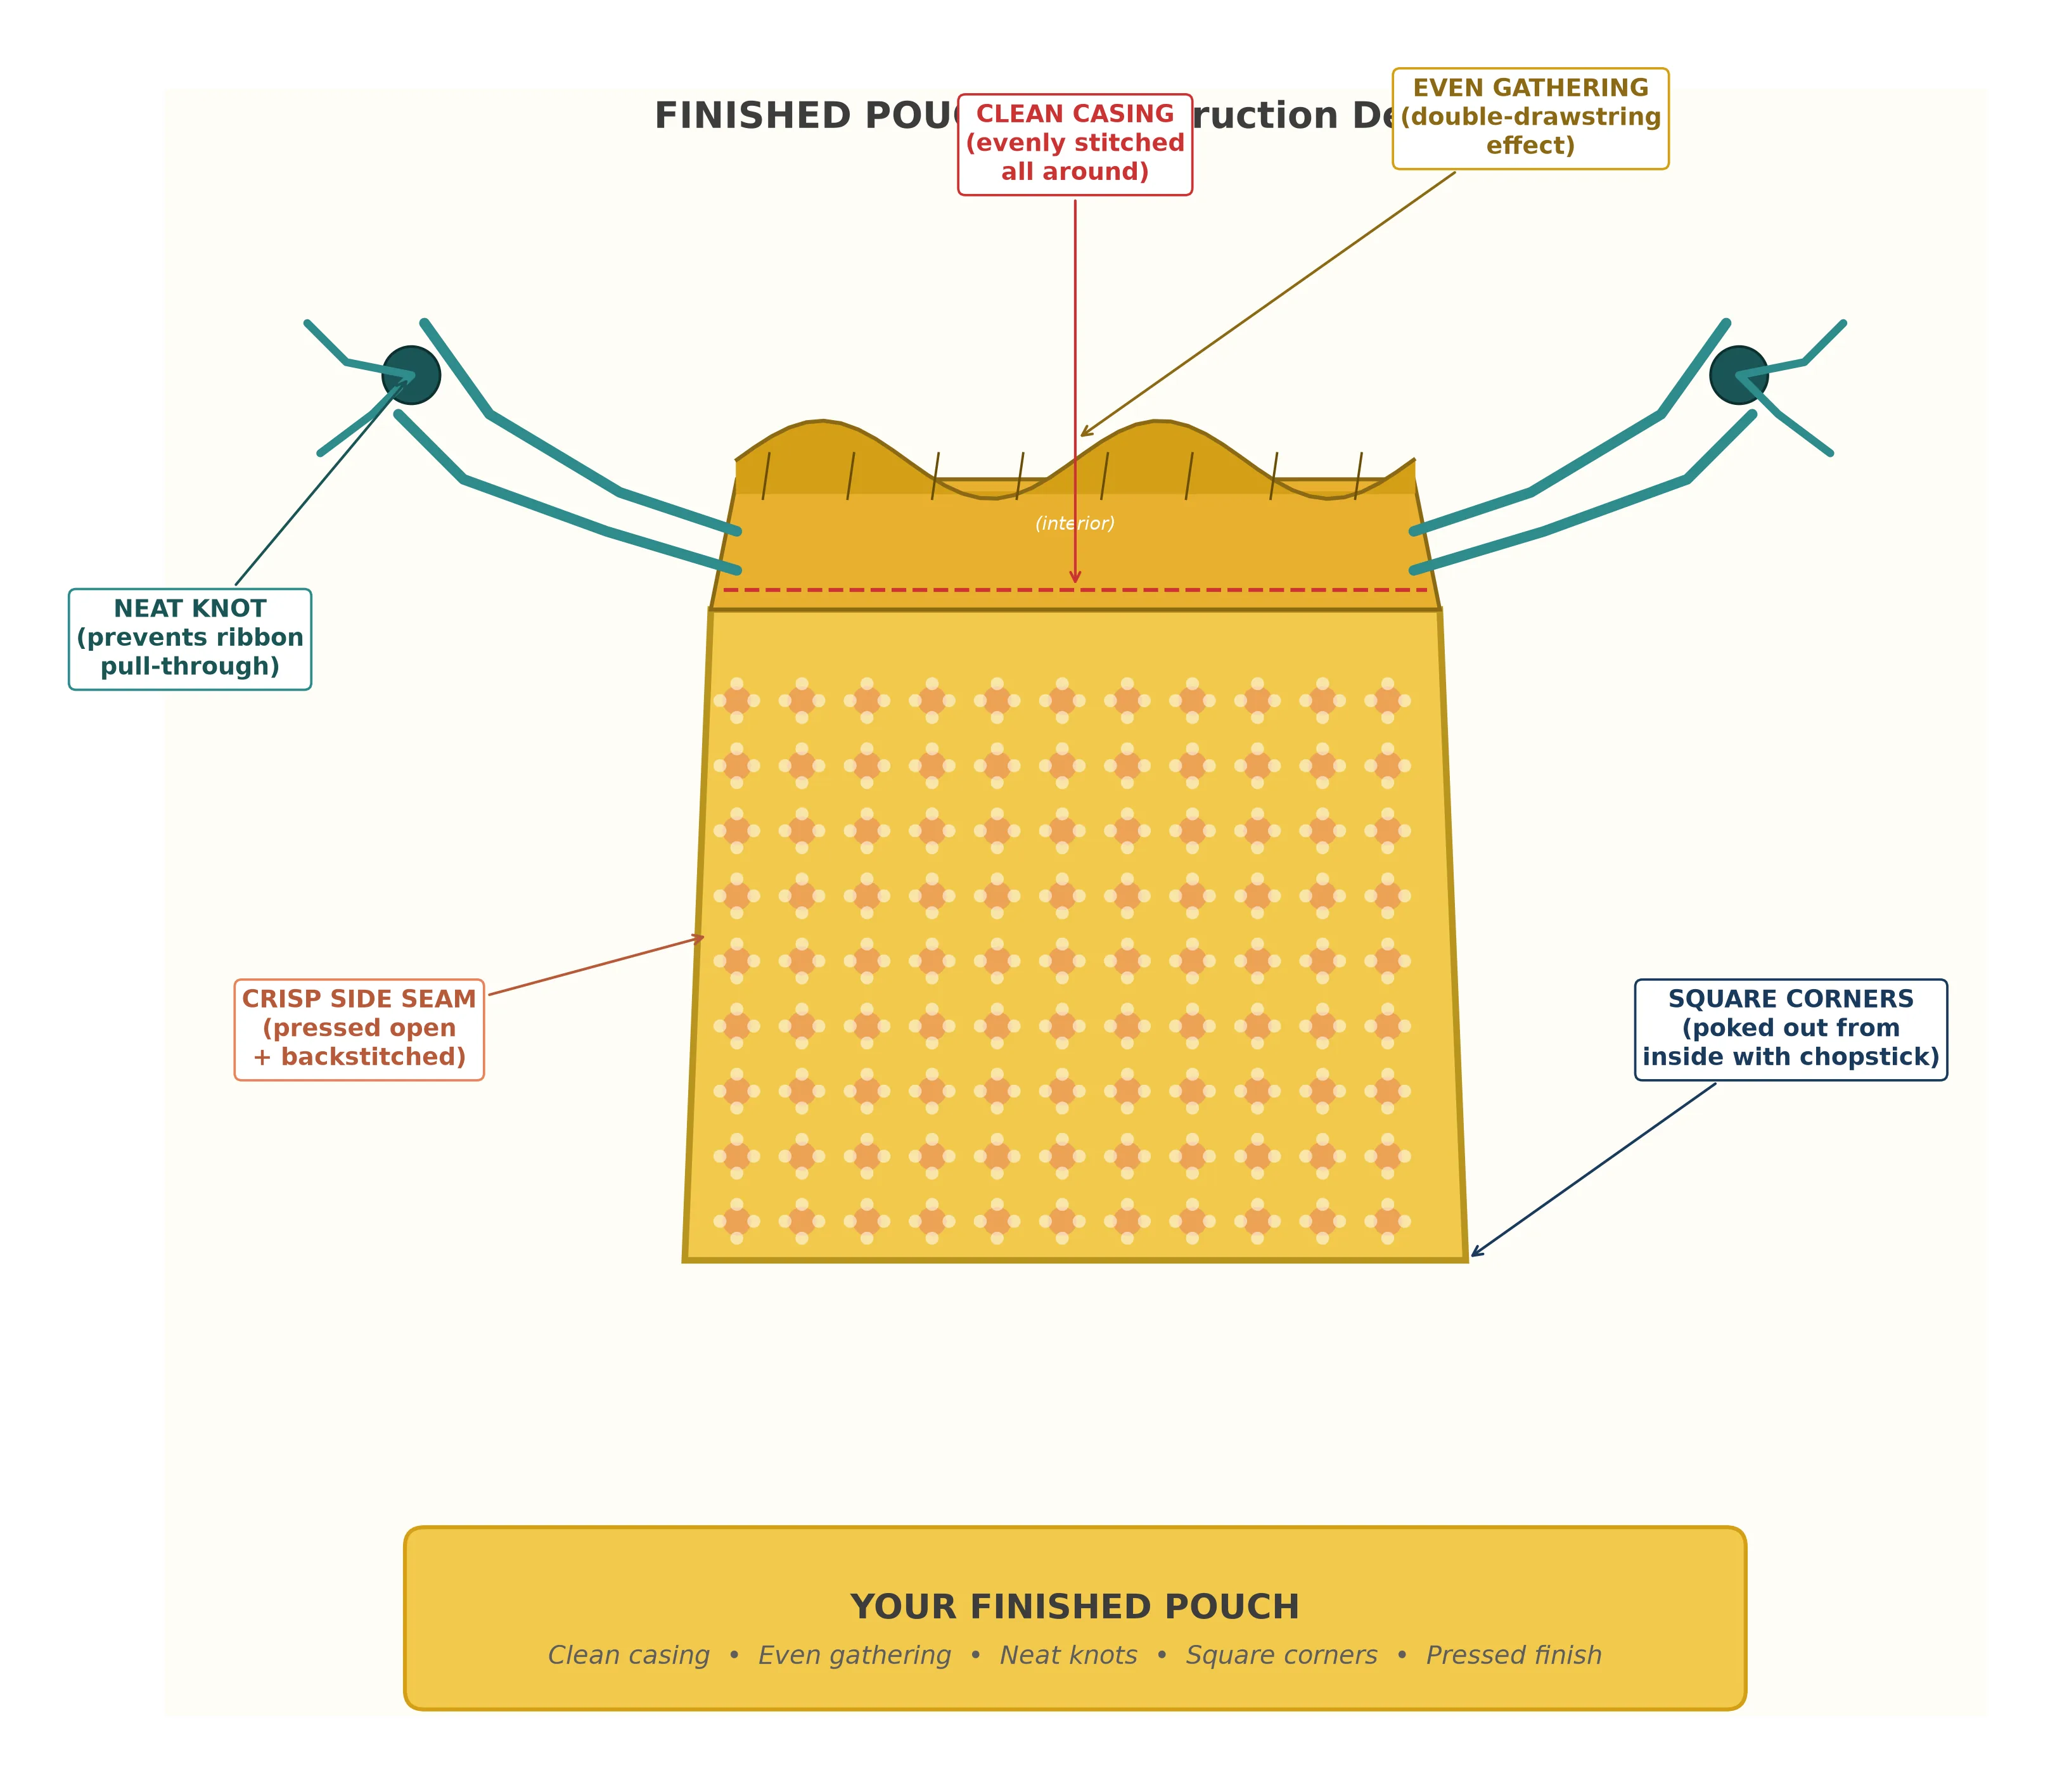
That's it — your drawstring gift pouch is complete! Pull both pairs of ribbon ends to cinch it closed, and admire your handiwork. The first one takes about 30 minutes; the second one takes about 15 once you know the steps.
Cotton vs Linen: Which Fabric Is Best for Drawstring Pouches?
The two most popular choices for drawstring pouches are quilting-weight cotton and linen. Both work beautifully, but they give very different results. Here's how they compare:
| Factor | Quilting Cotton | Linen / Cotton-Linen Blend |
|---|---|---|
| Look & Feel | Crisp, smooth, vibrant prints | Textured, earthy, rustic charm |
| Ease of Sewing | Very easy — minimal shifting | Easy — slightly more slippery when lightweight |
| Pressing | Presses crisply and holds fold | Presses well, may need starch for sharp folds |
| Cost | $8–$14 per yard | $12–$22 per yard |
| Print Options | Thousands of prints available | More limited; often solid or subtle |
| Best For | Colorful gift bags, party favors, children's gifts | Elegant gifts, wedding favors, home storage |
My recommendation for beginners: Start with quilting-weight cotton. It's the most forgiving fabric to work with, it presses beautifully for the casing, and the huge variety of prints means you can match the pouch to any gift or occasion. Save linen for your second or third batch when you're comfortable with the technique.
Fabrics to avoid for your first pouches: satin (too slippery), canvas or denim (too thick for the casing), knits (too stretchy), and sheer fabrics like chiffon (too flimsy to hold a shape). You want a fabric that's medium-weight, woven, and holds a crease. If you can fold it in half and the fold stays put when you set the iron down, it's perfect.
Variations and Creative Ideas
Once you've mastered the basic pouch, here are four ways to customize it. Each variation adds just 5–10 minutes to the project and takes your pouches from "nice" to "how did you make that?"
Two-Tone Contrast
Use one fabric for the front rectangle and a coordinating print for the back. When the pouch is cinched, both fabrics show at the gathered top, creating a beautiful two-tone effect. Choose a bold print for one side and a matching solid for the other.
Lined Luxury
Add a lining by cutting two additional rectangles in a coordinating fabric. Sew the outer and lining separately, then join them at the top edge. The lining hides all raw seams inside and looks stunning when you peek inside the pouch. This works beautifully for wedding favors or boutique packaging.
Stamped or Stenciled
Use a plain muslin or solid cotton and add a hand-stamped design with fabric ink before sewing. Monograms, "Thank You" messages, or simple geometric stamps transform plain fabric into something personal. Let the ink dry and heat-set it with an iron before cutting and sewing.
Pinking Shears Finish
For a quick, no-fray decorative edge, use pinking shears (scissors with zigzag blades) to trim the top raw edge before folding the casing. The zigzag cut peeks out slightly above the casing fold, adding a charming handmade detail. Best with tightly woven cotton that doesn't fray easily.
You can also experiment with different drawstring materials: try leather cord for a rustic look, waxed cotton string for a nautical vibe, or chunky yarn for a playful children's gift bag. The casing channel is wide enough to accommodate most cord types up to ¼ in (6 mm) diameter.
If you're making pouches for a specific event like a wedding or baby shower, consider Mood Fabrics' cotton selection guide for choosing the perfect print. And for premium ribbon and cord, Wawak Sewing Supplies has an excellent selection at wholesale prices.
What Makes This Tutorial Different
There are plenty of drawstring bag tutorials online. Here's what I've done differently to make this one the most useful version you'll find:
- Exact measurements in three sizes — not a vague "cut a rectangle." Every dimension includes seam and casing allowances already calculated, in both inches and centimeters.
- Double-drawstring method — most basic tutorials use a single drawstring, which cinches unevenly. The double-drawstring method gives a professional, symmetrical closure.
- Casing gap technique — I explain the gap in the side seam (and how to finish it neatly) in a way that makes the threading step completely intuitive.
- Full diagrams — cutting layout, pattern piece anatomy, cross-sections, and threading path are all illustrated so you never have to guess.
- Technique transfer — the casing technique you learn here is the exact same method used for elastic casings in garments. Once you can make a pouch casing, you already understand how to make an elastic-waist skirt or a cased pillowcase opening.
Frequently Asked Questions
What is the best fabric for a drawstring gift pouch?
Quilting-weight cotton is the best fabric for a beginner drawstring gift pouch. It's easy to cut, presses crisply, feeds smoothly through a sewing machine, and comes in hundreds of prints. Linen and cotton-linen blends also work beautifully and add a slightly more rustic, textured look. Avoid slippery fabrics like satin or polyester charmeuse for your first pouches — they shift while sewing and are much harder to press.
How much fabric do I need to sew a drawstring pouch?
For a small gift pouch (approximately 5 × 5 inches finished), you need just ¼ yard (0.25 m) of 44-inch-wide fabric. For a medium pouch, ⅓ yard (0.3 m) is sufficient. For a large pouch, ½ yard (0.5 m) gives you plenty of fabric. If you want to make all three sizes from the same fabric, ¾ yard (0.7 m) is enough for one of each.
Can I use cord instead of ribbon for the drawstring?
Absolutely. Cotton cord (sometimes called macramé cord or cotton piping cord) works perfectly and gives a more casual, natural look. Use ⅛ in to ¼ in (3–6 mm) diameter cord. You can also use twine, leather cord, or even shoelaces. Satin ribbon gives a more gift-worthy, polished finish. Just make sure whatever you choose can fit through the casing channel with room to slide freely.
What is a casing in sewing?
A casing is a fabric tunnel or channel created by folding and stitching fabric, through which you thread elastic, ribbon, cord, or drawstring. It's one of the most useful beginner techniques in sewing. To create a casing, you fold the raw edge of the fabric under twice, press it flat, and stitch along the inner fold — this creates a hollow tube inside the folded fabric. In this drawstring pouch, the casing sits at the top opening of the bag.
How do I make a drawstring pouch with two drawstrings?
To create a double-drawstring pouch that cinches from both sides, you need two separate ribbon or cord pieces and two casing gap openings (one on each side seam). Thread the first ribbon through one gap, all the way around the full casing, and back out the same gap. Thread the second ribbon through the opposite gap, all the way around, and back out that same gap. When you pull both pairs of ribbon ends in opposite directions, the pouch closes neatly from both sides.
Can I line a drawstring pouch for a more finished look?
Yes, you can line a drawstring pouch by cutting four rectangles (two outer, two lining) instead of two. Sew the outer pieces together and the lining pieces together separately, then join them at the top edge with the casing gap only in the outer layer. The lined version hides all raw seam allowances inside and gives the pouch a more professional, gift-ready finish. It adds about 10–15 minutes to the project.
What to Sew Next
Congratulations — you've just sewn your first drawstring gift pouch! You now have a handle on straight-line stitching, backstitching for reinforcement, pressing seam allowances, and the casing technique. Those skills are the foundation for dozens of sewing projects.
If you're feeling the momentum (and I bet you are — pouches are seriously addictive), I'd encourage you to make a few more in different sizes. Every pouch gets a little faster and a little neater than the last. The casing technique you just learned is the exact same method you'll use to sew a simple elastic-waist skirt later in this series — the only difference is that you'll thread elastic instead of ribbon.
For more beginner sewing projects, check out Tilly and the Buttons' beginner guides — they're some of the warmest and most approachable sewing resources on the web.
Ready for your next project? The fabric key fob is up next in this series, and it takes just 20 minutes. You'll learn topstitching and working with metal hardware — two skills that open up a whole new world of accessories and bag-making.
Continue Exploring
You Just Made Something Beautiful
Your first drawstring pouch is done. Fill it with a gift, pull those ribbons, and watch the smile on someone's face when they realize the wrapping itself is handmade. Now go make five more — you've got this.