How to Sew a Padded Laptop Sleeve with Zipper
Your gateway zipper project — a fully lined, padded sleeve that fits your laptop like a glove, in 13" and 15" sizes.
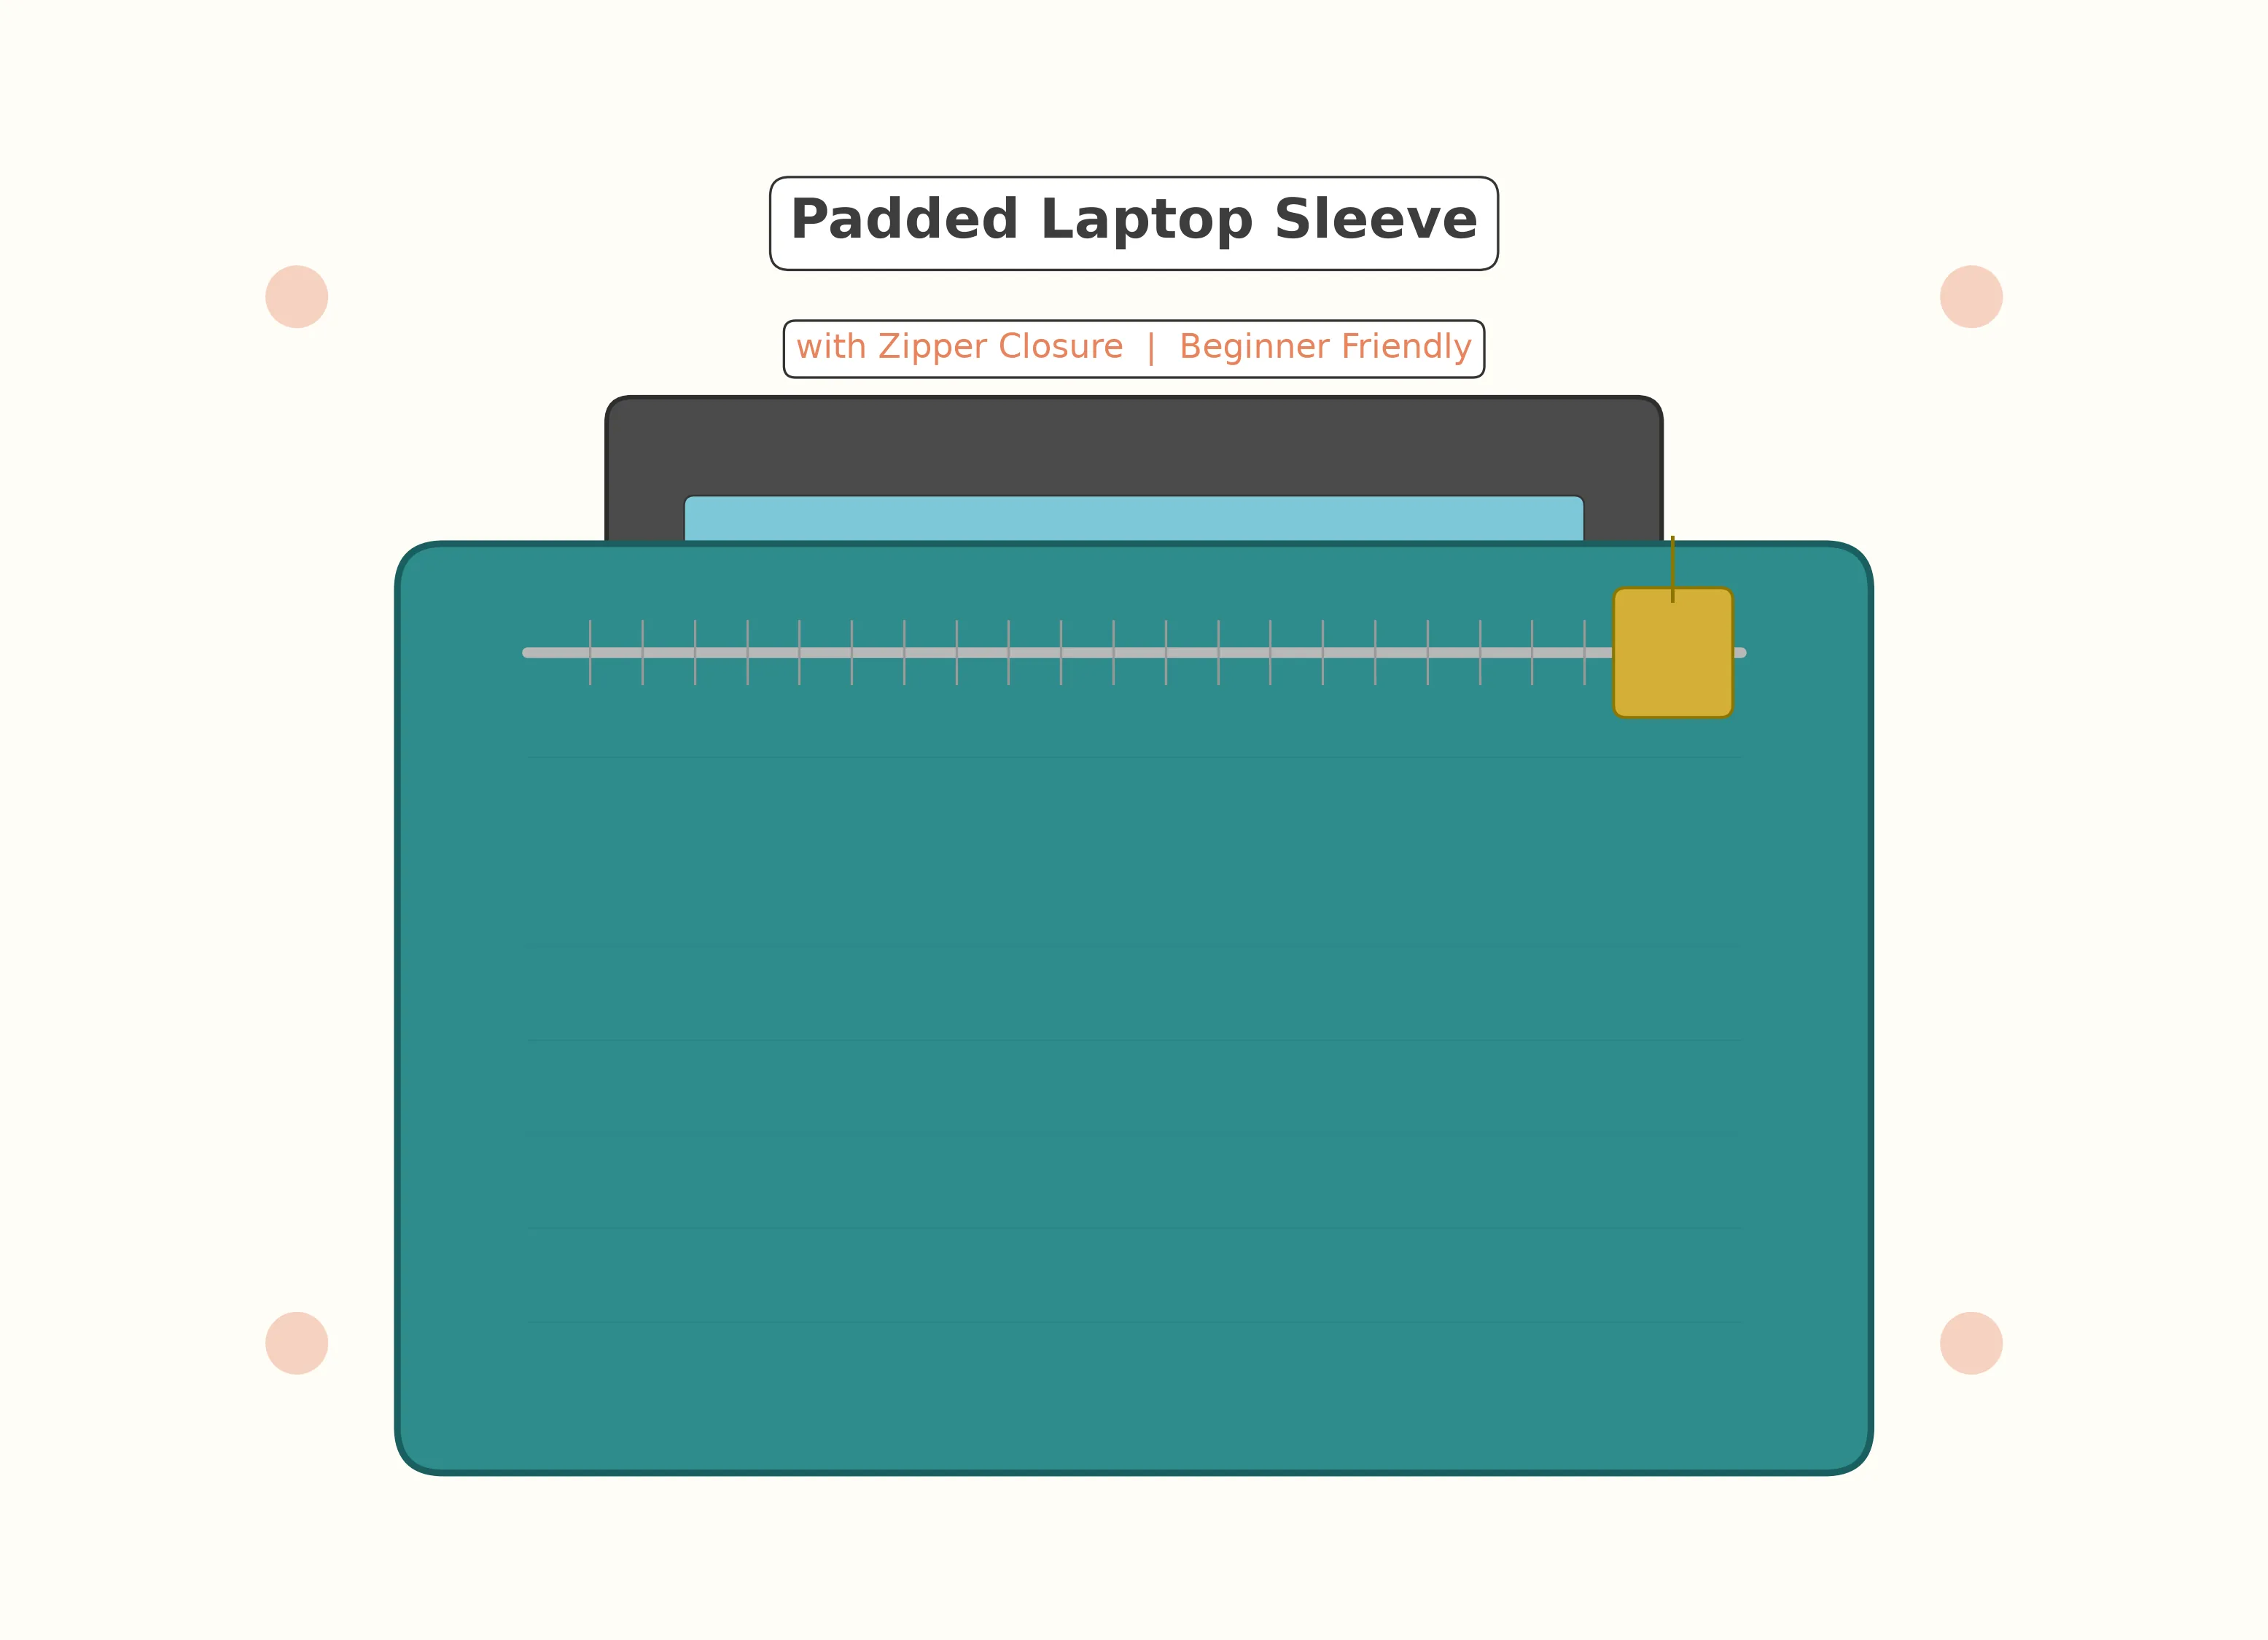
If you've been dreading your first zipper project, this is the tutorial that will change your mind. A padded laptop sleeve is the ideal gateway: the zipper runs along a single straight edge with no corners, no curves, and no fiddly placket construction. You install it once, open it halfway, and the rest is just straight stitching around three sides.
In this tutorial I'll walk you through making a fully lined, padded sleeve sized to fit either a 13-inch or 15-inch laptop. You'll learn the zipper sandwich method — the cleanest, most beginner-friendly way to install a zipper between two fabric layers — and finish with a professional, custom-fit case that cost under $15 to make.
What makes this tutorial different
Most laptop sleeve patterns online give you a basic rectangle with no padding, or they jump straight into complex zipper plackets that overwhelm new sewists. This tutorial takes the middle road: real foam padding that actually protects your device, combined with the simplest possible zipper installation — a straight line between two fabric layers.
By the time you finish, you'll have learned four transferable skills: working with foam interfacing, the zipper sandwich method, fully-lined construction, and the "leave a gap, turn right side out" technique used in nearly every bag pattern. Every one of these skills shows up again in more advanced bag projects later in this series.
Real protection, not just a cover
Store-bought laptop sleeves are often thin neoprene with almost no shock absorption. By using fusible foam interfacing like ByAnnie's Soft and Stable or Pellon Flex-Foam, your handmade sleeve has roughly 10x the padding of a drugstore version — and it's custom-fit to your exact device.
Need more hardware skills? Jump to our fabric key fob tutorial for topstitching practice, or skip ahead to the crossbody phone bag for the full capstone project.
Size chart & measurements
This pattern works for any device — the measurements adjust based on what you're protecting. Here's a quick reference for the most common laptop sizes:
| Device | Panel Size | Zipper Length | Fabric Needed |
|---|---|---|---|
| 13" laptop (MacBook Air, etc.) | 14 × 10.5 in (35.5 × 26.5 cm) | 14 in (36 cm) | 1/2 yd (45 cm) |
| 15" laptop (MacBook Pro, etc.) | 16 × 11.5 in (40.5 × 29 cm) | 16 in (41 cm) | 1/2 yd (45 cm) |
| iPad Pro 12.9" | 13.75 × 9.75 in (35 × 25 cm) | 13 in (33 cm) | 3/8 yd (34 cm) |
| Standard iPad 10.9" | 11 × 8 in (28 × 20.5 cm) | 10 in (25 cm) | 3/8 yd (34 cm) |
Custom sizing formula
For any device not listed above, use this formula:
- Panel length = device length + 1 in (2.5 cm)
- Panel width = device width + 1 in (2.5 cm)
- Zipper = at least 1 in (2.5 cm) longer than panel length
Manufacturer "screen sizes" (13-inch, 15-inch) refer to the diagonal screen measurement, not the full laptop dimensions. Always measure your closed laptop with a ruler — real dimensions can vary by half an inch between models with the same screen size.
Materials & tools
What you'll need
Fabric & Padding
- Outer: 1/2 yd medium-weight cotton or canvas
- Lining: 1/2 yd quilting cotton
- Foam interfacing: 1/2 yd (ByAnnie's Soft and Stable or Pellon Flex-Foam)
- Zipper: 14 in (36 cm) for 13" laptop
- Coordinating all-purpose thread
Tools
- Sewing machine with zipper foot
- Rotary cutter and cutting mat
- Clear quilting ruler 6 × 24 in
- Iron and pressing cloth
- Sharp fabric scissors
- Fabric clips (recommended) or pins
- Measuring tape for your device
Choosing your fabric
The outer fabric needs enough body to look good with the padding behind it, but not so much weight that your machine struggles with multiple layers at the seams.
Canvas vs. quilting cotton for the outer
- Medium-weight canvas or duck cloth — my top pick. Durable, structured, hides zipper stitching well. Use 8-10 oz weight.
- Home decor cotton — beautiful prints available, slightly heavier than quilting cotton, works great with foam interfacing.
- Quilting cotton — fine if you add fusible mid-weight interfacing before the foam. Alone, it's too thin.
- Denim — excellent choice. Wash first to pre-shrink.
- Avoid — slippery fabrics, stretchy knits, laminated cotton (hard to sew through the padding).
Lining fabric
Quilting cotton in a soft, smooth print is ideal. The lining is what touches your device, so avoid anything scratchy or rough. A fun printed lining (contrasting the outer) is one of my favorite details — a little surprise every time you unzip.
Cutting layout
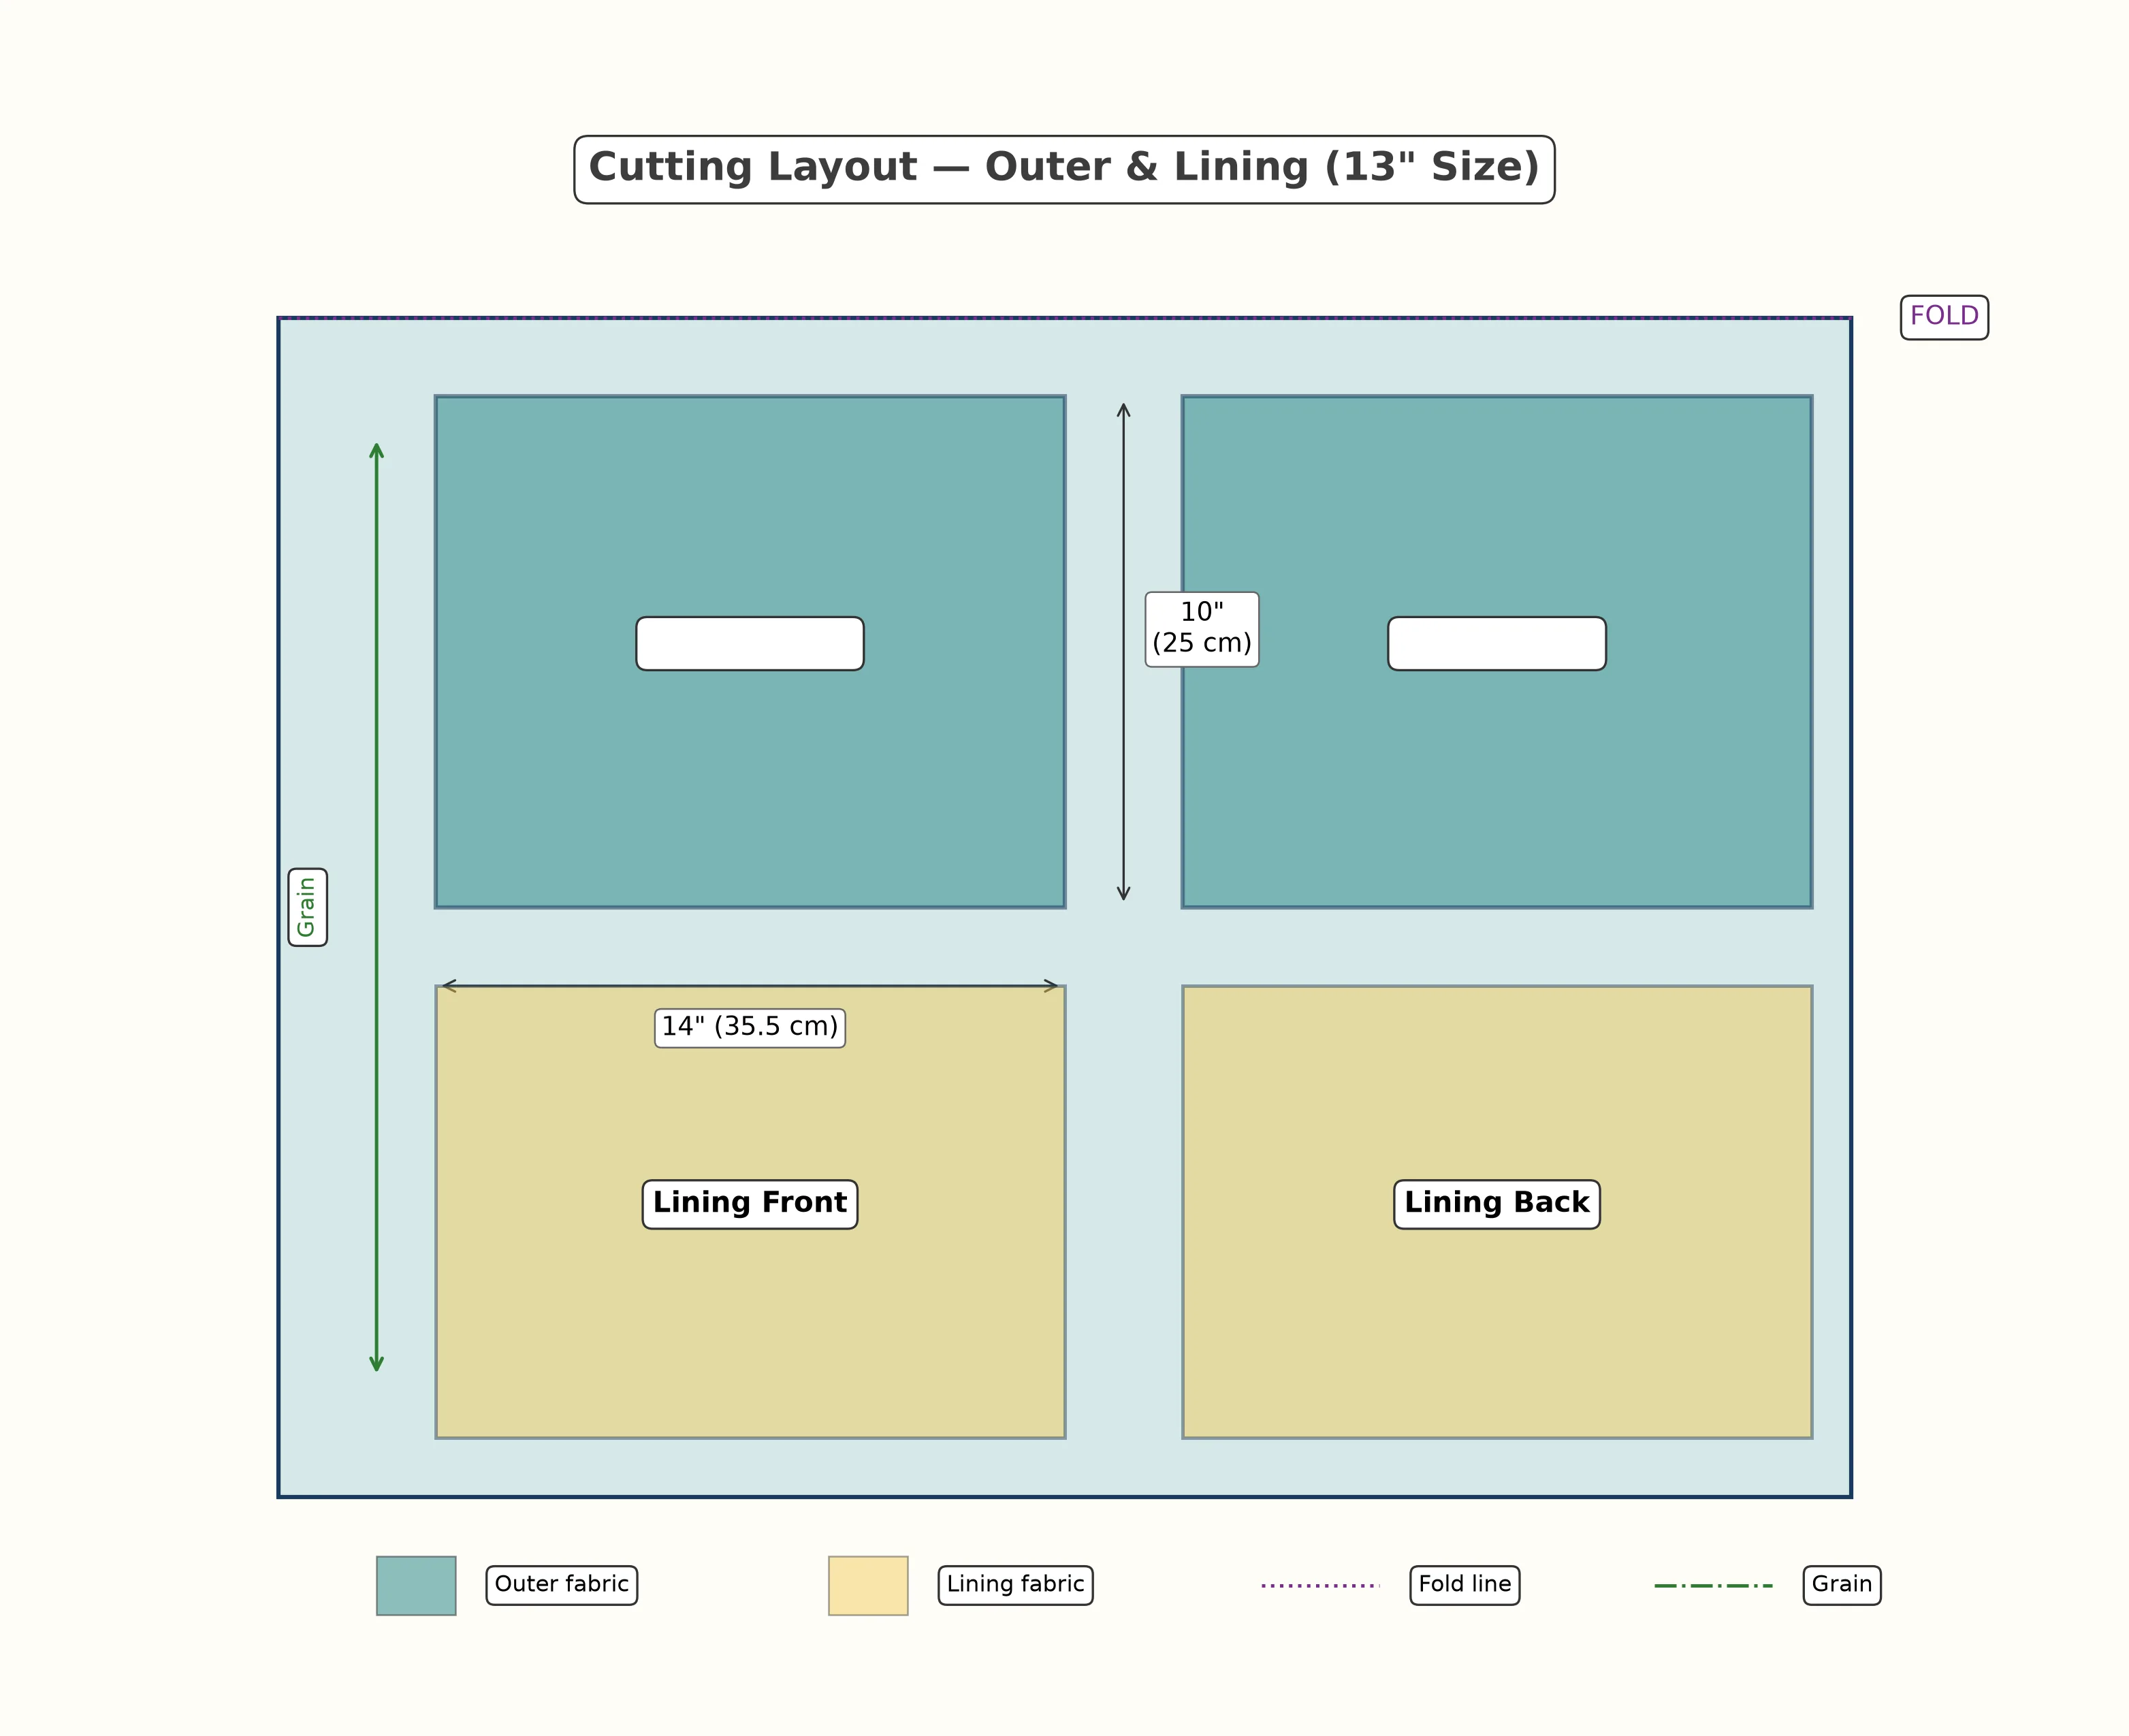
Cutting list (13" laptop)
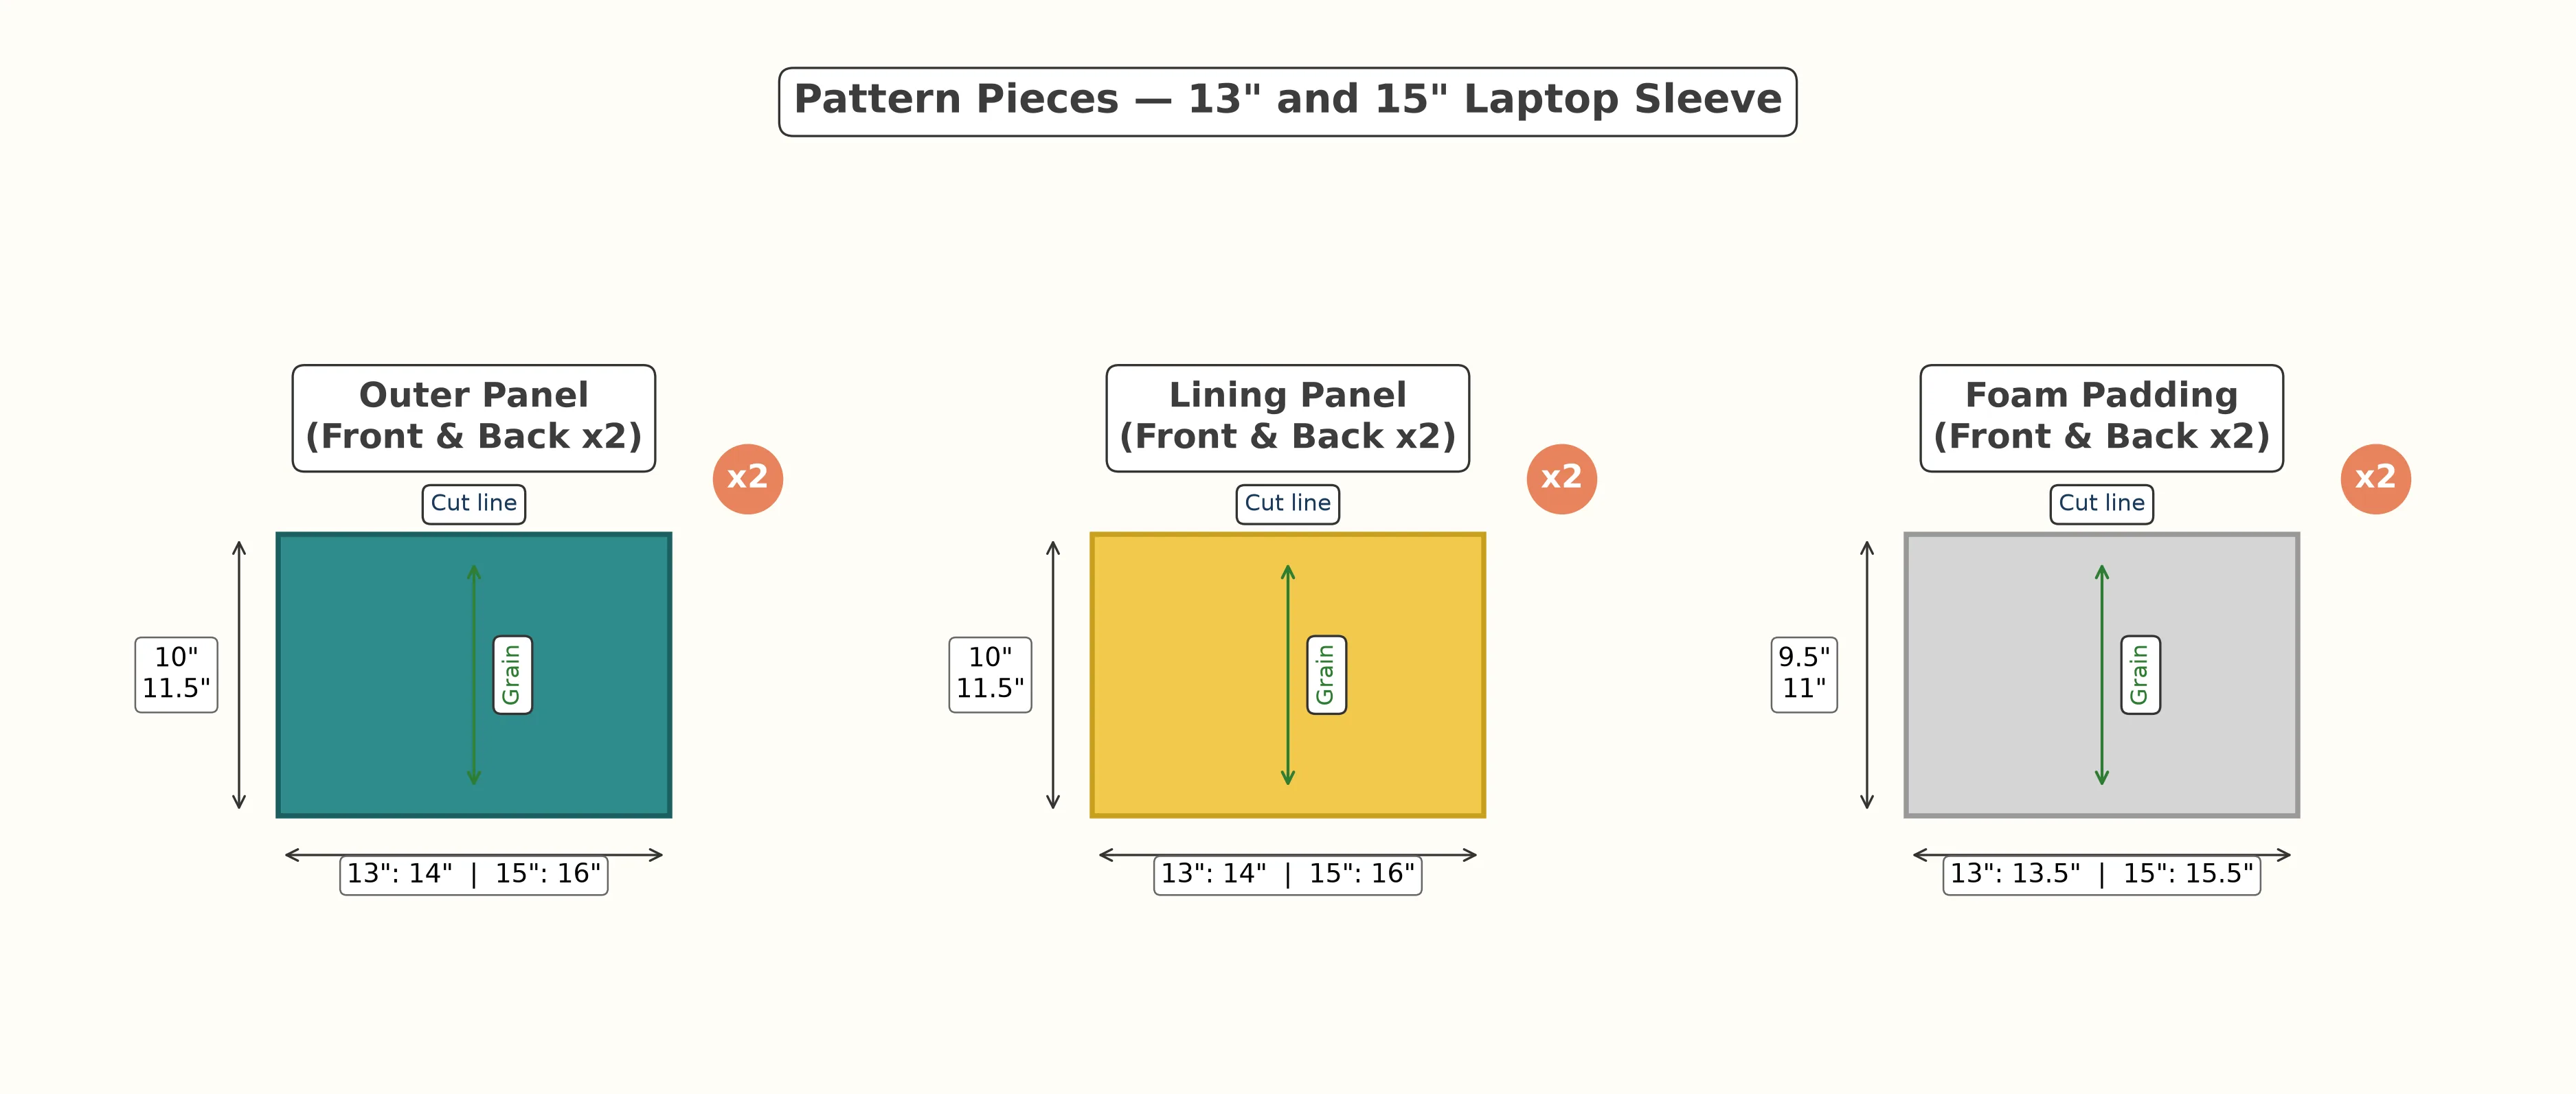
- Outer fabric: two rectangles, 14 × 10.5 in (35.5 × 26.5 cm)
- Lining fabric: two rectangles, 14 × 10.5 in (35.5 × 26.5 cm)
- Foam interfacing: two rectangles, 14 × 10.5 in (35.5 × 26.5 cm)
For a 15-inch laptop, cut all pieces at 16 × 11.5 in (40.5 × 29 cm). All seam allowances are included at 1/2 in (1.25 cm).
Pattern pieces & assembly order
The zipper sandwich method
Before we start sewing, let's talk about the technique at the heart of this project: the zipper sandwich. This is the standard professional method for installing a zipper between two fabric layers (outer and lining), and once you learn it, you'll use it in dozens of future projects.
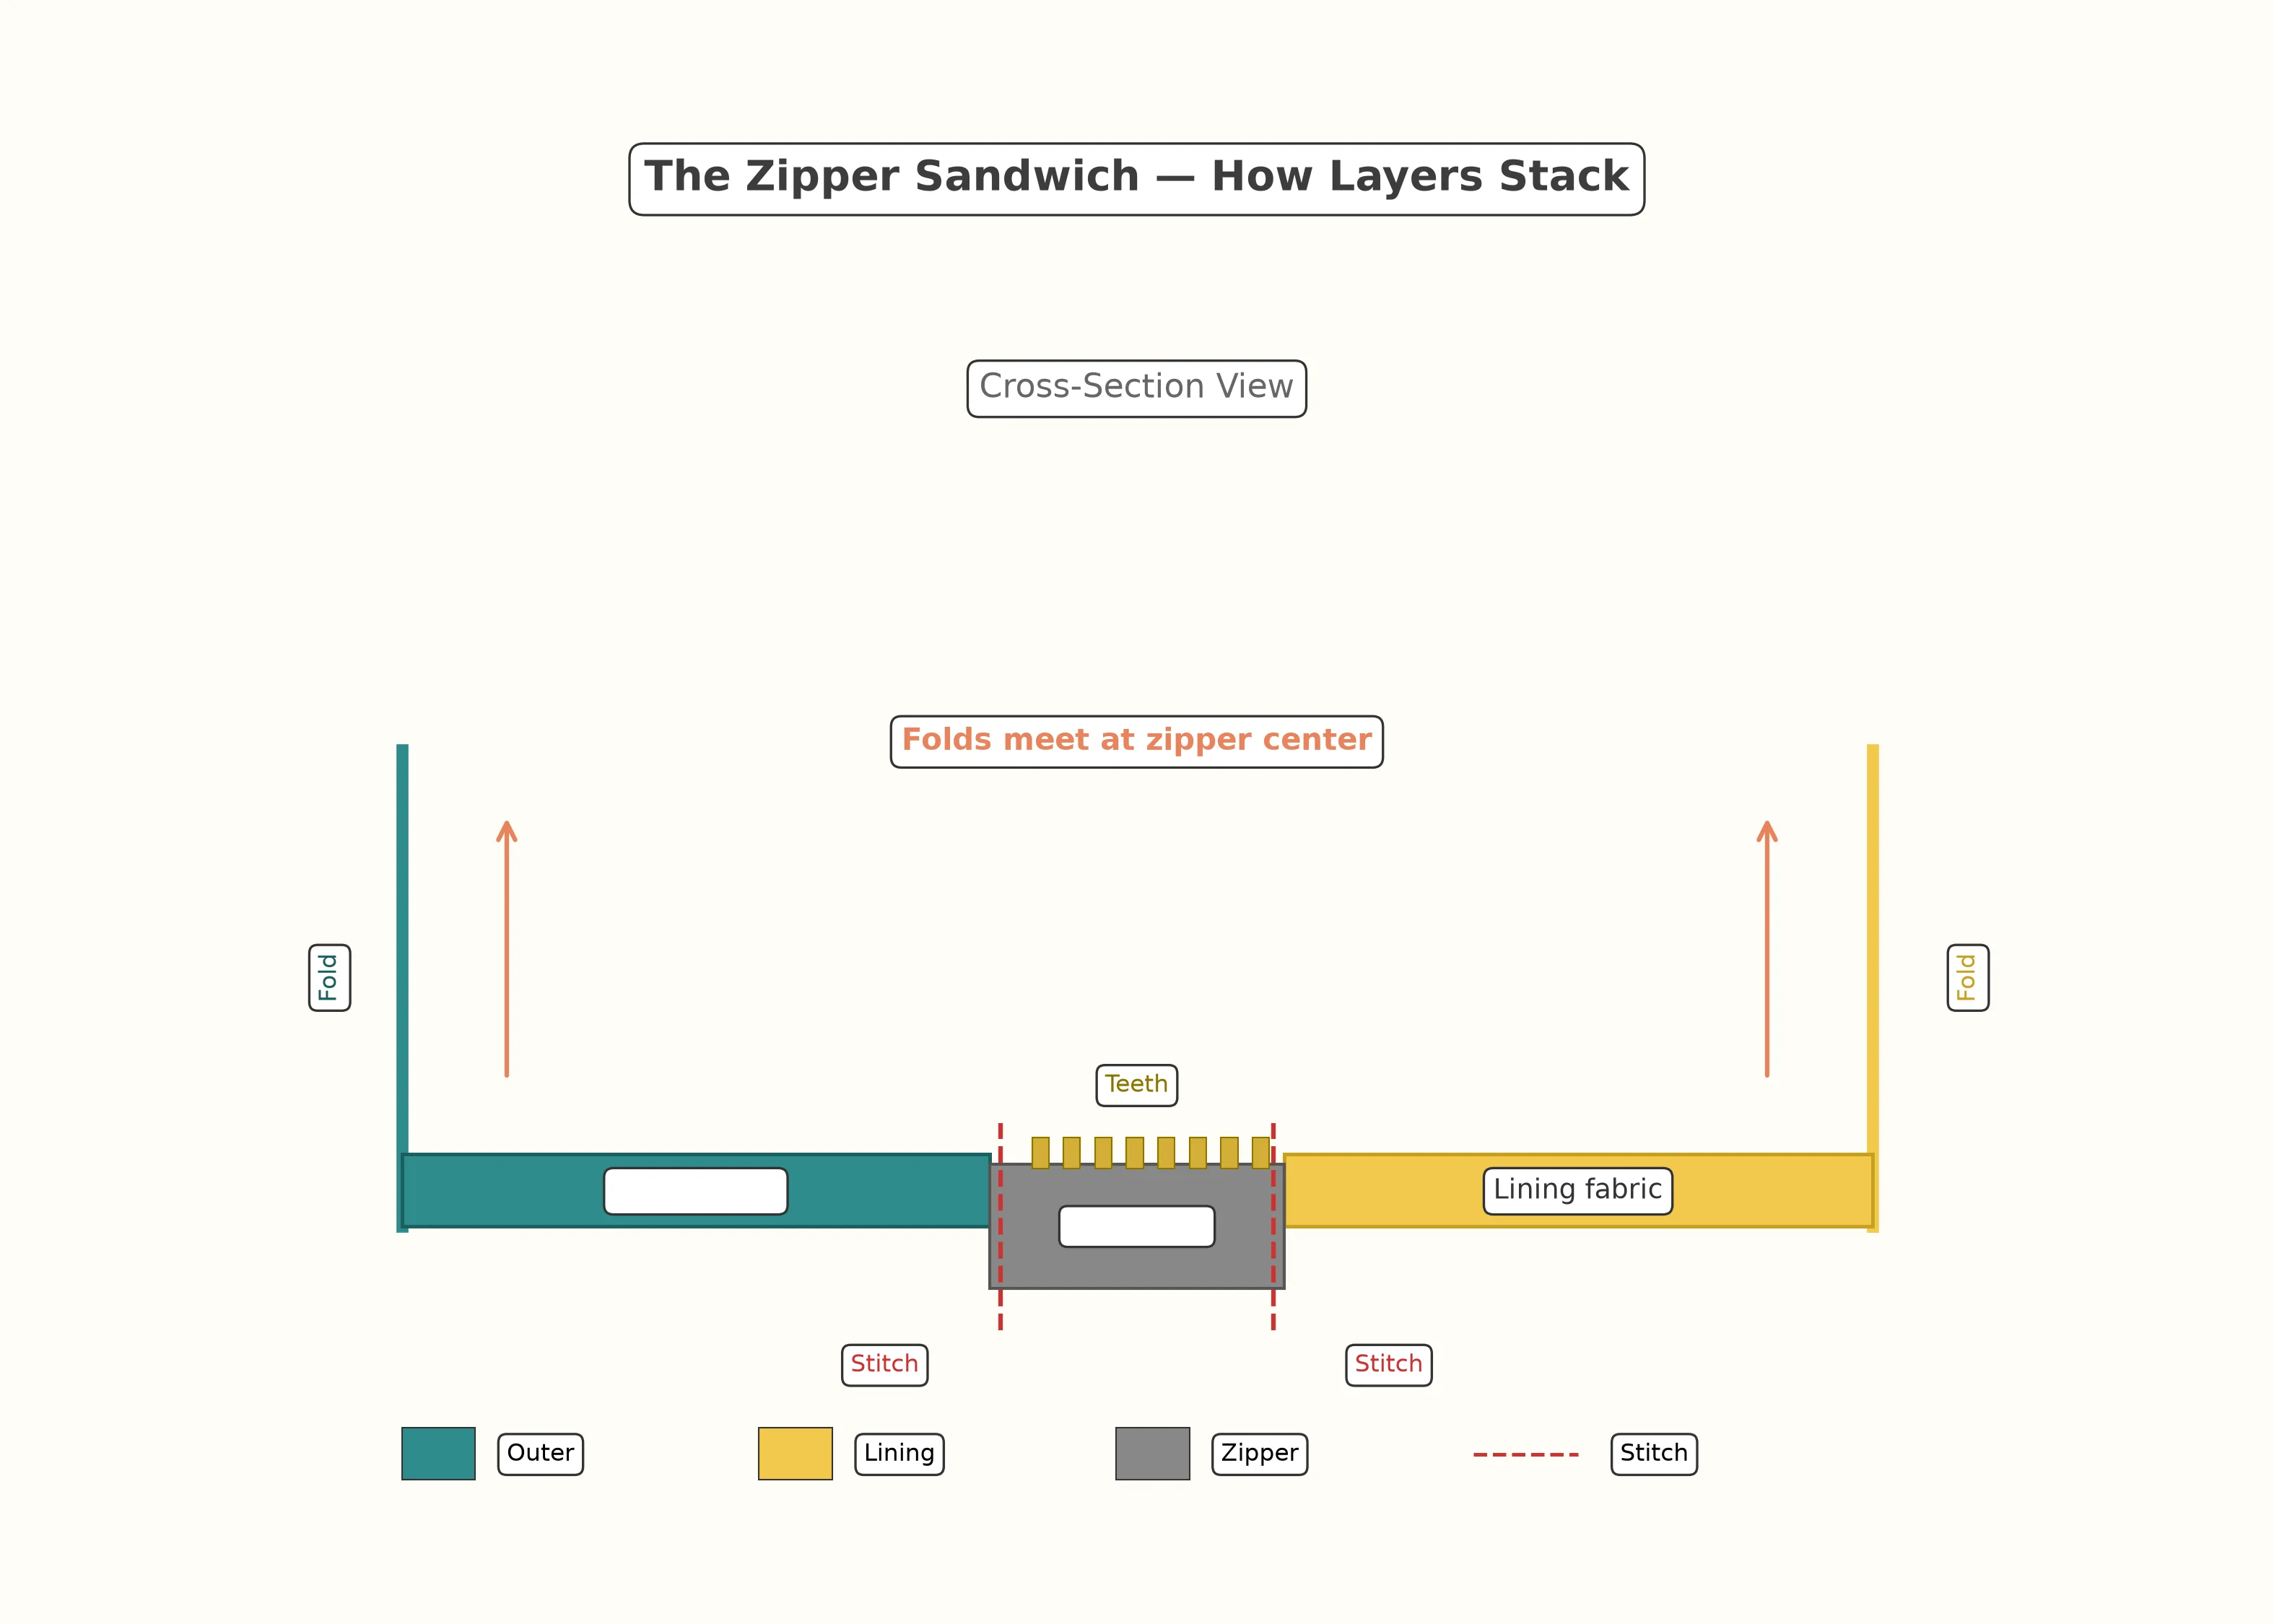
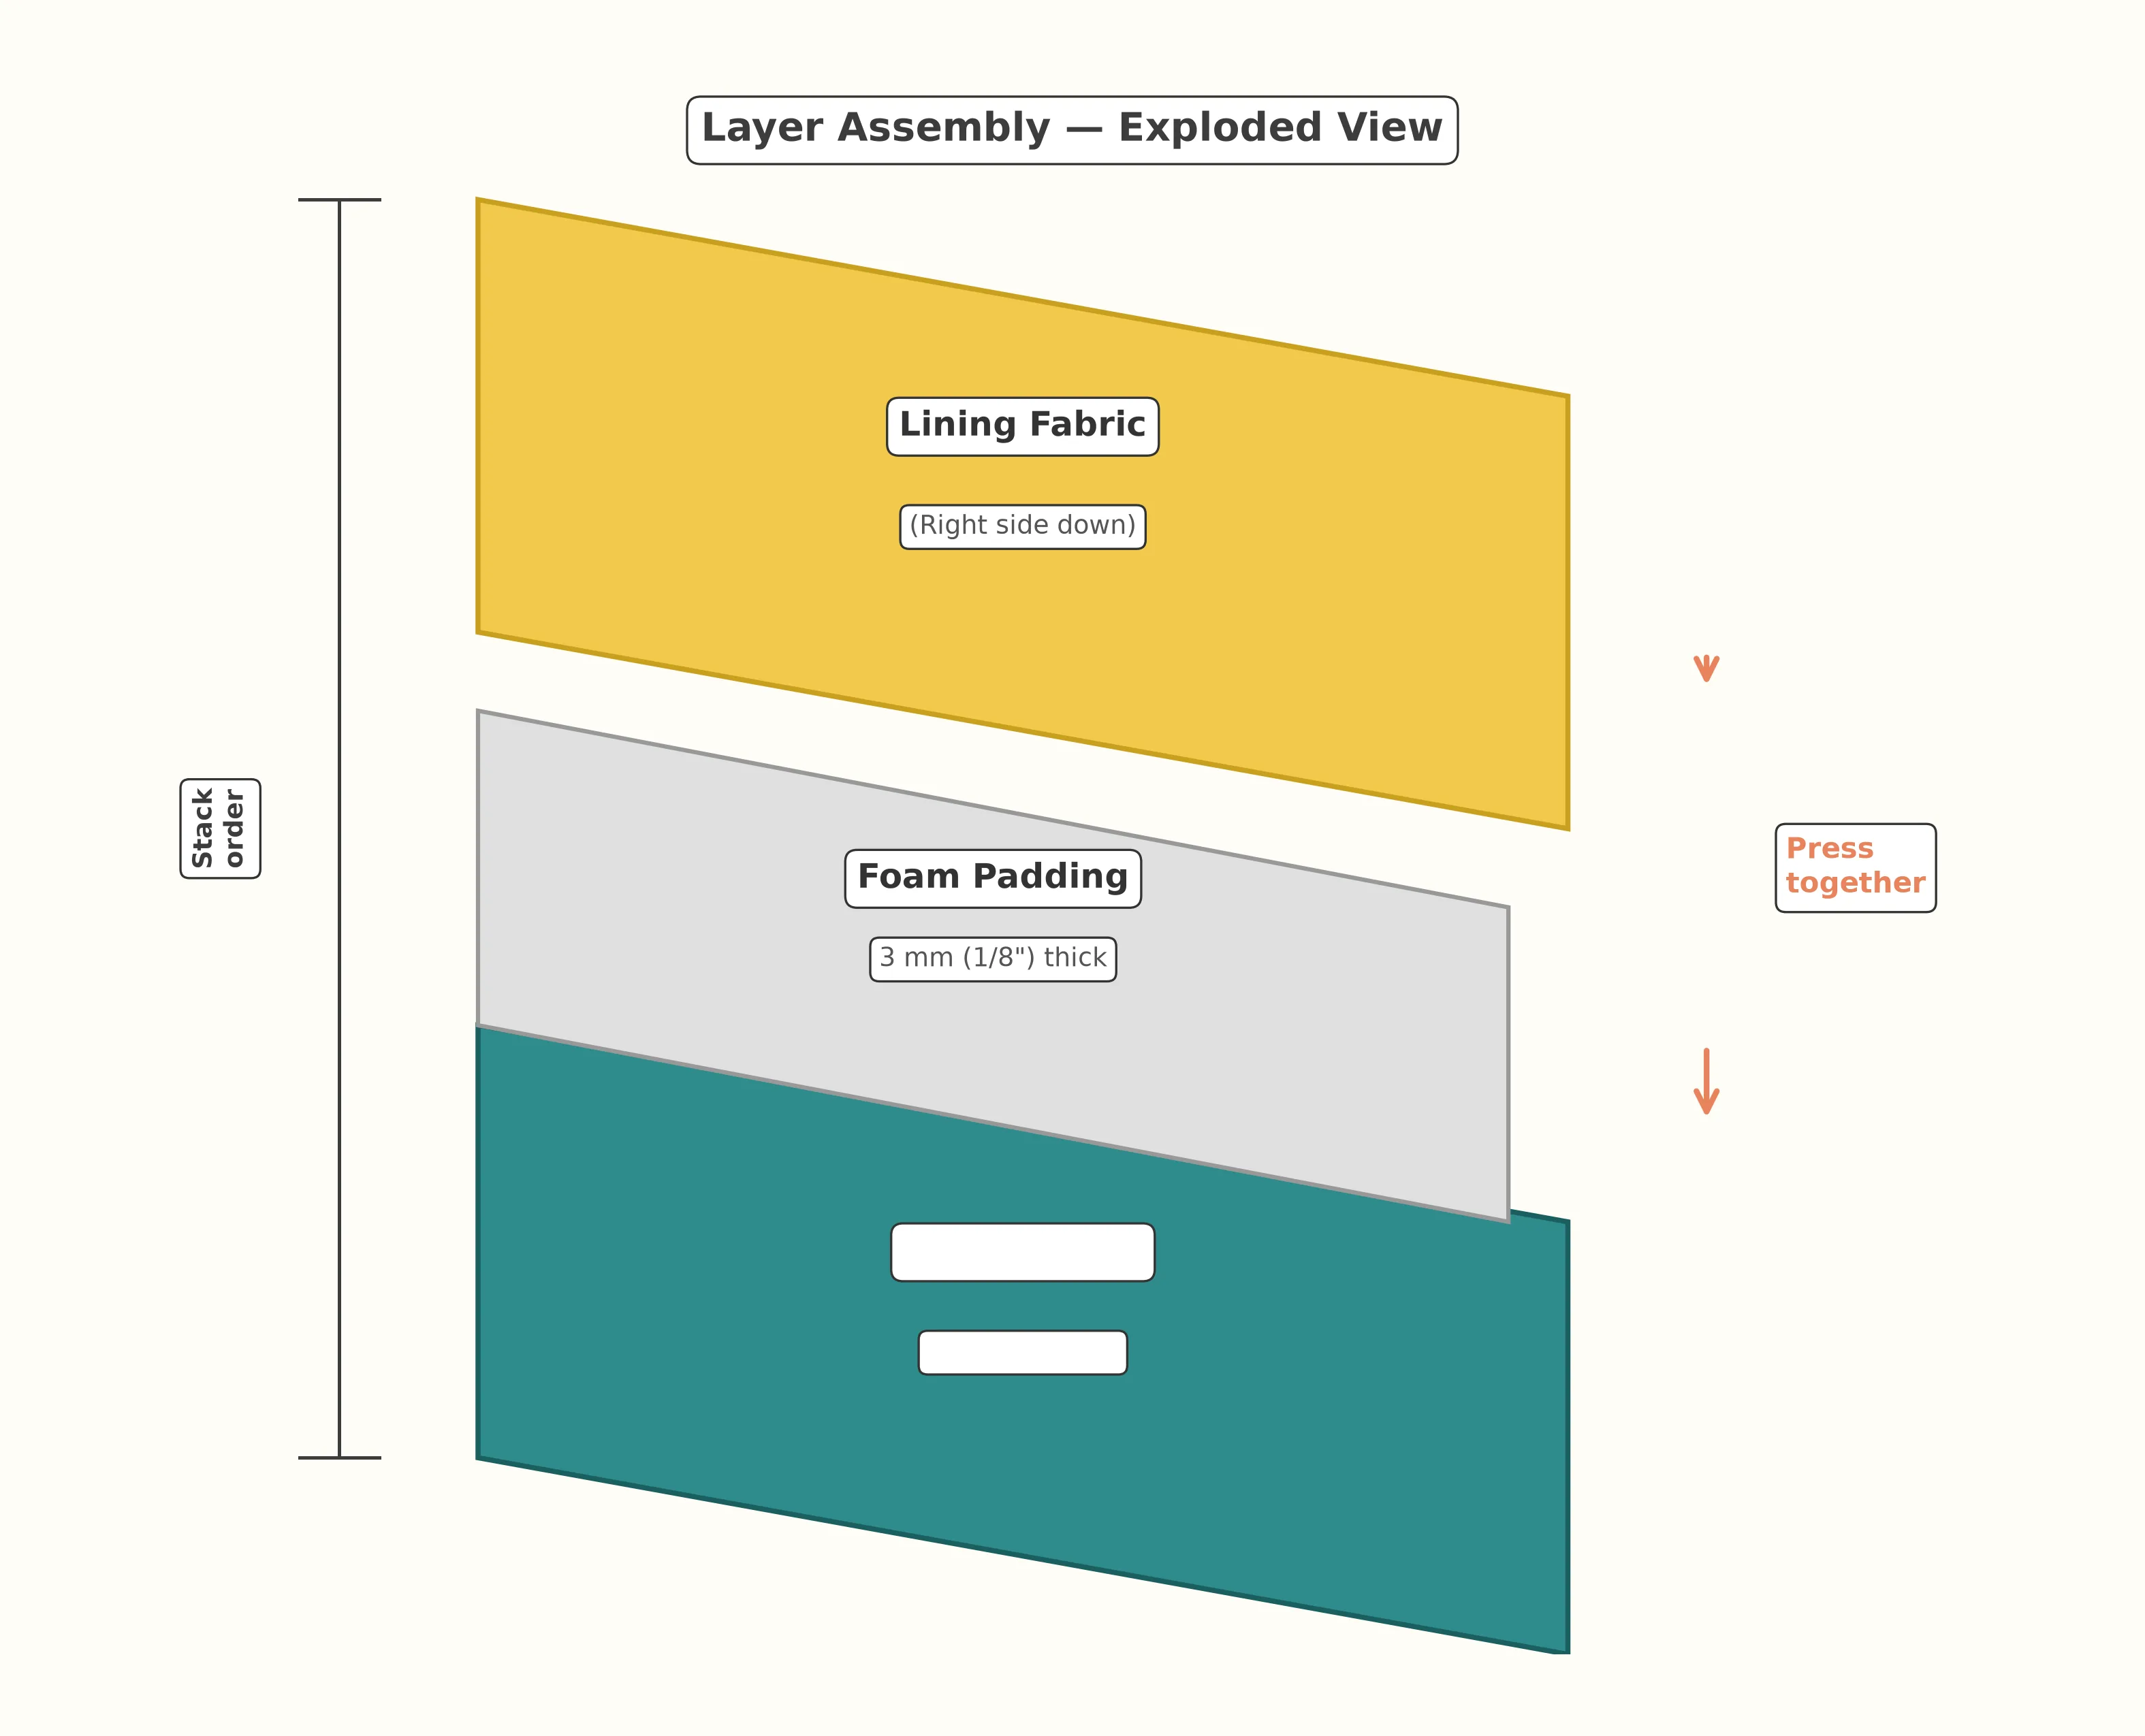
The stack is assembled in this exact order:
- Outer fabric — placed right side up (pretty side faces up)
- Zipper — placed right side down along the top edge (teeth facing down into the fabric)
- Lining — placed right side down on top of the zipper (pretty side faces down)
You stitch through all three layers along the top edge. When you fold both fabrics away from the zipper, the right sides of outer and lining both face outward, and the zipper is perfectly enclosed between them. Magic — but mechanical magic, not real magic.
Step-by-step construction
Fuse the foam to the outer fabric 8 min
If using fusible foam interfacing, place one piece of foam (fusible side down) on the wrong side of one outer panel. Cover with a pressing cloth to protect your iron. Press firmly for 15-20 seconds in each spot, moving across the entire panel. Flip and repeat from the right side for 10 seconds. Repeat for the second panel. If using batting instead, baste it to the outer panels with pins or a long machine stitch 1/4 inch from the edge.
Build the first zipper sandwich 5 min
Lay one outer panel right side up on your work surface. Place the zipper along the top long edge, right side down (teeth should be facing into the fabric), with the zipper tape aligned to the raw edge. Place one lining panel right side down on top, matching the top edge. Pin or clip through all three layers along the top edge only.
Stitch the first side of the zipper 5 min
Install your zipper foot. Starting at one end of the zipper, stitch through all three layers using a 1/2 in (1.25 cm) seam allowance. Keep your needle positioned just alongside the zipper teeth. When you reach the zipper pull, stop with your needle down, lift the foot, carefully slide the pull past the needle to the other side, lower the foot, and continue stitching. Backstitch at start and end.
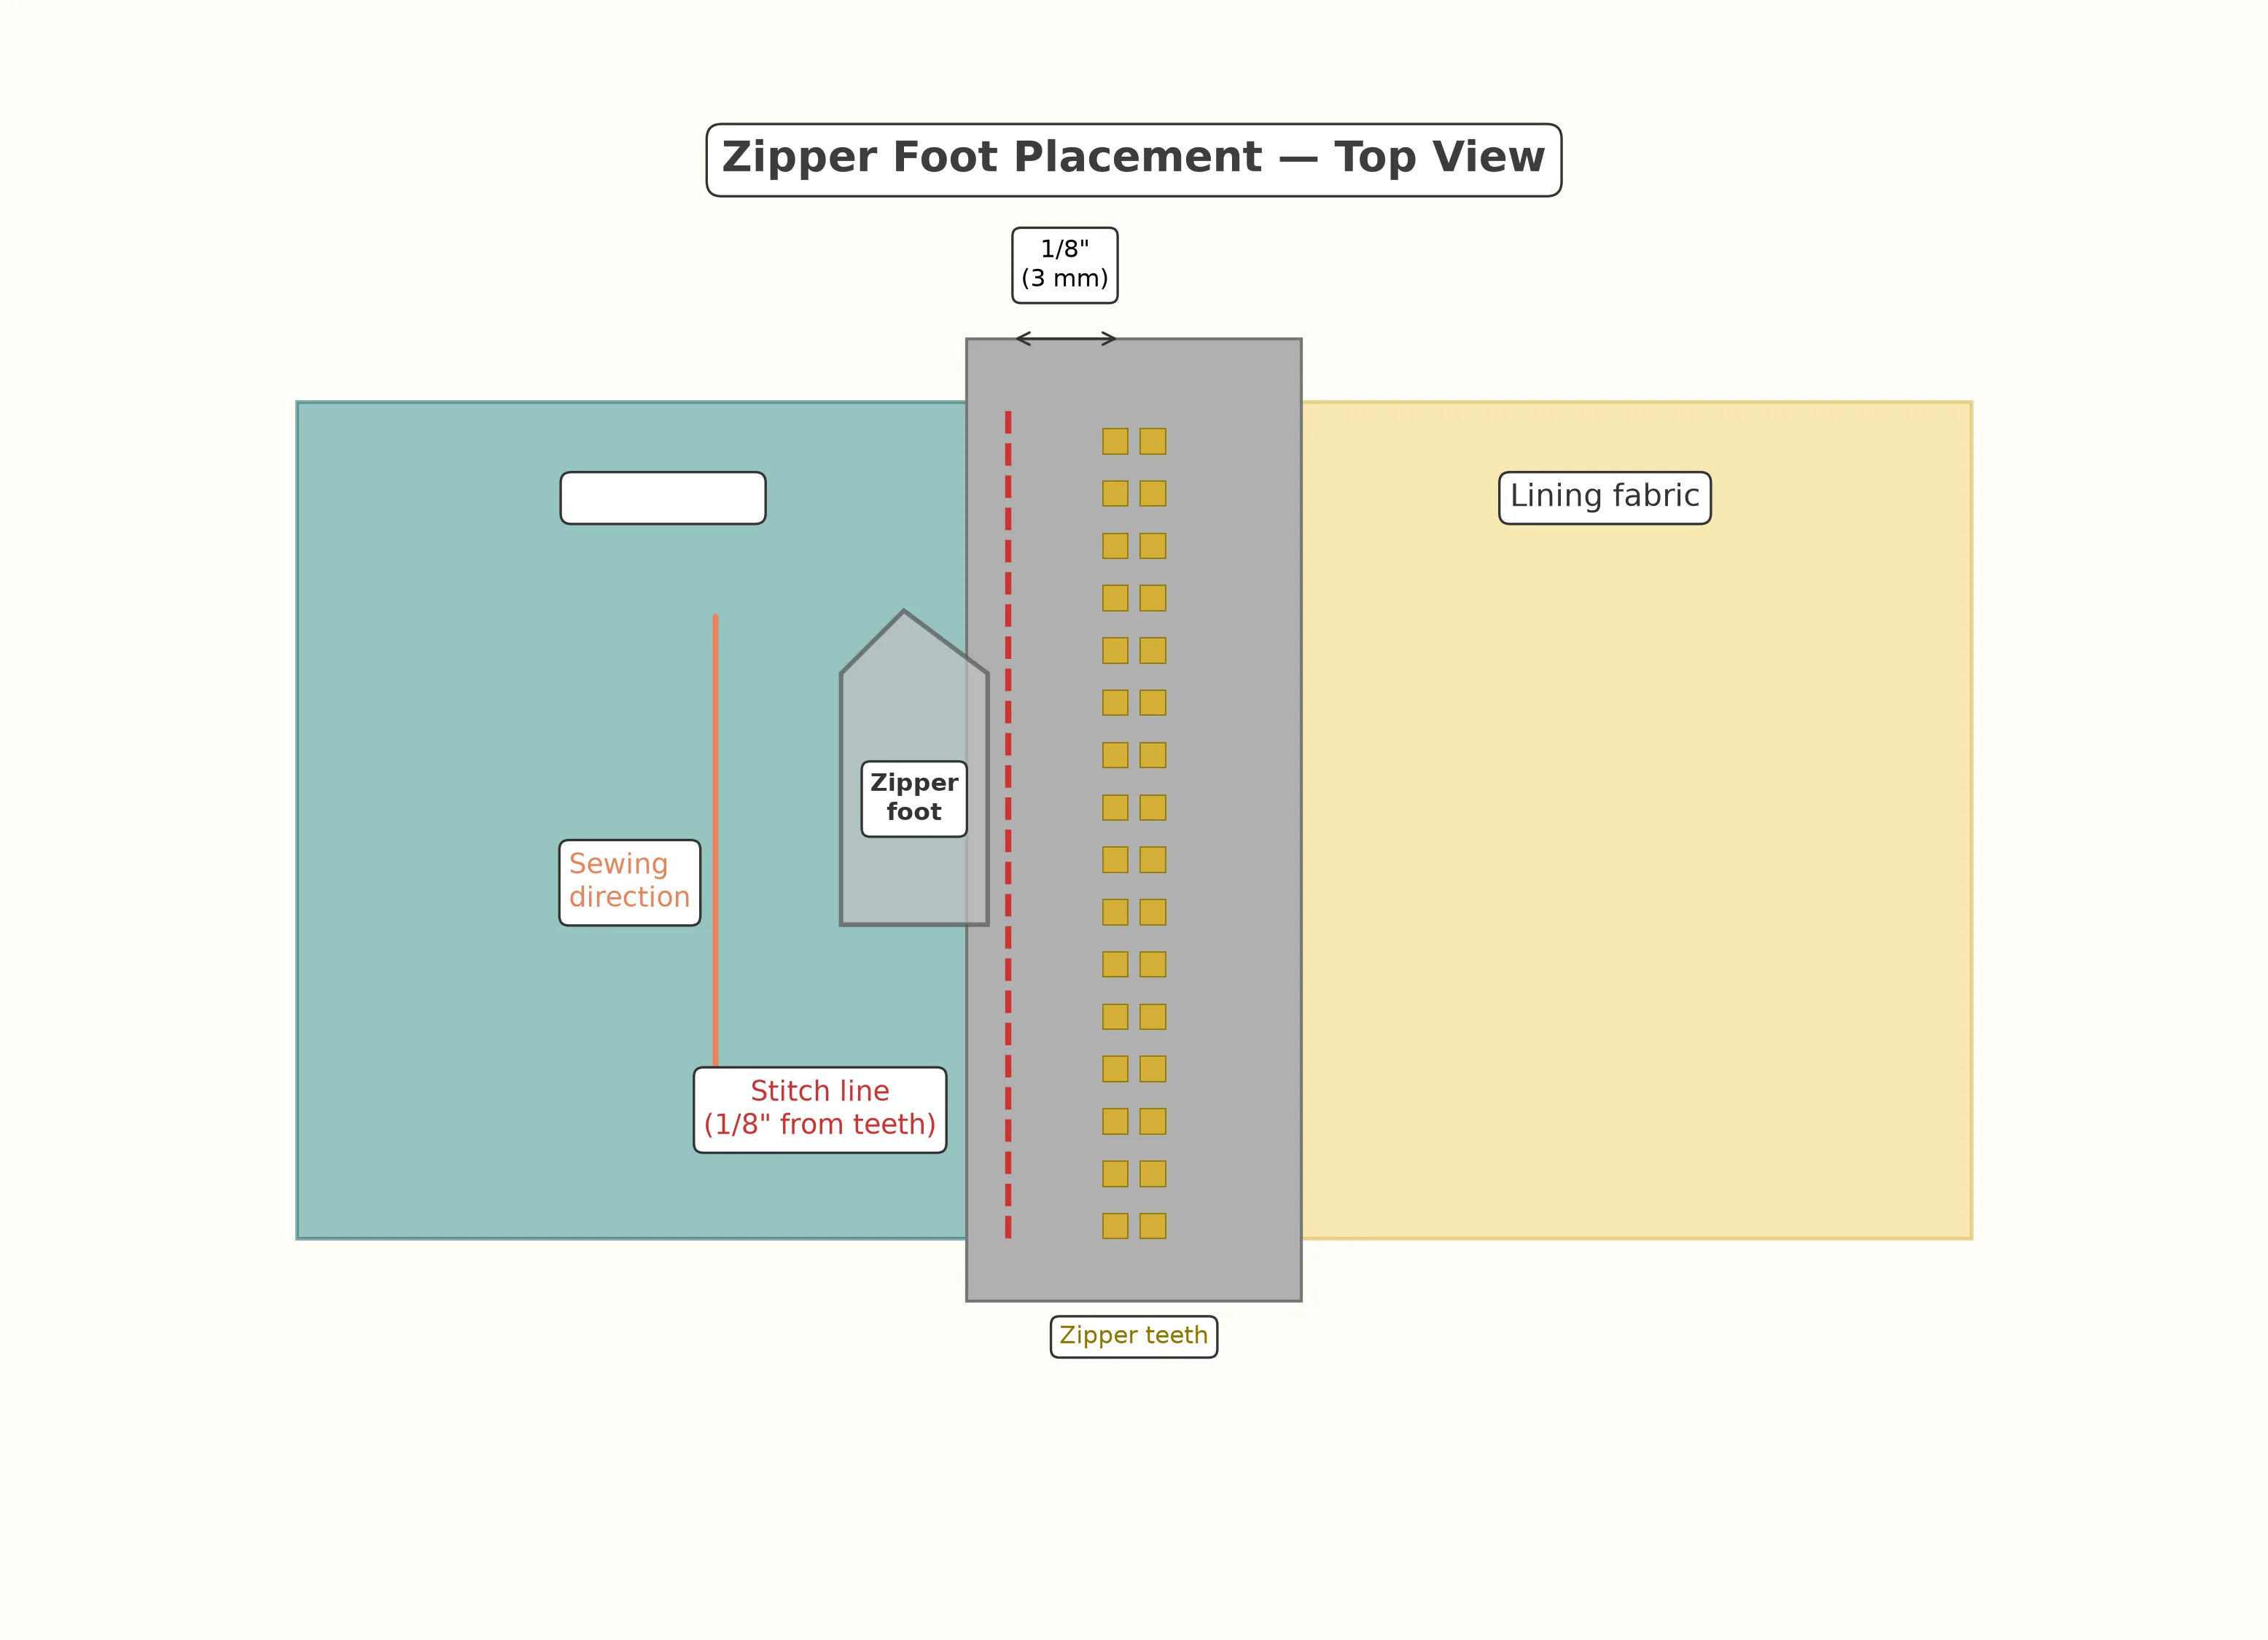
Press and topstitch 4 min
Fold both the outer and lining fabrics away from the zipper, so their wrong sides are now against the back of the zipper tape. Press firmly to crease the fold line (use your pressing cloth over the foam). Topstitch 1/8 in (3 mm) from the folded edge, through all layers. This step keeps the lining from catching in the zipper during use.
Attach the second side of the zipper 8 min
Repeat the sandwich on the opposite side of the zipper: outer panel right side up, zipper (already attached to the first side) right side down, second lining panel right side down. Pin, stitch with zipper foot, press away from zipper, and topstitch. Both halves of the sleeve are now joined by the zipper.
OPEN THE ZIPPER HALFWAY 30 sec
This is the single most important step in the entire project. Unzip the zipper so it's halfway open. This creates the opening through which you'll turn the sleeve right side out later. If you skip this step and sew the body closed, you will have no way to flip the sleeve. Do it now, before you forget.
I promise, almost every beginner forgets this step at least once. If you sew the body with a closed zipper, you'll have to carefully pick out several inches of stitching, open the zipper, and resew. Save yourself the heartache — tape a sticky note to your machine right now that says "OPEN ZIPPER."
Arrange for the body seams 3 min
Open the project flat. Fold it so the two outer panels are right sides together and the two lining panels are right sides together. The zipper should be positioned between them, with the teeth pointing into the center. Pin or clip around all three raw edges (both sides and the bottom of outer, both sides and bottom of lining).
Stitch around the body 10 min
Switch back to your standard presser foot. Starting at one top corner (where outer meets zipper), stitch down the outer side, across the outer bottom, up the other outer side, continue up to the lining side, across the lining top (right next to the zipper ends), down the lining side, and STOP partway across the lining bottom. Leave a 4 in (10 cm) gap in the lining bottom for turning. Continue stitching to complete the lining bottom.
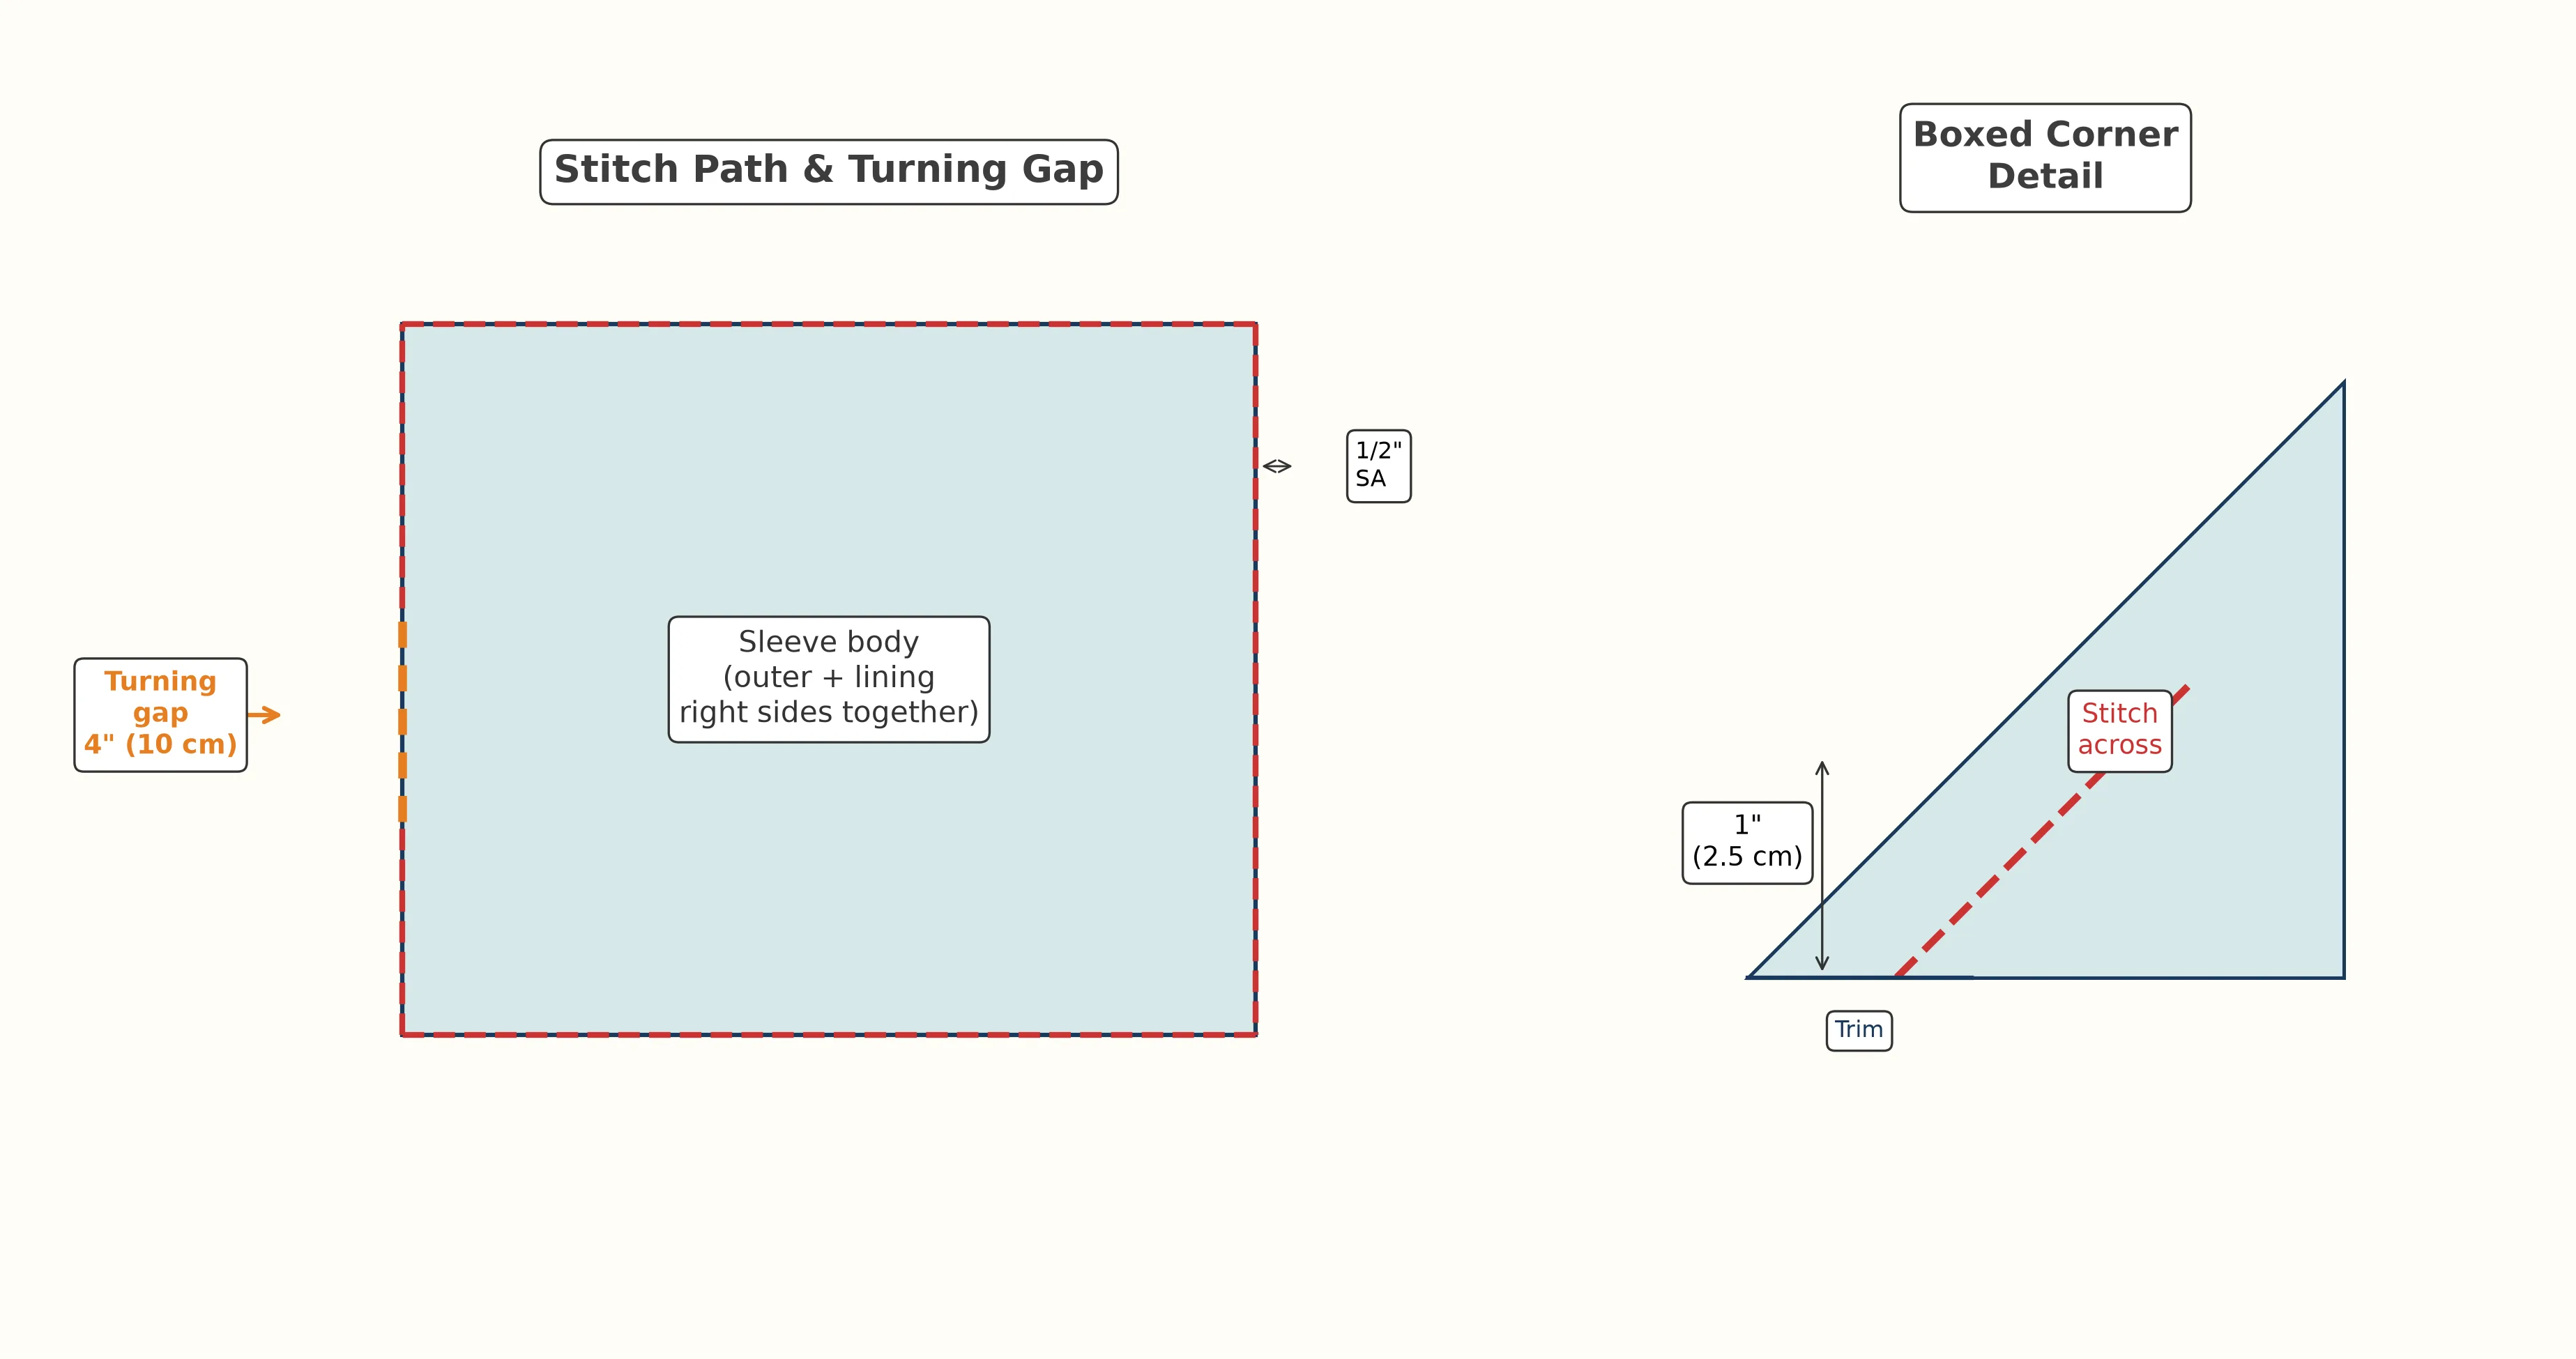
Trim corners and zipper ends 3 min
Clip the four outer corners and four lining corners at a 45° angle to reduce bulk (don't cut through your stitches). Also trim the excess zipper tape on both ends down to about 1/4 in. These trims make the final corners crisp when turned.
Turn right side out 4 min
Reach through the lining gap and gently pull the entire sleeve through to the right side. The outer fabric should now be on the outside and the zipper visible. Push out all four outer corners with a chopstick or point turner. Push the lining fully inside the outer sleeve.
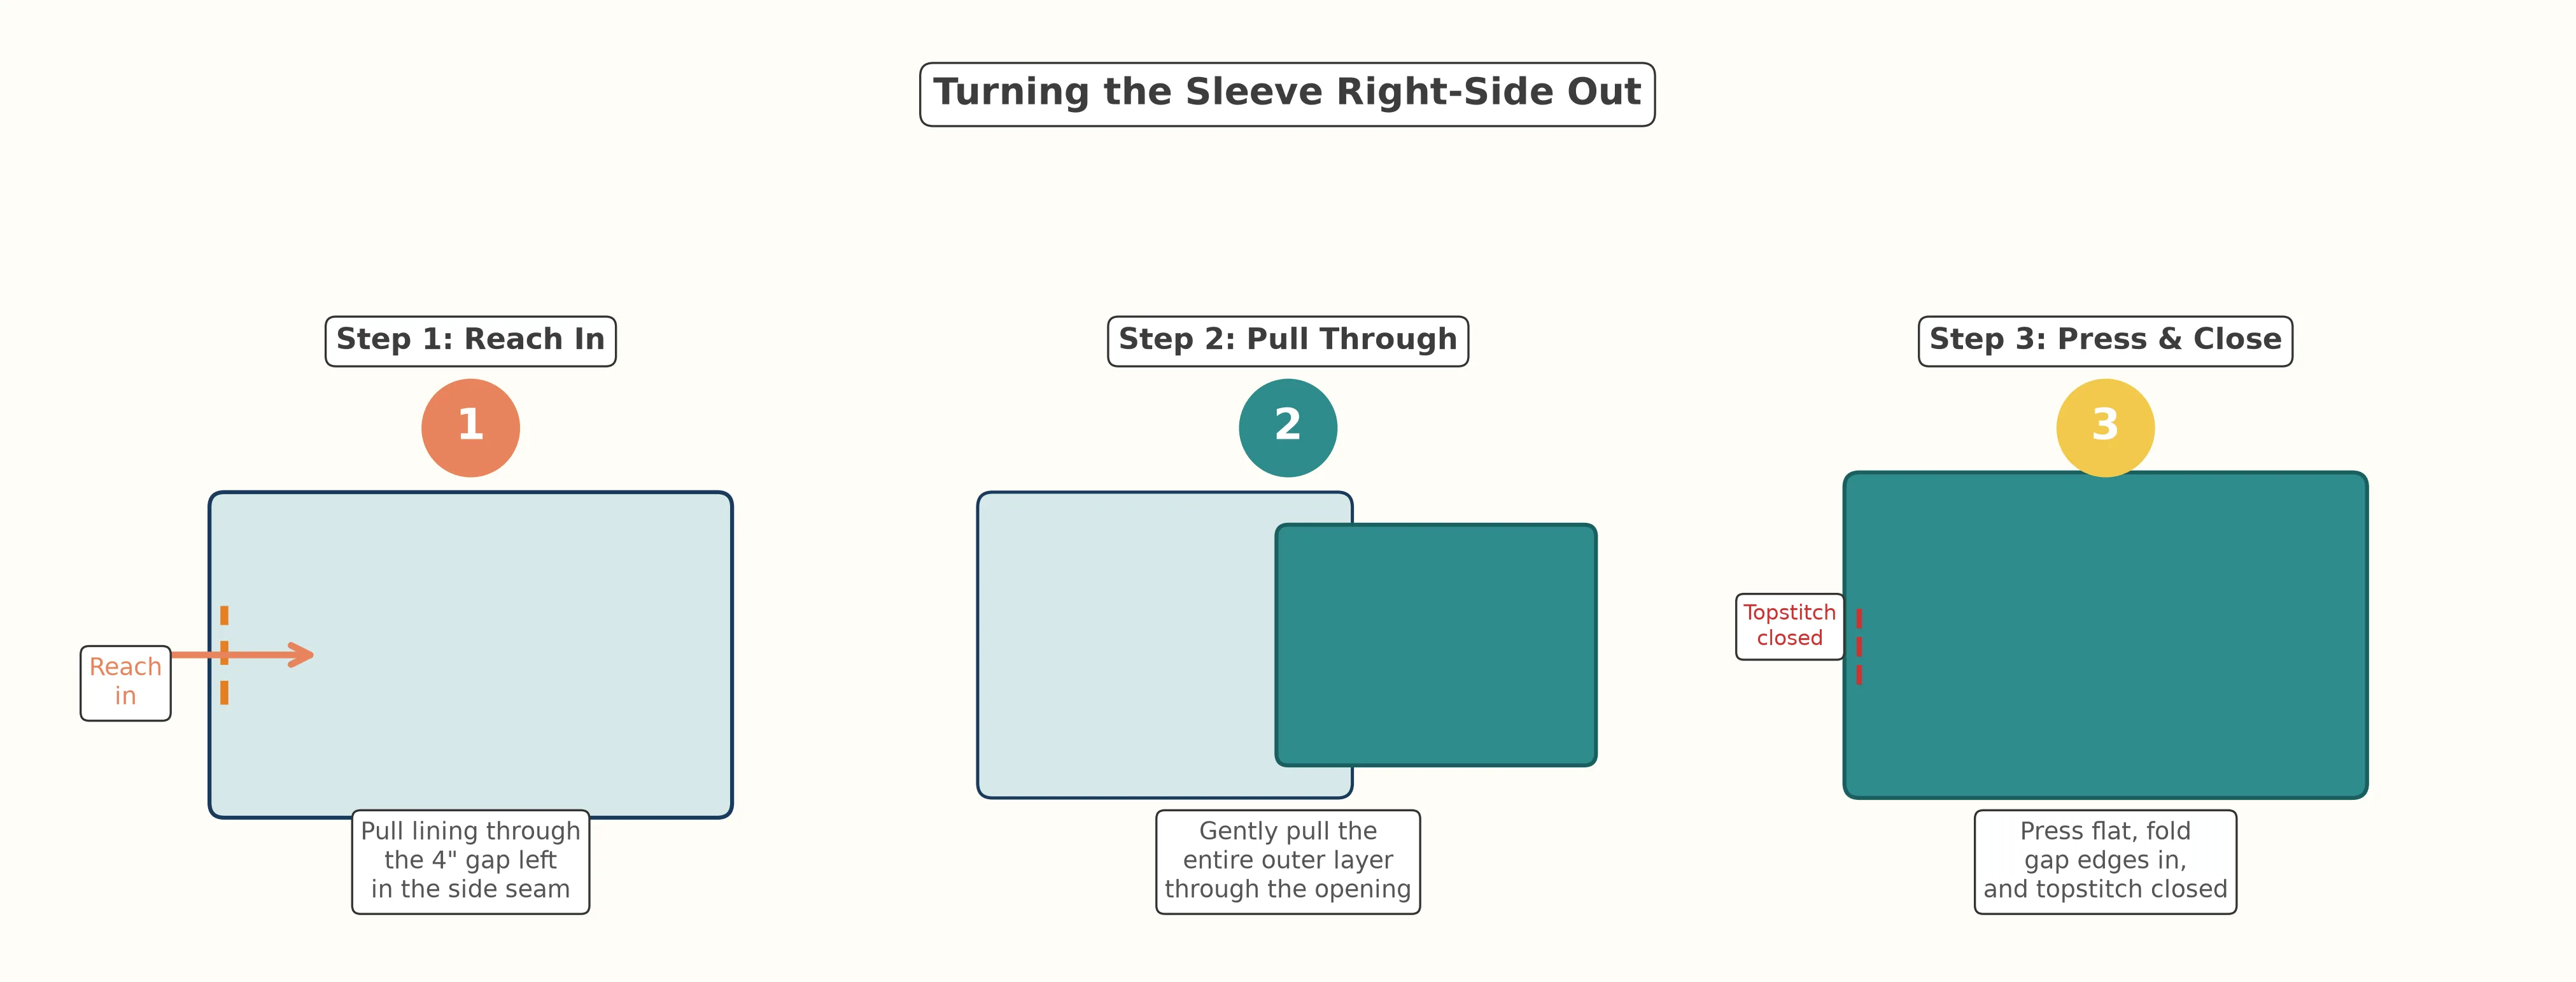
Close the lining gap 4 min
Tuck the raw edges of the lining gap inward to match the stitched line. Either hand-stitch closed with a ladder stitch for an invisible finish, or machine-topstitch very close to the folded edge. Since this gap sits inside the sleeve against the lining bottom, machine stitching is fine — no one will ever see it.
Final press and admire 3 min
Press the finished sleeve from both sides. The top edge (around the zipper) should press crisp and flat. Insert your laptop to check the fit — it should slide in with gentle friction. If it's too tight, you can hand-stretch the fabric slightly; if too loose, consider adding a small loop and button closure.
Zippers can always be trimmed shorter after installation, but they can't be made longer. A zipper that's 2 inches (5 cm) longer than needed is actually easier to install because the zipper pull stays safely out of your stitching line the entire time.
Variations & upgrades
Level up your sleeve
- Add a front pocket — stitch a lined pocket to one outer panel before Step 2 (great for a mouse, cables, or notebooks)
- Add a wrist strap — catch a 1 × 10 in fabric loop into one zipper end for carrying
- Monogrammed — embroider initials on the outer panel before fusing the foam
- Quilted outer — quilt straight parallel lines through the outer + foam before assembly (bonus structure)
- Reversible lining — use a dramatic contrasting lining print for a secret pop of personality
- Insulated version — swap foam for Insul-Bright to double as a laptop warmer in cold climates
- Tablet matching set — scale down the pattern to make a matching tablet or e-reader sleeve
Frequently asked questions
What size zipper do I need for a laptop sleeve?
The zipper should be at least 1 inch (2.5 cm) longer than the top edge of your sleeve. For a 13-inch laptop sleeve, use a 14-inch (36 cm) zipper. For a 15-inch laptop sleeve, use a 16-inch (41 cm) zipper. A longer zipper is easier to install because the zipper pull stays well out of the stitching line. Any all-purpose polyester zipper works — no special separating or metal zippers needed.
What is the best padding for a laptop sleeve?
Fusible foam interfacing (such as ByAnnie's Soft and Stable or Pellon FF77 Flex-Foam) gives the best protection and professional structure. It's about 1/8 in thick and iron-fuses to your fabric. If you can't find foam interfacing, use two layers of low-loft cotton batting basted in place. Avoid high-loft polyester batting — it compresses with use and loses its protective quality.
How do I measure my laptop for a sleeve pattern?
Measure the length (longest side), width (shortest side), and depth (thickness) of your closed laptop. Add 1 inch (2.5 cm) to the length and 1 inch (2.5 cm) to the width to account for ease, padding, and seam allowances. For most laptops, depth is less than 1 inch and doesn't need separate accommodation.
Can I sew a laptop sleeve without a zipper foot?
A zipper foot is strongly recommended but not strictly required. A zipper foot lets your needle sew right next to the zipper teeth without hitting them. Without one, use a standard foot and sew more carefully, keeping the needle positioned about 1/4 in from the teeth. A universal zipper foot costs about $8-15 and fits most sewing machines — it's a worthwhile tool investment for any zippered project.
Why do I need to open the zipper before sewing the sides?
This is the single most important step. The zipper is the only opening through which you turn the sleeve right side out. If the zipper is closed when you sew around the body, you'll have no way to flip the sleeve inside out without picking apart your stitching. Always open the zipper at least halfway before sewing the remaining seams.
Can I make this pattern for a tablet or iPad?
Yes — the same construction works for any device. Measure your tablet's length and width, add 1 in to each, and cut your panels to those dimensions. For a standard 10.9-inch iPad, cut panels at approximately 11 × 8 in (28 × 20.5 cm) and use a 10-inch (25 cm) zipper. For an iPad Pro 12.9, cut panels at 13.75 × 9.75 in (35 × 25 cm) with a 13-inch zipper.
Post 6 of 10 — Weekend Sewing Projects
You just installed your first zipper
That's a huge milestone. The zipper sandwich method you learned here is the same technique used in professional bag making, lined pouches, and even garment construction. Carry it with pride into every project that follows.
Up next in Weekend Sewing → Sew a reversible bucket hat — your first project with real curves.