
How to Sew a Reversible Bucket Hat (Free Pattern, Two Sizes)
If you want to sew a reversible bucket hat this weekend, you are in exactly the right place. A bucket hat is one of those rare sewing projects that looks store-bought even on your very first try, and making it reversible means you get two completely different looks from a single afternoon of sewing. I made my first reversible bucket hat on a rainy Saturday with two fat quarters I had been hoarding for years, and I have been hooked ever since.
In this tutorial I will walk you through every step — from cutting the three pattern pieces (the crown, the side band, and the brim) to joining two complete hat layers into one clean, topstitched accessory. I define every sewing term the first time it appears, and I give all measurements in both inches and centimeters so you never have to guess. By the end you will have a hat you can flip inside out depending on your outfit, your mood, or whether you spilled coffee on one side (no judgment — it happens).
Why a Reversible Bucket Hat?
A bucket hat (also called a fisherman hat) is a soft, round hat with a downward-sloping brim that shades your face and neck from the sun. The shape is simple — essentially a flat circle on top, a cylindrical band in the middle, and a donut-shaped ring for the brim — which makes it an ideal project when you want to practice sewing curved seams (seams that follow a curve rather than a straight line) without the pressure of fitting a full garment.
Making the hat reversible adds a clever twist: you sew two complete hats — one in Fabric A and one in Fabric B — then join them at the brim edge and turn the whole thing right side out. The result hides all raw seams inside and gives you two wearable sides. Pair a bold floral with a solid neutral, or go wild with two contrasting prints. If you enjoyed the quick satisfaction of the elastic headband earlier in this series, the bucket hat is the natural next step up in both skill and style.
Materials & Tools
Fabric & Notions
- Fabric A — ½ yard (45 cm) medium-weight cotton
- Fabric B — ½ yard (45 cm) coordinating cotton
- Lightweight fusible interfacing — ¼ yard (23 cm) for brim stability
- Thread — all-purpose polyester in a neutral shade
Tools
- Sewing machine with standard presser foot
- Fabric scissors or rotary cutter
- Pins or sewing clips (small plastic clips that hold fabric layers together without leaving pin holes)
- Iron and ironing board
- Measuring tape
- Fabric marker or chalk
Choosing Your Fabric
The best fabrics for a reversible bucket hat are medium-weight woven cottons such as quilting cotton, cotton poplin, or a cotton-linen blend. These fabrics are easy to press, hold a curve well, and are not so thick that the doubled brim becomes unwieldy. I recommend choosing two fabrics of similar weight so the hat drapes evenly on both sides.
Avoid very thick fabrics like denim or canvas (the brim will be too rigid when doubled), very thin fabrics like voile or chiffon (they will not hold the hat's shape), and slippery fabrics like satin or silk (the two layers will slide against each other and the hat will shift on your head). If you are sewing for a child, the same fabric rules apply — just check the children's sun hat tutorial in our Kids series for smaller sizing.
Pattern Pieces Explained
A bucket hat is built from just three shapes. Understanding what each piece does will make the construction steps feel much more logical.
Crown — A flat circle that sits on top of your head. For size S/M the crown is 7 inches (18 cm) in diameter; for L/XL it is 7½ inches (19 cm). You need two crown circles per fabric (four total).
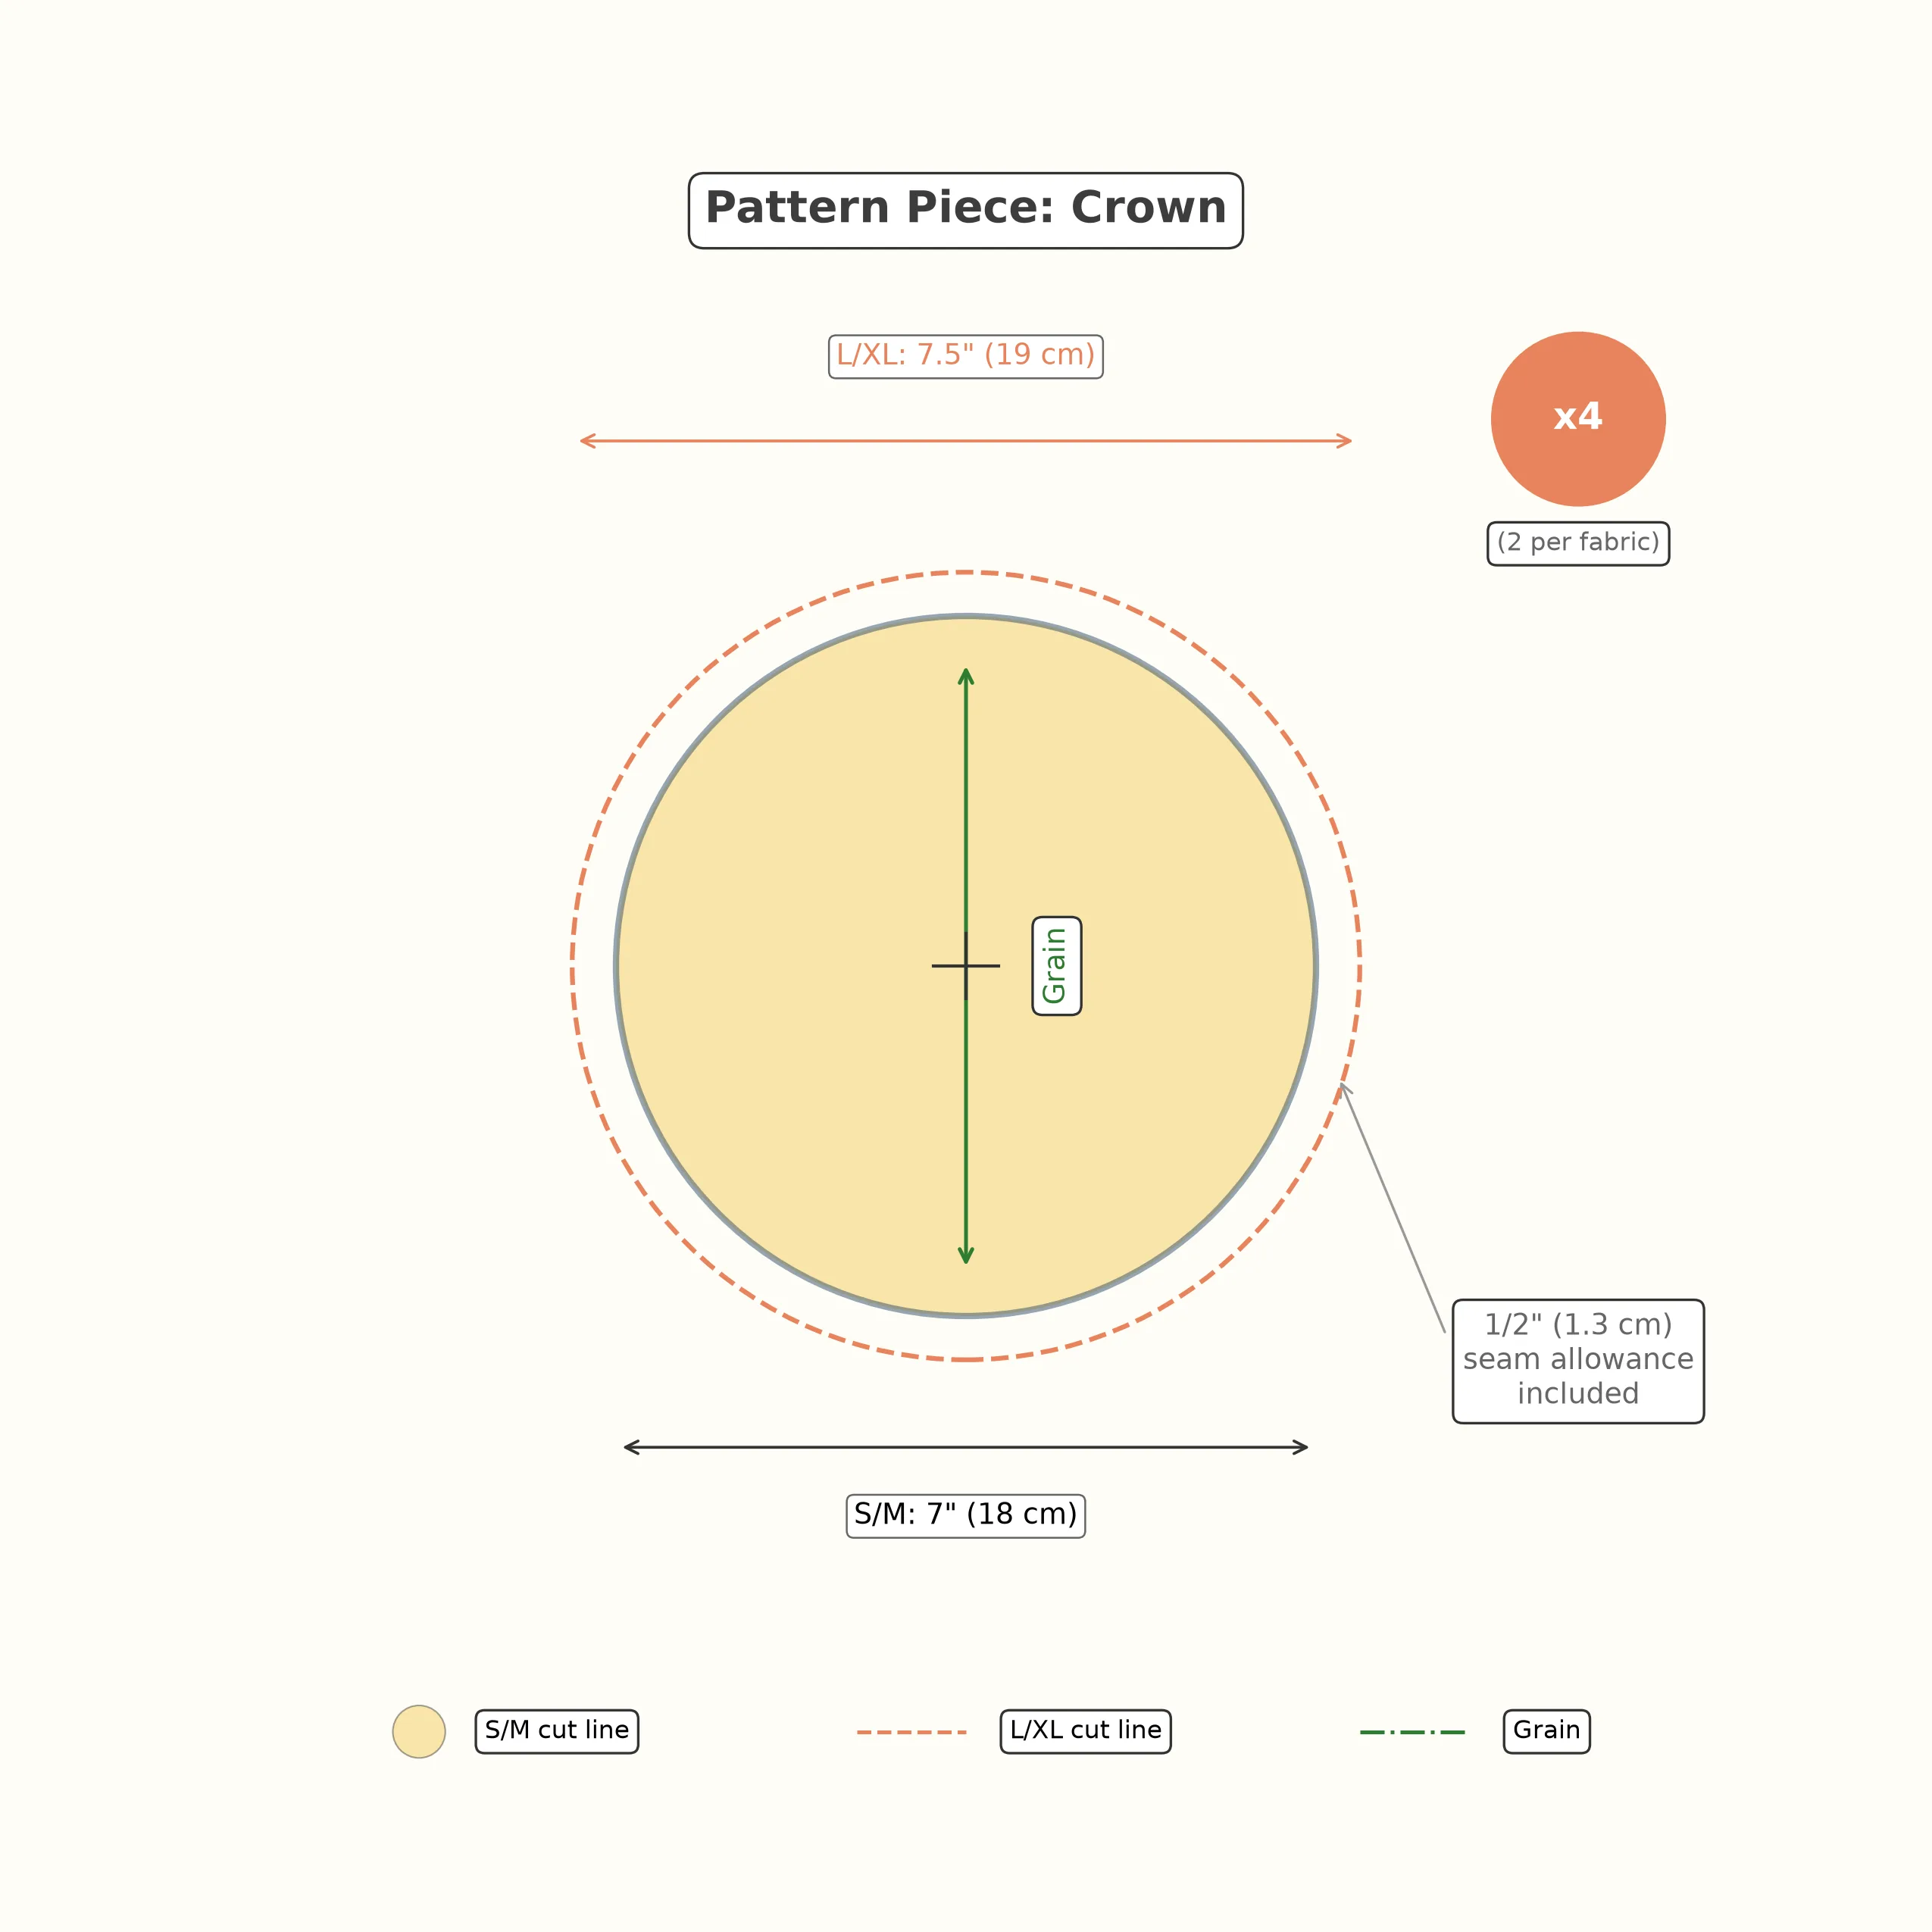
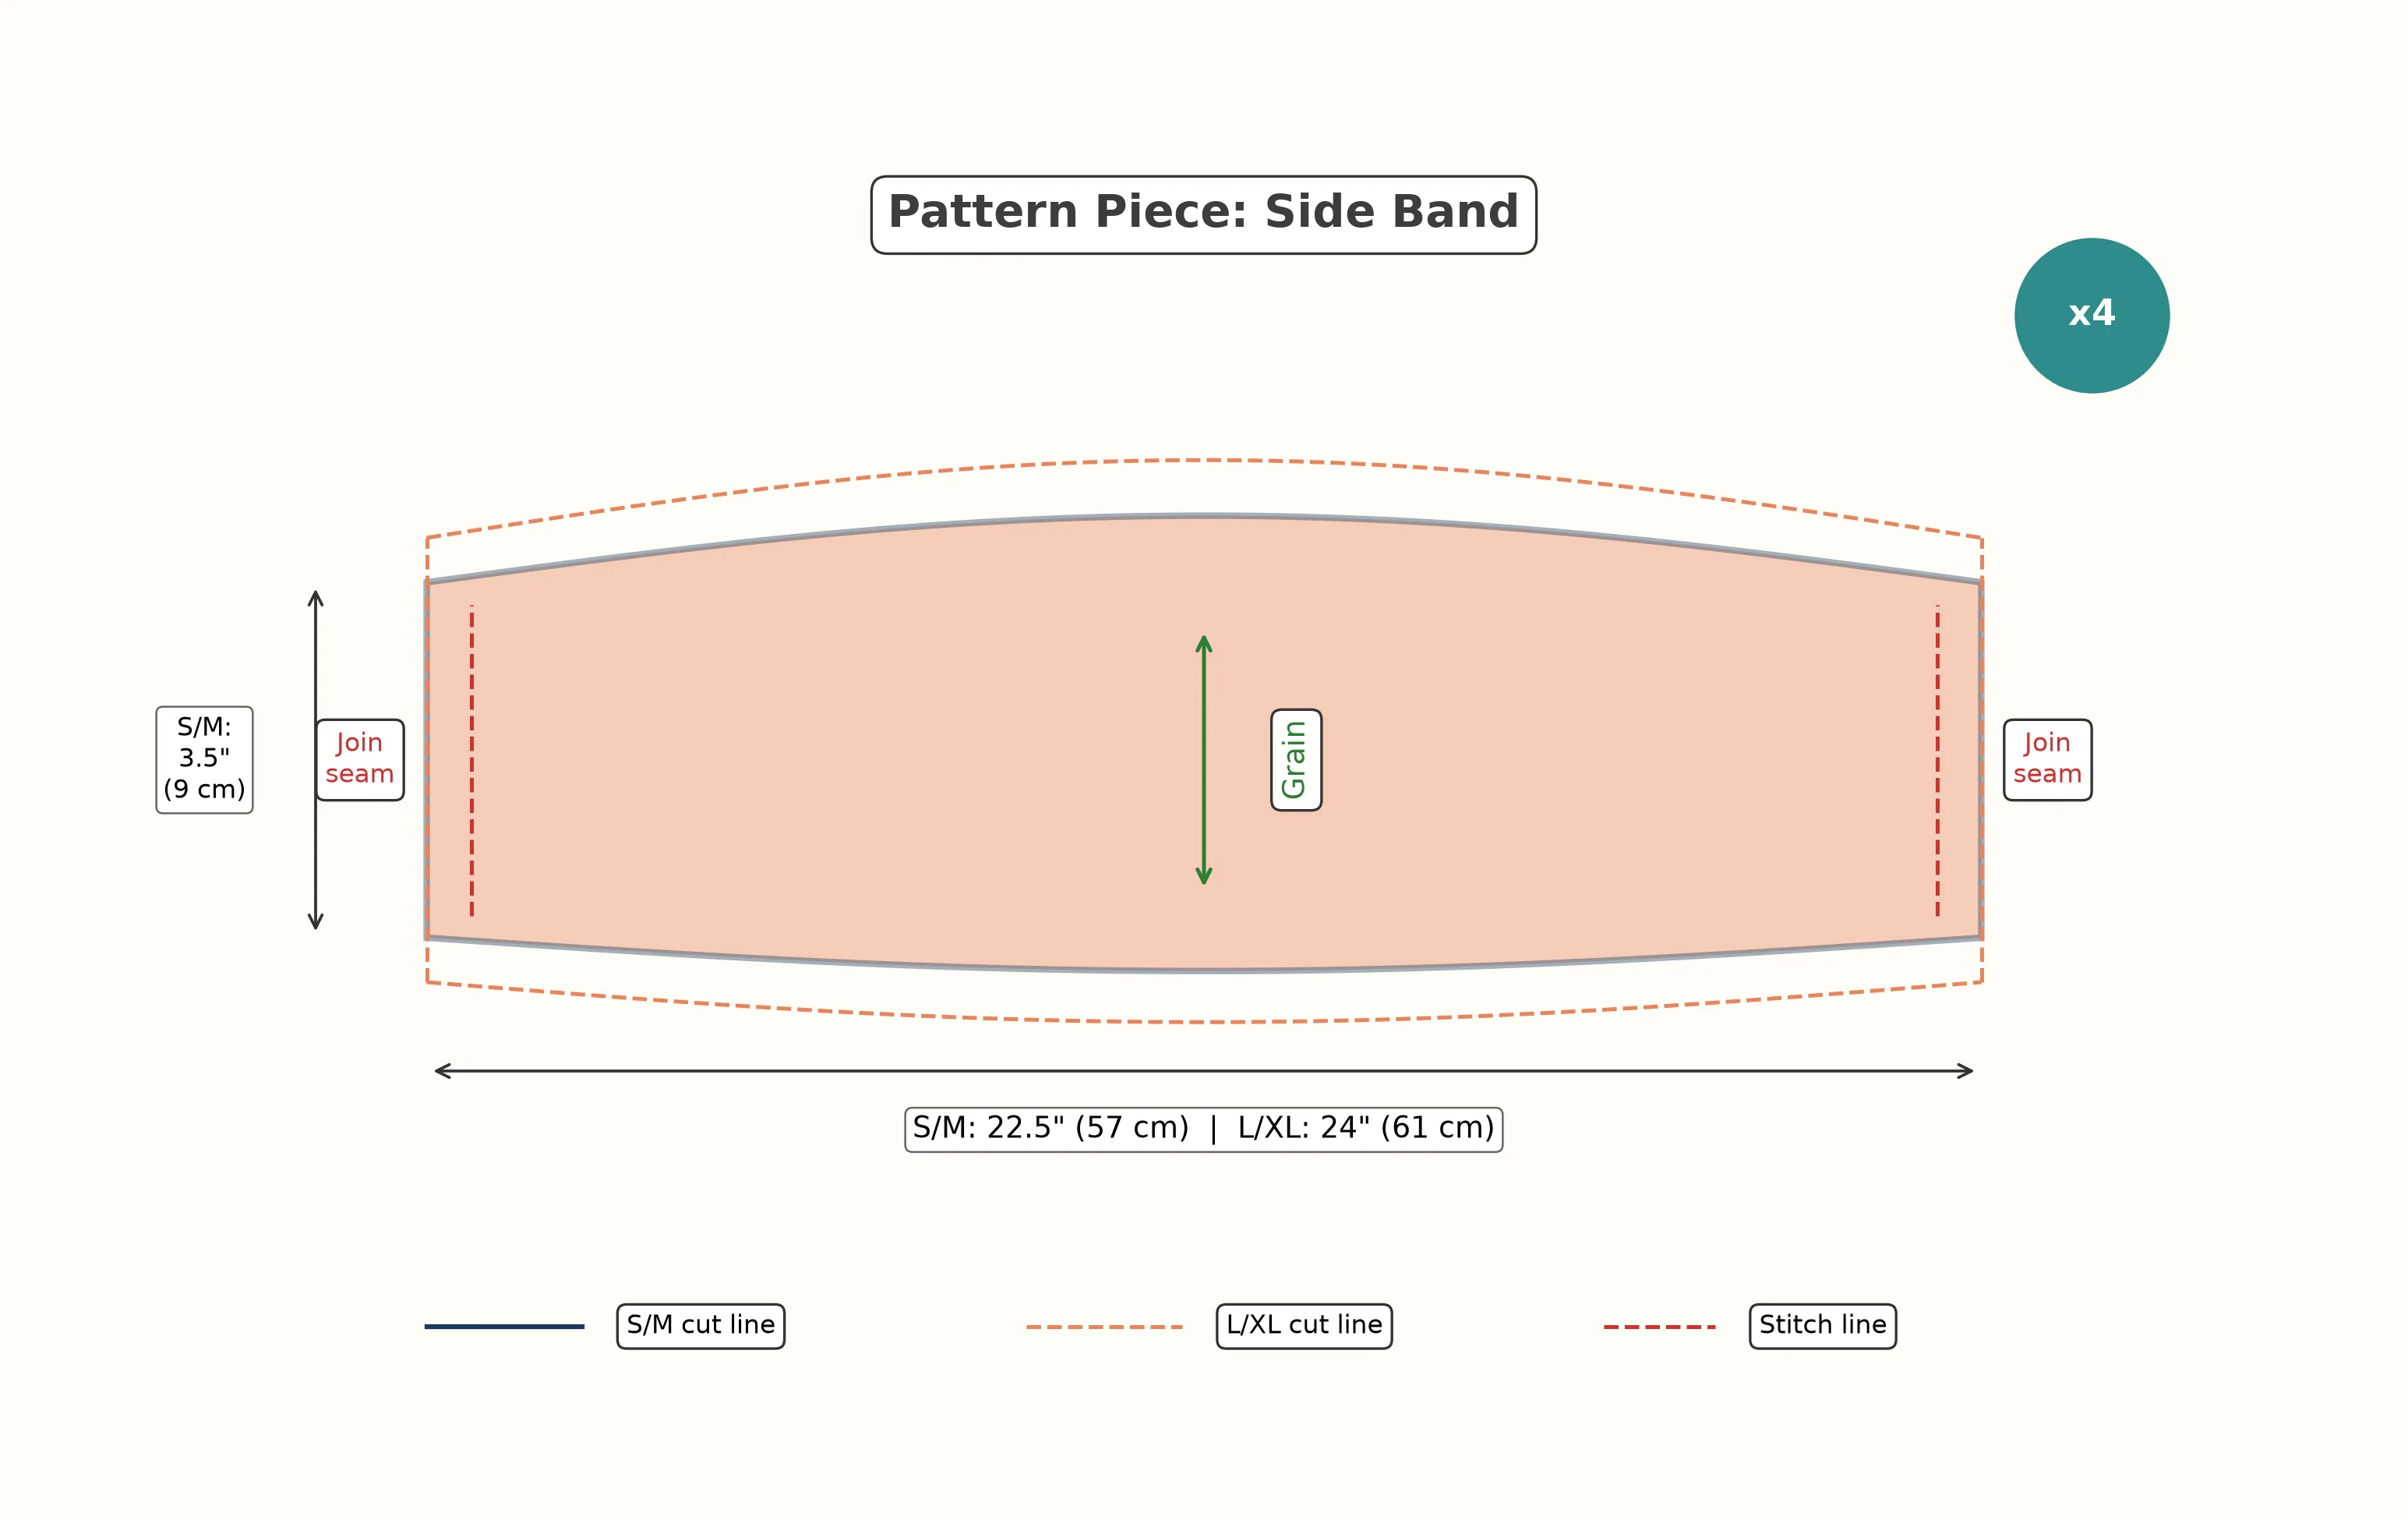
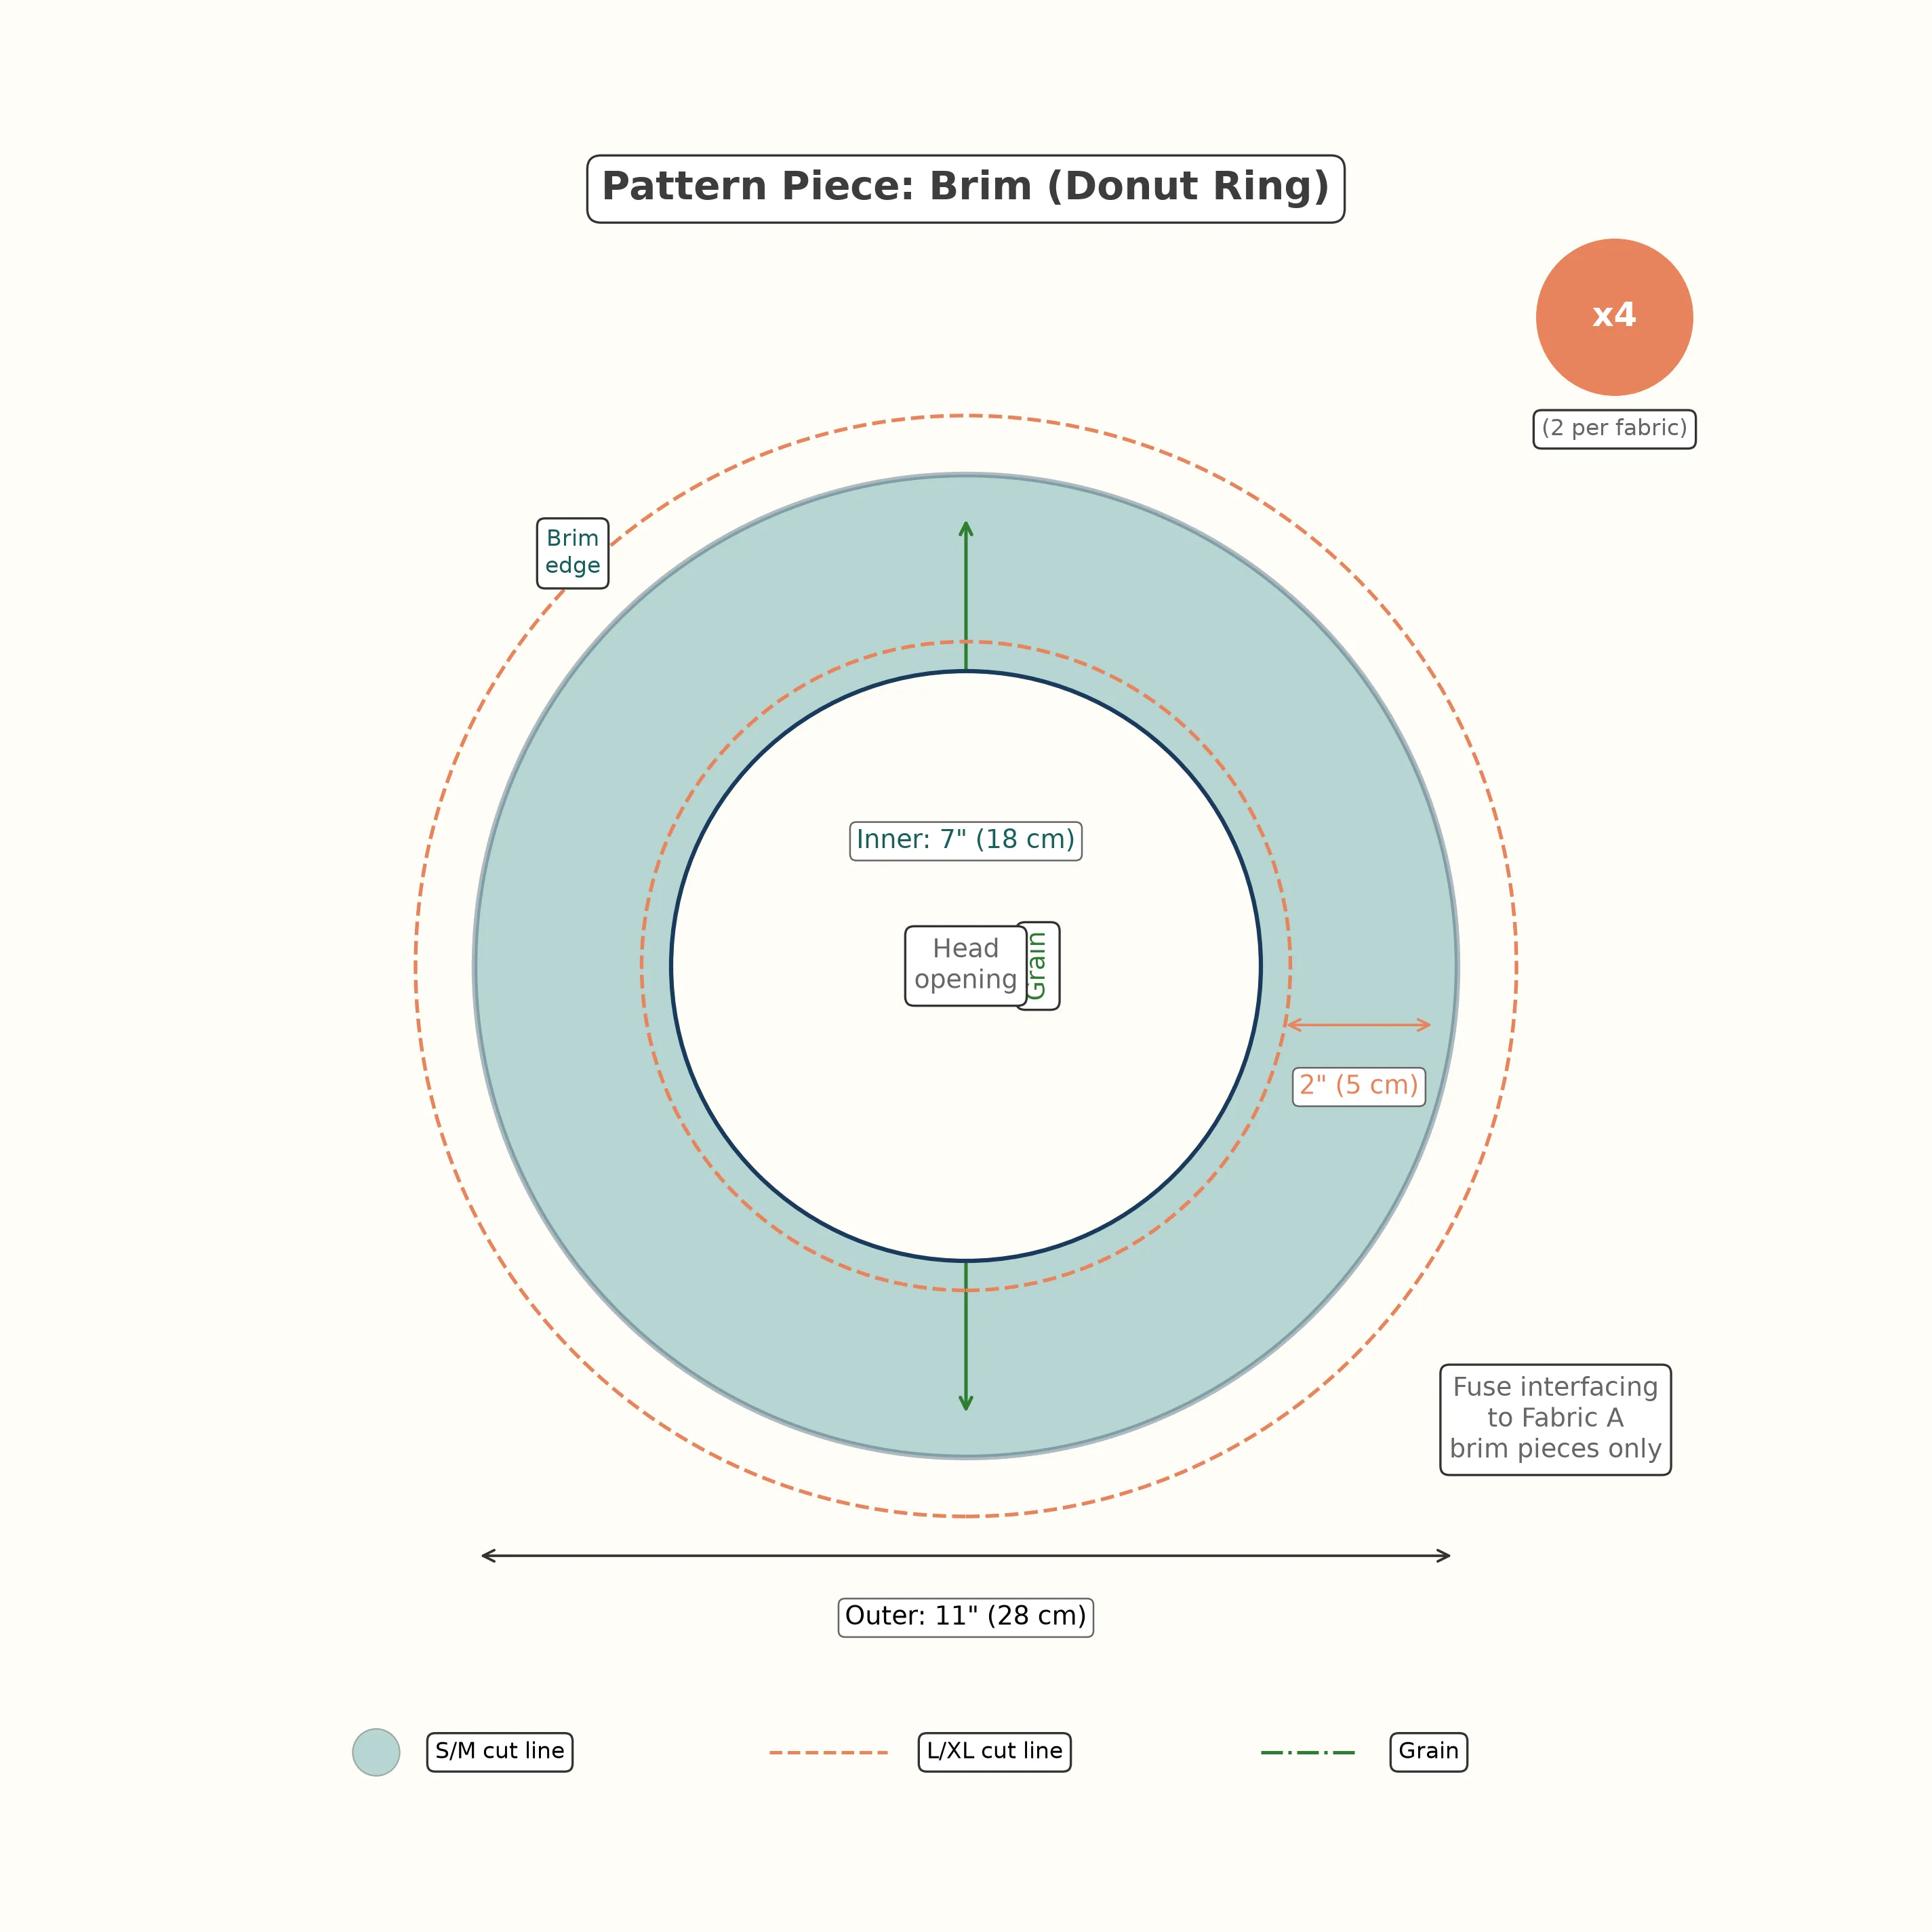
All pattern pieces include a ½ inch (1.3 cm) seam allowance (the extra fabric beyond the stitch line that gets hidden inside the seam). When you cut, cut directly on the outer edge of the pattern — the seam allowance is already built in.
Cutting Layout
Lay each fabric right side up on your cutting surface. Fold the fabric in half so you can cut symmetrical pieces more easily. The layout below shows how to arrange all pieces for one fabric layer; repeat the same layout for Fabric B.
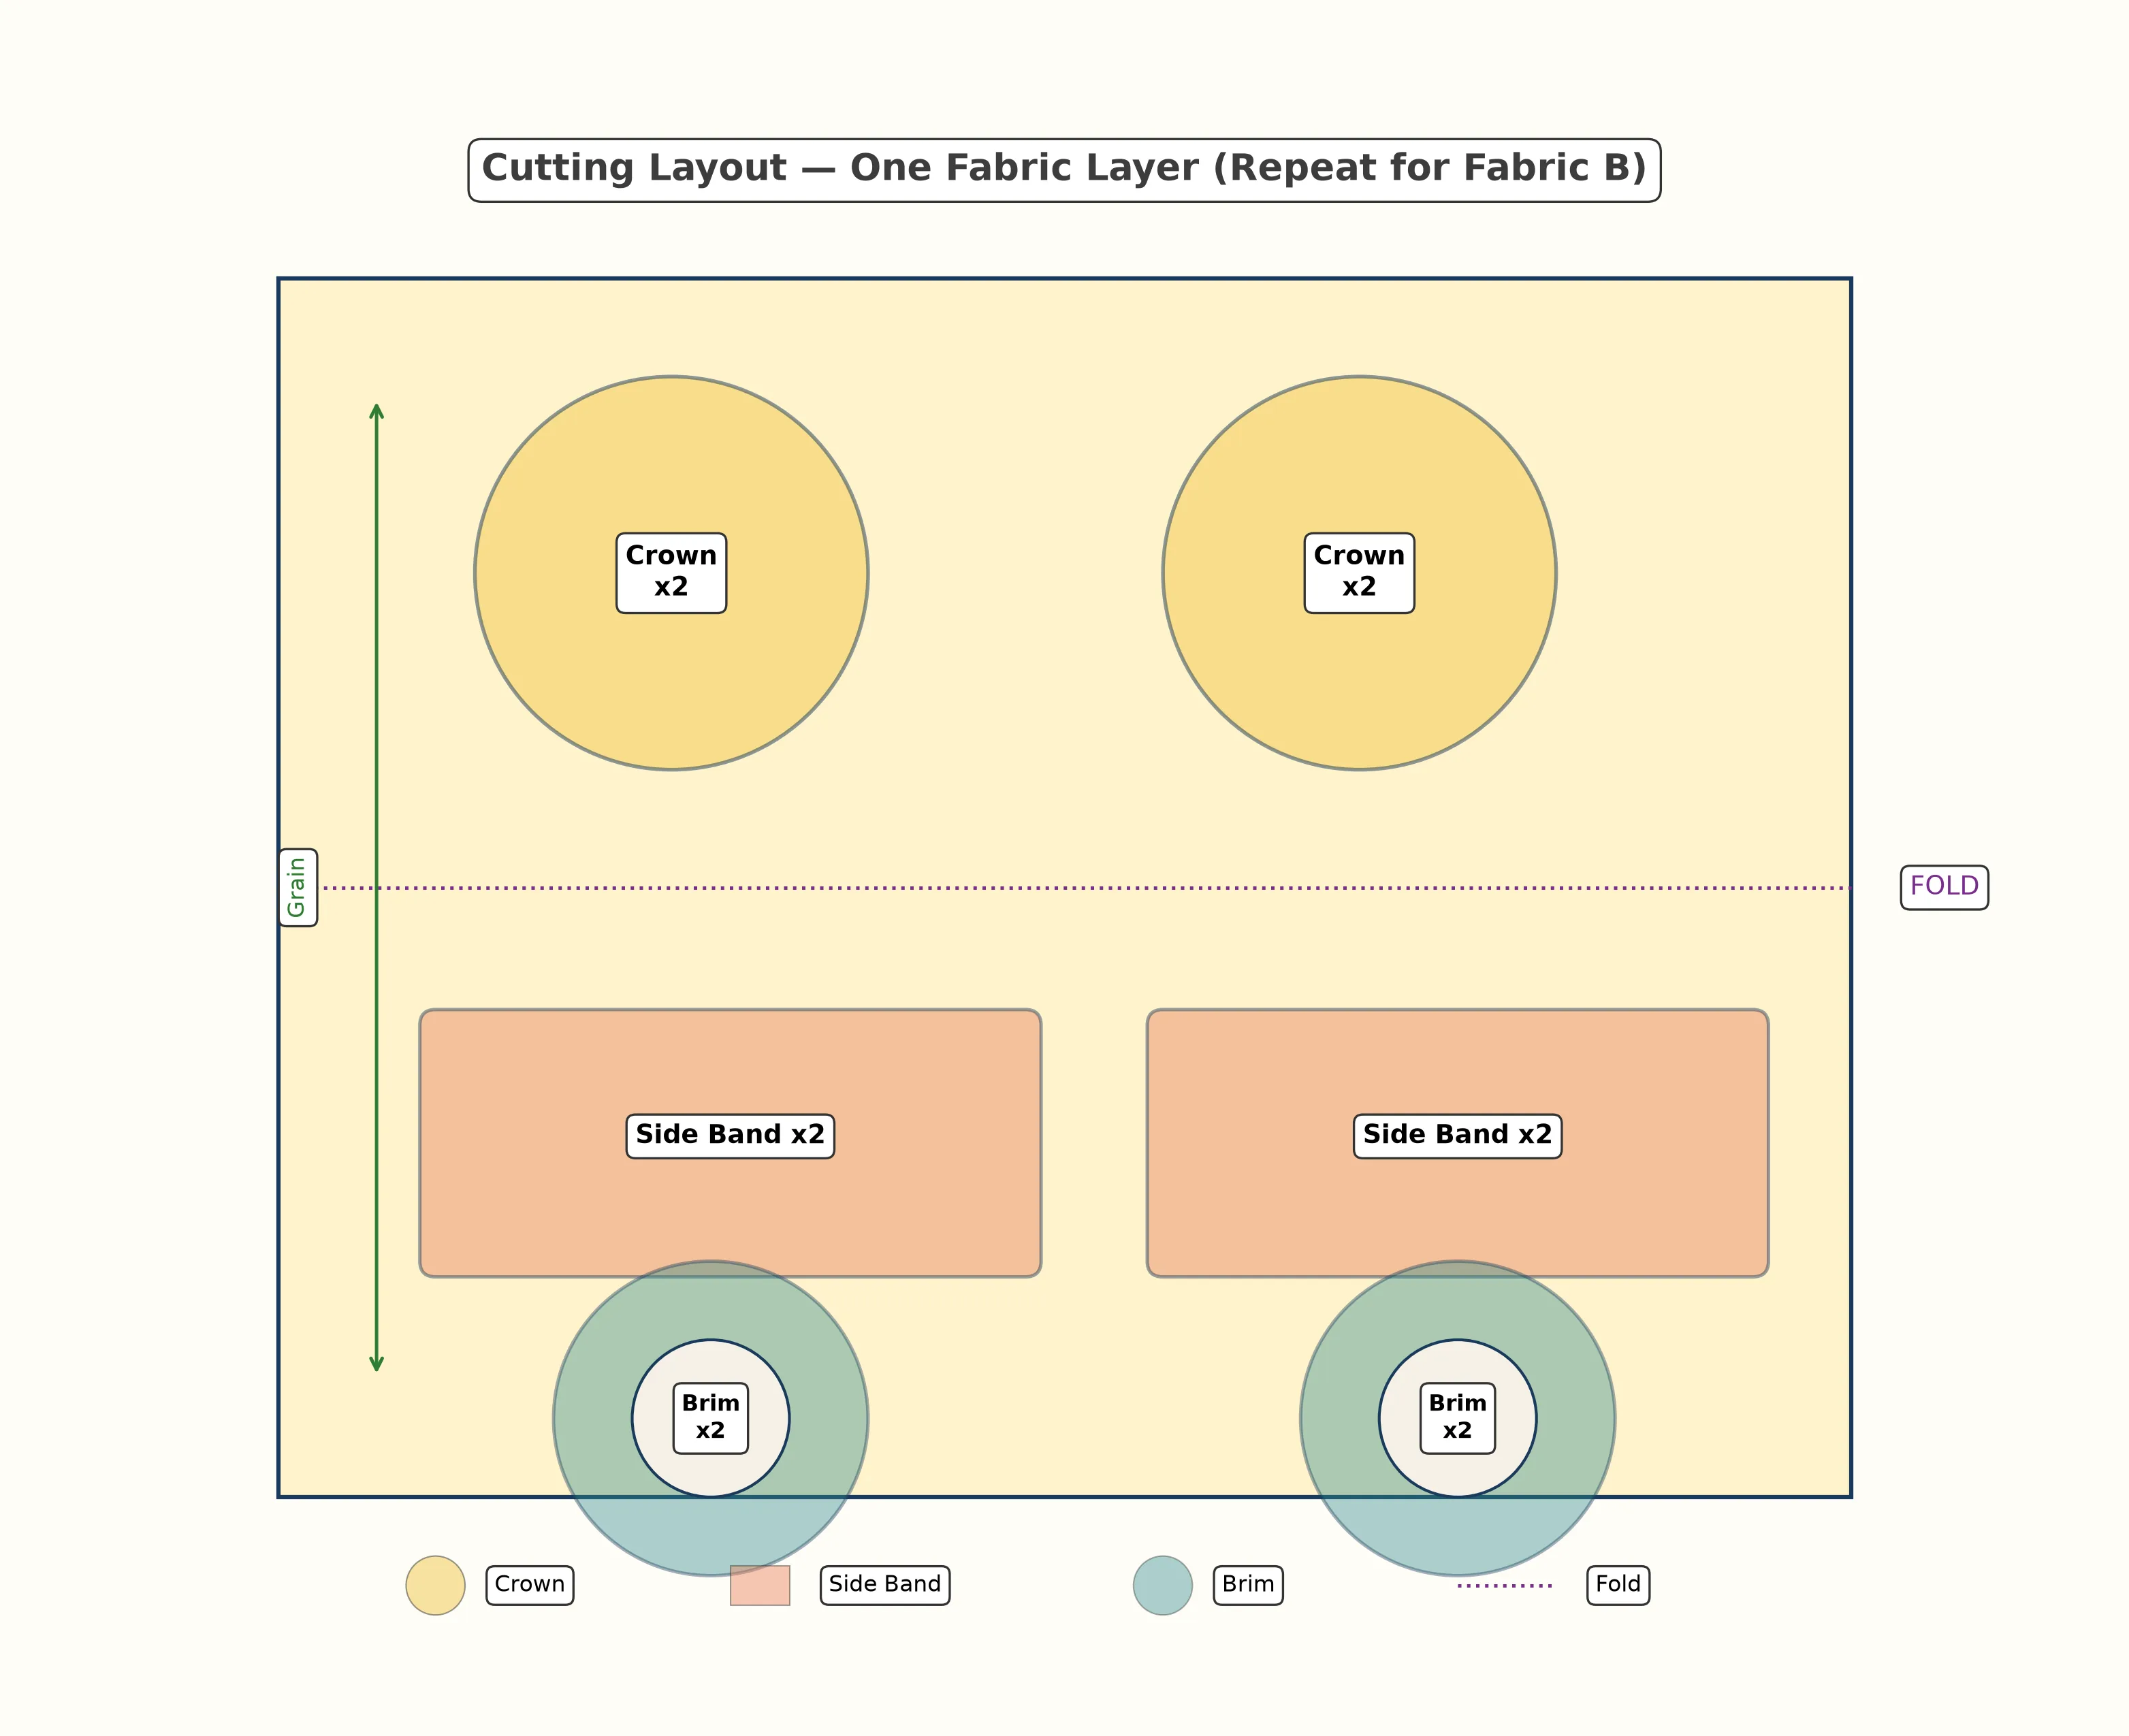
Cutting list per fabric: 2 crown circles, 2 side bands, 2 brim rings. That means 12 pieces total across both fabrics. If you are adding interfacing, cut 2 brim rings from the interfacing as well and fuse them to the wrong side of Fabric A's brim pieces before you start sewing.
Step-by-Step Construction
Now the fun part. We will build two complete hats and then join them. Take your time with the curved seams — they are the only tricky part, and I promise they get easier with every pin you place.
Sew the Side Bands into Loops
Take one pair of side band pieces (Fabric A) and place them right sides together (meaning the printed sides face each other). Stitch the short ends together with a ½ inch (1.3 cm) seam to form a ring. Press the seam open. Repeat for Fabric B. You now have two fabric tubes.
Attach the Crown to the Side Band
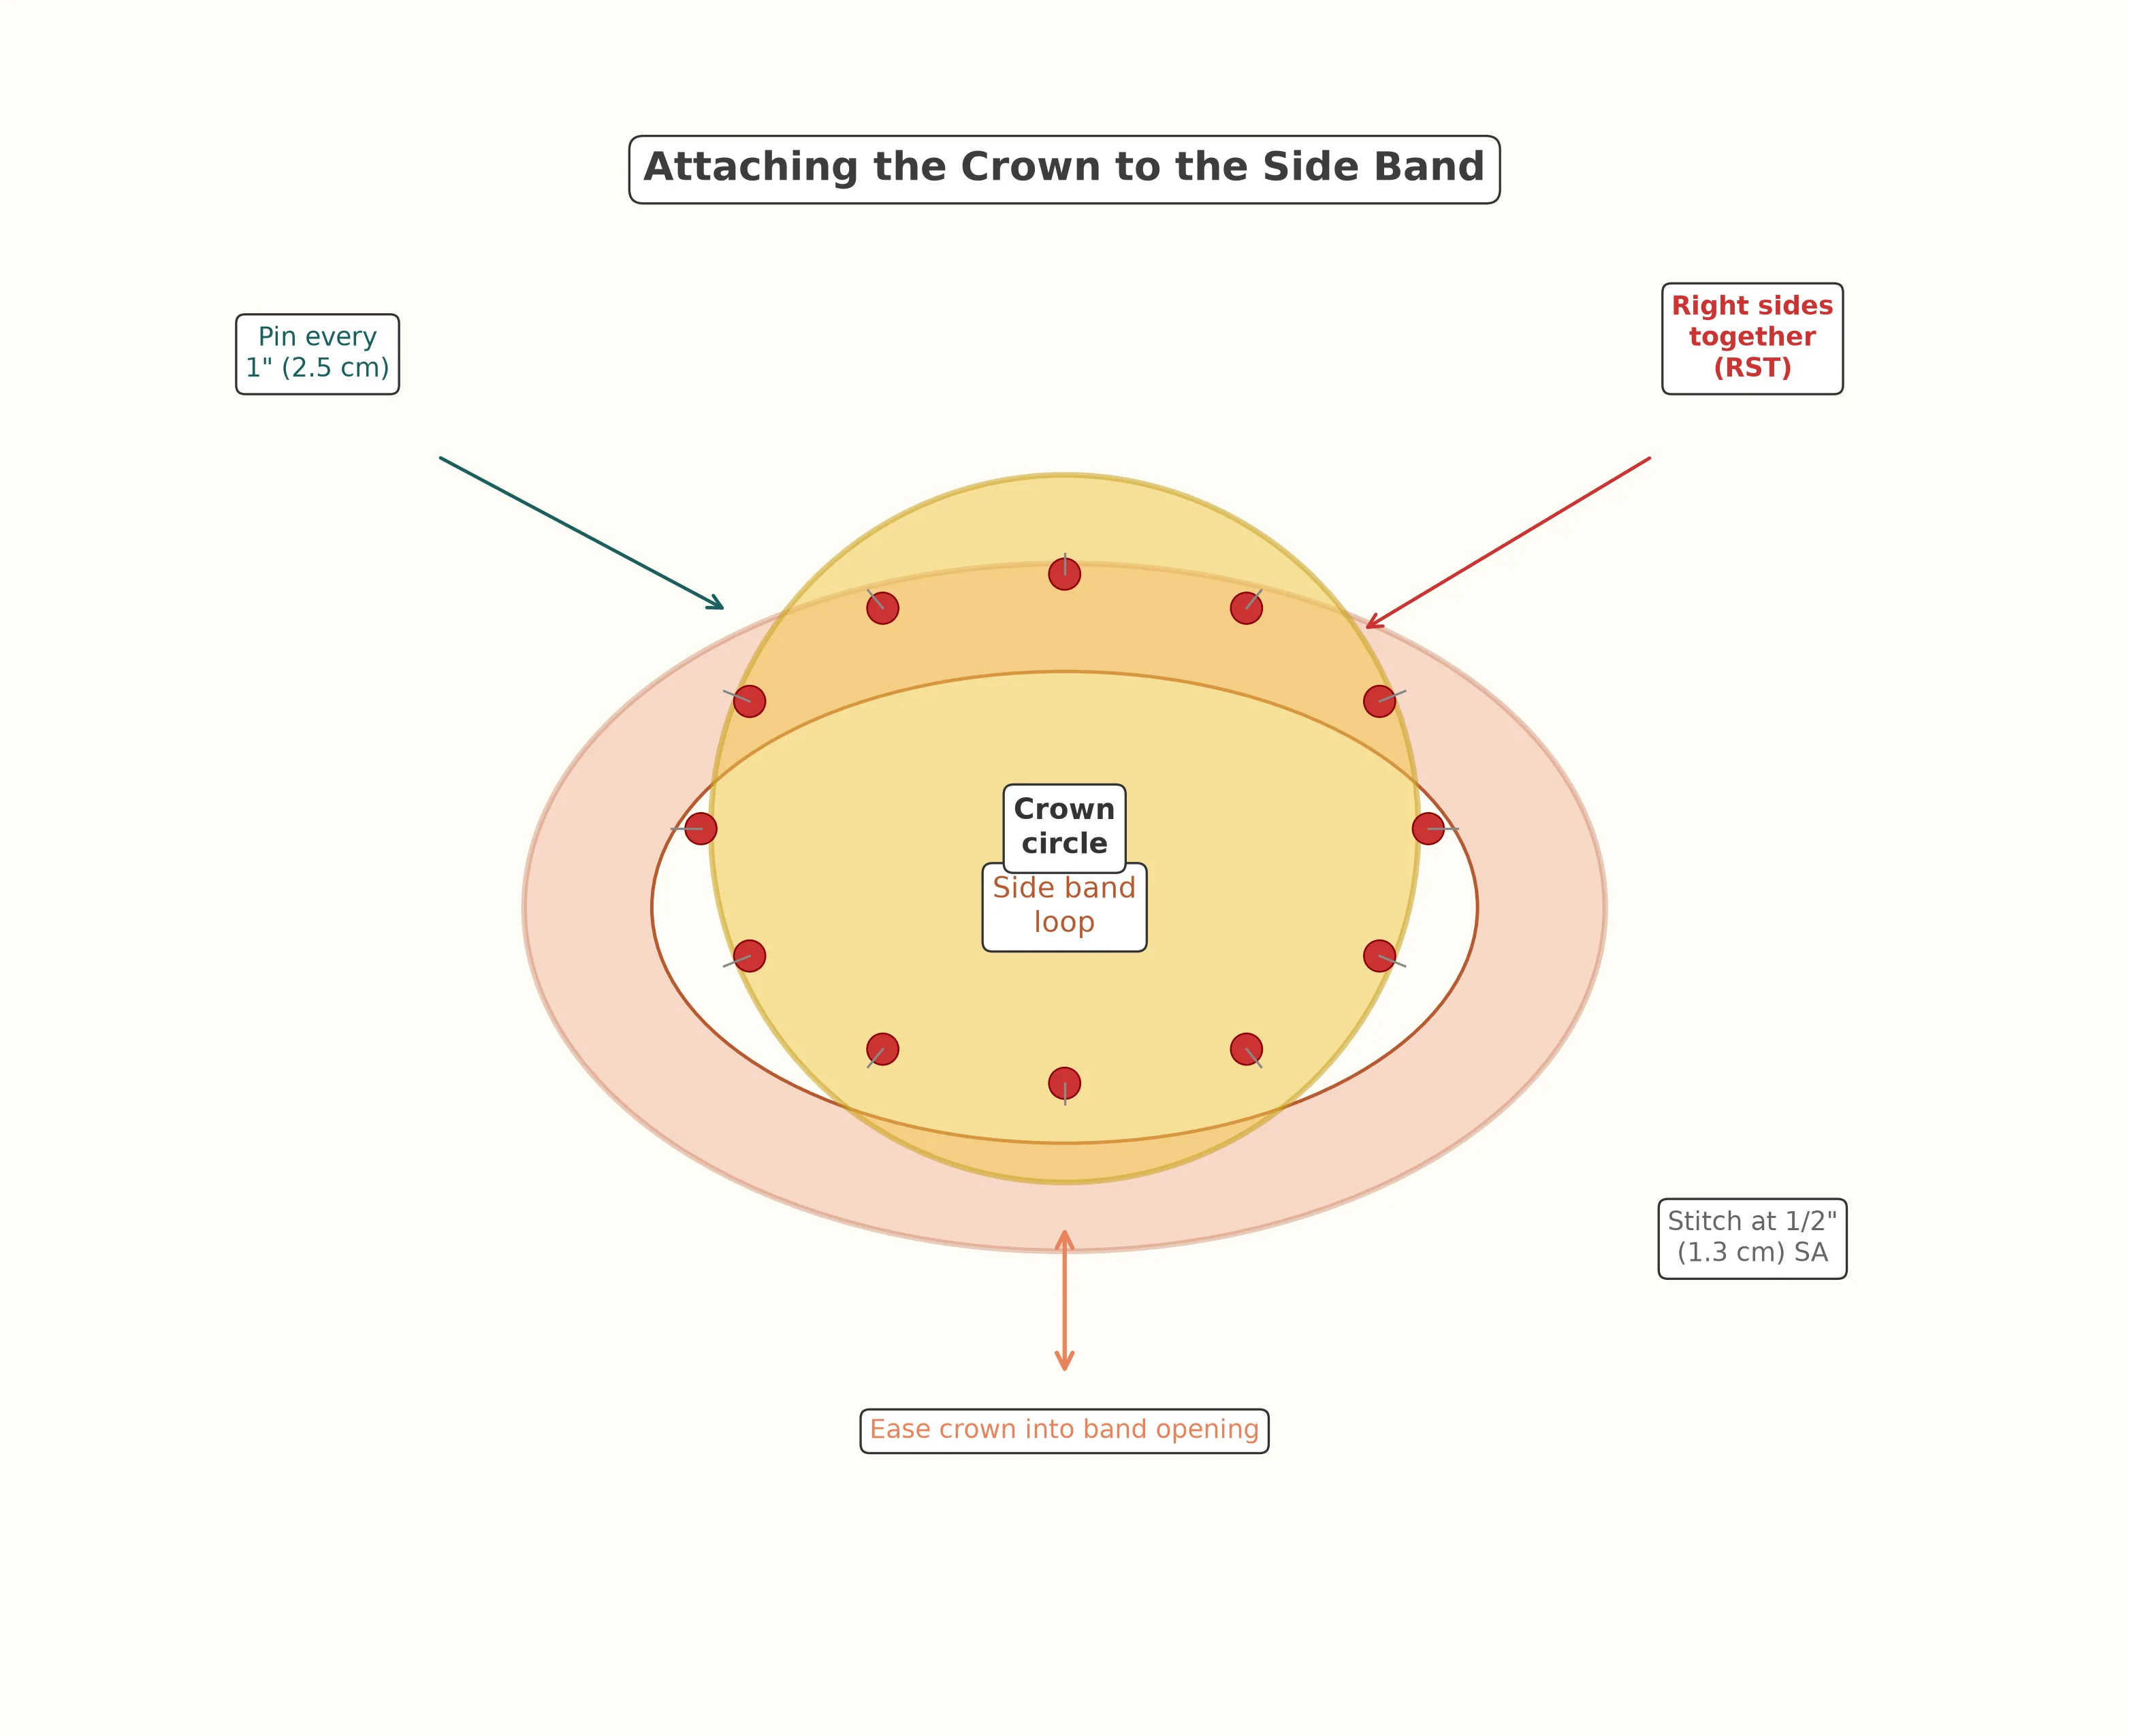
Pin the crown circle to the top edge of the side band loop, right sides together. This is your first curved seam, and the trick is to pin generously — I use a pin every 1 to 1½ inches (2.5 to 4 cm). The crown circle is slightly smaller than the side band opening, so you will need to ease the fabric (gently stretch the shorter edge to match the longer one without creating puckers). Stitch slowly at a ½ inch (1.3 cm) seam allowance.
Clip the Seam Allowances
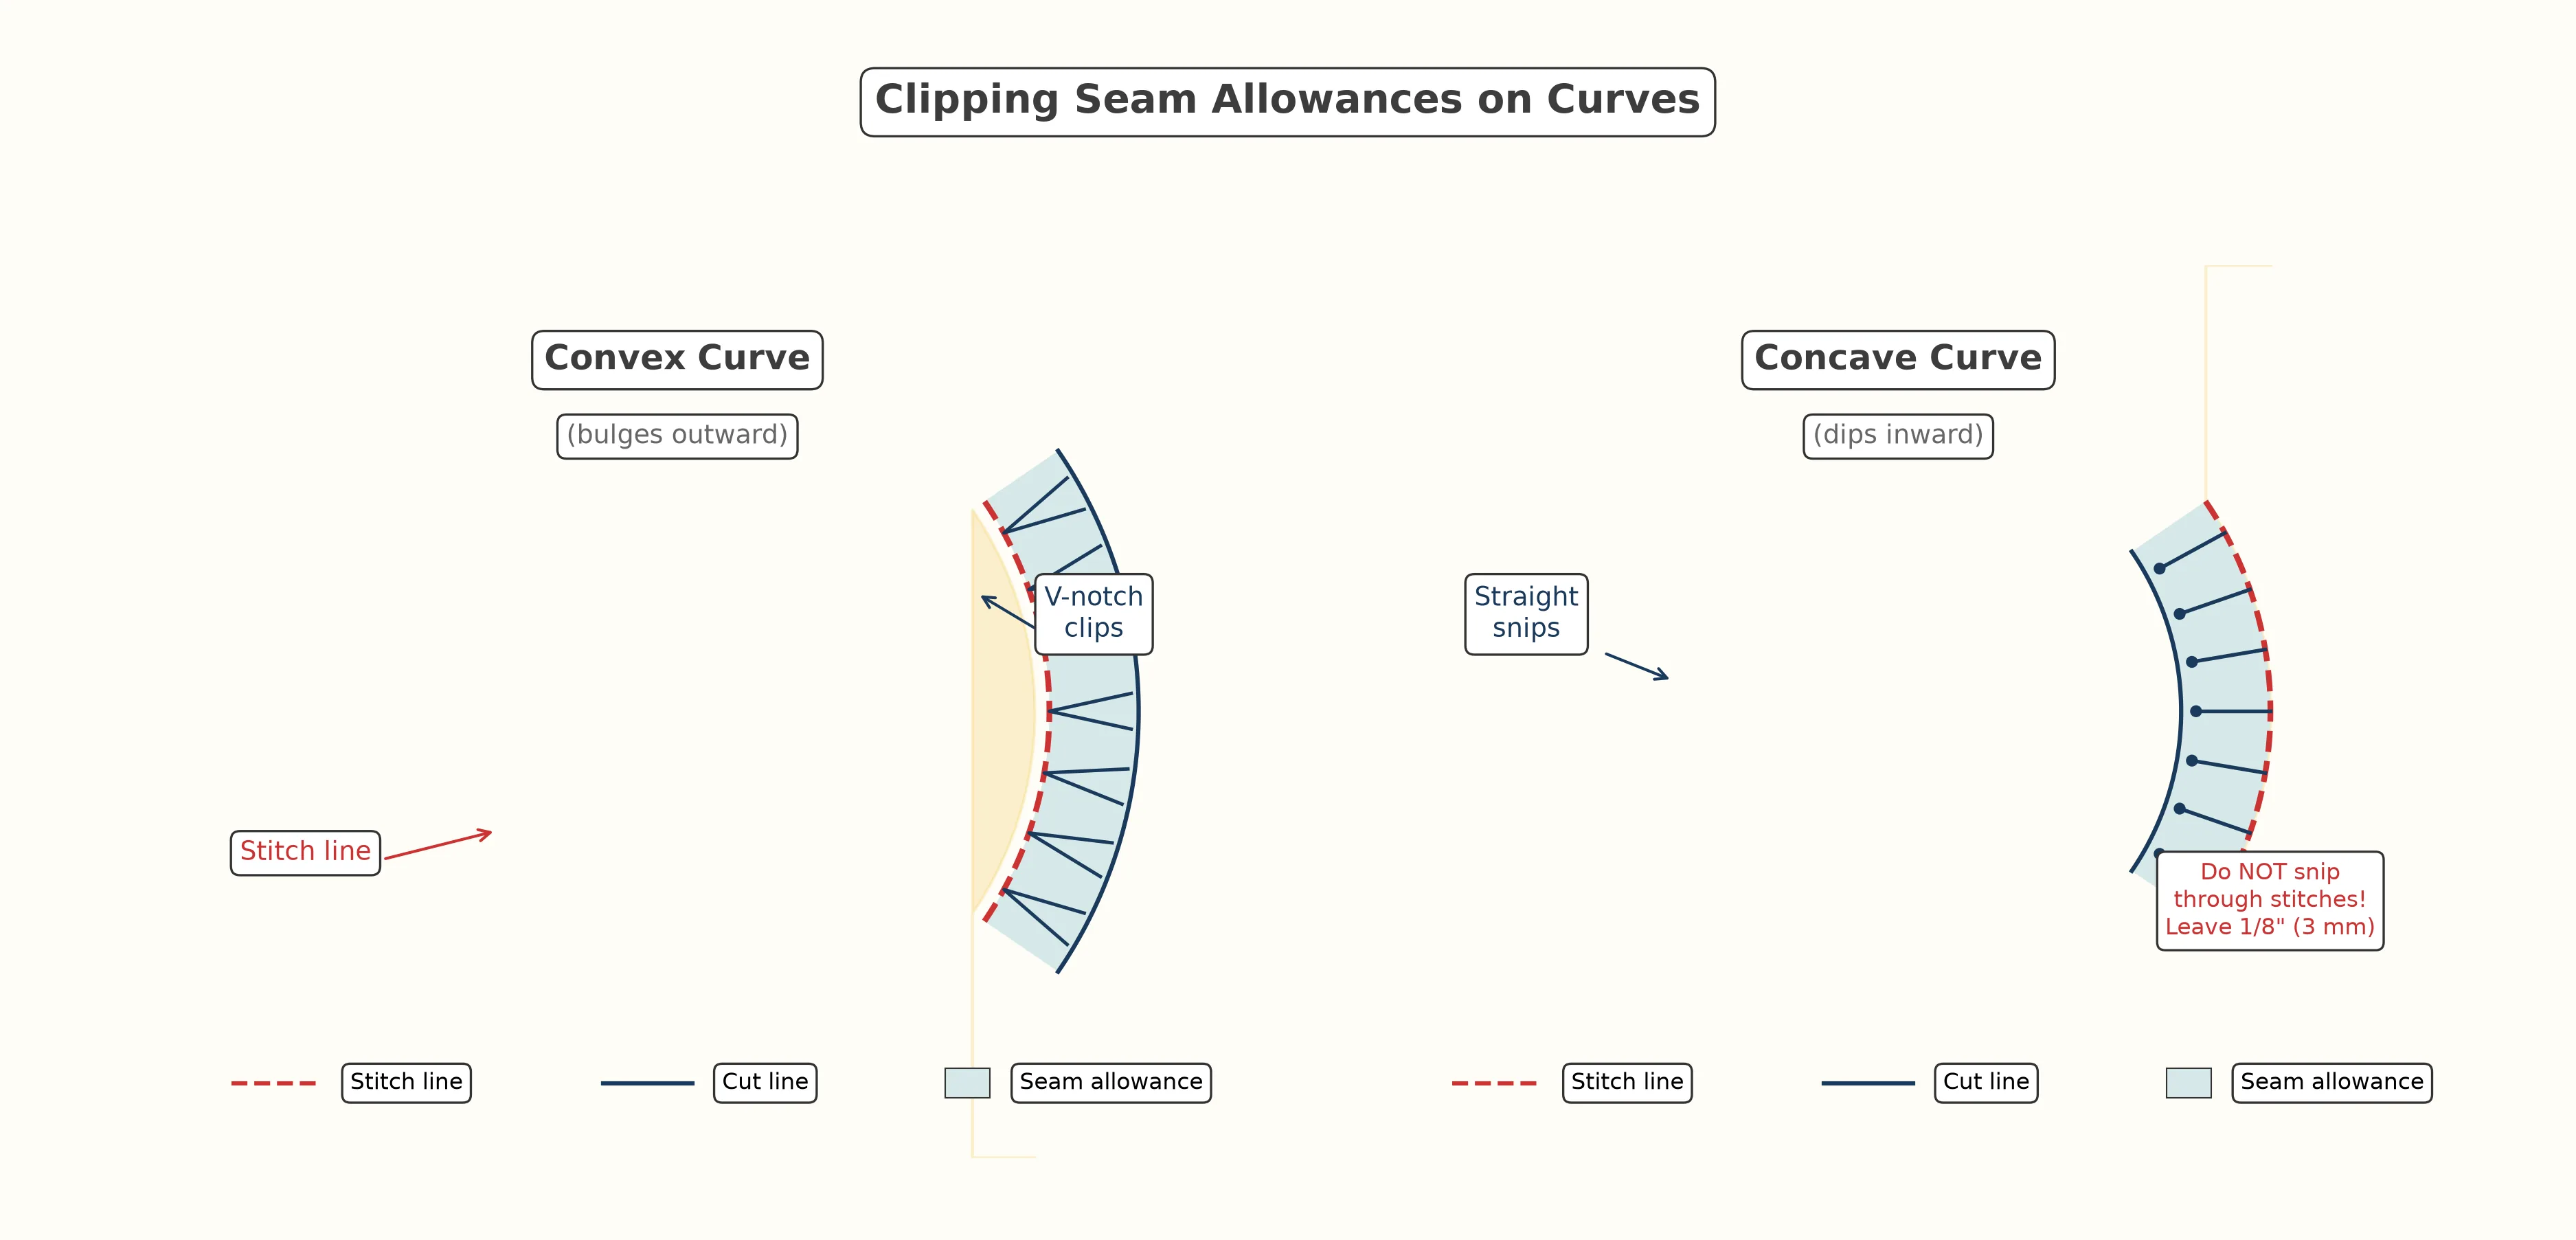
This step is the secret to smooth curves. Clipping means cutting small snips into the seam allowance (the extra fabric between your stitch line and the raw edge) so the fabric can spread or compress around a curve without puckering. For convex curves (curves that bulge outward, like the crown edge), cut small V-shaped notches into the seam allowance every ½ inch (1.3 cm). For concave curves (curves that dip inward), make straight snips toward — but not through — the stitch line.
Attach the Brim to the Side Band
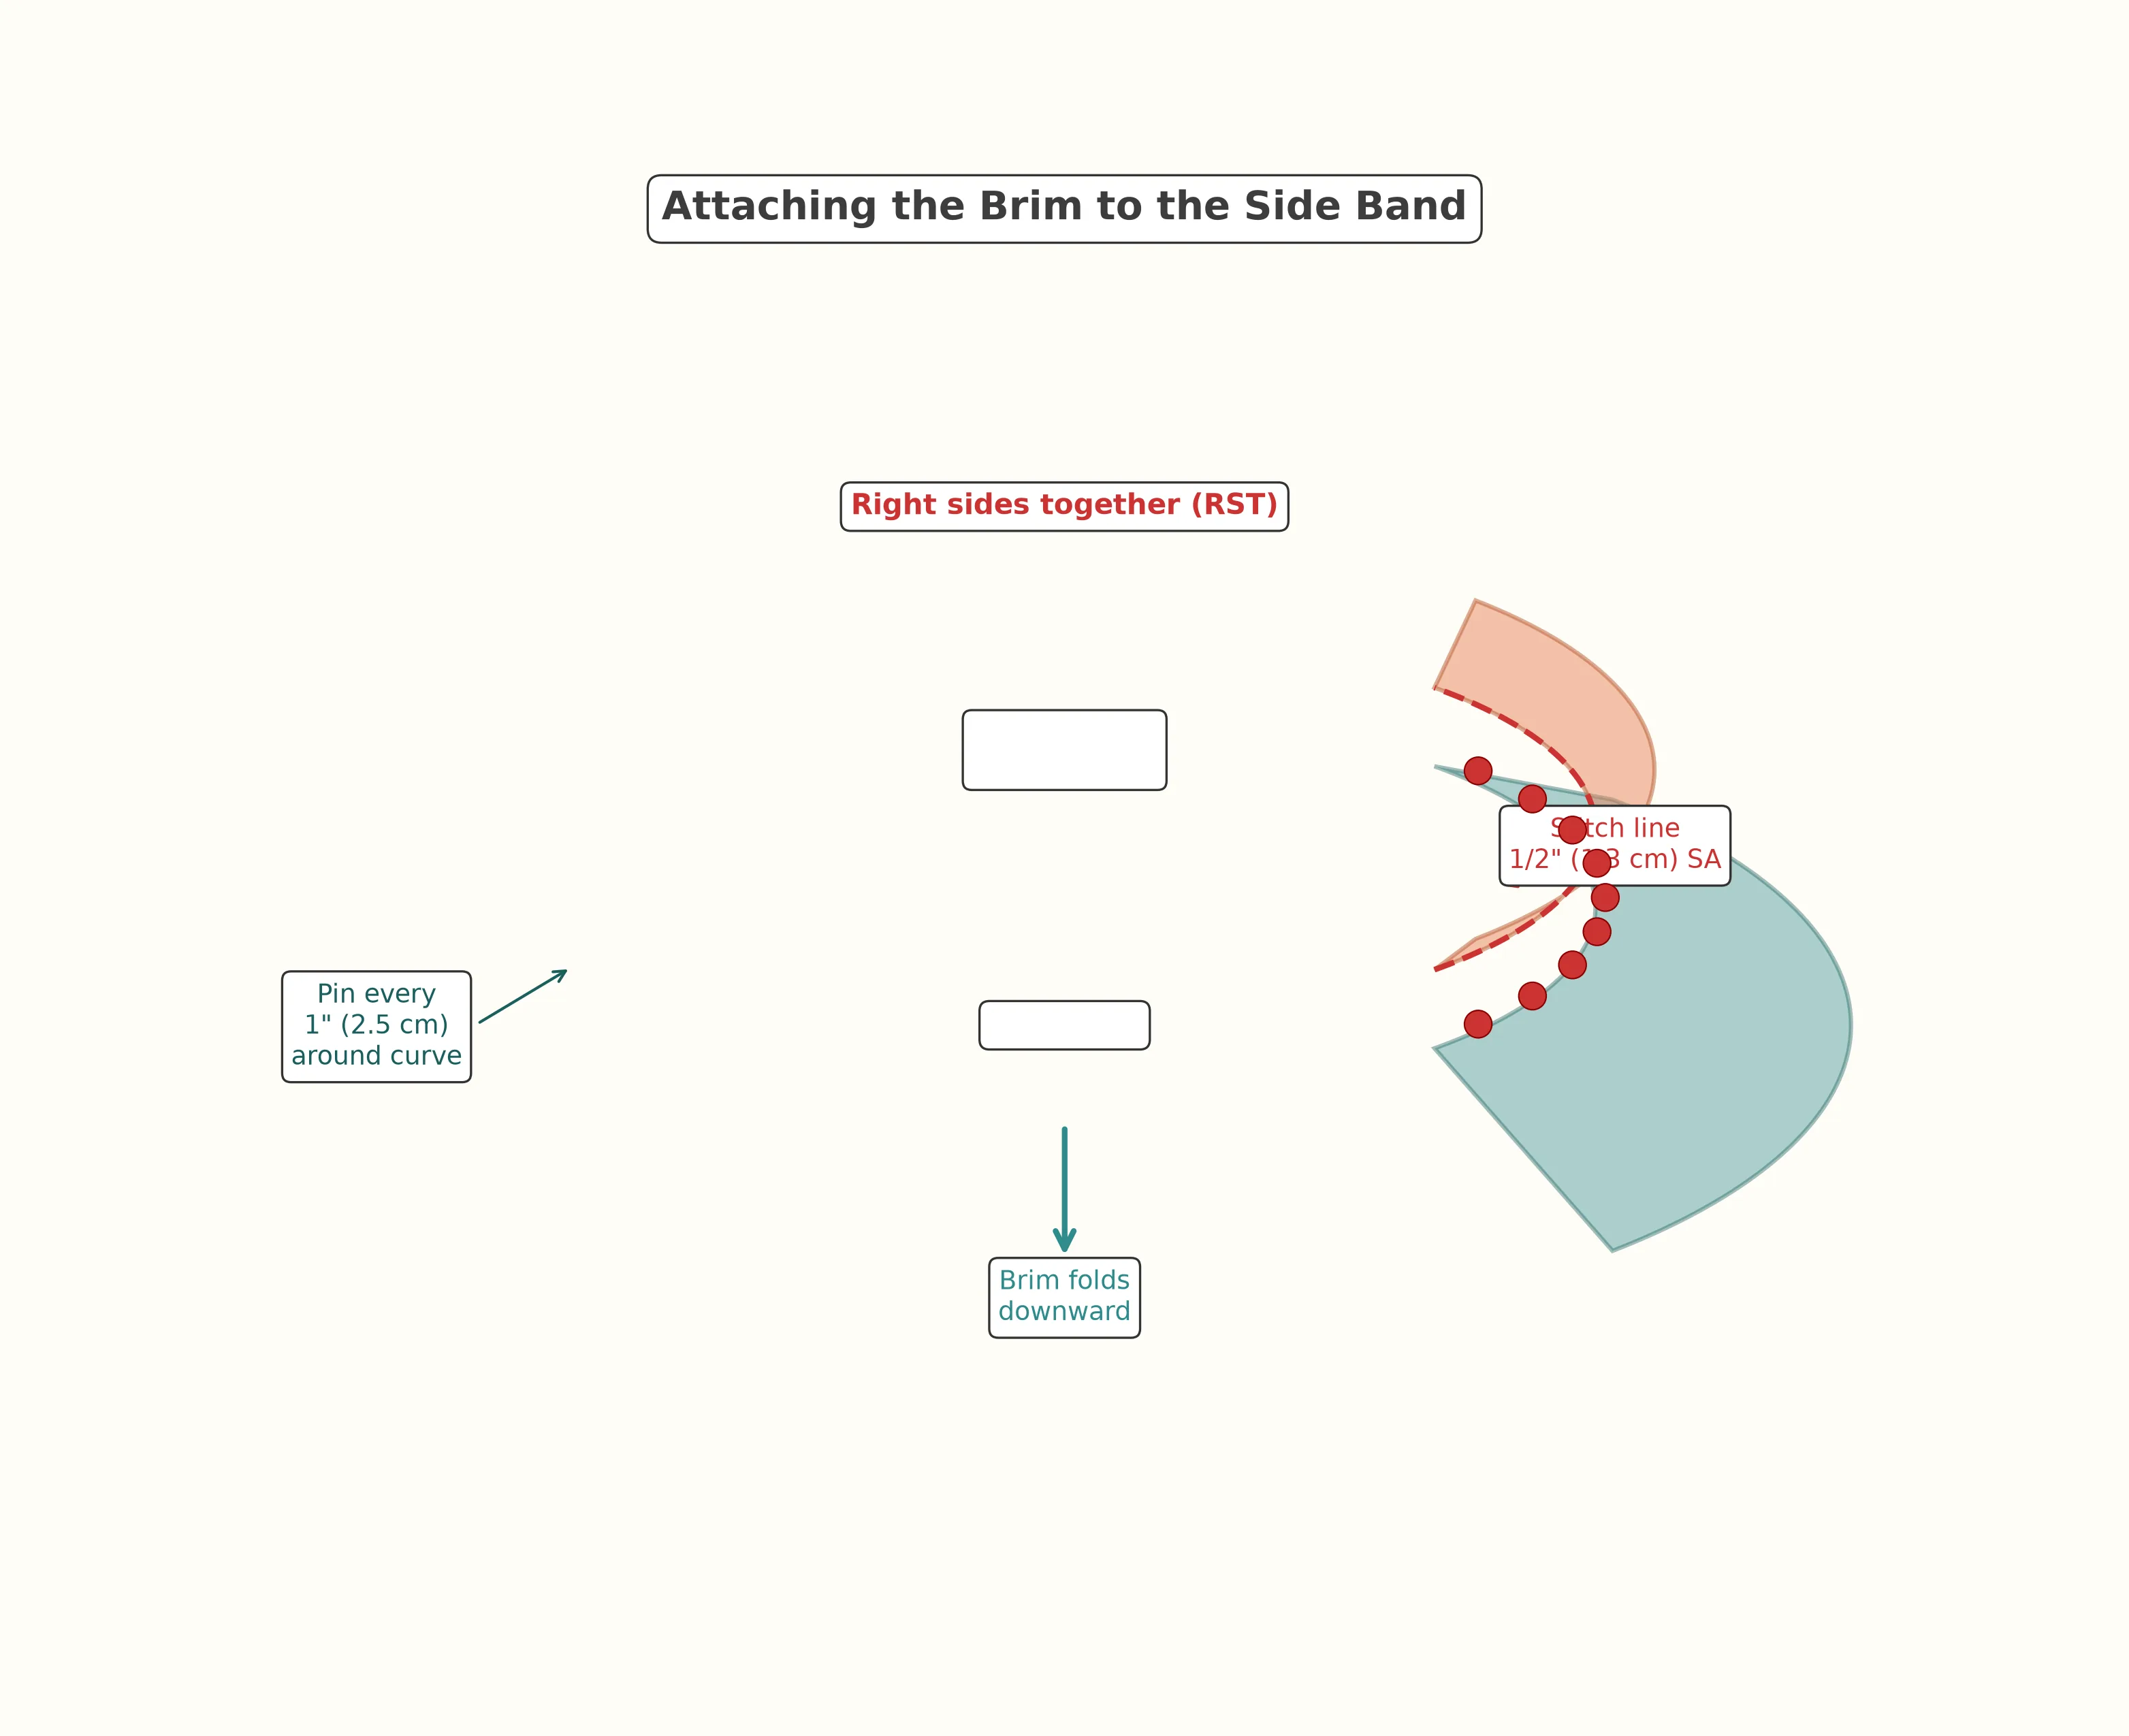
Pin the inner edge of the brim ring to the bottom edge of the side band, right sides together. Again, this is a curved seam, so pin every inch (2.5 cm) and ease gently. Stitch at ½ inch (1.3 cm), then clip the seam allowance. Press the seam toward the brim.
Repeat for Fabric B
Complete Steps 1 through 4 with your second fabric. You should now have two complete bucket hats — one in each fabric — with all seams on the inside. Set one hat aside; we will join them next.
Join the Two Hat Layers
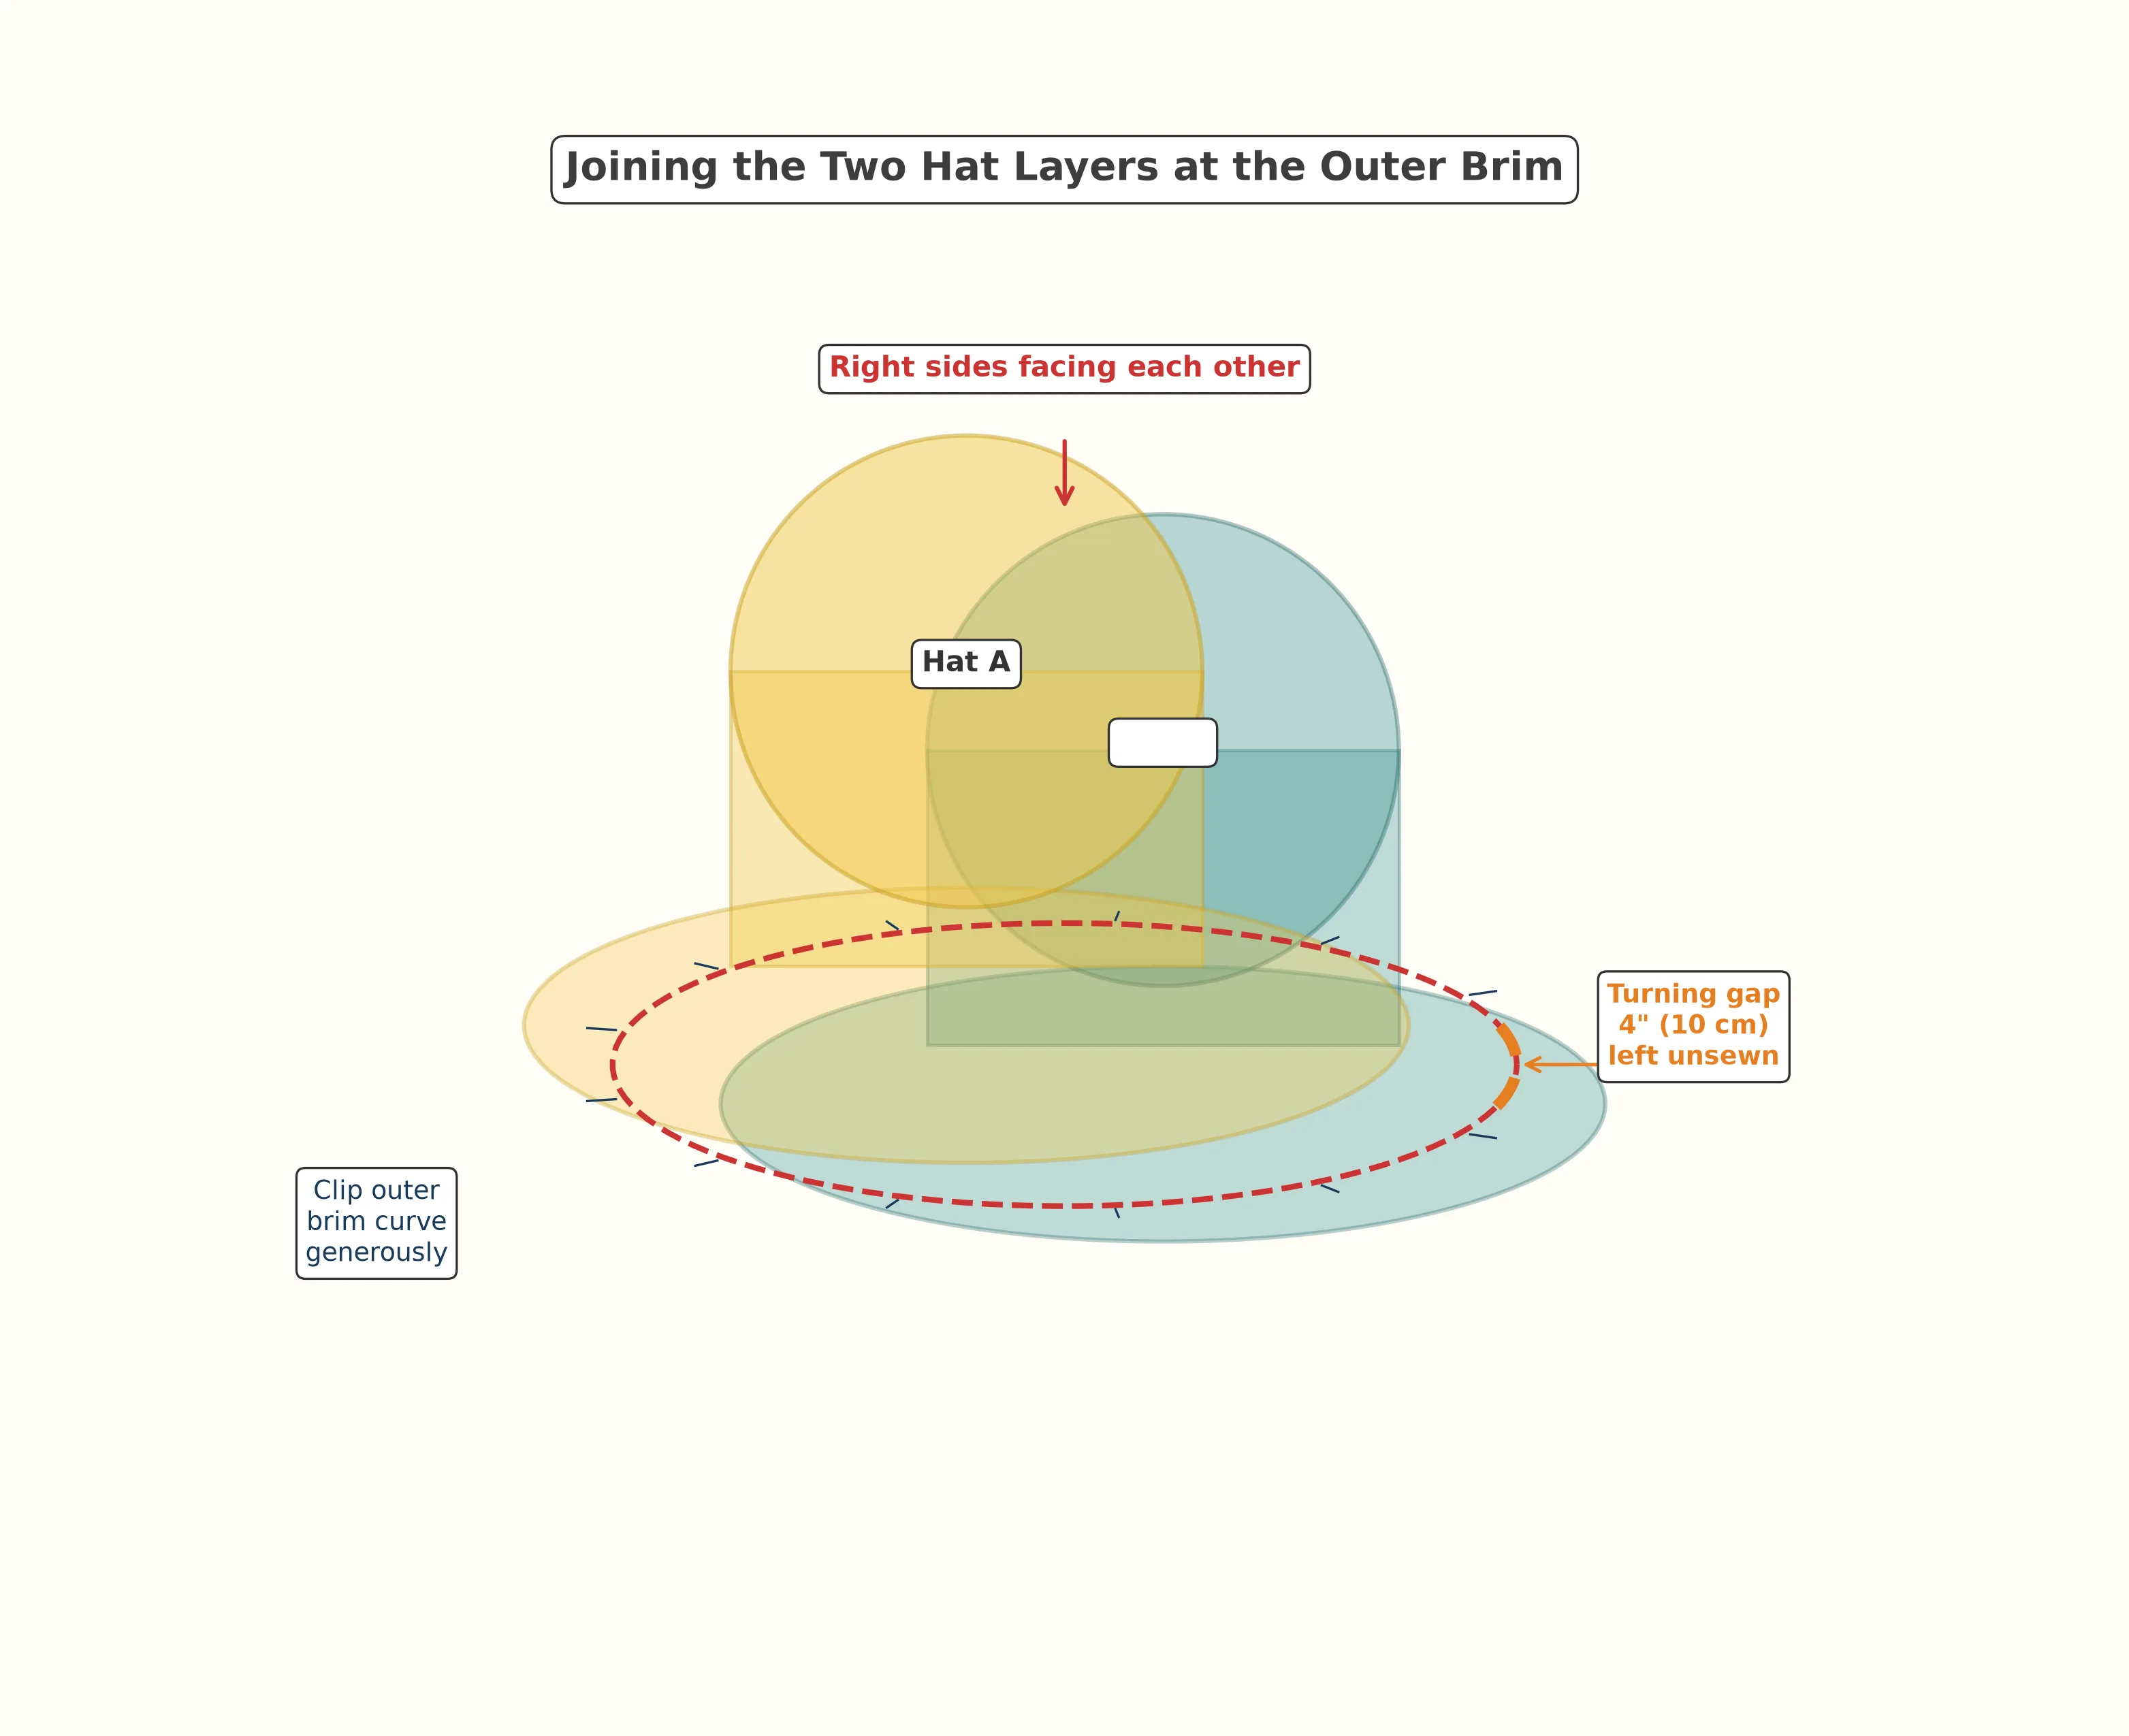
Place both hats right sides together so the printed fabrics face each other and the raw brim edges align. Pin all the way around the outer brim edge. Stitch around the entire outer brim at ½ inch (1.3 cm), leaving a 4 inch (10 cm) gap unsewn for turning. Clip the outer brim curve generously.
Turn Right Side Out & Press
Reach through the turning gap and pull the entire hat right side out. Use a blunt tool (a chopstick or the eraser end of a pencil works well) to gently push out the brim edge so it is crisp and even. Press the brim flat with a warm iron.
Topstitch the Brim
Edgestitch (stitch very close to the edge, about ⅛ inch or 3 mm from the fold) around the outer brim to close the turning gap and give the brim a clean finish. For extra structure, add one or two more rows of concentric topstitching around the brim, spacing them about ¼ inch (6 mm) apart. This is what gives a bucket hat that professional, store-bought look.
Sizing Guide
Measure around the fullest part of your head, just above the ears and across the forehead, using a flexible measuring tape. Compare your measurement to the chart below to choose your size.
| Measurement | S/M | L/XL |
|---|---|---|
| Head circumference | 21–22.5" (53–57 cm) | 22.5–24" (57–61 cm) |
| Crown diameter | 7" (18 cm) | 7.5" (19 cm) |
| Side band height | 3.5" (9 cm) | 3.75" (9.5 cm) |
| Side band circumference | 22.5" (57 cm) | 24" (61 cm) |
| Brim inner diameter | 7" (18 cm) | 7.5" (19 cm) |
| Brim outer diameter | 11" (28 cm) | 12" (30.5 cm) |
| Brim width | 2" (5 cm) | 2.25" (5.7 cm) |
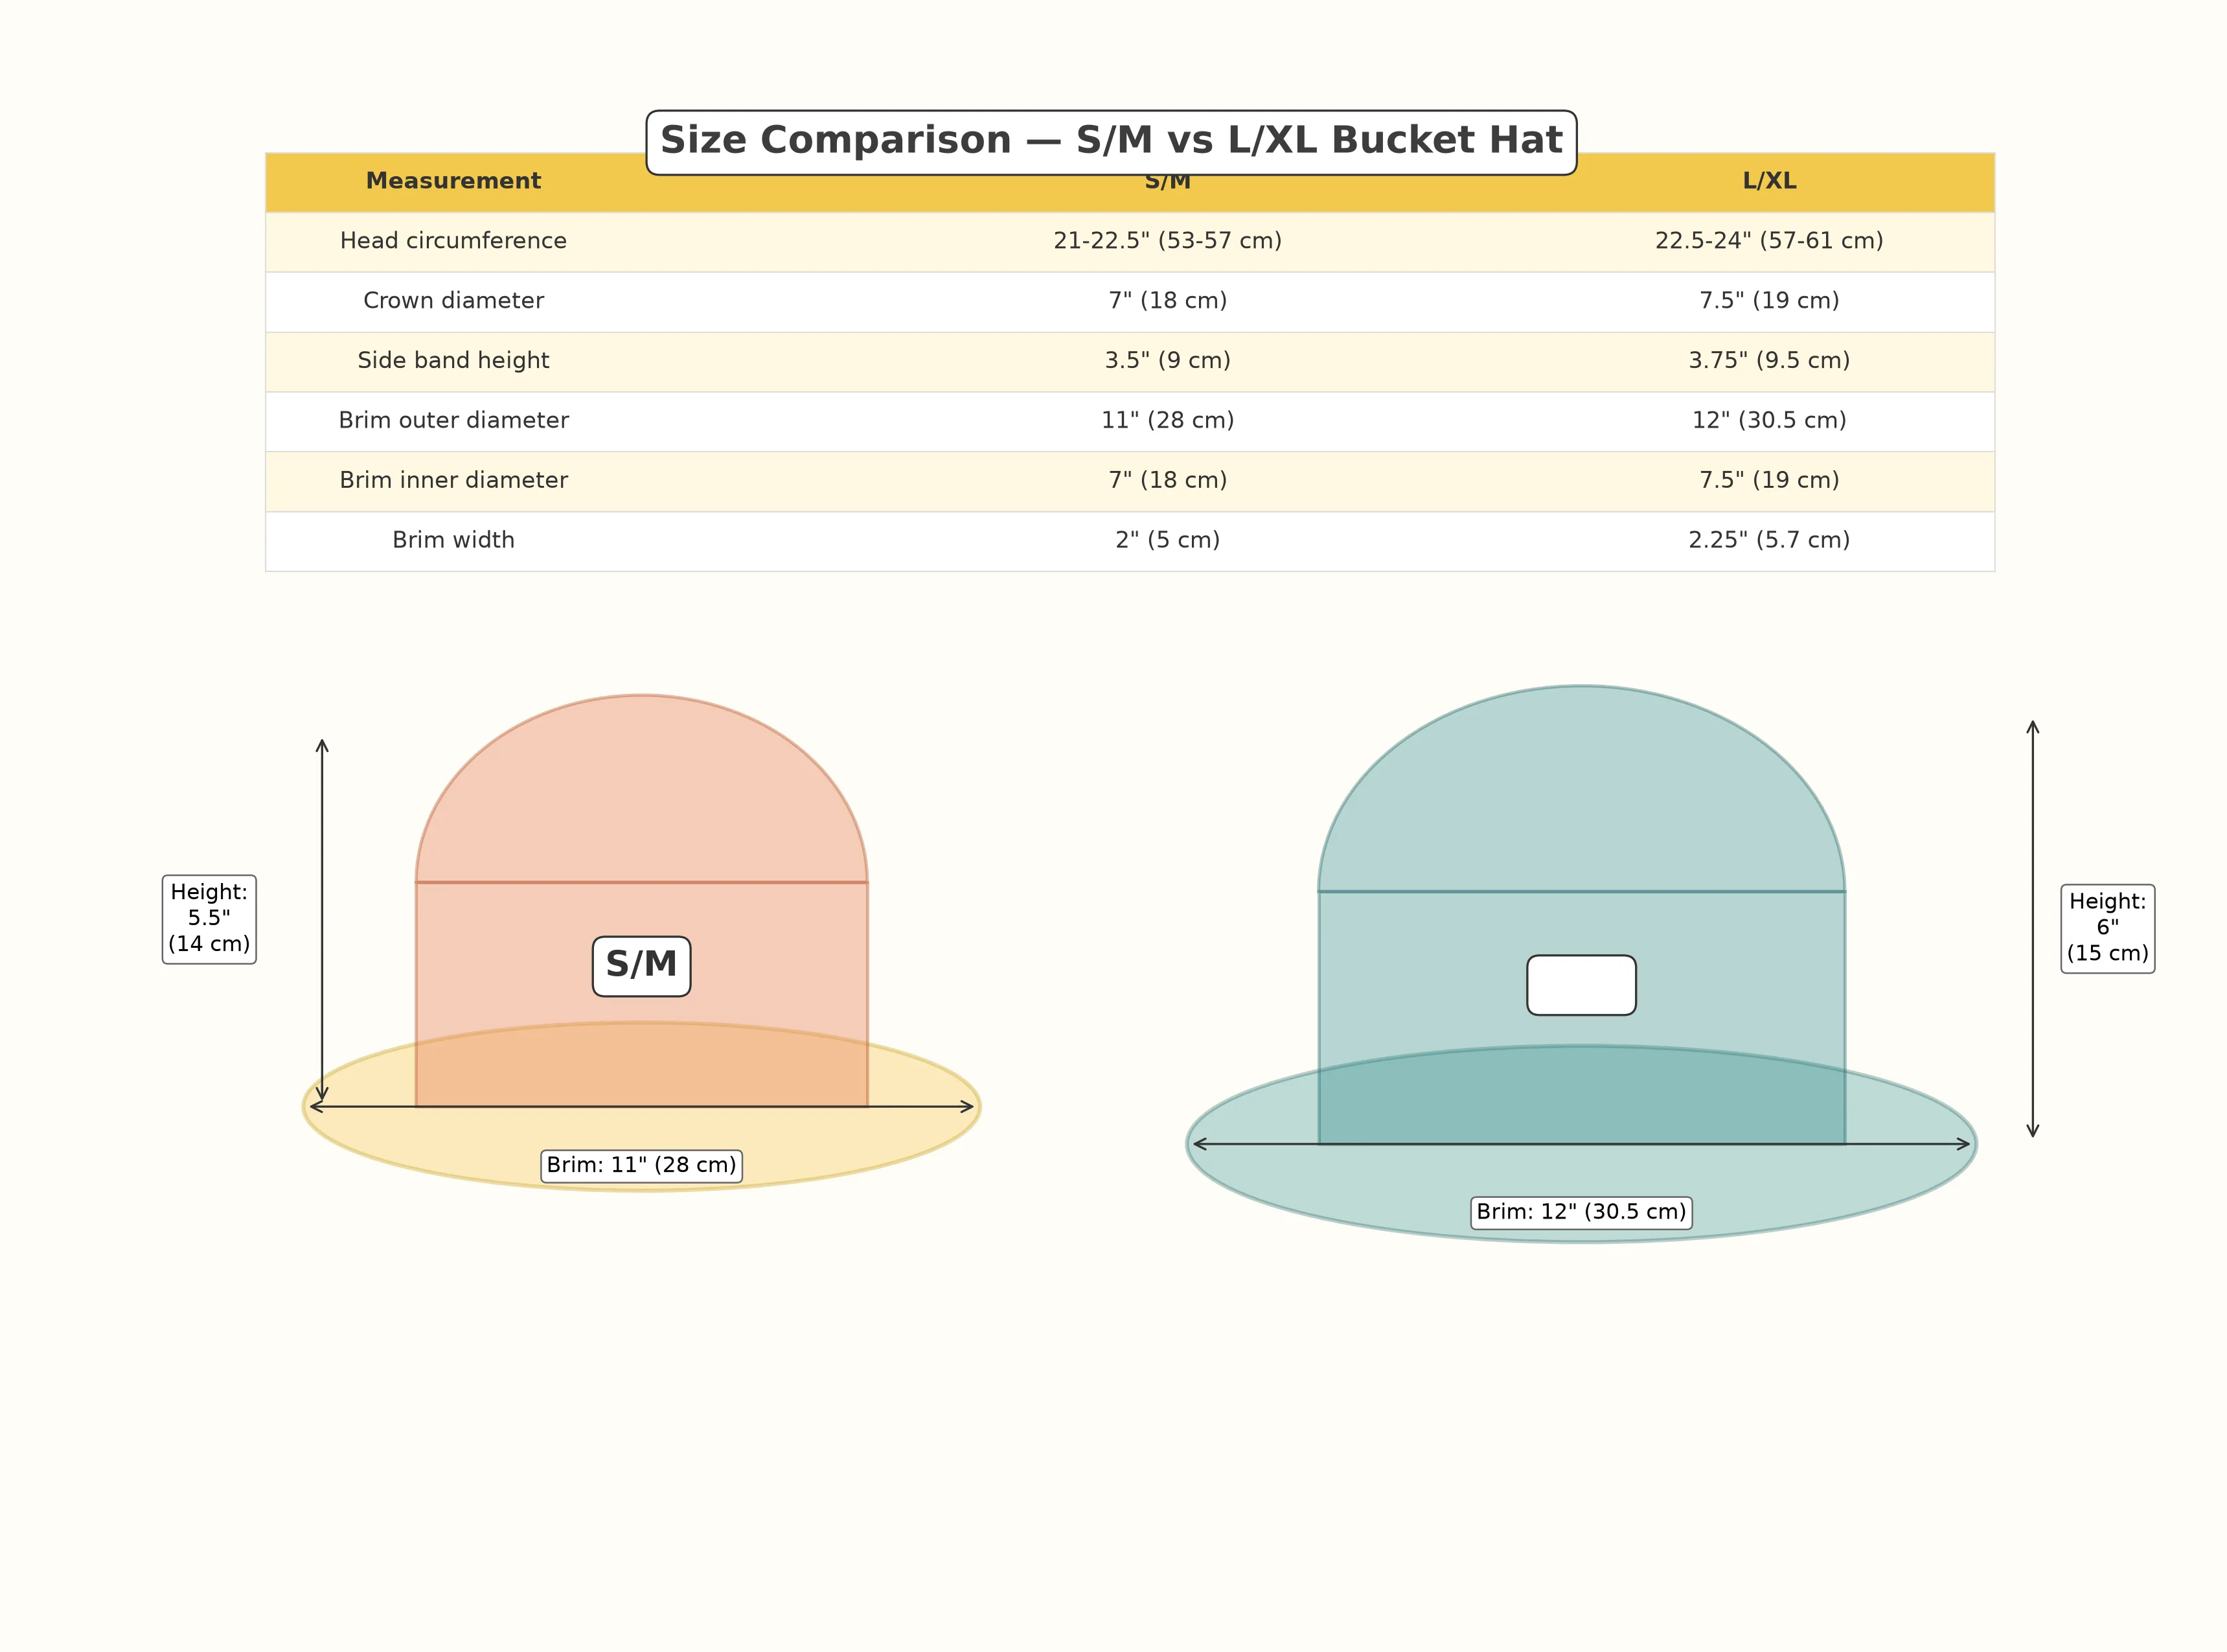
Customization Ideas
Once you have the basic construction down, the reversible bucket hat is a blank canvas for creativity:
- Embroidered initials — Stitch your monogram on the crown of one side before assembly for a personalized touch.
- Contrast topstitching — Use a bright thread color for the brim topstitching to add a pop of detail that peeks out on both sides.
- Chin cord — Sew a narrow fabric tube or use grosgrain ribbon threaded through two small buttonholes on the side band for windy beach days.
- Patchwork brim — Piece together fabric scraps for one of the brim layers to create a unique patchwork look, similar to the technique you will use in the fabric basket later in this series.
- Seasonal fabrics — Use a cozy flannel on one side and a breezy cotton on the other for a hat that works year-round.
Troubleshooting
My curved seams are puckering
Puckering almost always means you need more clips in the seam allowance. Go back and add snips every ¼ inch (6 mm) instead of every ½ inch (1.3 cm). Press the seam over a tailor's ham (a rounded pressing cushion that mimics body curves) or a rolled-up towel to help the curve set smoothly.
The brim is wavy instead of flat
This usually happens when the outer brim edge is stretched during sewing. Try using a walking foot (a presser foot that feeds the top and bottom layers of fabric at the same rate) or reduce your presser foot pressure. Additional rows of topstitching will also help flatten a wavy brim.
The two layers are shifting
If Fabric A and Fabric B are sliding against each other when you wear the hat, add a few hand-stitched tacks (small, hidden stitches) at the crown center and at four points around the side band seam to anchor the layers together without affecting the reversible look.
Weekend Sewing Projects — Series Progress
Post 7 of 10 — 70% complete
Keep Sewing This Weekend
Frequently Asked Questions
What is the best fabric for a reversible bucket hat?
Medium-weight cotton or cotton-linen blends work best. Avoid very thick fabrics like denim because the brim will be too stiff when doubled, and avoid slippery fabrics like satin because the two layers will shift during wear.
How much fabric do I need to sew a reversible bucket hat?
You need approximately ½ yard (45 cm) of each of two coordinating fabrics for an adult size. If your fabric is only 42 inches (107 cm) wide, you may need slightly more for the L/XL size.
Can beginners sew a bucket hat?
Absolutely. A bucket hat uses only straight and curved seams with no zippers, buttons, or closures. The main new skill is sewing smooth curves and clipping seam allowances, both of which are clearly explained in this tutorial.
How do I keep the brim from flopping?
Apply lightweight fusible interfacing to the brim pieces of one fabric layer before assembly. Adding one or two extra rows of concentric topstitching around the brim also adds structure and a professional finish.
How do I wash a reversible bucket hat?
Machine wash on a gentle cycle in cold water and air dry flat. If the brim loses its shape, press it with a warm iron while slightly damp. Avoid high heat in the dryer, which can warp the interfacing.
What head sizes does this pattern fit?
The S/M size fits head circumferences of 21 to 22.5 inches (53 to 57 cm). The L/XL size fits 22.5 to 24 inches (57 to 61 cm). Measure around the fullest part of your head, just above the ears, to choose your size.
Final Thoughts
Learning to sew a reversible bucket hat is one of those projects that quietly levels up your sewing skills. You will walk away with real experience sewing curved seams, clipping seam allowances, and joining two complete fabric layers — techniques that transfer directly to garment sewing, bag making, and quilting. And you will have a genuinely useful, genuinely cute accessory that you can flip to match whatever you are wearing.
If this is your first curved-seam project, be patient with yourself. The first curve might look a little wobbly, and that is completely normal. By the time you reach the outer brim topstitching, your curves will be noticeably smoother. Sewing is a skill built one seam at a time, and every hat you make will be better than the last.
When you are ready for your next weekend project, head over to the simple elastic skirt tutorial — it is your first foray into garment sewing, and I promise it is easier than you think. Or if you want to stay in the accessories lane, the crossbody phone bag at the end of this series combines zippers, straps, and lining into one satisfying capstone project.
Happy sewing, and enjoy your two-in-one hat!