DIY Elastic Headband Sewing Tutorial
A quick, satisfying project that turns a scrap of fabric and a bit of elastic into a wearable accessory you'll actually use every day.
There is something almost magical about a sewing project that takes half an hour from start to finish and produces something you will wear every single day. The elastic headband is that project. It requires barely any fabric — a fat quarter is more than enough for two or three headbands — and the construction is so simple that even a brand-new sewist can achieve professional-looking results on the very first try.
Headbands have made a major comeback in recent years, and for good reason. They keep hair out of your face while you work, exercise, or apply skincare, and they add a polished touch to an otherwise casual outfit. But the headbands you find in stores are often made from cheap synthetic fabrics that slip off your head within minutes, leave dents in your hair, or cost an absurd amount for what is essentially a strip of fabric and a piece of elastic.
This tutorial walks you through the classic enclosed elastic headband — the kind where the elastic is hidden inside a fabric tube, so the finished accessory looks clean and polished from every angle. You will learn how to cut the fabric, sew the tube, turn it right side out, insert the elastic, and close the opening with an invisible hand stitch. The entire process uses only straight seams, so if you can sew a straight line, you are ready for this project.
By the end, you will have a comfortable, custom-fitted headband that stays put all day — and the skills to make dozens more as gifts, stocking stuffers, or quick craft fair items. Let's get started.
Materials & Tools
Each headband requires very little material, making this the perfect scrap-buster project. The quantities below are for one adult headband.
1 fat quarter or fabric scrap at least 20 × 5 in (51 × 13 cm) — quilting cotton, lawn, or lightweight linen
5 in (13 cm) of 1/2 in (12 mm) wide elastic — braided or knit elastic both work well
Matching thread — all-purpose polyester is ideal for the stretch and durability
Sewing machine with universal needle size 80/12 and standard presser foot
Safety pin or Clover tube turner for turning the fabric tube right side out
Hand sewing needle and thread for the final closure stitch
Fabric scissors or rotary cutter and ruler
Iron and pressing cloth for crisp folds
Quilting cotton is the easiest fabric for beginners because it presses well and does not slip under the presser foot. For a softer, more luxurious headband, try cotton lawn or viscose challis. Avoid heavy fabrics like denim or canvas — they will be too bulky to turn into a narrow tube and will feel stiff on your head.
Size Chart
The headband size is determined by two measurements: the fabric strip length (which wraps around the head) and the elastic length (which provides the stretch at the back). The fabric strip width controls how wide the finished headband sits on your head.
| Size | Head Circumference | Fabric Strip (W × L) | Elastic Length | Finished Width |
|---|---|---|---|---|
| Baby (6–18 mo) | 17–18 in (43–46 cm) | 3 × 14 in (8 × 36 cm) | 3 in (8 cm) | ~1 in (2.5 cm) |
| Child (2–8 yr) | 19–20 in (48–51 cm) | 3.5 × 16 in (9 × 41 cm) | 3.5 in (9 cm) | ~1.25 in (3 cm) |
| Teen / Small Adult | 21–22 in (53–56 cm) | 4 × 18 in (10 × 46 cm) | 4 in (10 cm) | ~1.5 in (4 cm) |
| Adult (average) | 22–23 in (56–58 cm) | 5 × 20 in (13 × 51 cm) | 5 in (13 cm) | ~2 in (5 cm) |
For a perfect fit, measure the wearer's head circumference at the point where the headband will sit (typically across the forehead and around the back of the head). Subtract 2 in (5 cm) from that measurement to get the fabric strip length. The elastic should be approximately 1/4 of the total head circumference.
Cutting Layout
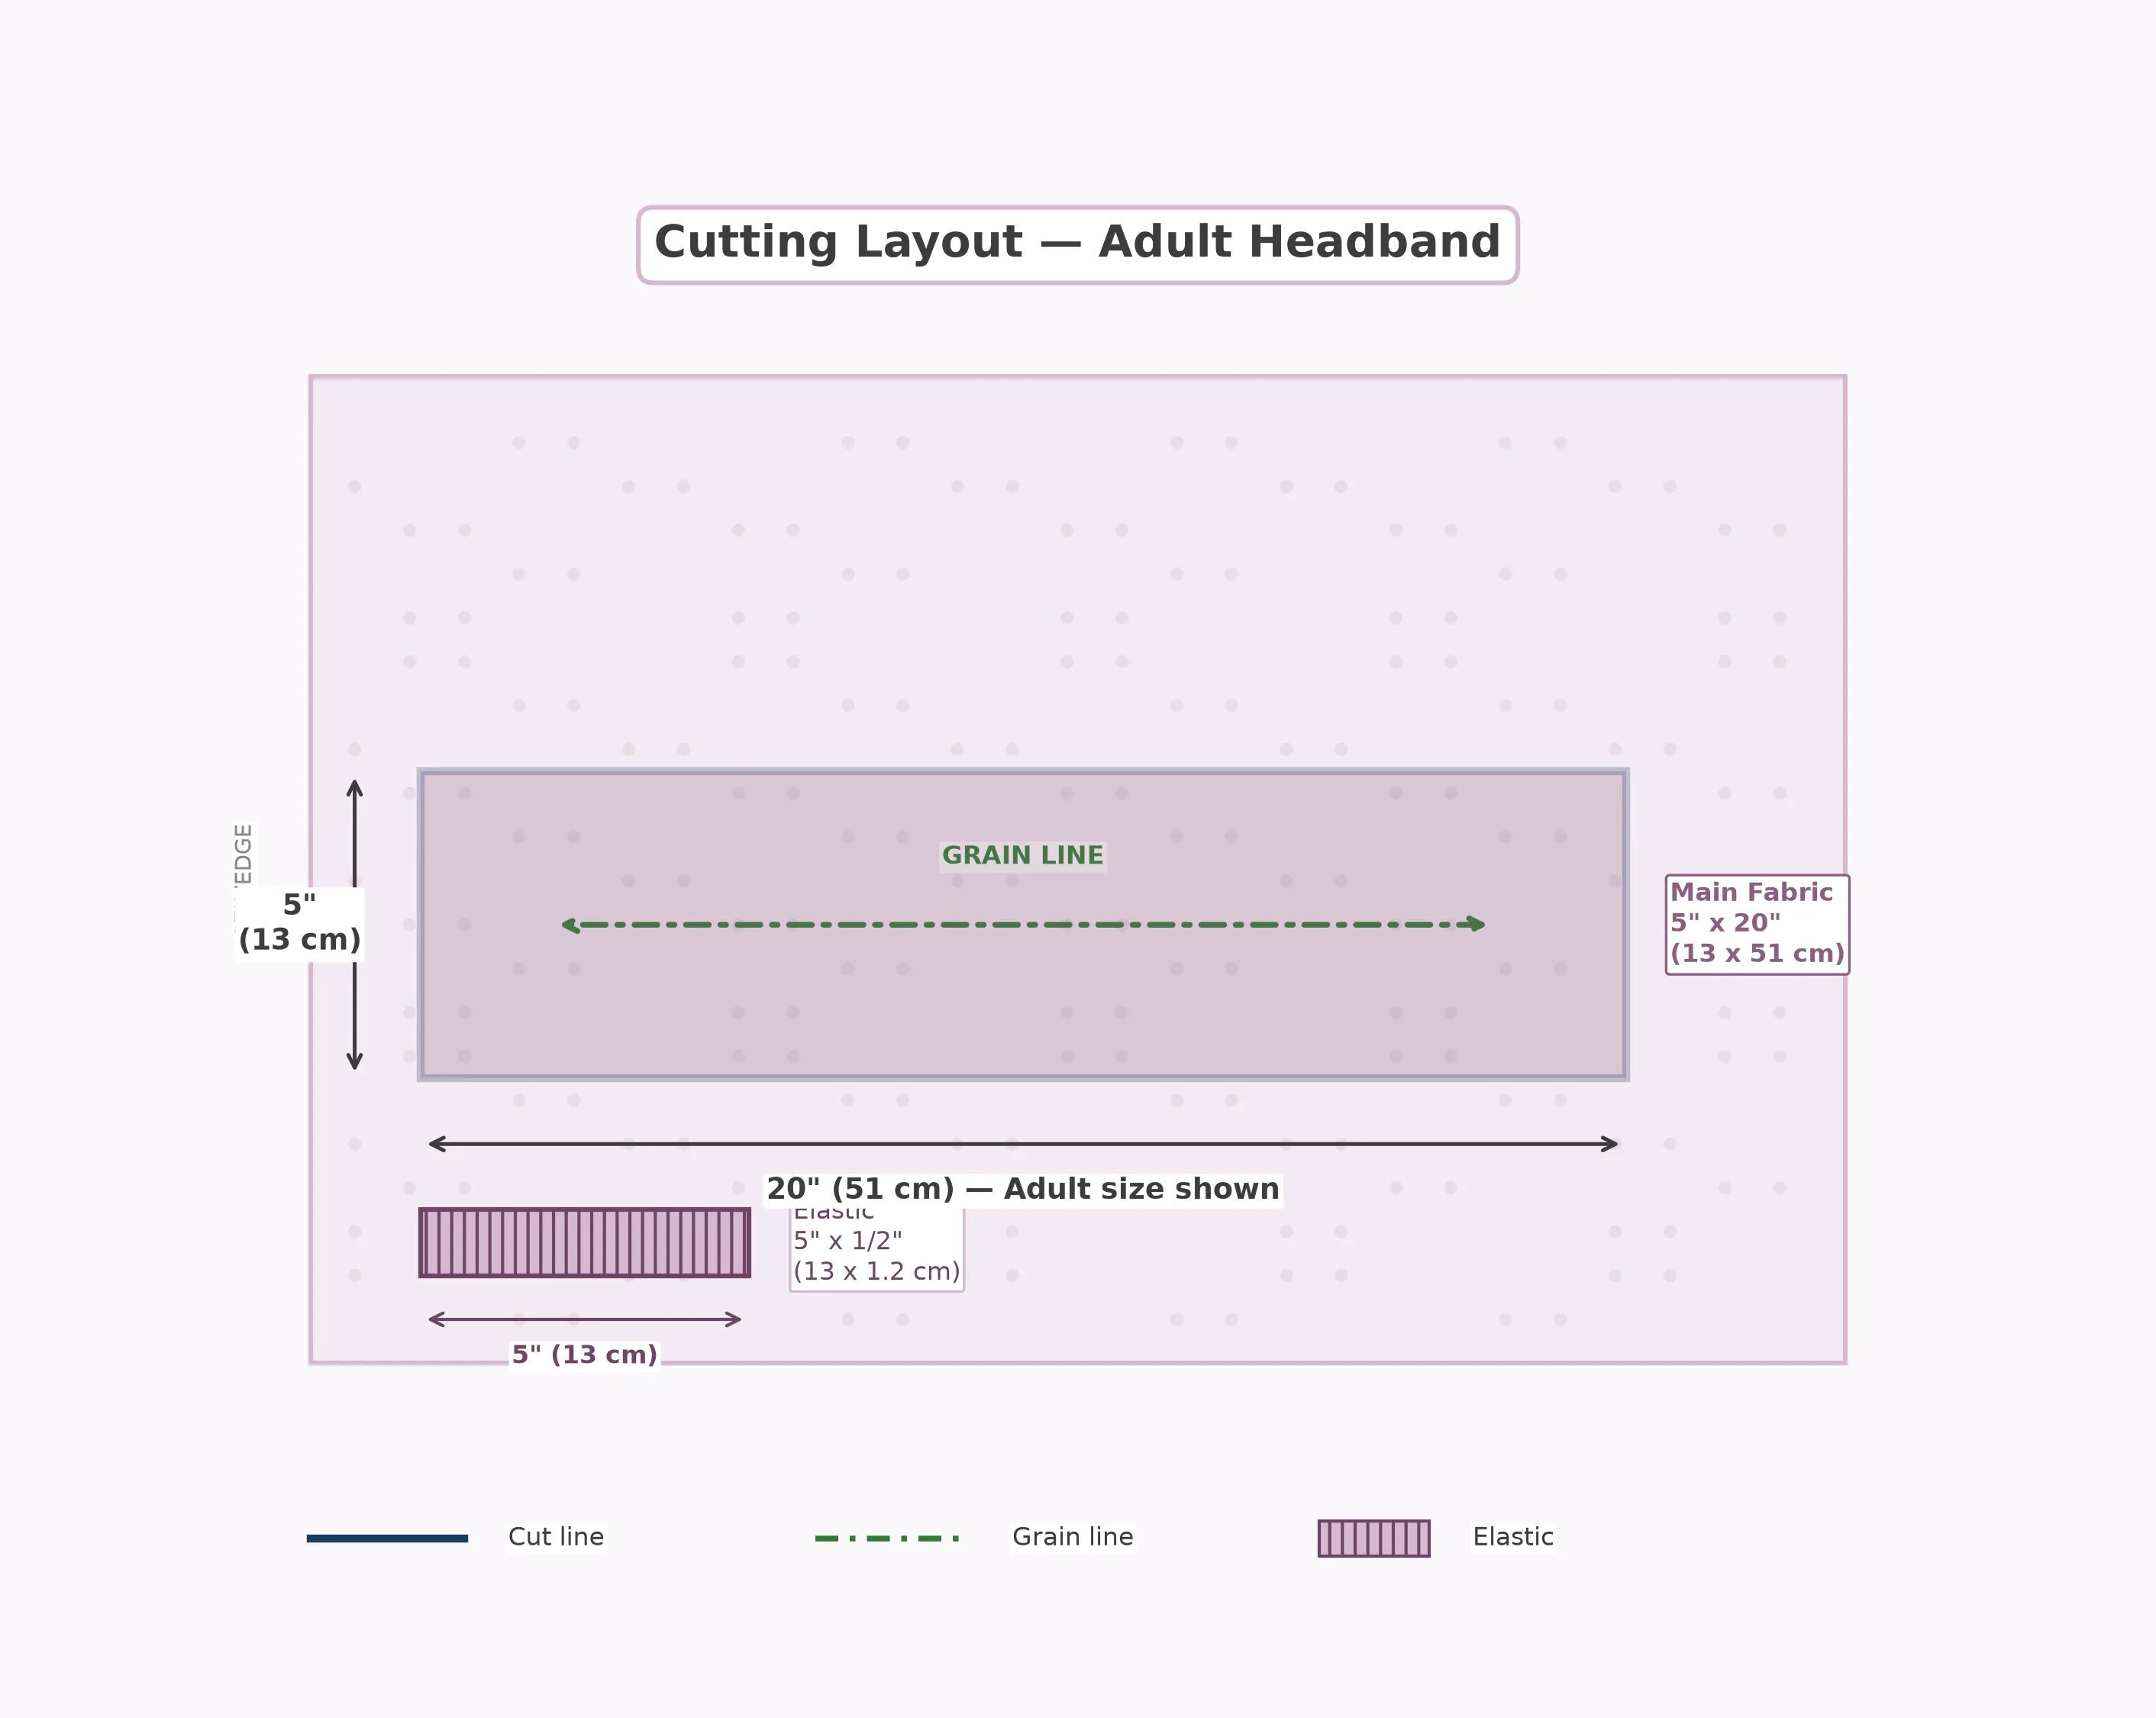
From your fabric, cut one rectangle according to the size chart above. The long edge of the rectangle should run parallel to the lengthwise grain (parallel to the selvedge) so the headband has minimal stretch along its length. The stretch should come from the elastic at the back, not from the fabric itself.
If you are using a directional print (like a floral with stems pointing in one direction), make sure the pattern runs along the length of the strip so it reads correctly when the headband is worn. For non-directional prints or solids, grain direction is less critical.
Cut the elastic to the length specified in the size chart. Use braided elastic for a firmer grip or knit elastic for a softer, more comfortable hold. Avoid clear elastic — it tends to snap after repeated stretching and will not last through washing.
Pattern Breakdown
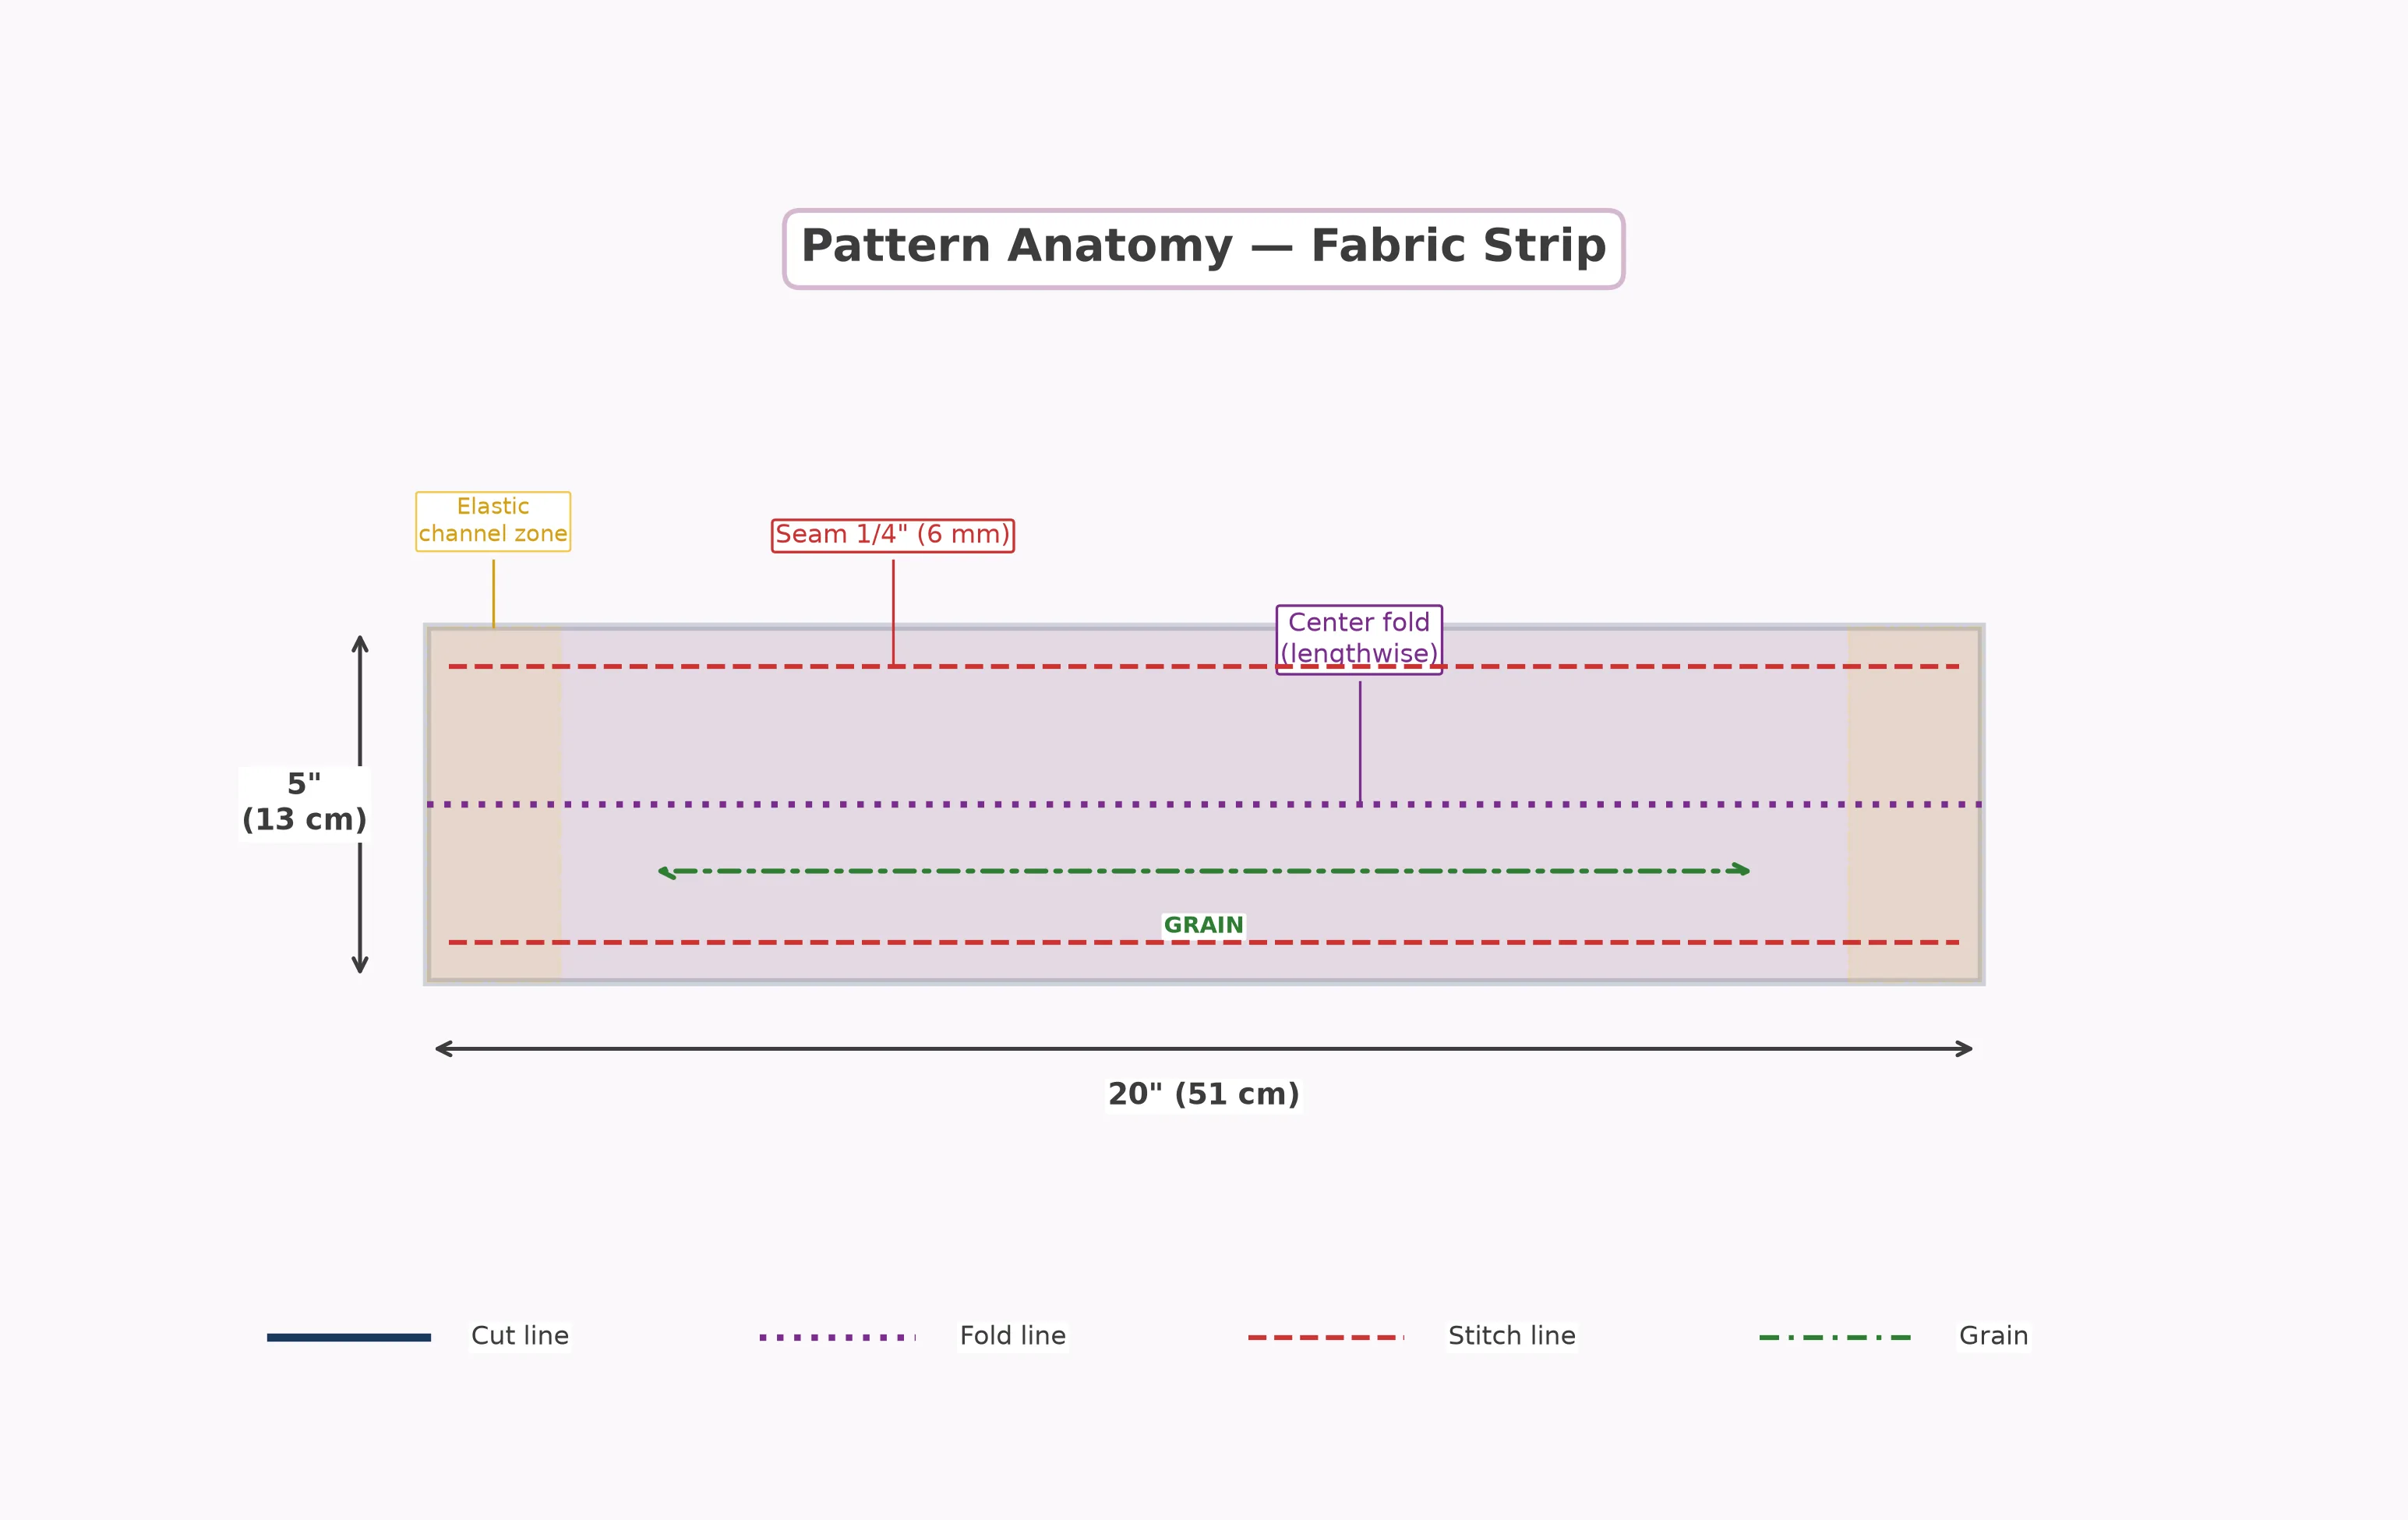
The elastic headband is beautifully simple in its construction. The entire pattern consists of one rectangular piece of fabric and one strip of elastic. There are no darts, no curves, and no interfacing required. Here is how the rectangle transforms into a finished headband:
1. The Tube — The fabric rectangle is folded in half lengthwise, right sides together, and sewn along the long edge to create a tube. The seam allowance is 1/4 in (6 mm), which keeps the tube narrow and the finished headband sleek.
2. The Turn — The tube is turned right side out using a safety pin or tube turner. This is the most time-consuming step, but it is not difficult — just requires patience with narrow tubes.
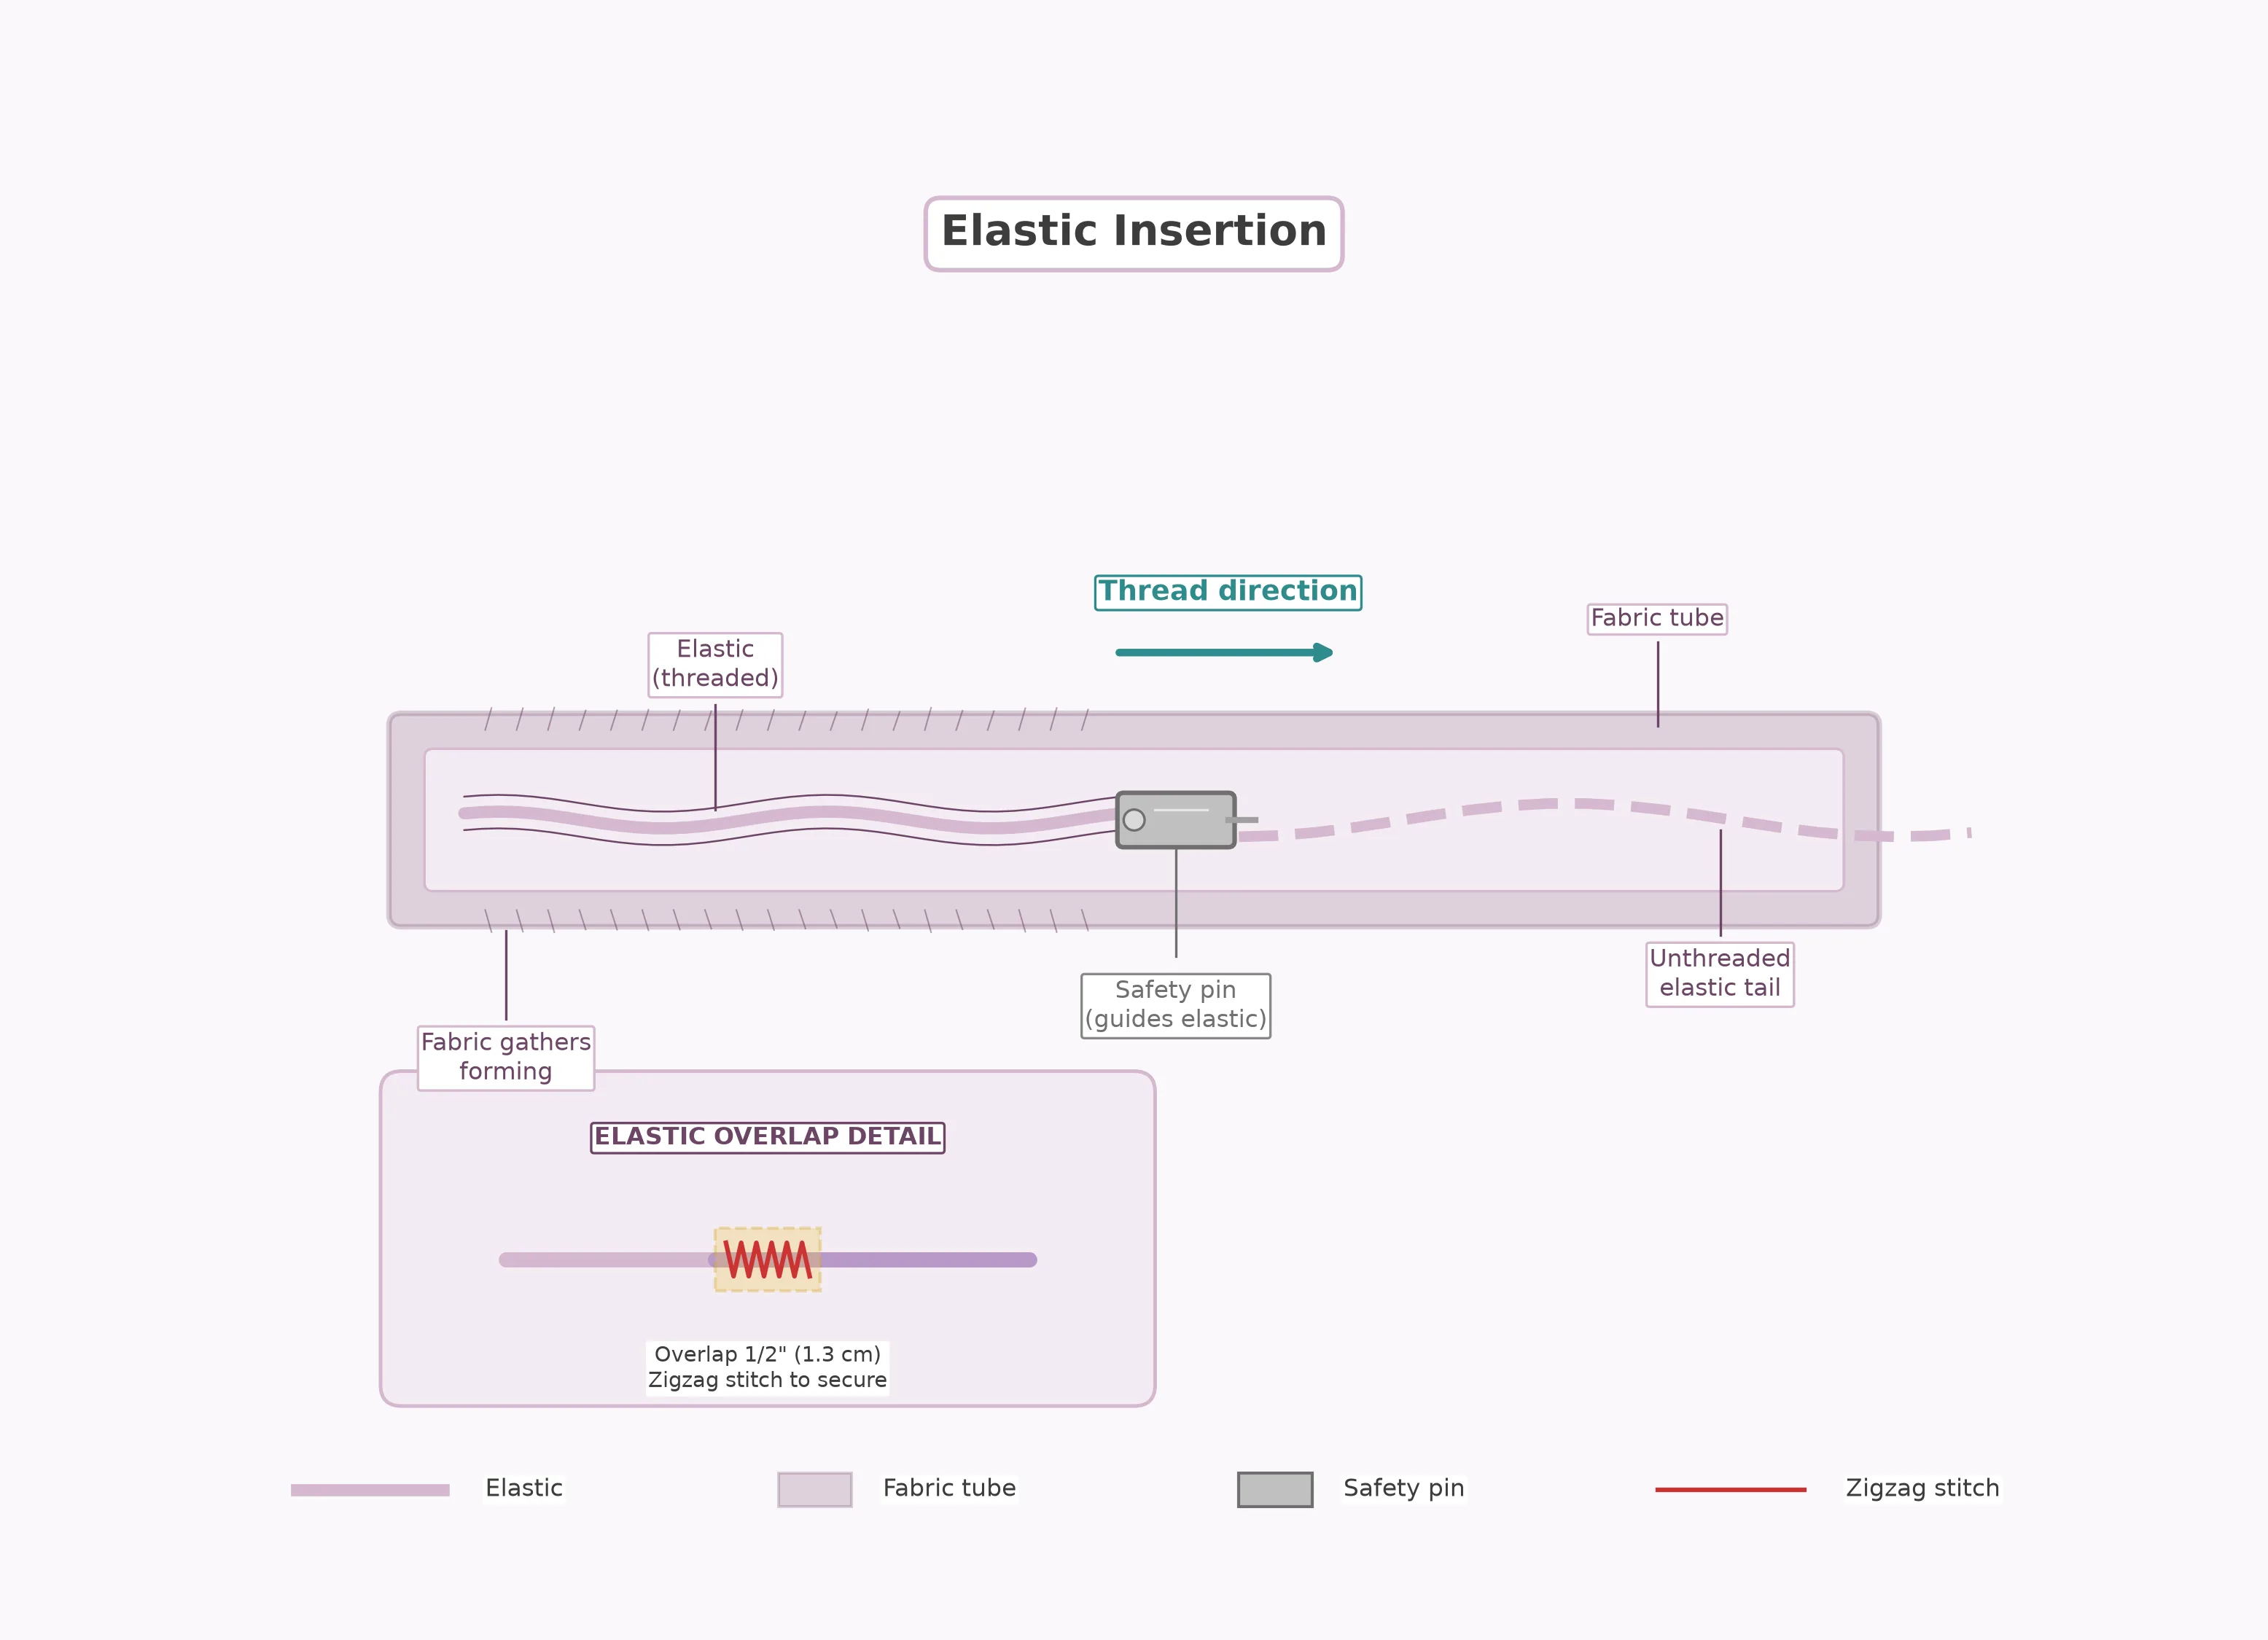
3. The Elastic Channel — The elastic is threaded through the center of the tube and secured at both ends. The fabric gathers around the elastic, creating the characteristic ruched look at the back of the headband.
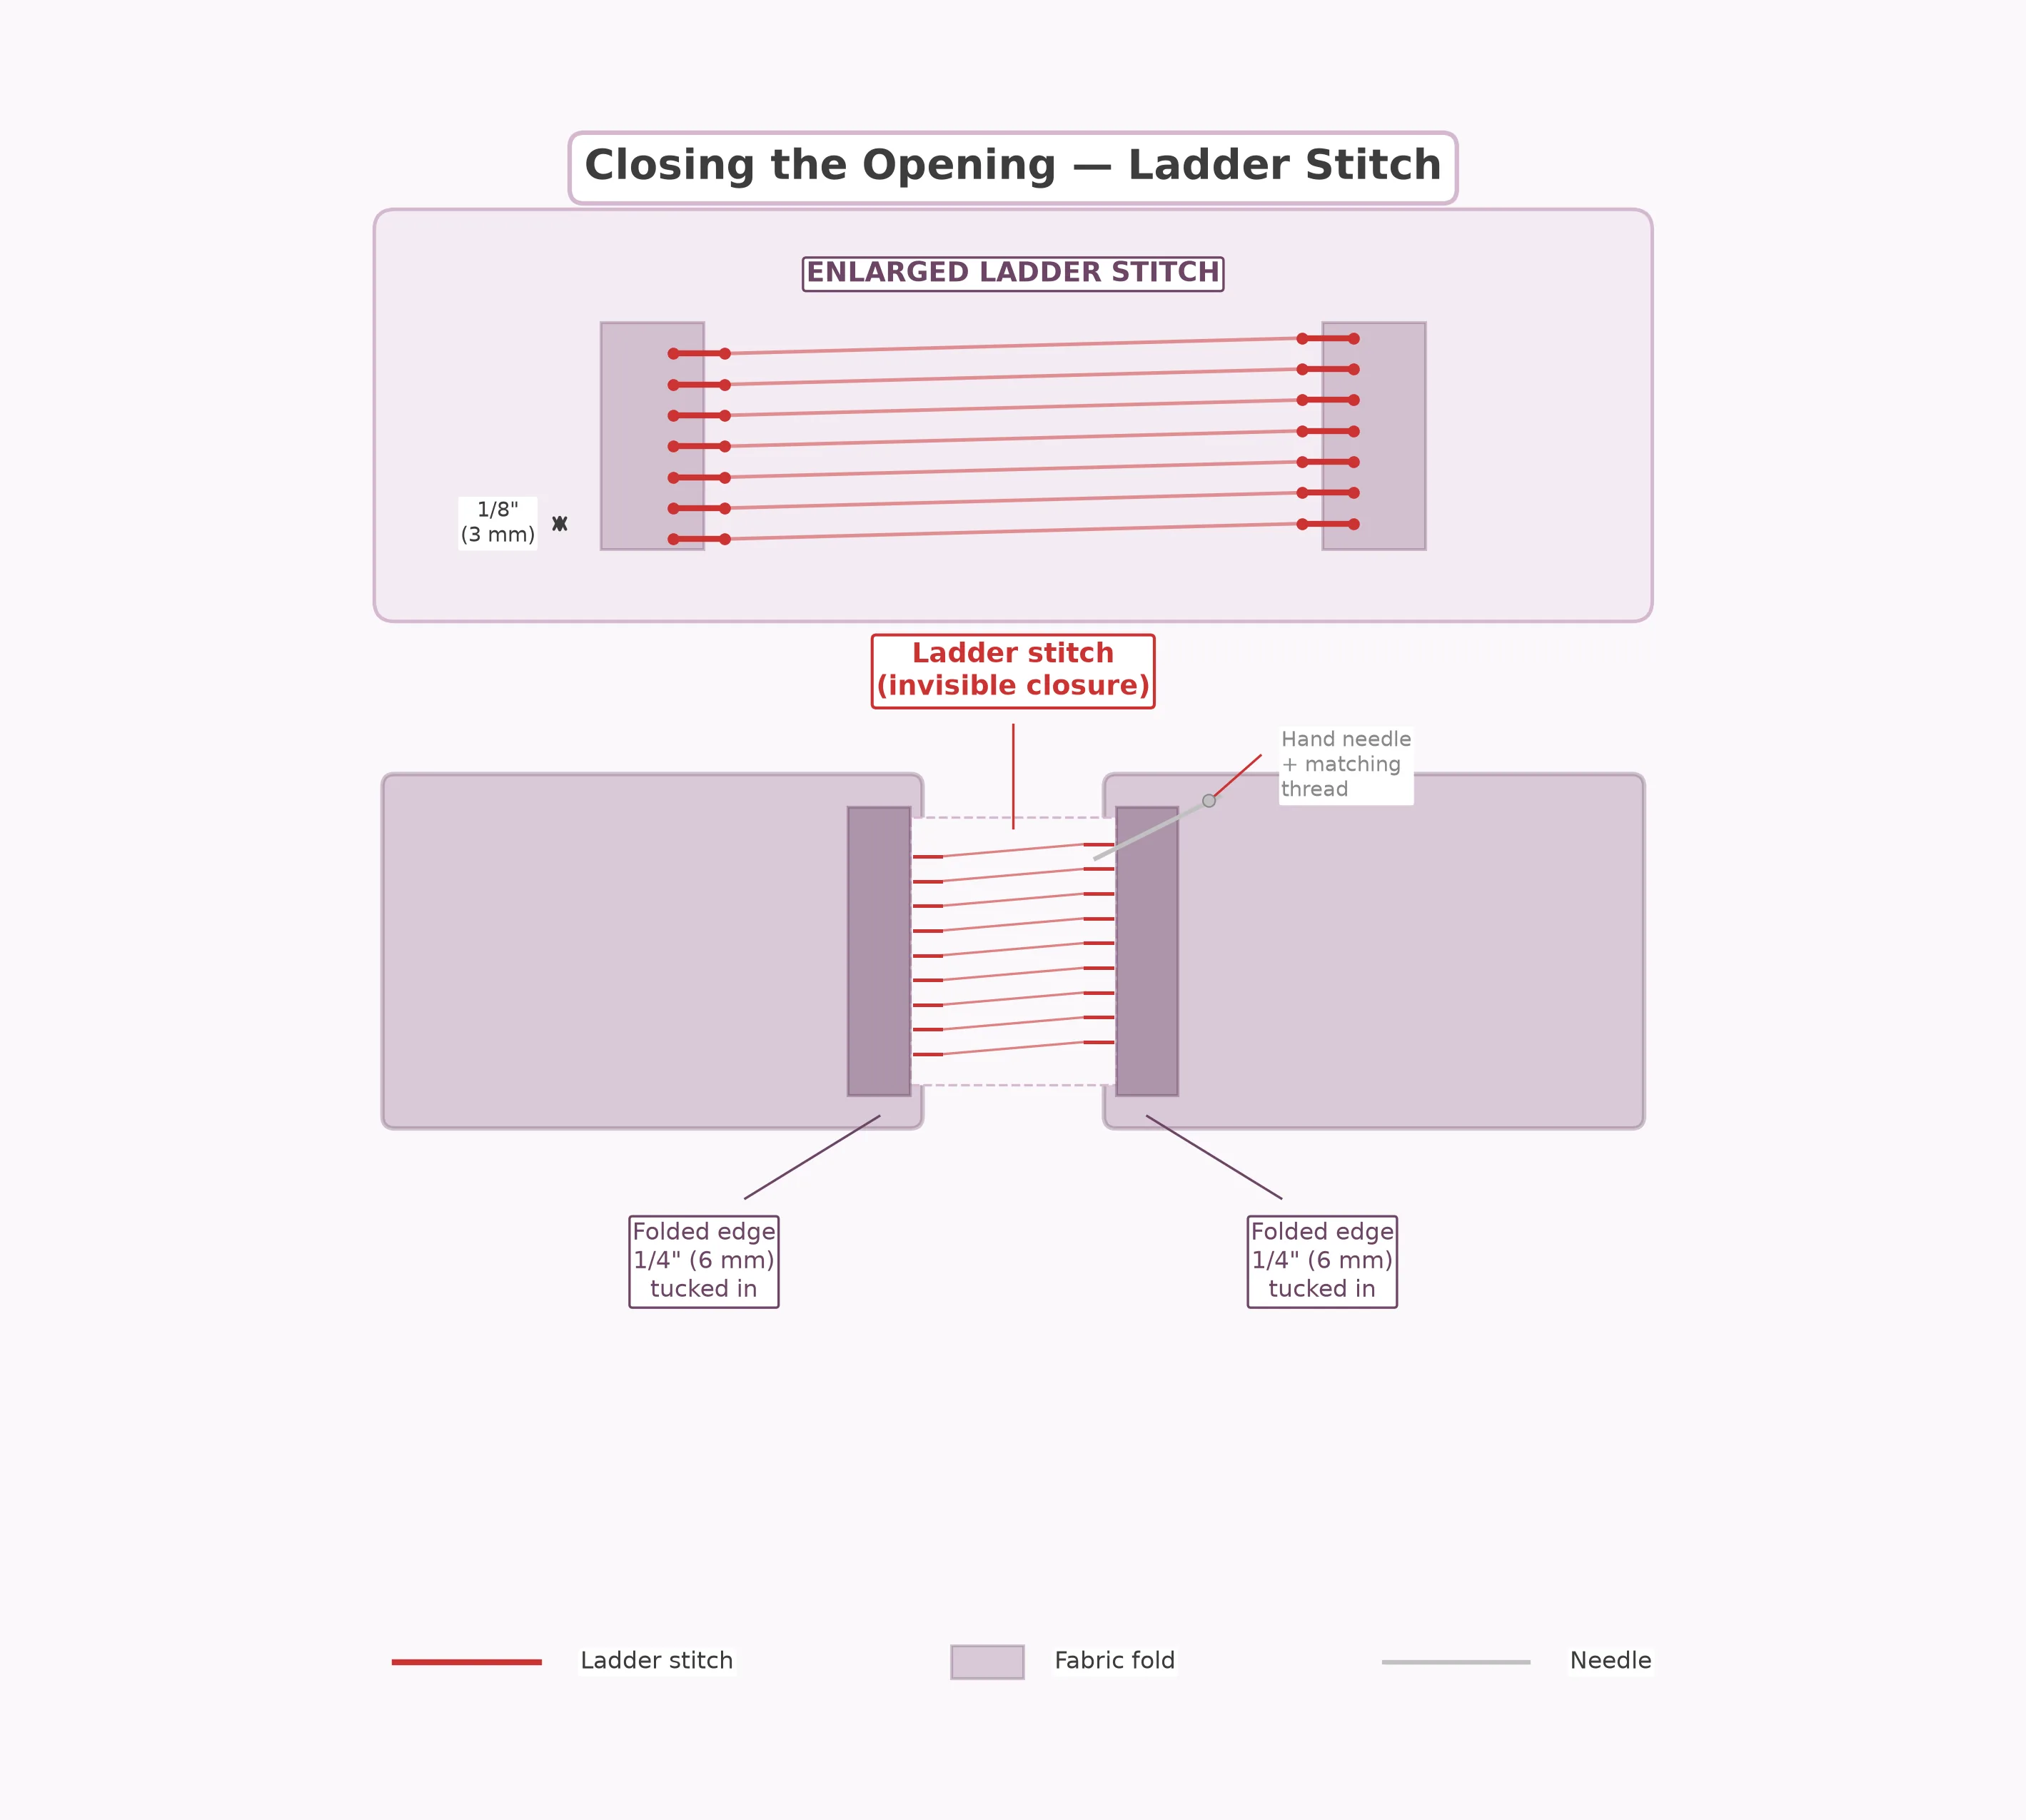
4. The Closure — The short ends of the tube are folded inward and hand-stitched closed with a ladder stitch for an invisible finish.
Step-by-Step Instructions
Cut the Fabric and Elastic
Using the size chart above, cut one fabric rectangle for your chosen size. For an adult headband, this is 5 × 20 in (13 × 51 cm). Cut one piece of elastic to 5 in (13 cm). Mark the wrong side of the fabric with a small chalk dot in one corner so you can keep track of right and wrong sides throughout the project.
Fold and Sew the Long Seam
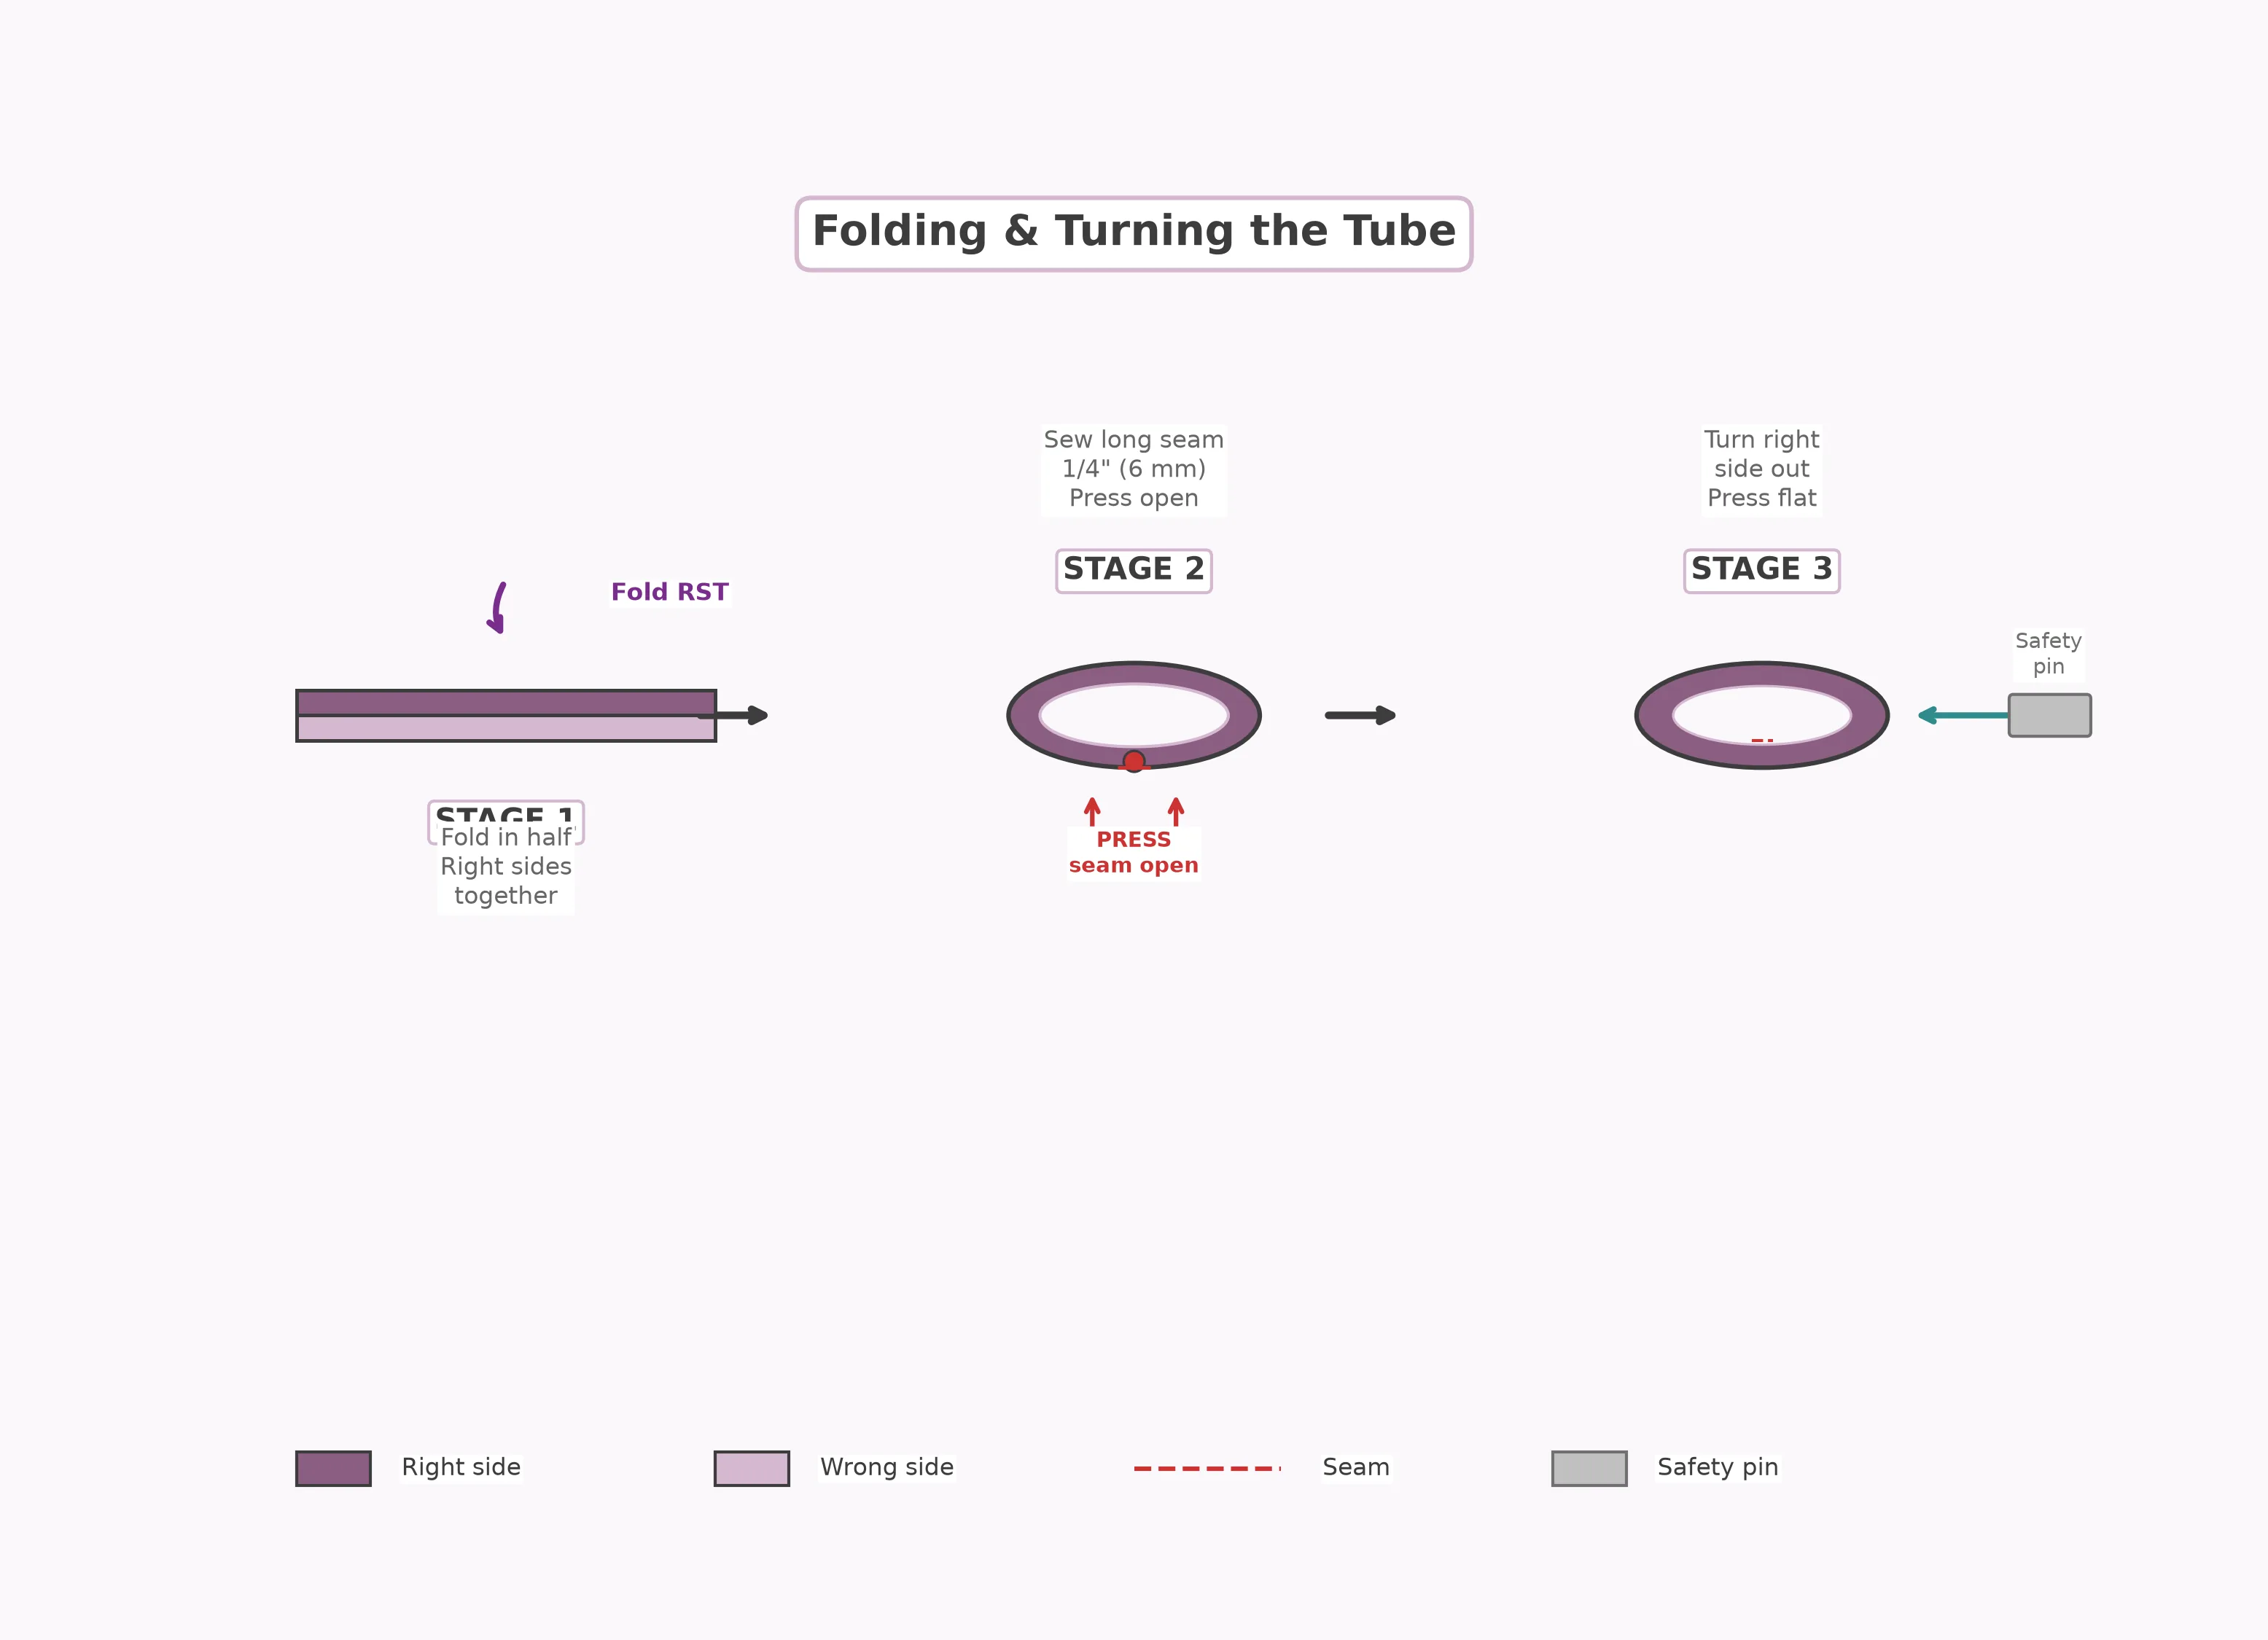
Fold the fabric rectangle in half lengthwise, right sides together, aligning the long edges. Pin along the long edge every 3–4 in (8–10 cm) to keep the layers from shifting. Sew the long seam with a 1/4 in (6 mm) seam allowance using a straight stitch at 2.5 mm stitch length. Backstitch at both ends to lock the stitches. You now have a long fabric tube that is open at both short ends.
Press the Seam Open
Before turning the tube, press the seam allowance open using the tip of your iron. This step makes a surprising difference in the final appearance — a pressed-open seam lies flat inside the tube and prevents a bulky ridge from showing on the outside of the headband. Use a tailor's ham or a rolled-up towel to support the tube while pressing if needed.
Turn the Tube Right Side Out
Attach a safety pin to one end of the tube and work it through the inside of the tube, gathering the fabric as you go. This takes a few minutes for a narrow tube — be patient and do not pull too hard, or the fabric may bunch up and jam. If you have a Clover tube turner, this step is much faster. Once the tube is turned, press it flat with the seam centered along one edge (this will be the underside of the headband).
Insert the Elastic
Attach a safety pin to one end of the elastic and thread it through the center of the fabric tube, entering from one open end. Push the elastic through until it emerges from the same end (the tube will gather and bunch around the elastic). Pin the elastic end securely to the fabric at the opening so it does not slip back inside. Repeat from the other end, pulling the elastic through until both ends of the elastic are visible at the same opening. Overlap the elastic ends by 1/2 in (1.3 cm) and sew them together with a zigzag stitch to form a loop.
Before sewing the elastic ends together, run your fingers along the entire length of the elastic inside the tube to make sure it is not twisted. A twisted elastic will cause the headband to sit unevenly on your head and will be very difficult to fix once the ends are sewn together.
Distribute the Gathers
Once the elastic loop is secured, gently stretch the headband and distribute the fabric gathers evenly around the elastic section. The front of the headband (the part that will sit across your forehead) should be smooth and flat, while the back section (where the elastic is) will be gathered and ruched. Adjust the gathers until you are happy with the look.
Close the Opening
Fold the raw edges of the opening inward by 1/4 in (6 mm) and press. Thread a hand sewing needle with matching thread and close the opening using a ladder stitch (also called an invisible stitch). Take small, even stitches about 1/8 in (3 mm) apart, alternating between the two folded edges. Pull the thread taut after every few stitches to close the gap. Knot the thread securely and bury the tail inside the tube.
Final Press and Wear
Give the finished headband a final press, focusing on the front section to keep it smooth and flat. Try it on and adjust the gathers one more time if needed. Your headband is complete! Make a few more in different fabrics to match your wardrobe — once you have the process down, each headband takes less than 20 minutes.
Pro Tips & Common Mistakes
If you are a complete beginner and the idea of turning a narrow tube sounds daunting, cut your fabric strip 1 in (2.5 cm) wider than the chart suggests. A wider tube is much easier to turn and still looks great as a headband. You can always trim the width after turning if you prefer a narrower look.
The elastic lengths in the size chart are starting points. Before sewing the elastic ends together, wrap the elastic around your head at the headband position and adjust the overlap until the tension feels comfortable. Too tight and you will get a headache; too loose and the headband will slide off. The elastic should feel snug but not constricting.
It is tempting to skip pressing the seam open before turning the tube, especially when you are eager to finish. But an unpressed seam creates a visible ridge on the outside of the headband that looks amateurish and feels uncomfortable against your skin. Take the extra two minutes to press — your finished headband will look significantly more professional.
Elastic that is too wide (1 in / 25 mm or more) will not fit inside the narrow tube and will create a bulky, uncomfortable lump at the back of the headband. Stick to 1/4 to 1/2 in (6–12 mm) wide elastic for the best results. If you only have wide elastic, cut it lengthwise to the correct width before inserting it.
Since each headband uses so little fabric and time, this is the perfect project for batch sewing. Cut 5–10 fabric strips in one session, sew all the long seams at once, turn all the tubes, and then insert elastic and close the openings. You can make an entire gift set in under two hours.
Style Variations
Twist-Front Headband
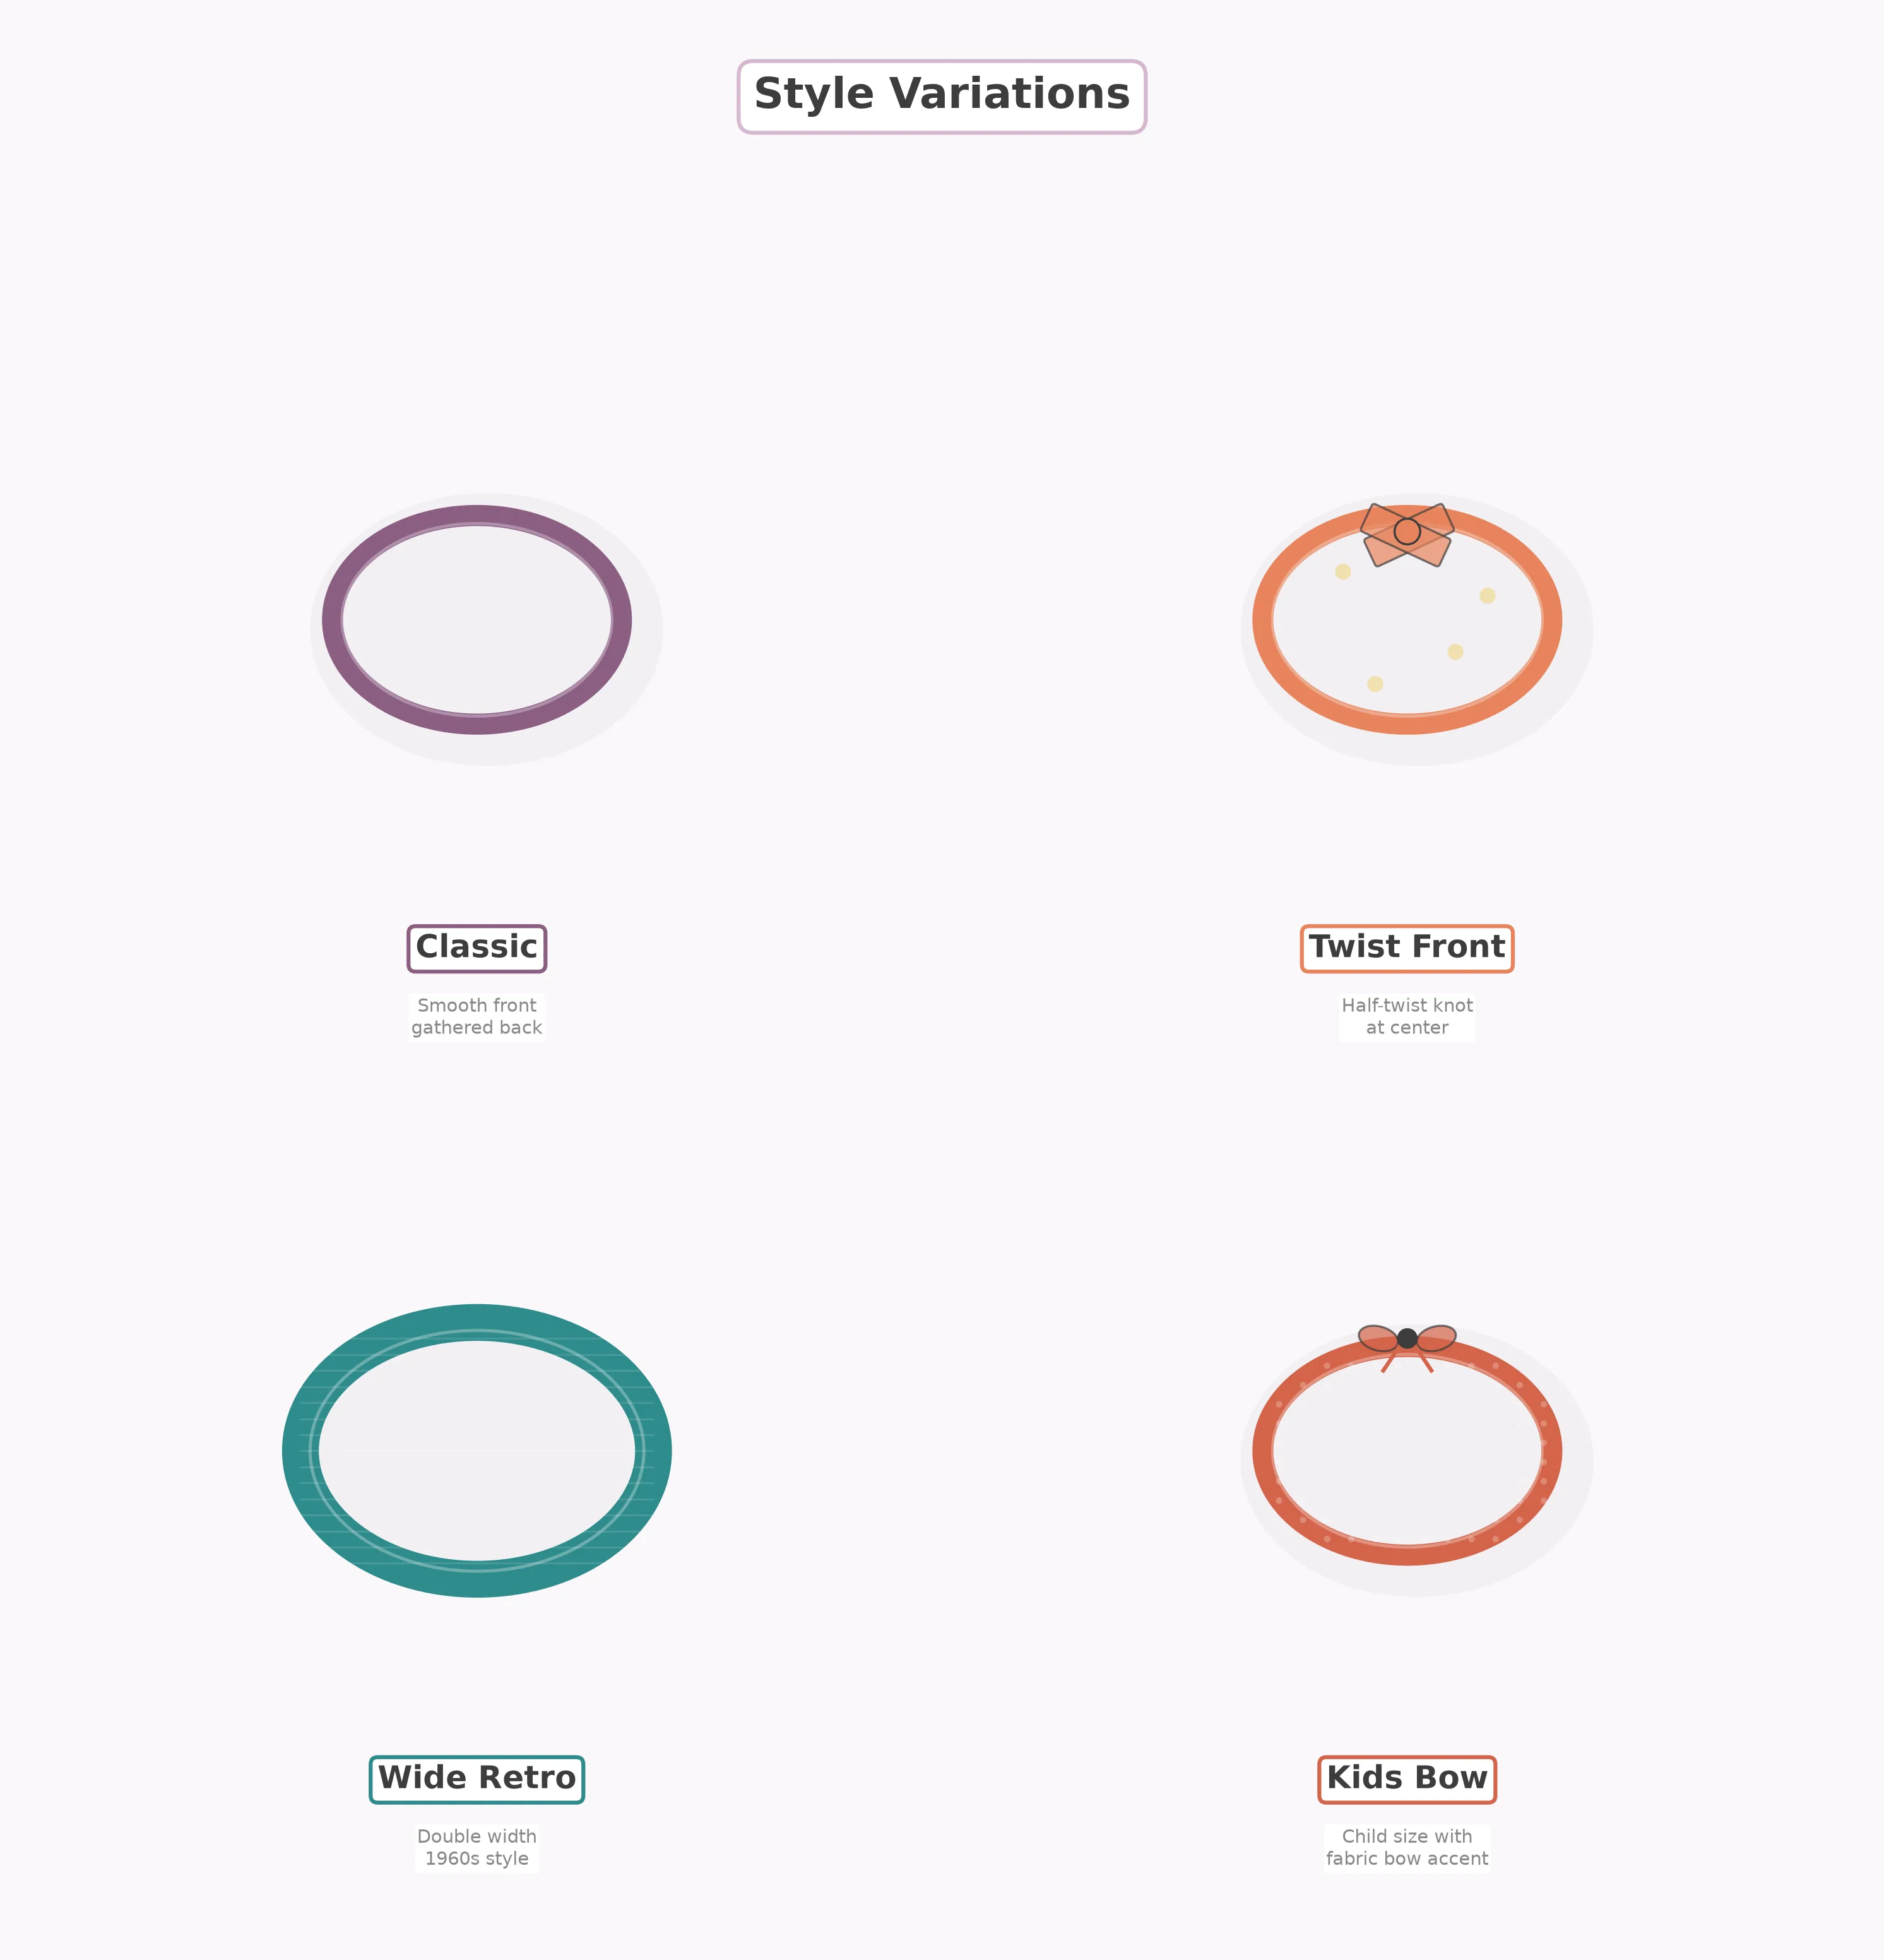
Before closing the ends, give one side of the tube a half-twist so the fabric crosses at the center front. This creates the trendy "knot" look popular on social media.
Bow Accent
Sew a small fabric bow from a 3 × 6 in (8 × 15 cm) scrap and hand-stitch it to the top or side of the headband for a sweet, feminine touch — perfect for kids' headbands.
Wide Retro Band
Double the fabric strip width to 8–10 in (20–25 cm) for a bold, 1960s-inspired wide headband. Use a stiffer fabric like linen or add lightweight interfacing for structure.
Kids' Elastic Band
Use the baby or child size from the chart and choose fun prints — dinosaurs, unicorns, rainbows. These make excellent birthday party favors and sell well at school craft fairs.
Frequently Asked Questions
Keep Sewing
Your New Favorite Accessory
Now that you have the basic technique down, experiment with different fabrics, widths, and embellishments. Headbands make wonderful handmade gifts — bundle three in a ribbon-tied stack for a thoughtful, personal present that costs less than $5 to make.
Next Project: Placemat Set