Sew a Quilted Fabric Placemat Set
Your gentle, one-hour introduction to quilting — layering, machine quilting, and self-binding in a small, satisfying project.
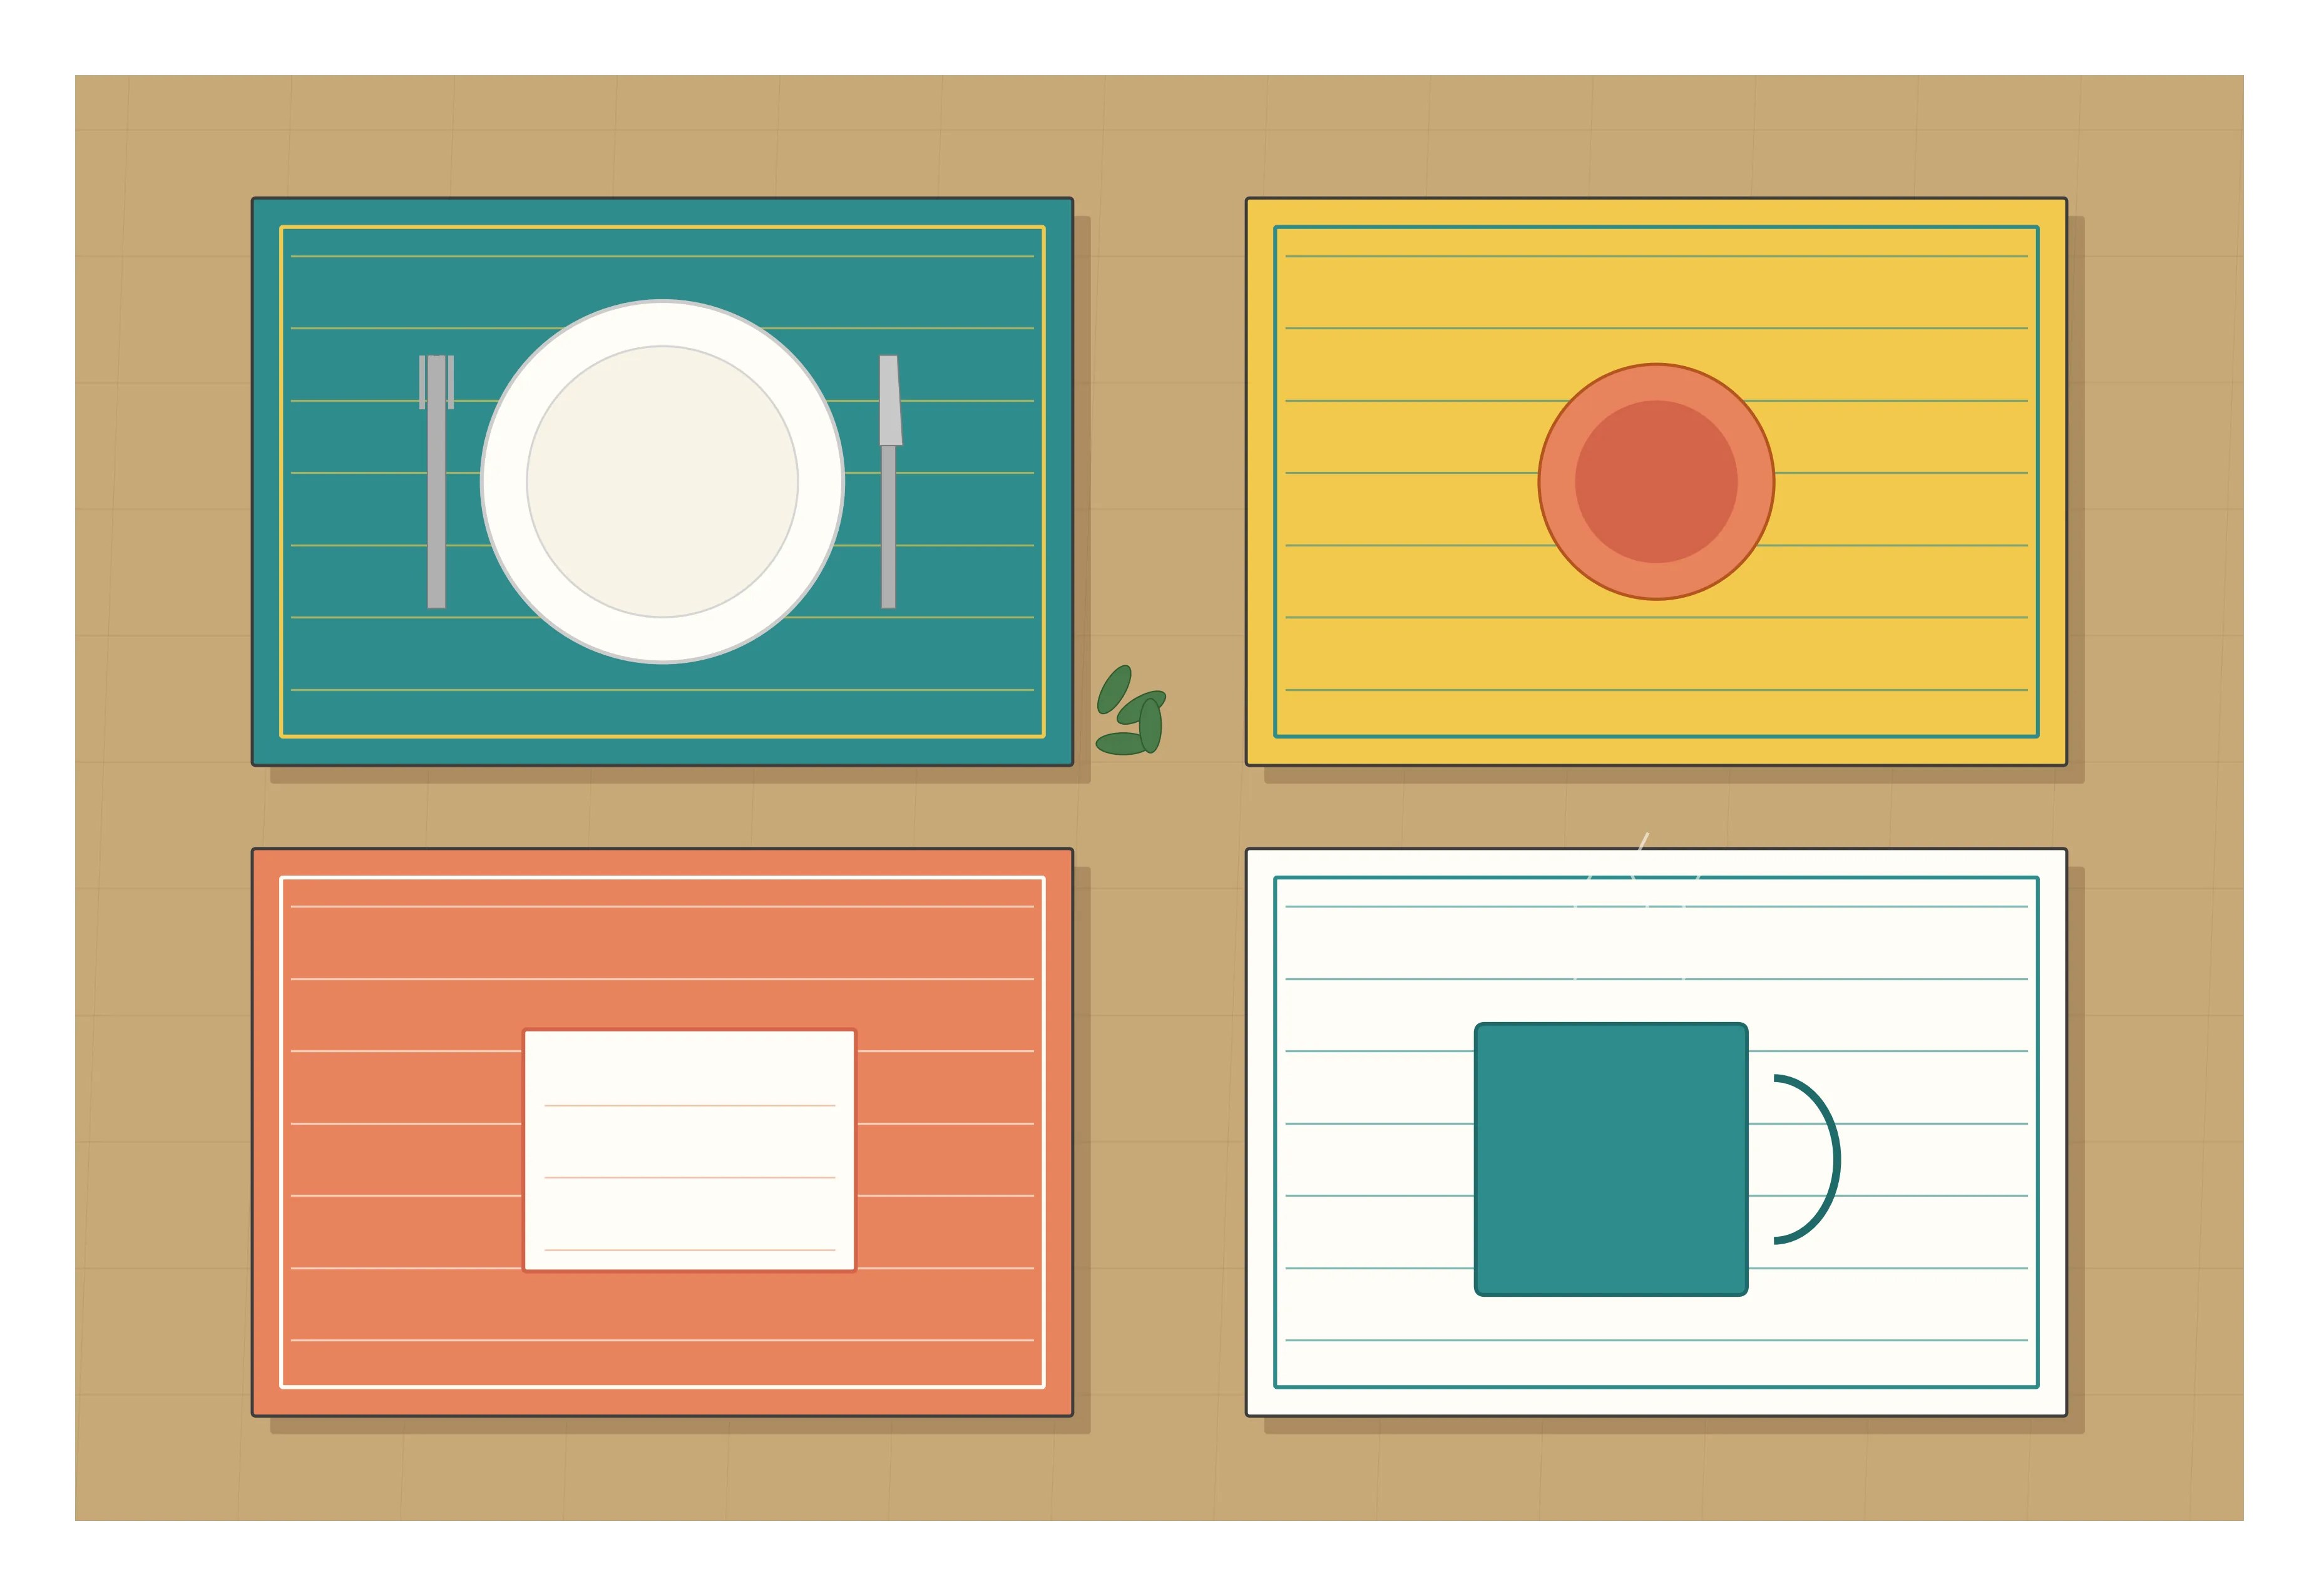
There is a gentle magic to the first time you sew quilted fabric placemats. You layer three pieces of material, stitch some straight lines, and suddenly you've made something that looks and feels like real quilting — all in the space of a single afternoon. If you've been curious about quilting but intimidated by the idea of making a bed-sized quilt, this is where I always tell people to start.
A placemat is a tiny quilt. It teaches you every foundational skill — the quilt sandwich, basting, machine quilting, and binding — but at a scale small enough that nothing feels overwhelming. In the time it takes to watch a movie, you'll have four finished placemats ready for your table.
In this tutorial I'll walk you through making a set of four reversible 13 × 18 in (33 × 45.5 cm) placemats using straight-line machine quilting and self-binding — a clever edge finish that skips the fiddly separate binding strip entirely.
What makes this tutorial different
Most placemat tutorials online show you a quick quilt-and-bind without explaining why each step matters. I want you to finish this project not just with four placemats, but with real understanding of how quilting works. Every technique here — the quilt sandwich, basting, straight-line quilting, self-binding — scales directly up to any quilt you'll ever make.
This project is also the gentler sibling of your first quilt. Instead of wrestling a 60 × 80 in queen quilt through your home sewing machine, you're working with a piece that fits comfortably on your lap. If something goes slightly wrong on placemat number one, you've only lost about fifteen minutes of work — not a weekend.
Why I start every new quilter here
I've taught beginner sewing for years, and placemats are my #1 "first quilting" recommendation. They teach every foundational skill in a project you'll actually use every day. By the time you've made a set of four, you've basted, quilted, and bound four small quilts — that's four times the practice of making a single wall-hanging.
Ready for a bigger project after this? Jump to the beginner sampler quilt tutorial in our full quilting series.
Materials & tools
What you'll need for a set of four
Fabric & Batting
- Top fabric: 1/2 yd (45 cm) quilting cotton
- Backing fabric: 5/8 yd (57 cm) quilting cotton
- Low-loft 100% cotton batting: 1/2 yd (45 cm)
- All-purpose thread in a coordinating color
Tools
- Sewing machine with straight stitch
- Walking foot (strongly recommended)
- Rotary cutter and self-healing mat
- Clear quilting ruler 6 × 24 in
- 20 curved safety pins (for basting)
- Iron and pressing surface
- Sharp fabric scissors
Prewash all fabric and batting before cutting. Quilting cotton can shrink 2–3% in the first wash, and if you skip this step, your beautifully flat placemats will pucker the first time they go through the laundry. Wash on cold, tumble dry low, then press before cutting.
Choosing your fabric
The best fabric for placemats is quilting cotton — a medium-weight 100% cotton that holds up to repeated washing, takes a crease well, and comes in endless prints. It's affordable (usually $10–$14 per yard) and widely available.
Quilting cotton vs. home decor fabric
You might be tempted to use heavier home-decor fabric for "sturdiness," but I'd steer you back toward quilting cotton for this project. Here's why:
- Quilting cotton — lightweight, easy to quilt through three layers, washes beautifully, drapes softly on the table
- Home decor fabric — bulky when layered with batting, harder to maneuver under the needle, often requires dry cleaning
Save home-decor fabrics for projects like curtains or structured fabric baskets where their body is an advantage.
Picking prints that work
For your very first set, I recommend one focal print for the top and a coordinating solid or small-scale print for the backing. This gives you a reversible set with two distinct looks. Large-scale prints look stunning on placemats because the size shows the whole motif.
Cutting layout
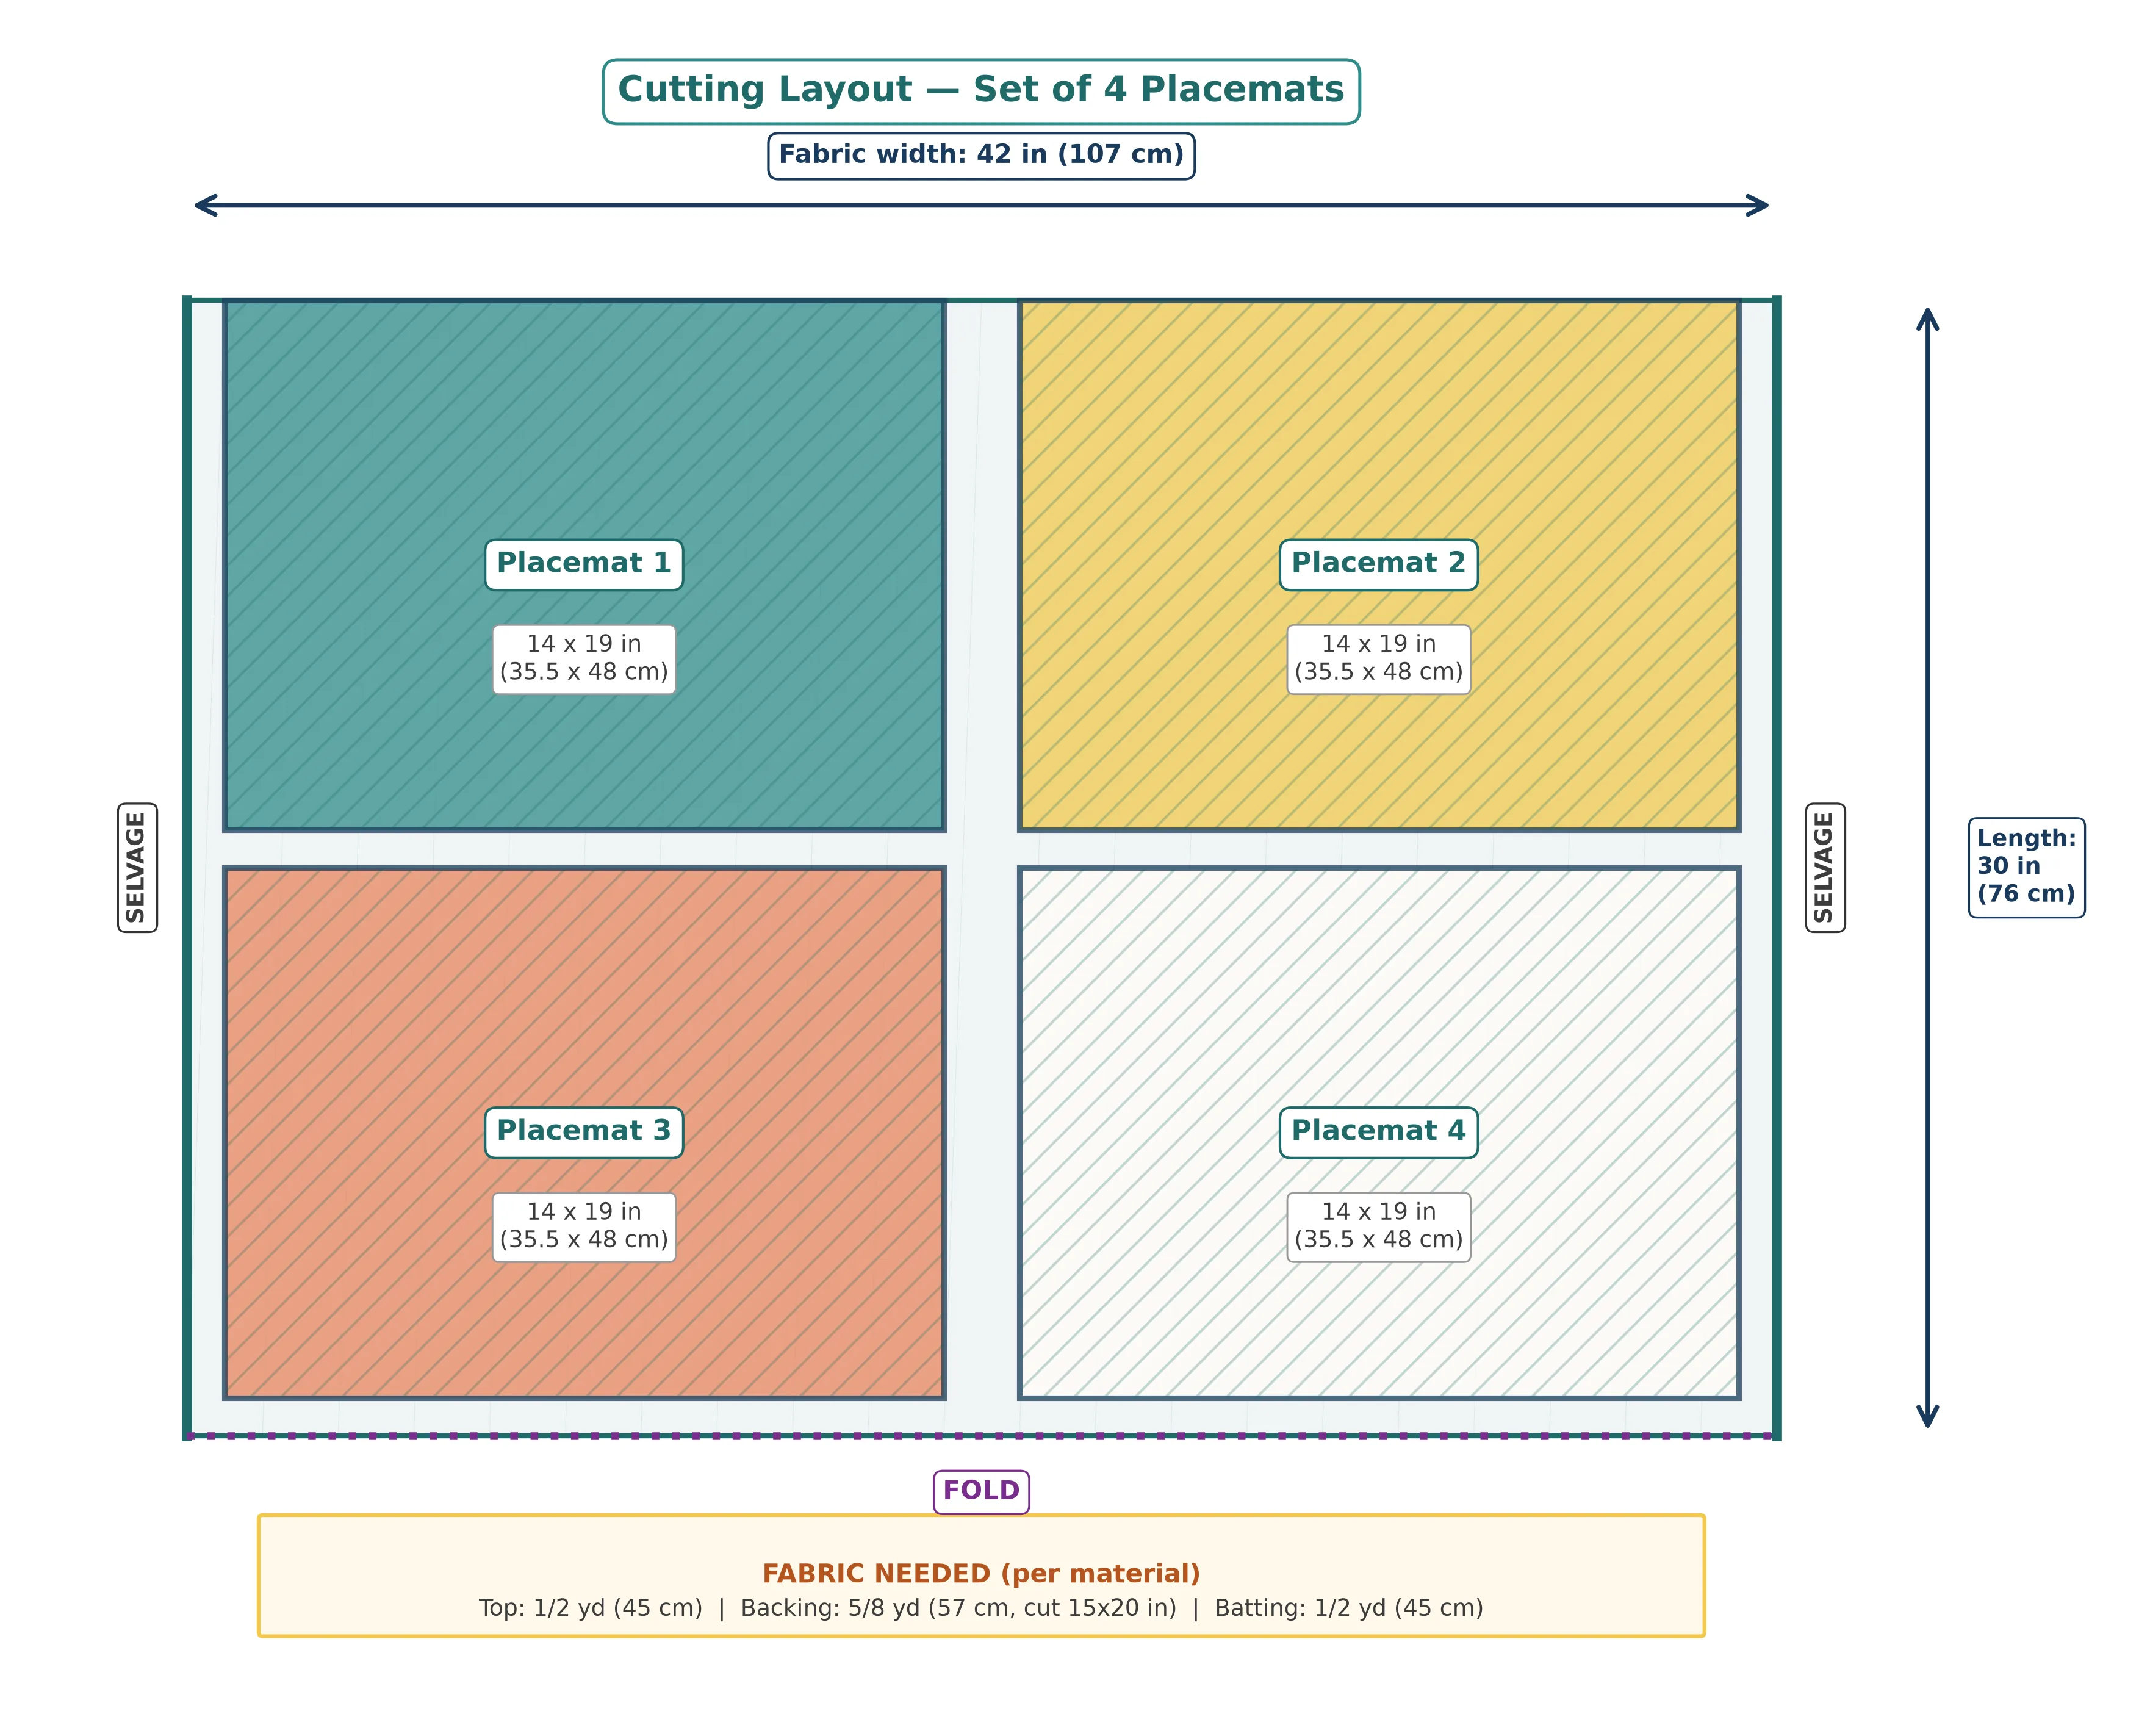
Each placemat is cut from three identically-sized rectangles. We cut them larger than the finished size to allow for shrinkage during quilting, then trim down at the end.
Cutting list
- Top fabric: four rectangles, each 14 × 19 in (35.5 × 48 cm)
- Backing fabric: four rectangles, each 15 × 20 in (38 × 51 cm) — larger for self-binding
- Batting: four rectangles, each 14 × 19 in (35.5 × 48 cm)
For traditional separate binding, all three layers are cut to the same size. But because we're using self-binding, your backing must be cut 1 inch (2.5 cm) larger on all sides than the top and batting. That extra fabric is what folds forward to become the binding. Cut the backing too small and you'll have nothing to fold.
Pattern pieces & measurements
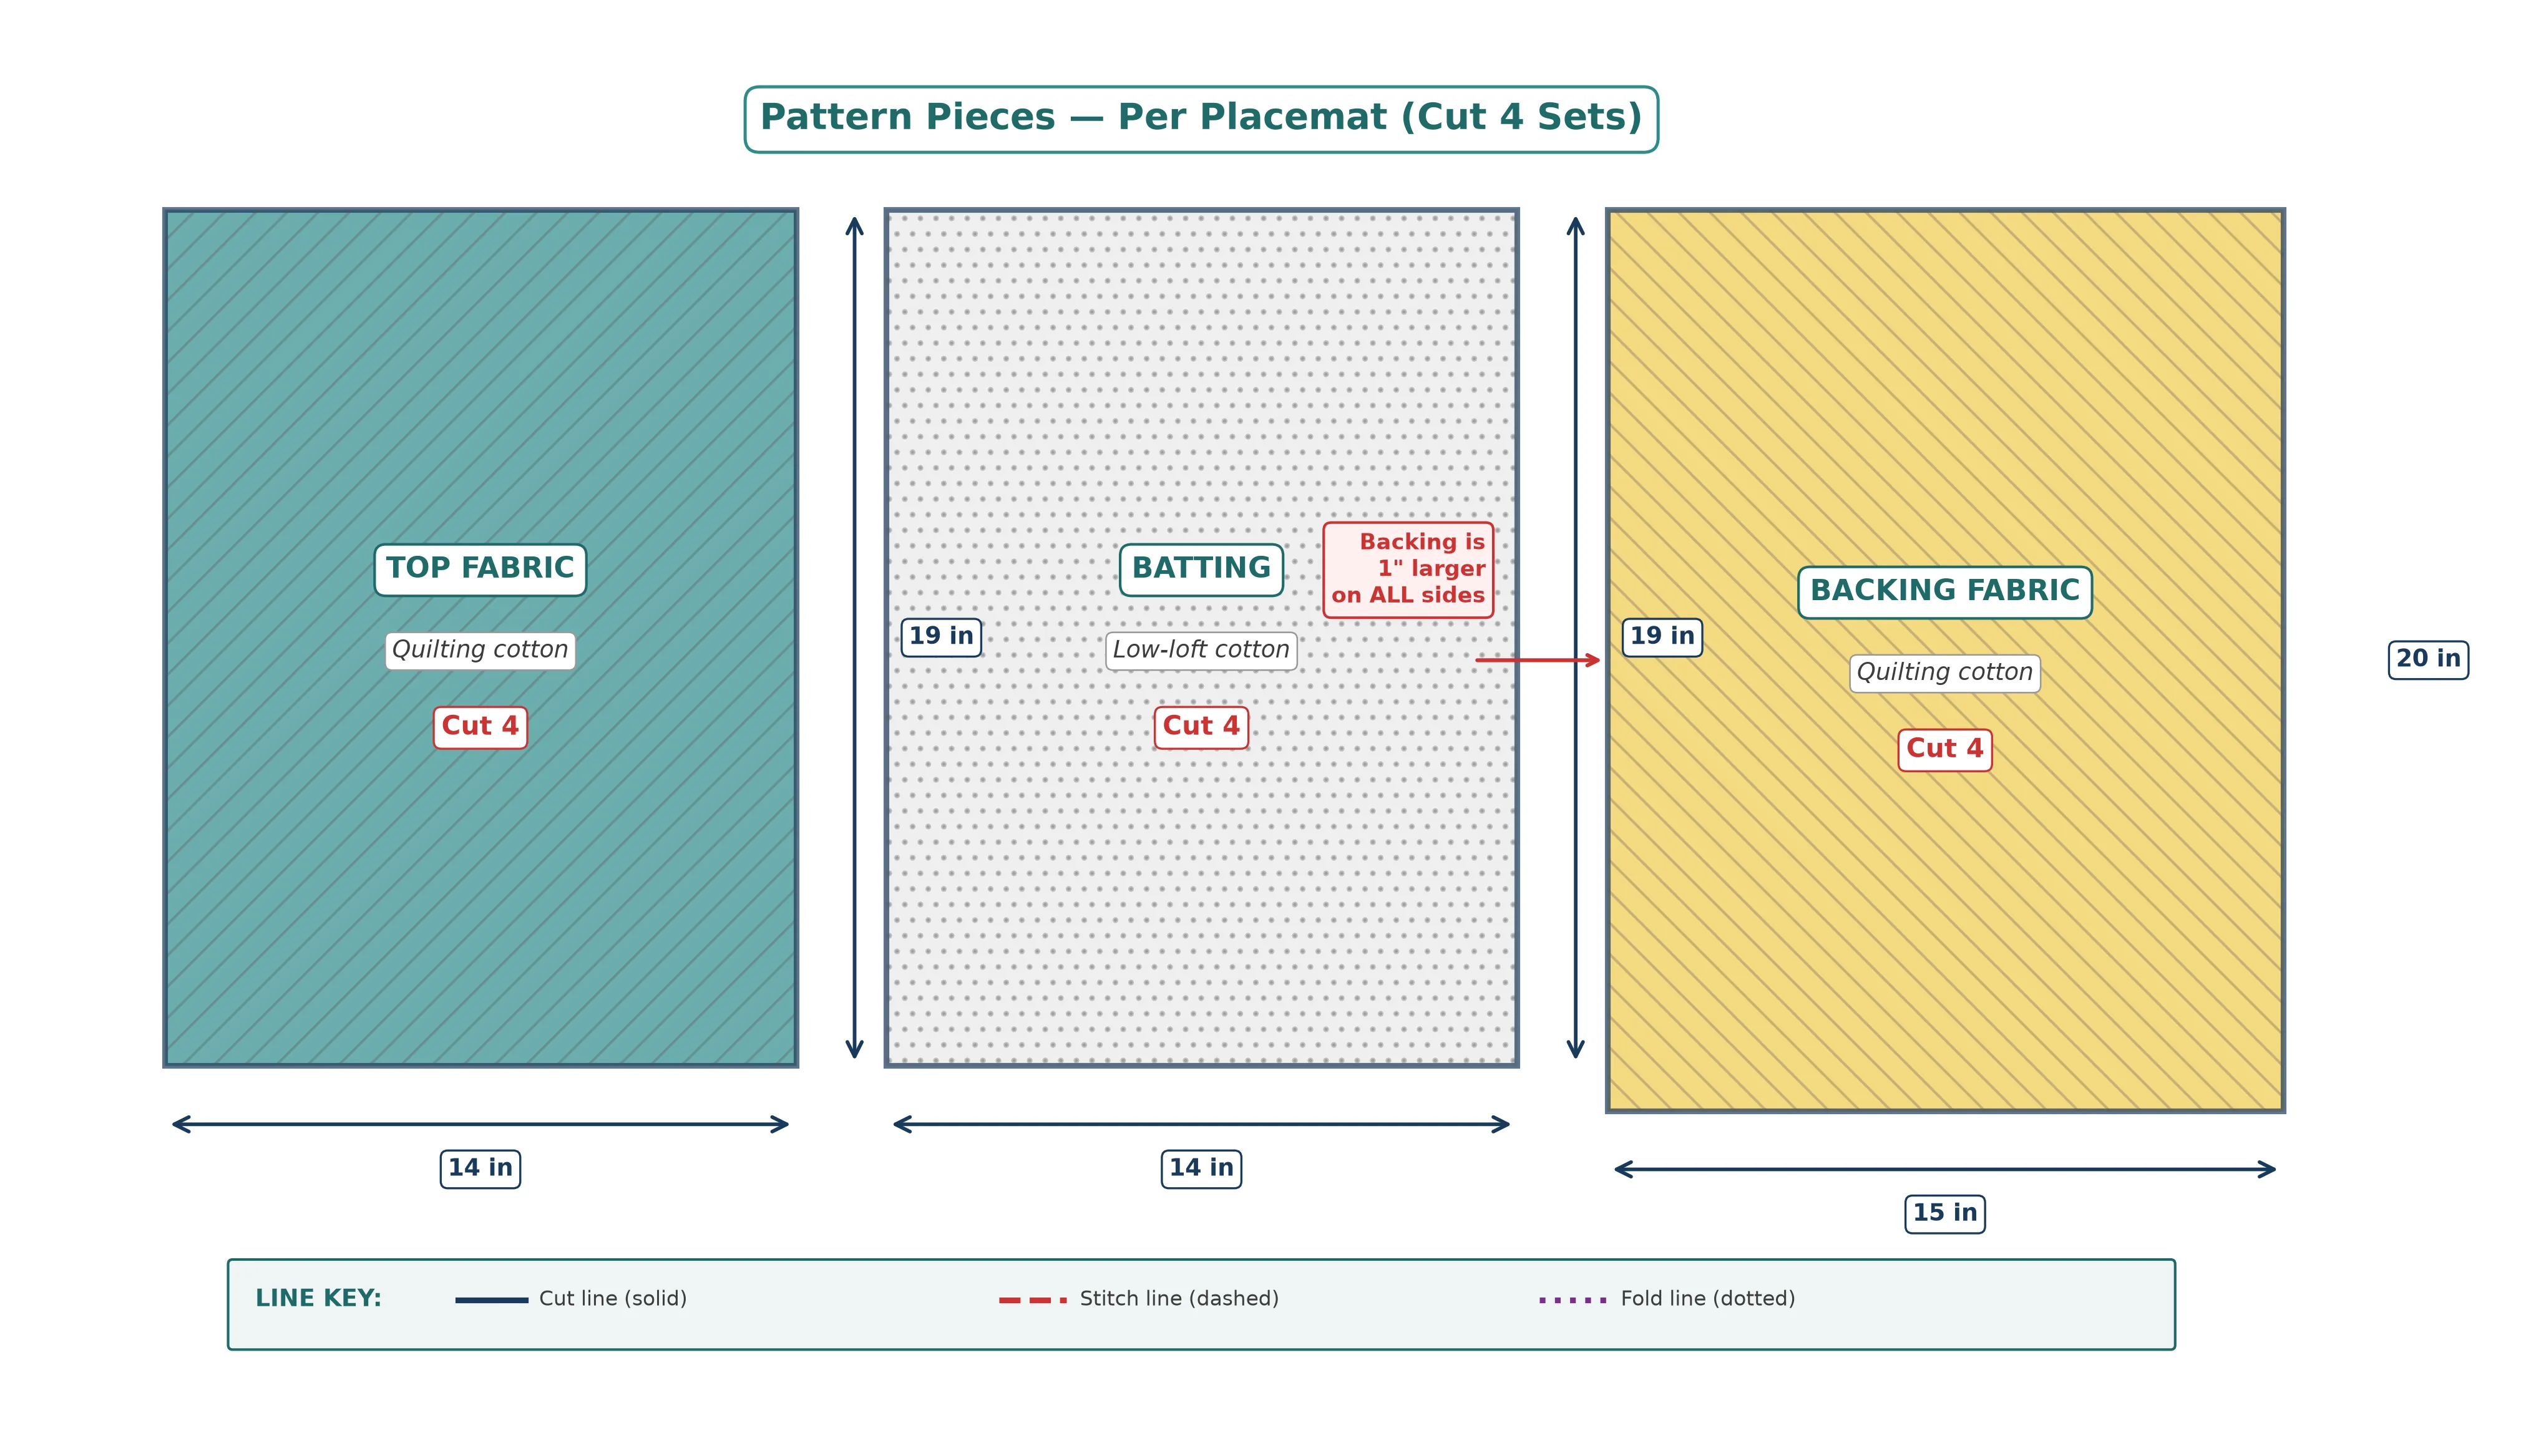
No printing required — these are simple rectangles. If you prefer to work from a paper template, cut a 14 × 19 in rectangle from newsprint or freezer paper and use it as a cutting guide.
Understanding the quilt sandwich
Before we start sewing, let's talk about the single most important concept in quilting: the quilt sandwich. This is the three-layer stack of top + batting + backing that defines every quilt (and every quilted project) ever made.
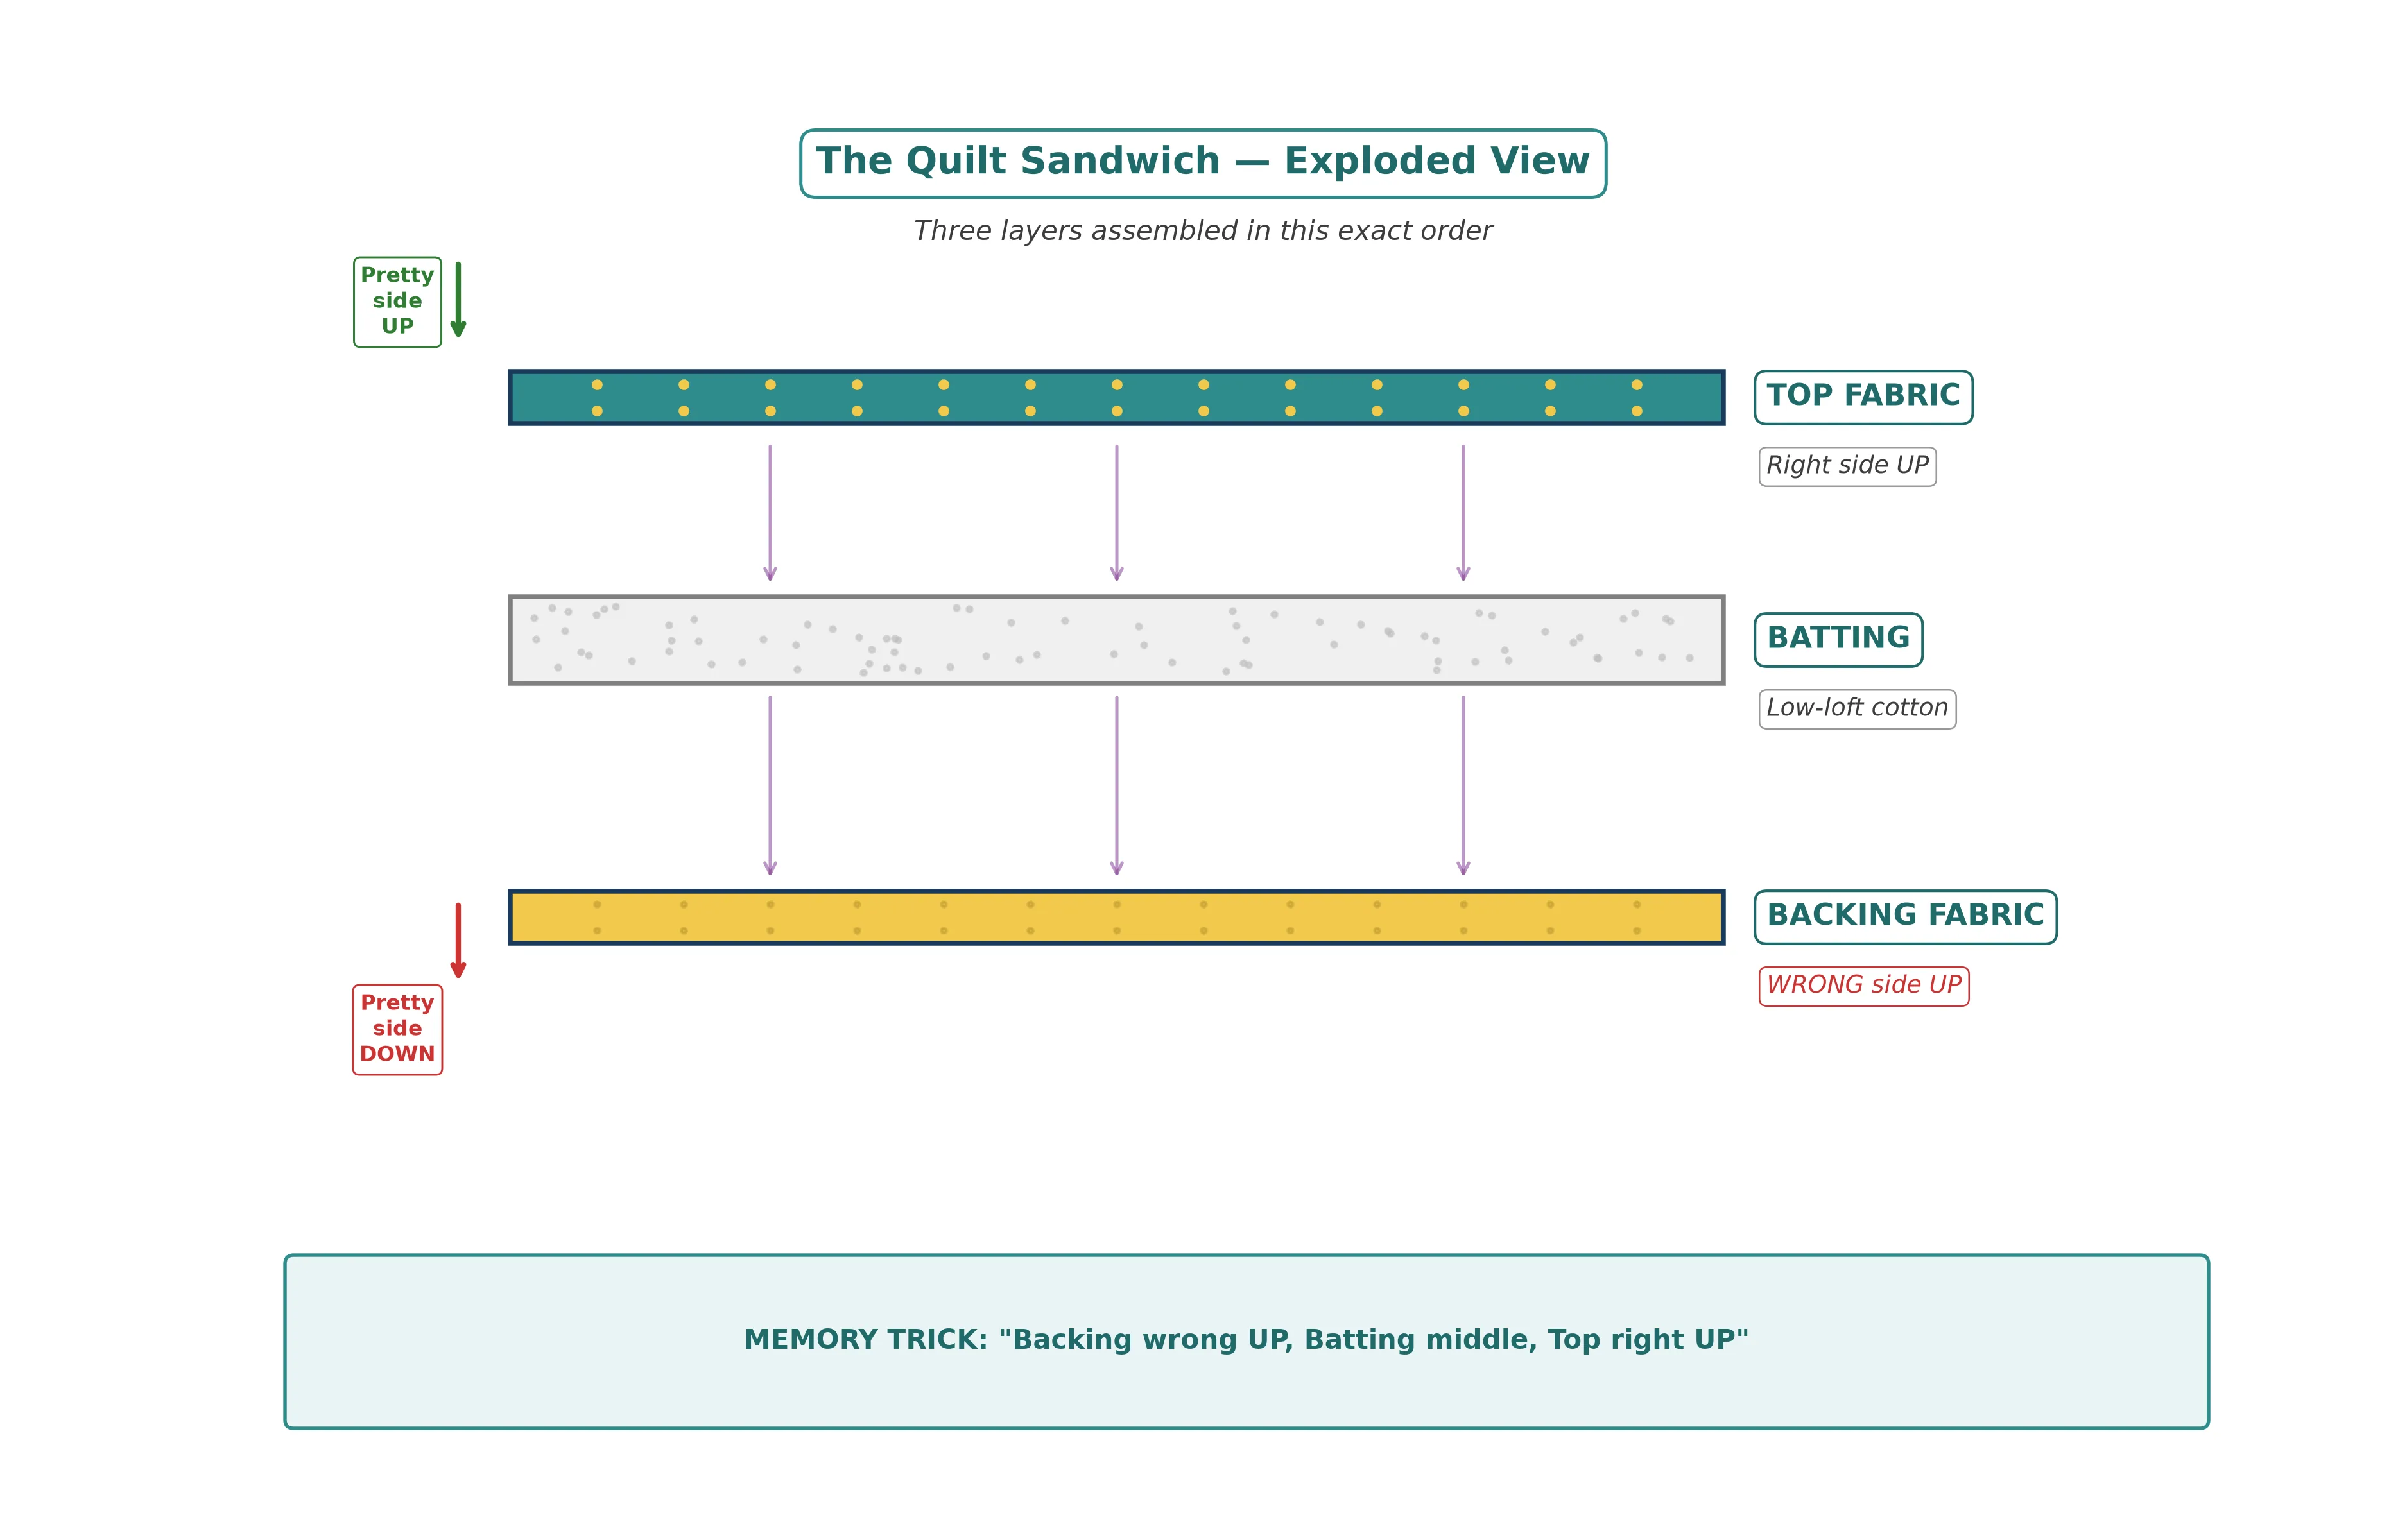
The layers are assembled in a specific order:
- Backing — placed wrong side up on your work surface (the pretty side faces down)
- Batting — centered on top of the backing
- Top fabric — placed right side up on top of the batting (the pretty side faces up)
Once assembled, this stack is held together with pins (basting), then permanently joined with lines of stitching (quilting). The quilting is both decorative and functional — the stitches are what prevent the batting from shifting around inside after many washes.
Step-by-step construction
Press and cut all pieces 10 min
Press all three fabrics (top, backing) flat. Using your rotary cutter and ruler, cut four top rectangles at 14 × 19 in, four backing rectangles at 15 × 20 in, and four batting rectangles at 14 × 19 in. Accuracy matters here — straight edges make everything easier later.
Build the quilt sandwich 5 min each
Lay a backing rectangle wrong side up on your table. Center a batting rectangle on top (there should be 1/2 in (1.25 cm) of backing visible on all four sides). Center a top rectangle right side up on the batting. Smooth from the center outward with your palms to eliminate any wrinkles. The layers should lie perfectly flat.
Pin baste with curved safety pins 5 min each
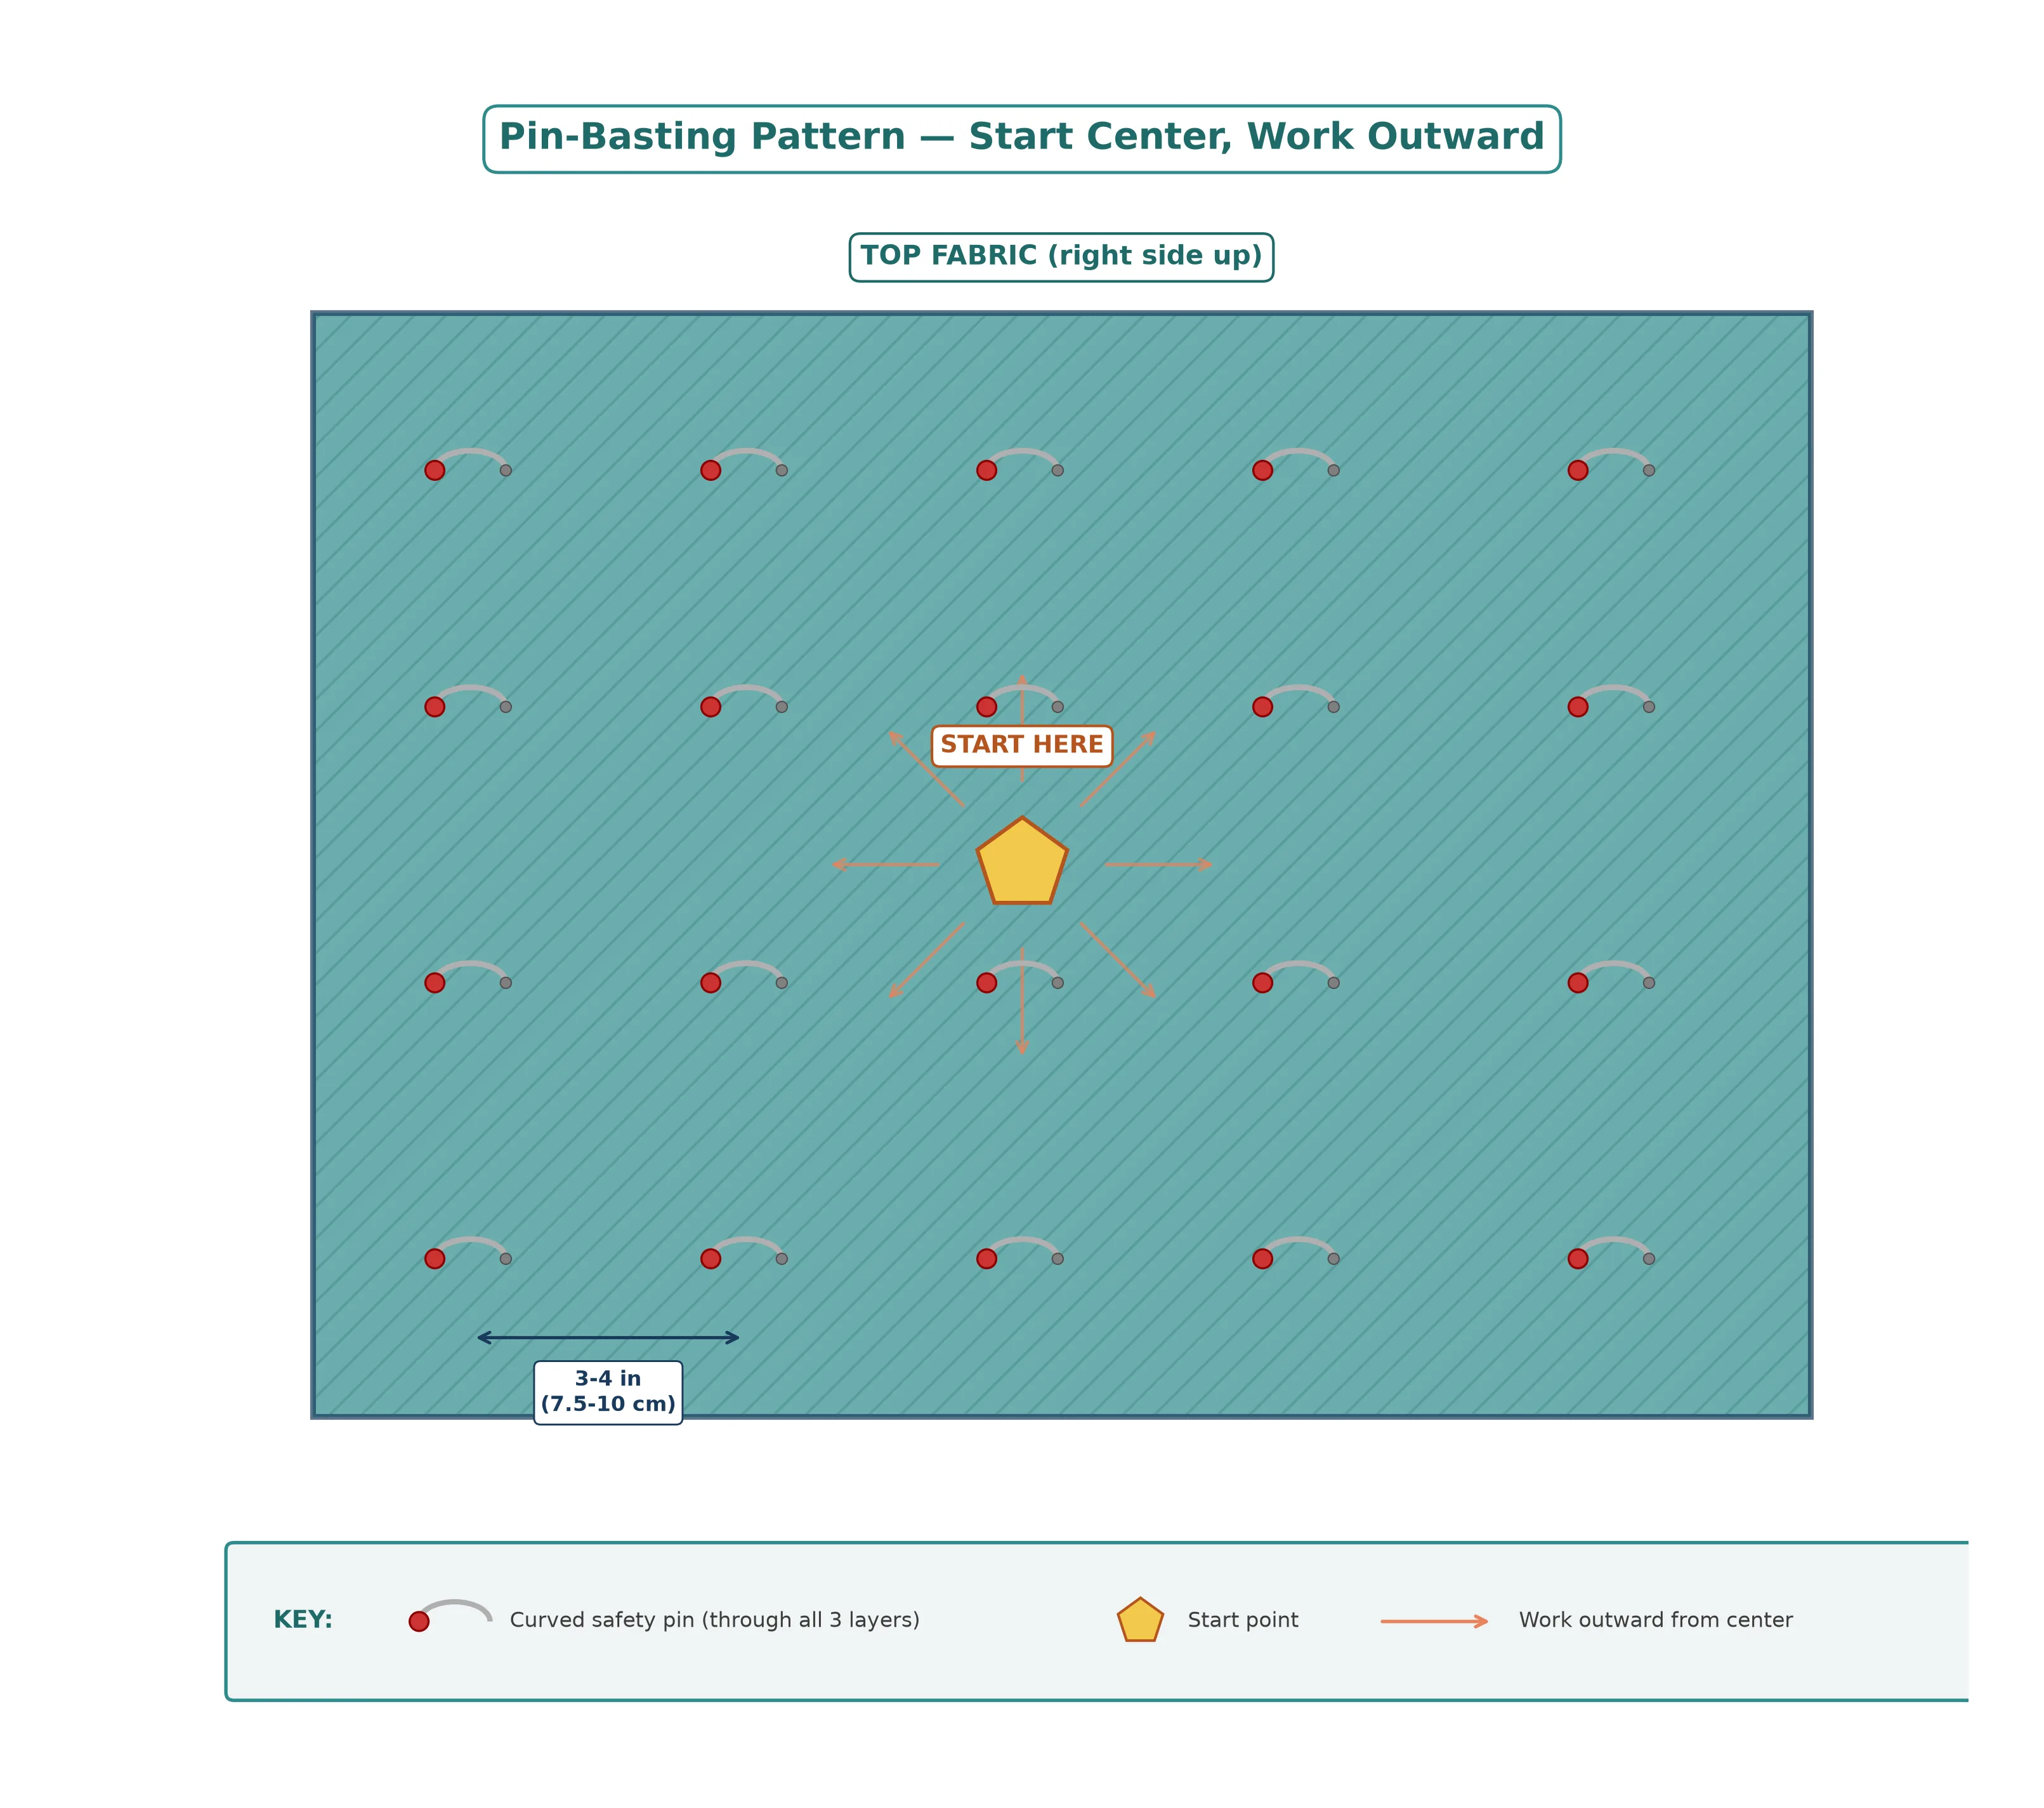
Starting from the center of the sandwich and working outward, place a curved safety pin every 3–4 in (7.5–10 cm) in a grid pattern. Pin through all three layers. You'll need about 15–20 pins per placemat. Curved pins are much easier to insert than straight ones because they catch the back and come up again in one motion.
Install your walking foot 2 min
Swap your standard presser foot for a walking foot if you have one. A walking foot has its own set of feed dogs on top that work in sync with your machine's feed dogs below, pulling all three layers through together. Without it, the top layer tends to shift and bunch as you quilt. If you don't own one, use a standard foot and sew slowly — it's manageable for a project this small.
Quilt the first line down the center 3 min
Set your machine to a straight stitch, length 3.0 mm (slightly longer than normal — this is more forgiving on bulky layers). Start your first line of stitching down the exact center of the placemat, lengthwise. Remove any pins as the needle approaches them (never stitch over a pin!). Backstitch at the start and end of each line.
Add parallel quilting lines 15 min
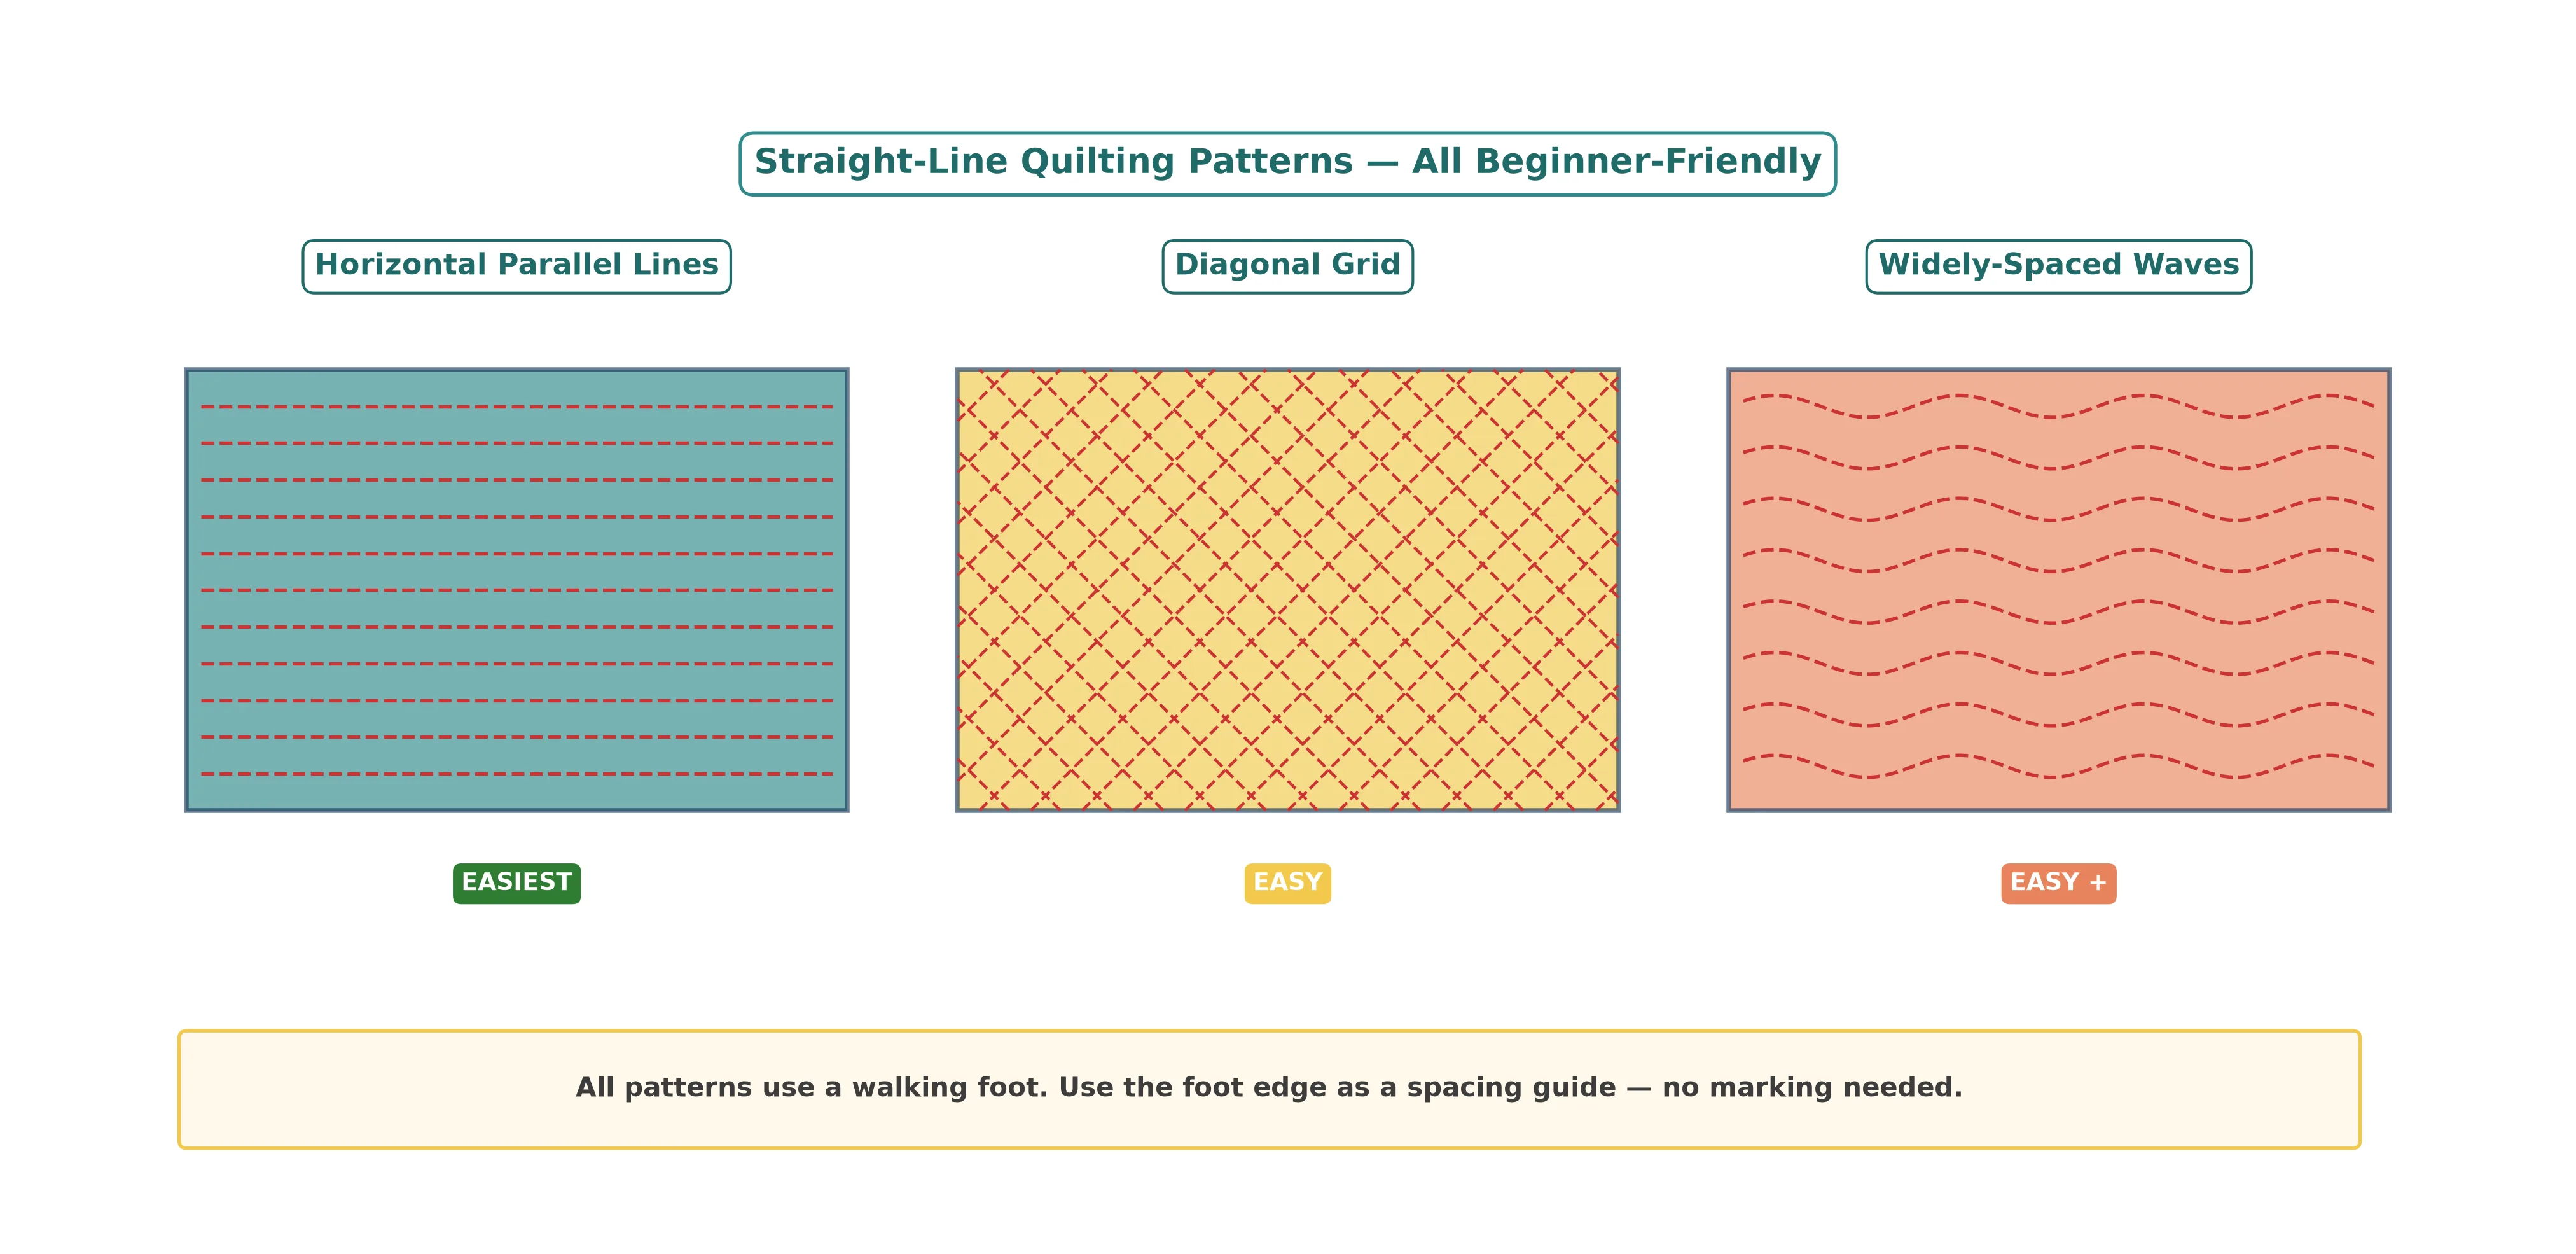
Working from the center outward, add parallel lines of stitching every 1–1.5 in (2.5–3.75 cm). Use the edge of your walking foot as a spacing guide — line it up with the previous row of stitching, and you'll get even spacing without marking. Quilt one half of the placemat first, then flip and quilt the other half (always working outward from center prevents the top from shifting).
Square up each placemat 3 min each
Quilting causes slight shrinkage, so your placemats are now slightly smaller than when you started. Lay each one flat on your cutting mat. Using your rotary cutter and ruler, trim down to exactly 13 × 18 in (33 × 45.5 cm). Measure from the center of the placemat outward to keep the trim even. The backing will still extend 1 in (2.5 cm) beyond on all sides — leave it for now.
Trim batting flush with the top 2 min each
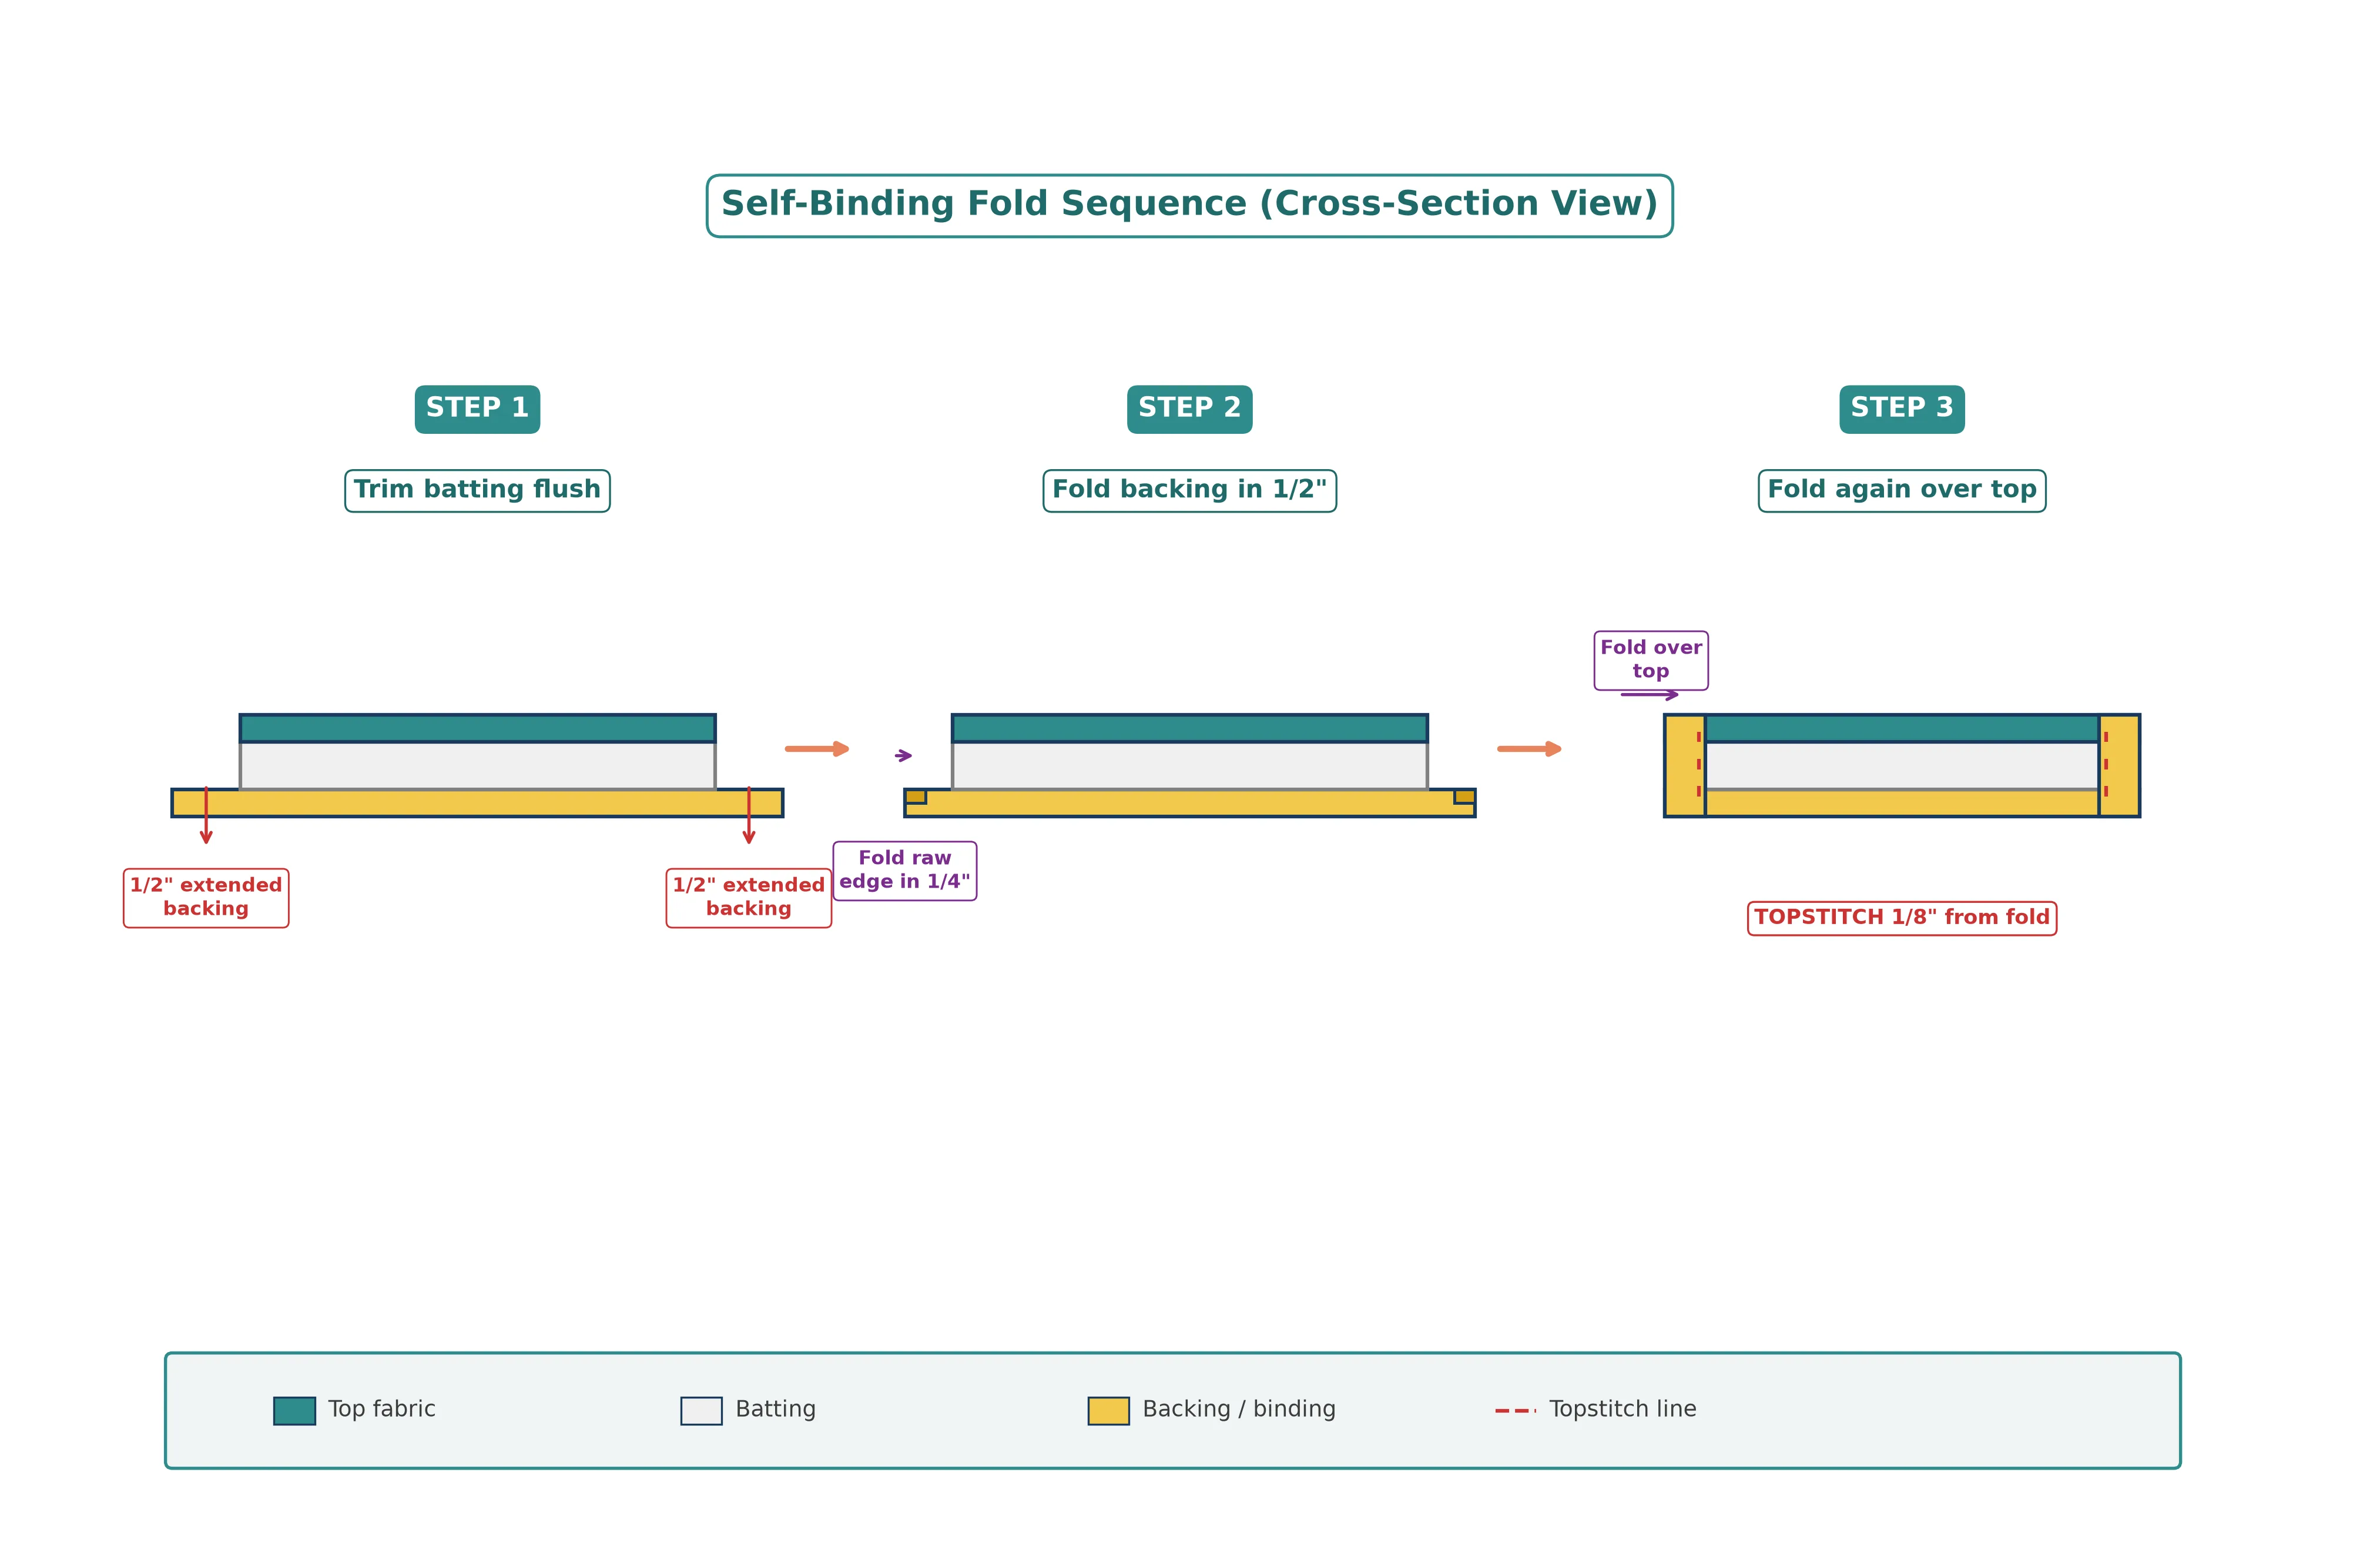
Carefully trim just the batting back so it sits flush with the top fabric. The backing fabric still extends 1 in all the way around — this is what will become your binding. Use small sharp scissors for precision and go slowly to avoid cutting the backing.
Fold the self-binding 5 min each
On each side, fold the extended backing edge 1/2 in (1.25 cm) toward the top, pressing with the iron. Then fold it over again to meet the raw edge of the top fabric, creating a 1/2 in binding frame on the top side. Press firmly. The binding should fully cover the raw edges of the top and batting.
Mitre the corners 3 min each
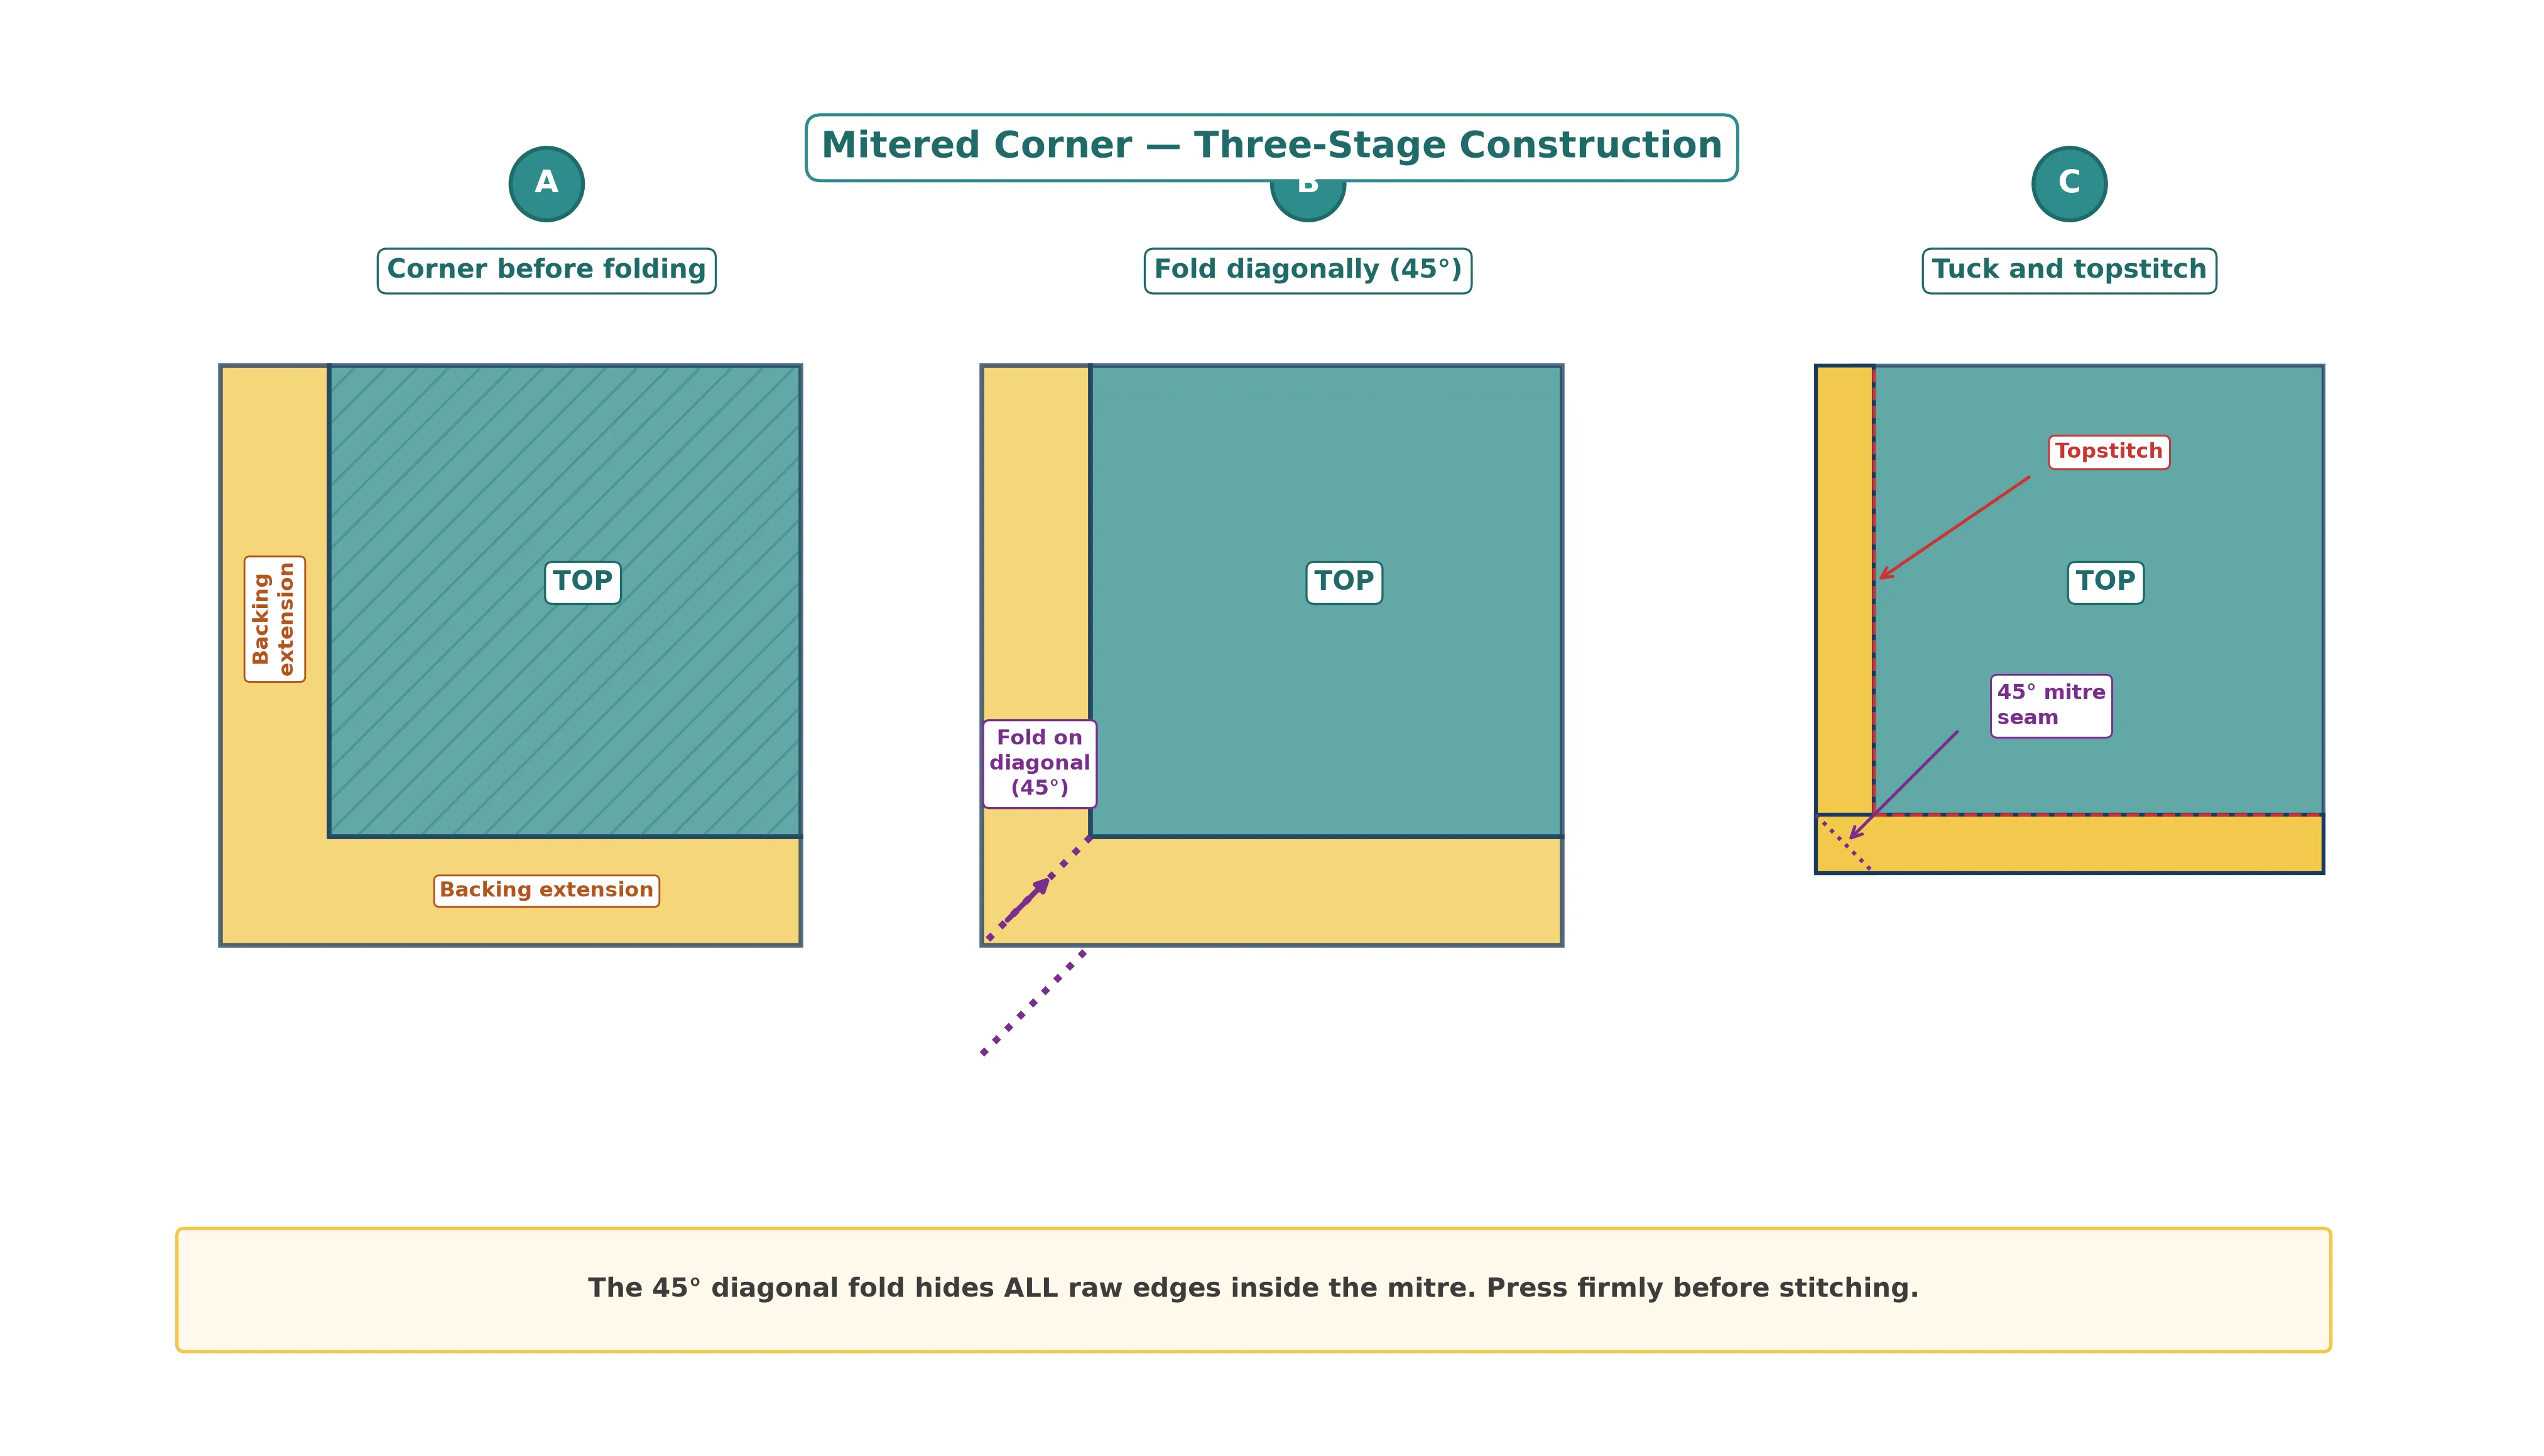
Corners are where self-binding feels tricky the first time — but it's a clean, repeatable fold. At each corner, fold the backing diagonally to form a 45° mitre, tucking the raw edges inside. Press firmly, pin in place, and the corner will lie perfectly flat. Watch the diagram carefully — the first corner takes practice; the next three feel automatic.
Topstitch the binding down 4 min each
Switch to a standard presser foot. Topstitch 1/8 in (3 mm) from the folded inner edge of the binding, all the way around each placemat. Pivot at each corner (needle down, lift foot, rotate, lower foot). Backstitch when you return to your starting point. This single line of stitching secures the entire binding and finishes the placemat.
Press and admire 2 min each
Give each finished placemat a final press from both sides. The binding should sit crisp and flat. Repeat the entire process for your remaining three placemats — by placemat number four, you'll be moving at twice the speed of placemat number one. That's the magic of making a set.
Instead of making one complete placemat at a time, work in batches. Cut all pieces first, then baste all four, then quilt all four, then bind all four. This feels much faster because you're not switching tools and settings every few minutes — and you'll finish the set in less time than making them one by one.
Quilting pattern options
Once you're comfortable with simple parallel lines, try varying the pattern. All of these are achievable with a walking foot and no special skills.
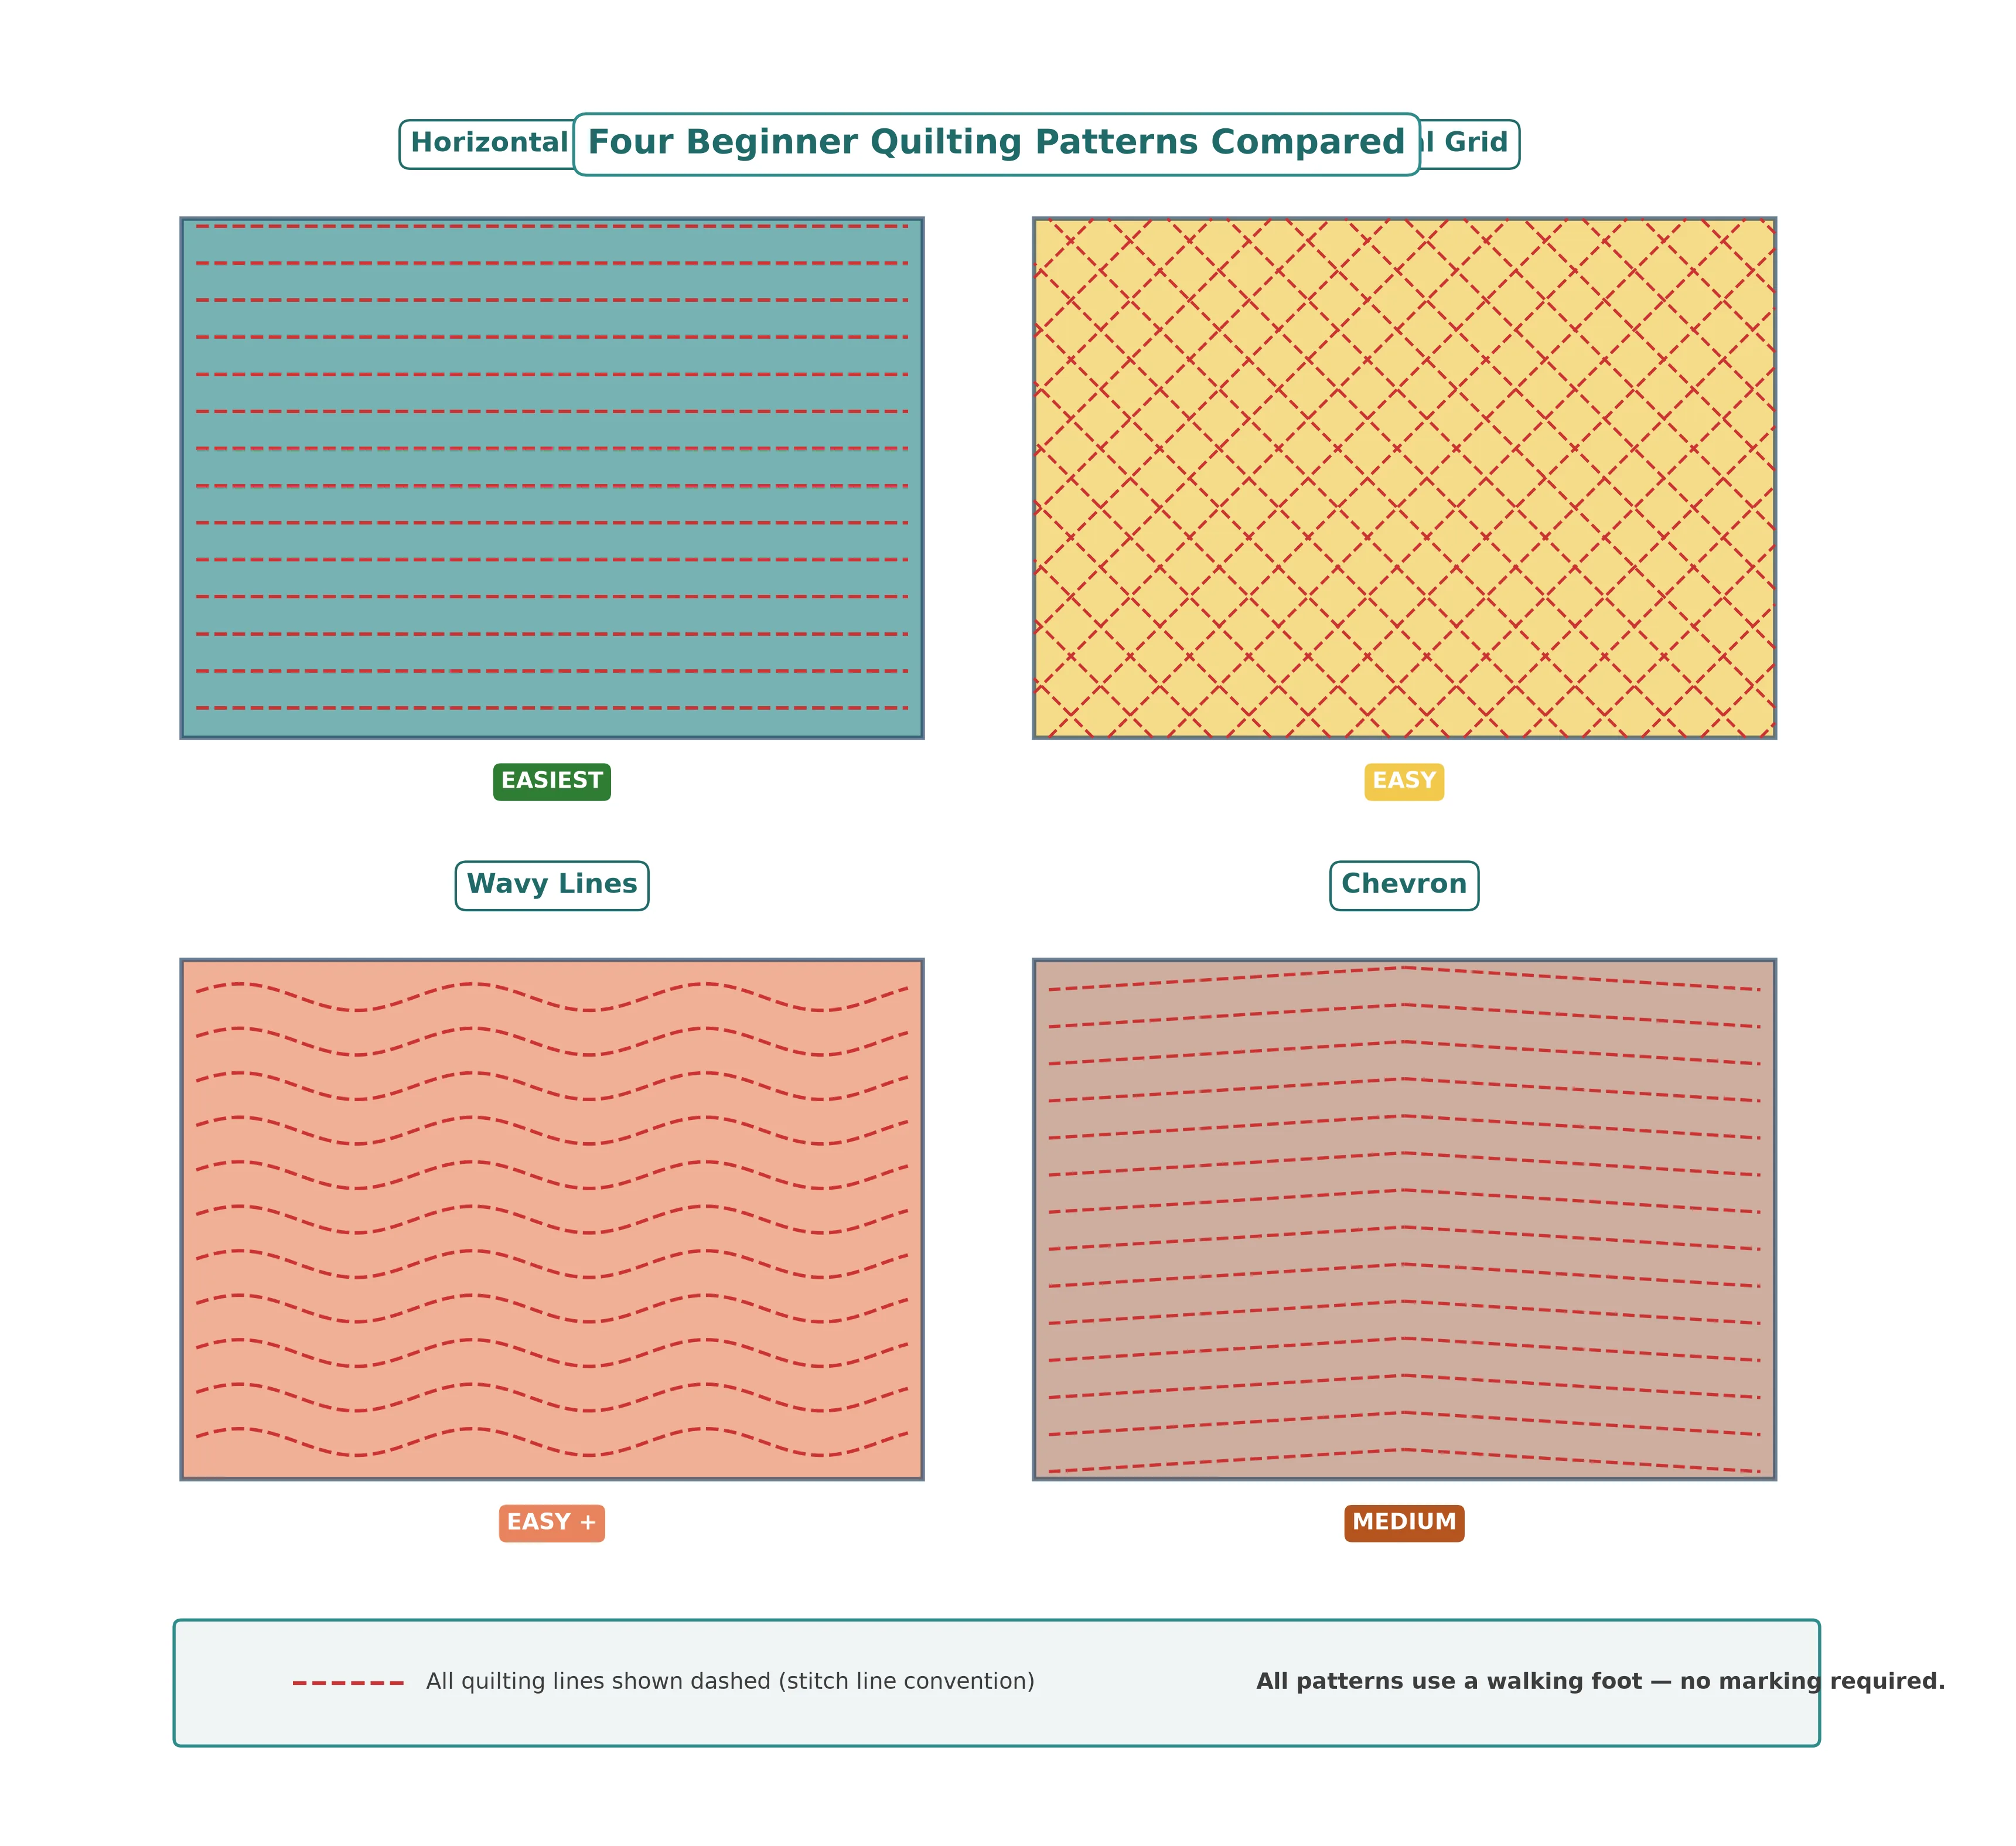
Parallel Lines
Horizontal lines spaced 1–1.5 in apart. The classic starting point.
Diagonal Grid
45° lines in both directions. More texture, same technique.
Wavy Lines
Gently guide the sandwich left and right as you stitch forward.
Chevron
Angled lines meeting at a center point. Mark lightly first.
Variations & creative ideas
Make them your own
- Seasonal sets — make four sets throughout the year in autumn, winter, spring, and summer palettes
- Patchwork tops — piece together squares or strips from fabric scraps for the top layer before quilting
- Mix-and-match set — four different coordinating prints that share one solid backing fabric
- Children's placemats — scale down to 10 × 14 in (25.5 × 35.5 cm) and use laminated cotton for easy wipe-down
- Insulated version — swap cotton batting for Insul-Bright to double as hot pads
- Monogrammed — add an embroidered monogram in one corner before quilting
- Scrap-busting set — use up small quilting cotton scraps by piecing random improv blocks
Frequently asked questions
Do I need a walking foot to sew quilted placemats?
A walking foot is strongly recommended but not strictly required. It feeds all three layers (top, batting, backing) evenly and prevents the top layer from shifting as you quilt. If you don't have one, use lots of pins, sew slowly, and start from the center of each placemat working outward. A standard presser foot works for small projects like placemats, though you may get slight puckering.
What is the best batting for placemats?
Low-loft 100% cotton batting is ideal for placemats. It's thin enough to lay flat on the table, absorbs heat from warm dishes, and washes well. Avoid thick polyester or high-loft batting — placemats need to sit flat under plates. Warm & Natural and Pellon Nature's Touch are reliable options available at most fabric stores.
How do you finish the edges of a placemat without separate binding?
Use the self-binding method shown in this tutorial. Cut your backing fabric 1 inch larger than your top on all sides. After quilting, trim the batting flush with the top but leave the backing extended. Fold the backing edge in 1/4 in, then fold it over the top to create a 1/2 in binding frame, mitre the corners, and topstitch. This method skips cutting and attaching a separate binding strip entirely.
What size should a placemat be?
The standard finished placemat size is 13 × 18 in (33 × 45.5 cm). This fits a dinner plate plus flatware comfortably. For a more generous presentation (chargers or large dinner plates), size up to 14 × 20 in (35.5 × 51 cm). Children's placemats work well at 10 × 14 in (25.5 × 35.5 cm).
Can I wash quilted placemats?
Yes — that's one of the best things about them. Pre-wash all your fabric before cutting to prevent shrinkage after assembly. Finished placemats can be machine washed on cold with mild detergent, tumble dried low, and ironed. The quilting stitches hold the layers securely through many wash cycles.
What quilting pattern is easiest for beginners?
Straight parallel lines spaced 1 to 1.5 inches apart are the easiest. Use the edge of your walking foot as your spacing guide — just line up the foot with the previous row of stitching. For slightly more interest, try a diagonal grid (lines at 45 degrees in both directions) or widely-spaced wavy lines. Save free-motion quilting for later projects.
Post 5 of 10 — Weekend Sewing Projects
You just made your first quilts
Four small quilts, actually. Every technique you used today — the sandwich, basting, straight-line quilting, binding — is exactly the same technique used on a king-size bed quilt. The only difference is scale. Enjoy your placemats, and when you're ready to go bigger, I'll see you in the beginner quilt series.
Up next in Weekend Sewing → Padded laptop sleeve with a zipper.